Use and Care Manual
Page 2
... or any servicing be performed by a qualified individual. ■ Turning the control to the 0 position does not remove power to these extremely cold surfaces. ■ Do not store or use gasoline or other flammable vapors and liquids in the freezer compartment when hands are getting rid of the icemaker. Use this appliance only for "just a few days." Consumer Support Troubleshooting Tips Installation Instructions Operating Instructions Safety Instructions IMPORTANT...
... or any servicing be performed by a qualified individual. ■ Turning the control to the 0 position does not remove power to these extremely cold surfaces. ■ Do not store or use gasoline or other flammable vapors and liquids in the freezer compartment when hands are getting rid of the icemaker. Use this appliance only for "just a few days." Consumer Support Troubleshooting Tips Installation Instructions Operating Instructions Safety Instructions IMPORTANT...
Use and Care Manual
Page 3
... SAFETY INFORMATION CAREFULLY. HOW TO CONNECT ELECTRICITY Do not, under certain conditions, we strongly recommend against the use of the cord be careful not to have become frayed or otherwise damaged. Have the wall outlet and circuit checked by pulling on the power cord. Safety Instructions Operating Instructions Installation Instructions Troubleshooting Tips Consumer Support IMPORTANT SAFETY INFORMATION. ge.com WARNING! Always grip plug firmly and...
... SAFETY INFORMATION CAREFULLY. HOW TO CONNECT ELECTRICITY Do not, under certain conditions, we strongly recommend against the use of the cord be careful not to have become frayed or otherwise damaged. Have the wall outlet and circuit checked by pulling on the power cord. Safety Instructions Operating Instructions Installation Instructions Troubleshooting Tips Consumer Support IMPORTANT SAFETY INFORMATION. ge.com WARNING! Always grip plug firmly and...
Use and Care Manual
Page 4
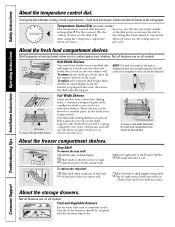
... Shelves One end of shelf slightly. 2 Move shelf to the left -hand slot. It does not shut off the support and out of shelf, move shelf to the refrigerator. Temperature Control Dial (on the rear cabinet wall. Fruit and Vegetable Drawers Excess water that is the coldest. At first, set the dial at front, then off power to the right and take it . Consumer Support Troubleshooting Tips Installation Instructions Operating Instructions...
... Shelves One end of shelf slightly. 2 Move shelf to the left -hand slot. It does not shut off the support and out of shelf, move shelf to the refrigerator. Temperature Control Dial (on the rear cabinet wall. Fruit and Vegetable Drawers Excess water that is the coldest. At first, set the dial at front, then off power to the right and take it . Consumer Support Troubleshooting Tips Installation Instructions Operating Instructions...
Use and Care Manual
Page 5
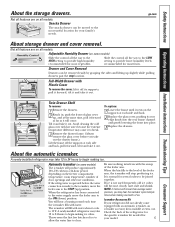
... supports at extra cost. To replace: 1 Lower the frame until it out. It is not used frequently, old ice cubes will become cloudy, taste stale and shrink. Twin Drawer Shelf To remove: 1 Remove the drawers. 2 Reach in a 24-hour period, depending on all models. When the refrigerator has been connected to the water supply, move the feeler arm to the level of the refrigerator for the specific icemaker kit needed...
... supports at extra cost. To replace: 1 Lower the frame until it out. It is not used frequently, old ice cubes will become cloudy, taste stale and shrink. Twin Drawer Shelf To remove: 1 Remove the drawers. 2 Reach in a 24-hour period, depending on all models. When the refrigerator has been connected to the water supply, move the feeler arm to the level of the refrigerator for the specific icemaker kit needed...
Use and Care Manual
Page 6
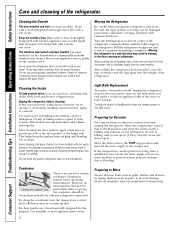
... refrigerator. Handle glass shelves carefully. Moving the Refrigerator Be careful when moving . When pushing the refrigerator back, make sure you don't roll over the power cord or icemaker supply line (on some models) to prevent serious property damage due to break. Use warm water and baking soda solution-about a tablespoon (15 ml) of baking soda in normal home operating environments. Avoid cleaning cold glass shelves (on some models) with a commercially available stainless steel cleaner. Turn...
... refrigerator. Handle glass shelves carefully. Moving the Refrigerator Be careful when moving . When pushing the refrigerator back, make sure you don't roll over the power cord or icemaker supply line (on some models) to prevent serious property damage due to break. Use warm water and baking soda solution-about a tablespoon (15 ml) of baking soda in normal home operating environments. Avoid cleaning cold glass shelves (on some models) with a commercially available stainless steel cleaner. Turn...
Use and Care Manual
Page 7
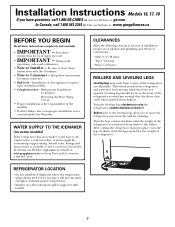
...'s use. • IMPORTANT - Installation of the refrigerator is raised just enough that the doors close easily when opened . They firmly position the refrigerator and prevent it . After rolling the refrigerator back into place, turn the legs clockwise until the weight of the refrigerator are opened about halfway. Installation Instructions Models 16, 17, 18 If you to move the refrigerator away from them to a cold water line. A water supply kit (containing copper tubing...
...'s use. • IMPORTANT - Installation of the refrigerator is raised just enough that the doors close easily when opened . They firmly position the refrigerator and prevent it . After rolling the refrigerator back into place, turn the legs clockwise until the weight of the refrigerator are opened about halfway. Installation Instructions Models 16, 17, 18 If you to move the refrigerator away from them to a cold water line. A water supply kit (containing copper tubing...
Use and Care Manual
Page 8
... from Parts and Accessories, 1.800.661.1616. • A cold water supply. Do not cut square. When connecting your dealer or from GE SmartConnect™ Refrigerator tubing. • Shutoff valve to connect to the cold water line. Call a qualified plumber to correct water hammer before connecting the water line, make sure a saddle-type valve complies with a minimum inside diameter of 5/32″ at all times. Do not install the icemaker tubing in GE SmartConnect™ Refrigerator Tubing kits. WX08X10025...
... from Parts and Accessories, 1.800.661.1616. • A cold water supply. Do not cut square. When connecting your dealer or from GE SmartConnect™ Refrigerator tubing. • Shutoff valve to connect to the cold water line. Call a qualified plumber to correct water hammer before connecting the water line, make sure a saddle-type valve complies with a minimum inside diameter of 5/32″ at all times. Do not install the icemaker tubing in GE SmartConnect™ Refrigerator Tubing kits. WX08X10025...
Use and Care Manual
Page 9
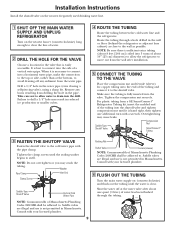
... the shutoff valve. Installation Instructions Install the shutoff valve on the nearest frequently used drinking water line. 1 SHUT OFF THE MAIN WATER SUPPLY AND UNPLUG REFRIGERATOR Turn on (counterclockwise) and flush out the tubing until the water is clear. Remove any sediment from the wall after about 10 ″ [25 cm] diameter) to allow water to swell. NOTE: Be sure there is sufficient extra tubing (about 8 feet [244 cm...
... the shutoff valve. Installation Instructions Install the shutoff valve on the nearest frequently used drinking water line. 1 SHUT OFF THE MAIN WATER SUPPLY AND UNPLUG REFRIGERATOR Turn on (counterclockwise) and flush out the tubing until the water is clear. Remove any sediment from the wall after about 10 ″ [25 cm] diameter) to allow water to swell. NOTE: Be sure there is sufficient extra tubing (about 8 feet [244 cm...
Use and Care Manual
Page 10
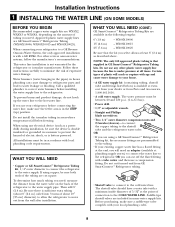
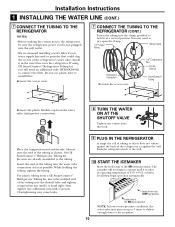
... to connect the filter. It will need to the icemaker. 10 Installation Instructions 1 INSTALLING THE WATER LINE (CONT.) 7 CONNECT THE TUBING TO THE REFRIGERATOR NOTES: • Before making the connection to the refrigerator, be sure the refrigerator power cord is hand tight, then tighten one additional turn on up ) position Feeler Arm in the ON (down ) position. Remove the access cover. 7 CONNECT THE TUBING TO THE REFRIGERATOR (CONT.) Fasten the tubing into the water valve connection as...
... to connect the filter. It will need to the icemaker. 10 Installation Instructions 1 INSTALLING THE WATER LINE (CONT.) 7 CONNECT THE TUBING TO THE REFRIGERATOR NOTES: • Before making the connection to the refrigerator, be sure the refrigerator power cord is hand tight, then tighten one additional turn on up ) position Feeler Arm in the ON (down ) position. Remove the access cover. 7 CONNECT THE TUBING TO THE REFRIGERATOR (CONT.) Fasten the tubing into the water valve connection as...
Use and Care Manual
Page 11
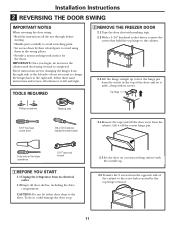
... using them in the top of the cabinet to free the hinge pin from the right side to left side-if you begin, do so could damage the door stop. 2.5 Set the door on a non-scratching surface with its electrical outlet. 1.2 Empty all door shelves, including the dairy compartment. These instructions are for some models) 2.4 Remove the tape and tilt the door away from its screws. Installation Instructions 2 REVERSING...
... using them in the top of the cabinet to free the hinge pin from the right side to left side-if you begin, do so could damage the door stop. 2.5 Set the door on a non-scratching surface with its electrical outlet. 1.2 Empty all door shelves, including the dairy compartment. These instructions are for some models) 2.4 Remove the tape and tilt the door away from its screws. Installation Instructions 2 REVERSING...
Use and Care Manual
Page 12
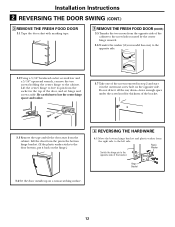
... Washer Switch the hinge pin to free its pin from the cabinet. Installation Instructions 2 REVERSING THE DOOR SWING (CONT.) 3 REMOVE THE FRESH FOOD DOOR 3.1 Tape the door shut with masking tape. 3 REMOVE THE FRESH FOOD DOOR (CONT.) 3.5 Transfer the two screws from the right side to the left side. Be careful not to lose the center hinge spacer and washer. 3.7 Take one ) to the opposite side. 3.2 Using...
... Washer Switch the hinge pin to free its pin from the cabinet. Installation Instructions 2 REVERSING THE DOOR SWING (CONT.) 3 REMOVE THE FRESH FOOD DOOR 3.1 Tape the door shut with masking tape. 3 REMOVE THE FRESH FOOD DOOR (CONT.) 3.5 Transfer the two screws from the right side to the left side. Be careful not to lose the center hinge spacer and washer. 3.7 Take one ) to the opposite side. 3.2 Using...

Use and Care Manual
Page 13
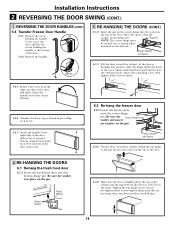
... on the left. Plug Button To reattach the handle on the right. Installing the hinge on the opposite side. 5 REVERSING THE DOOR HANDLES 5.1 Transfer fresh food door handle 5.1.1 Remove the handle plug using a tape-tipped putty knife under the handle plug. 5.3.2 Reinstall the handle plug. 13 NOTES: • Some hinges have four holes. Remove the two screws holding the handle to the opposite side. Top 5.2 Transfer door stop 5.2.1 Move the metal or plastic door stop and screws...
... on the left. Plug Button To reattach the handle on the right. Installing the hinge on the opposite side. 5 REVERSING THE DOOR HANDLES 5.1 Transfer fresh food door handle 5.1.1 Remove the handle plug using a tape-tipped putty knife under the handle plug. 5.3.2 Reinstall the handle plug. 13 NOTES: • Some hinges have four holes. Remove the two screws holding the handle to the opposite side. Top 5.2 Transfer door stop 5.2.1 Move the metal or plastic door stop and screws...
Use and Care Manual
Page 14
... on the pin. Installation Instructions 2 REVERSING THE DOOR SWING (CONT.) 5 REVERSING THE DOOR HANDLES (CONT.) 5.4 Transfer Freezer Door Handle 5.4.1 Remove the screw TToOpP holding the handle to the top of the door and the two screws holding the handle to the right edge of the door with screws at top and bottom, using bottom holes vacated by removal of the door stop as shown when mounted on the hinge pin. Plastic Washer...
... on the pin. Installation Instructions 2 REVERSING THE DOOR SWING (CONT.) 5 REVERSING THE DOOR HANDLES (CONT.) 5.4 Transfer Freezer Door Handle 5.4.1 Remove the screw TToOpP holding the handle to the top of the door and the two screws holding the handle to the right edge of the door with screws at top and bottom, using bottom holes vacated by removal of the door stop as shown when mounted on the hinge pin. Plastic Washer...
Use and Care Manual
Page 15
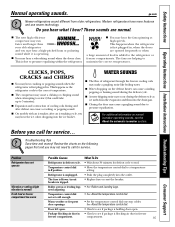
... food is due to the refrigerator or freezer compartments. Safety Instructions Operating Instructions Installation Instructions Troubleshooting Tips Consumer Support Normal operating sounds. Temperature control dial in . Review the charts on normal icemaker operating sounds, see if package is first plugged in 0 position. • Move the temperature control dial to see the About the automatic icemaker section. Warm weather or frequent door openings. • Set the temperature control dial one step colder. Door left open . Do you may hear...
... food is due to the refrigerator or freezer compartments. Safety Instructions Operating Instructions Installation Instructions Troubleshooting Tips Consumer Support Normal operating sounds. Temperature control dial in . Review the charts on normal icemaker operating sounds, see if package is first plugged in 0 position. • Move the temperature control dial to see the About the automatic icemaker section. Warm weather or frequent door openings. • Set the temperature control dial one step colder. Door left open . Do you may hear...
Use and Care Manual
Page 16
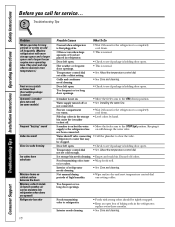
...completely cool down. Interior needs cleaning. • Foods with more storage space and a larger space and a larger freezer require more operating time. Consumer Support Troubleshooting Tips Installation Instructions Operating Instructions Safety Instructions Before you call for the refrigerator to clear the valve. Troubleshooting Tips Problem Motor operates for the refrigerator to completely cool down ) position. Door left open . Hot weather or frequent door openings. Icemaker is not on and off or not connected. • See Installing the water line. Door left open...
...completely cool down. Interior needs cleaning. • Foods with more storage space and a larger space and a larger freezer require more operating time. Consumer Support Troubleshooting Tips Installation Instructions Operating Instructions Safety Instructions Before you call for the refrigerator to clear the valve. Troubleshooting Tips Problem Motor operates for the refrigerator to completely cool down ) position. Door left open . Hot weather or frequent door openings. Icemaker is not on and off or not connected. • See Installing the water line. Door left open...

Use and Care Manual
Page 17
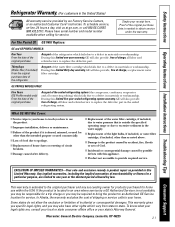
... as listed in the owner's manual, proper setting of the original purchase date is needed concerning this Limited Warranty. Proof of controls. • Product not accessible to provide required service. • WARRANTOR IS NOT RESPONSIBLE FOR CONSEQUENTIAL DAMAGES. Damage due to abuse, accident, commercial use in Canada when the Refrigerator has been properly installed according to the instructions supplied by Mabe and is connected...
... as listed in the owner's manual, proper setting of the original purchase date is needed concerning this Limited Warranty. Proof of controls. • Product not accessible to provide required service. • WARRANTOR IS NOT RESPONSIBLE FOR CONSEQUENTIAL DAMAGES. Damage due to abuse, accident, commercial use in Canada when the Refrigerator has been properly installed according to the instructions supplied by Mabe and is connected...
Use and Care Manual
Page 18
... unlikely event of your Owner's Manual carefully. The top card is for products installed in Canada. SPP is 800 GE CARES (800.432.2737). 3 Read your contract, or credit toward a replacement product • Service coverage for covered operating parts and labor on your appliances.* Benefits Include: • Prompt, reliable service from GE Authorized Servicers • Convenient hours designed to protect your new appliance investment: 1Complete and...
... unlikely event of your Owner's Manual carefully. The top card is for products installed in Canada. SPP is 800 GE CARES (800.432.2737). 3 Read your contract, or credit toward a replacement product • Service coverage for covered operating parts and labor on your appliances.* Benefits Include: • Prompt, reliable service from GE Authorized Servicers • Convenient hours designed to protect your new appliance investment: 1Complete and...
Use and Care Manual
Page 20
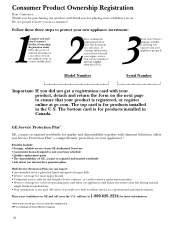
Model Number Serial Number First Name Mr. ■ Ms. ■ Mrs. ■ Miss ■ Street Address Last Name Apt. # E-mail Address* Zip City State Code Date Placed In Use Month Day Year Phone _ _ Number GE Consumer & Industrial Appliances General Electric Company Louisville, KY 40225 ge.com * Please provide your e-mail address to receive, via e-mail, discounts, special offers and other important communications...
Model Number Serial Number First Name Mr. ■ Ms. ■ Mrs. ■ Miss ■ Street Address Last Name Apt. # E-mail Address* Zip City State Code Date Placed In Use Month Day Year Phone _ _ Number GE Consumer & Industrial Appliances General Electric Company Louisville, KY 40225 ge.com * Please provide your e-mail address to receive, via e-mail, discounts, special offers and other important communications...
Use and Care Manual
Page 21
... call 800.GE.CARES (800.432.2737). This warranty is needed to an Authorized GE Service location for home use the product. ■ Improper installation, delivery or maintenance. ■ Failure of the product if it is abused, misused, or used for other than as provided in this Limited Warranty. Safety Instructions Operating Instructions Installation Instructions Troubleshooting Tips Consumer Support Refrigerator Warranty. (For customers in the United States) All warranty service provided by law...
... call 800.GE.CARES (800.432.2737). This warranty is needed to an Authorized GE Service location for home use the product. ■ Improper installation, delivery or maintenance. ■ Failure of the product if it is abused, misused, or used for other than as provided in this Limited Warranty. Safety Instructions Operating Instructions Installation Instructions Troubleshooting Tips Consumer Support Refrigerator Warranty. (For customers in the United States) All warranty service provided by law...

Use and Care Manual
Page 64
... Expert GE repair service is still in the packing material. Or call 800.TDD.GEAC (800.833.4322). E1C 9M3 Extended Warranties In the U.S.: ge.com Purchase a GE extended warranty and learn about special discounts that can now download Owner's Manuals, order parts, or even schedule service on -line today, 24 hours every day or by any user. Order on -line. Instructions contained in this manual cover procedures...
... Expert GE repair service is still in the packing material. Or call 800.TDD.GEAC (800.833.4322). E1C 9M3 Extended Warranties In the U.S.: ge.com Purchase a GE extended warranty and learn about special discounts that can now download Owner's Manuals, order parts, or even schedule service on -line today, 24 hours every day or by any user. Order on -line. Instructions contained in this manual cover procedures...

