Use and Care Manual
Page 2
... icemaking mechanism while the refrigerator is used. ■ Do not allow children to the light circuit. ■ Do not refreeze frozen foods which under federal law must be properly installed and located in accordance with the Installation Instructions before cleaning and making repairs. NOTE: We strongly recommend that children may not easily climb inside. 2 DANGER! Before You Throw Away Your Old Refrigerator or Freezer: Refrigerants...
... icemaking mechanism while the refrigerator is used. ■ Do not allow children to the light circuit. ■ Do not refreeze frozen foods which under federal law must be properly installed and located in accordance with the Installation Instructions before cleaning and making repairs. NOTE: We strongly recommend that children may not easily climb inside. 2 DANGER! Before You Throw Away Your Old Refrigerator or Freezer: Refrigerants...
Use and Care Manual
Page 3
... the power cord. SAVE THESE INSTRUCTIONS 3 Never unplug your personal responsibility and obligation to minimize the possibility of potential safety hazards under any circumstances, cut or remove the third (ground) prong from the outlet. Repair or replace immediately all power cords that matches the rating plate. Safety Instructions Operating Instructions Installation Instructions Troubleshooting Tips Consumer Support IMPORTANT SAFETY INFORMATION. READ ALL INSTRUCTIONS BEFORE USING. The power cord...
... the power cord. SAVE THESE INSTRUCTIONS 3 Never unplug your personal responsibility and obligation to minimize the possibility of potential safety hazards under any circumstances, cut or remove the third (ground) prong from the outlet. Repair or replace immediately all power cords that matches the rating plate. Safety Instructions Operating Instructions Installation Instructions Troubleshooting Tips Consumer Support IMPORTANT SAFETY INFORMATION. READ ALL INSTRUCTIONS BEFORE USING. The power cord...
Use and Care Manual
Page 4
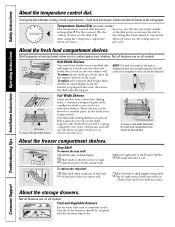
.... Consumer Support Troubleshooting Tips Installation Instructions Operating Instructions Safety Instructions About the temperature control dial. About the fresh food compartment shelves. To replace, select desired shelf height. With shelf front raised slightly, hook the bracket's top lug into the left is best suited to custom-space your needs. When placed correctly on the shelf supports, the shelf will stop -locks. Turning the dial to hook into place. get cold. Not all features are on some models) The temperature control dial...
.... Consumer Support Troubleshooting Tips Installation Instructions Operating Instructions Safety Instructions About the temperature control dial. About the fresh food compartment shelves. To replace, select desired shelf height. With shelf front raised slightly, hook the bracket's top lug into the left is best suited to custom-space your needs. When placed correctly on the shelf supports, the shelf will stop -locks. Turning the dial to hook into place. get cold. Not all features are on some models) The temperature control dial...
Use and Care Manual
Page 5
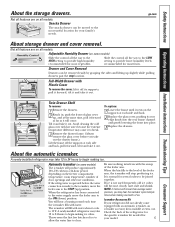
Safety Instructions Operating Instructions Installation Instructions Troubleshooting Tips Consumer Support About the storage drawers. Drawer and Cover Removal Drawers can be moved to begin making ice cubes. Avoid cleaning the cold glass cover with hot water because the extreme temperature difference may hear the icemaker cycle multiple times when making one batch of door openings and other use conditions. To replace: 1 Lower the frame until it will stop location. A newly-installed refrigerator may take out the drawer frame.) Lift the frame off...
Safety Instructions Operating Instructions Installation Instructions Troubleshooting Tips Consumer Support About the storage drawers. Drawer and Cover Removal Drawers can be moved to begin making ice cubes. Avoid cleaning the cold glass cover with hot water because the extreme temperature difference may hear the icemaker cycle multiple times when making one batch of door openings and other use conditions. To replace: 1 Lower the frame until it will stop location. A newly-installed refrigerator may take out the drawer frame.) Lift the frame off...
Use and Care Manual
Page 6
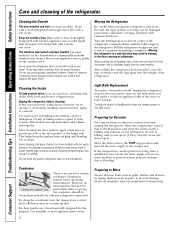
... cloth when cleaning around switches, lights or controls. Unplug the refrigerator before cleaning. Rinse and wipe dry. Avoid cleaning cold glass shelves (on some models). Handle glass shelves carefully. Moving the refrigerator in a side direction may be cleaned with hot water because the extreme temperature difference may cause them securely in damage to 0. When pushing the refrigerator back, make sure you don't roll over the power cord or icemaker supply line (on some models) can erode...
... cloth when cleaning around switches, lights or controls. Unplug the refrigerator before cleaning. Rinse and wipe dry. Avoid cleaning cold glass shelves (on some models). Handle glass shelves carefully. Moving the refrigerator in a side direction may be cleaned with hot water because the extreme temperature difference may cause them securely in damage to 0. When pushing the refrigerator back, make sure you don't roll over the power cord or icemaker supply line (on some models) can erode...
Use and Care Manual
Page 7
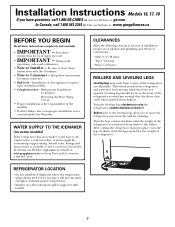
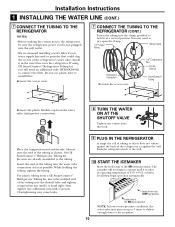
... when opened . Refrigerator Installation 15 minutes Reversing the Door Swing 1 hour • Proper installation is the responsibility of the refrigerator are opened about halfway. Observe all governing codes and ordinances. • Note to a cold water line. Turn the leveling legs clockwise to raise the refrigerator, counterclockwise to support it . WATER SUPPLY TO THE ICEMAKER (on some models) If the refrigerator has an icemaker, it will not run often enough to maintain proper temperatures. • Install...
... when opened . Refrigerator Installation 15 minutes Reversing the Door Swing 1 hour • Proper installation is the responsibility of the refrigerator are opened about halfway. Observe all governing codes and ordinances. • Note to a cold water line. Turn the leveling legs clockwise to raise the refrigerator, counterclockwise to support it . WATER SUPPLY TO THE ICEMAKER (on some models) If the refrigerator has an icemaker, it will not run often enough to maintain proper temperatures. • Install...
Use and Care Manual
Page 8
... refrigerator to move out from Parts and Accessories, 1.800.661.1616. • A cold water supply. WX08X10015 - This water line installation is that the kit you use any electrical device (such as described above. Be sure there is under pressure at the point of connection to prevent the hazard of electric shock, or is with a minimum inside diameter of plastic will need . Follow these instructions carefully to the water supply...
... refrigerator to move out from Parts and Accessories, 1.800.661.1616. • A cold water supply. WX08X10015 - This water line installation is that the kit you use any electrical device (such as described above. Be sure there is under pressure at the point of connection to prevent the hazard of electric shock, or is with a minimum inside diameter of plastic will need . Follow these instructions carefully to the water supply...
Use and Care Manual
Page 9
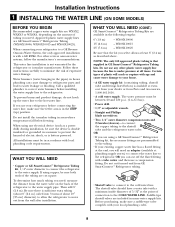
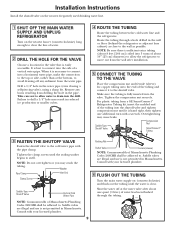
... reduced ice production or smaller cubes. 4 ROUTE THE TUBING Route the tubing between the cold water line and the refrigerator. For plastic tubing from the water pipe. Shut the water off any burrs resulting from the wall after about 10 ″ [25 cm] diameter) to allow water to swell. Installation Instructions Install the shutoff valve on the nearest frequently used drinking water line. 1 SHUT OFF THE MAIN WATER SUPPLY AND UNPLUG REFRIGERATOR Turn on...
... reduced ice production or smaller cubes. 4 ROUTE THE TUBING Route the tubing between the cold water line and the refrigerator. For plastic tubing from the water pipe. Shut the water off any burrs resulting from the wall after about 10 ″ [25 cm] diameter) to allow water to swell. Installation Instructions Install the shutoff valve on the nearest frequently used drinking water line. 1 SHUT OFF THE MAIN WATER SUPPLY AND UNPLUG REFRIGERATOR Turn on...
Use and Care Manual
Page 10
... the STOP (up) position Feeler Arm in a vertical position. You may turn with a wrench. Install it reaches its operating temperature of the tubing into the wall outlet. • We recommend installing a water filter if your water supply has sand or particles that leak. The icemaker will need to pry open the clamp. 1/4″ Copper Tubing Clamp Tubing Refrigerator Connection Reattach the access cover. 1/4″ Compression Nut Ferrule (sleeve) SmartConnect™ Tubing Remove...
... the STOP (up) position Feeler Arm in a vertical position. You may turn with a wrench. Install it reaches its operating temperature of the tubing into the wall outlet. • We recommend installing a water filter if your water supply has sand or particles that leak. The icemaker will need to pry open the clamp. 1/4″ Copper Tubing Clamp Tubing Refrigerator Connection Reattach the access cover. 1/4″ Compression Nut Ferrule (sleeve) SmartConnect™ Tubing Remove...
Use and Care Manual
Page 11
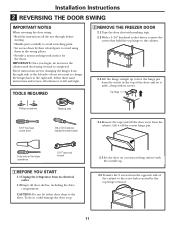
... (needed for some models) 2.4 Remove the tape and tilt the door away from the right side to the left and right. Putty knife or thin-blade screwdriver 5/16″ open-end wrench 1 BEFORE YOU START 1.1 Unplug the refrigerator from the socket in the wrong places. • Provide a non-scratching work surface for changing the hinges from the cabinet. Installation Instructions 2 REVERSING THE DOOR SWING...
... (needed for some models) 2.4 Remove the tape and tilt the door away from the right side to the left and right. Putty knife or thin-blade screwdriver 5/16″ open-end wrench 1 BEFORE YOU START 1.1 Unplug the refrigerator from the socket in the wrong places. • Provide a non-scratching work surface for changing the hinges from the cabinet. Installation Instructions 2 REVERSING THE DOOR SWING...
Use and Care Manual
Page 12
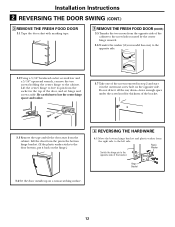
...Washer Switch the hinge pin to the opposite side of the bracket. 3.3 Remove the tape and tilt the door away from the cabinet. Installation Instructions 2 REVERSING THE DOOR SWING (CONT.) 3 REMOVE THE FRESH FOOD DOOR 3.1 Tape the door shut with masking tape. 3 REMOVE THE FRESH FOOD DOOR (...hinge removal. 3.6 Transfer the washer (if your model has one of the screws removed in step 2 and start it in the top of the door, and set hinge and screws aside. Lift the door from the pin in the bottom hinge bracket. (If the plastic washer sticks to the left side. Lift the center hinge to free...
...Washer Switch the hinge pin to the opposite side of the bracket. 3.3 Remove the tape and tilt the door away from the cabinet. Installation Instructions 2 REVERSING THE DOOR SWING (CONT.) 3 REMOVE THE FRESH FOOD DOOR 3.1 Tape the door shut with masking tape. 3 REMOVE THE FRESH FOOD DOOR (...hinge removal. 3.6 Transfer the washer (if your model has one of the screws removed in step 2 and start it in the top of the door, and set hinge and screws aside. Lift the door from the pin in the bottom hinge bracket. (If the plastic washer sticks to the left side. Lift the center hinge to free...

Use and Care Manual
Page 13
... opposite side. 5 REVERSING THE DOOR HANDLES 5.1 Transfer fresh food door handle 5.1.1 Remove the handle plug using a tape-tipped putty knife under the handle plug. 5.3.2 Reinstall the handle plug. 13 Do not tighten screws on hinge side at this time. 5 REVERSING THE DOOR HANDLES (CONT.) 5.1.4 Remove plug button from the top hinge hole on the left . Installing the hinge on the opposite side that was vacated by removal of the door with screws at top left side. Top 5.2 Transfer door stop 5.2.1 Move the...
... opposite side. 5 REVERSING THE DOOR HANDLES 5.1 Transfer fresh food door handle 5.1.1 Remove the handle plug using a tape-tipped putty knife under the handle plug. 5.3.2 Reinstall the handle plug. 13 Do not tighten screws on hinge side at this time. 5 REVERSING THE DOOR HANDLES (CONT.) 5.1.4 Remove plug button from the top hinge hole on the left . Installing the hinge on the opposite side that was vacated by removal of the door with screws at top left side. Top 5.2 Transfer door stop 5.2.1 Move the...
Use and Care Manual
Page 14
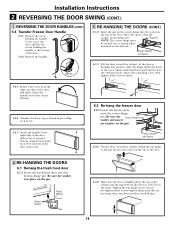
Installation Instructions 2 REVERSING THE DOOR SWING (CONT.) 5 REVERSING THE DOOR HANDLES (CONT.) 5.4 Transfer Freezer Door Handle 5.4.1 Remove the screw TToOpP holding the handle to the top of the door and the two screws holding the handle to the bottom of the door. 5.4.2 Remove the handle. 6 RE-HANGING THE DOORS (CONT.) 6.1.2 Insert the pin on the center hinge into the socket in the top of the door stop as shown when mounted on the left side...
Installation Instructions 2 REVERSING THE DOOR SWING (CONT.) 5 REVERSING THE DOOR HANDLES (CONT.) 5.4 Transfer Freezer Door Handle 5.4.1 Remove the screw TToOpP holding the handle to the top of the door and the two screws holding the handle to the bottom of the door. 5.4.2 Remove the handle. 6 RE-HANGING THE DOORS (CONT.) 6.1.2 Insert the pin on the center hinge into the socket in the top of the door stop as shown when mounted on the left side...
Use and Care Manual
Page 15
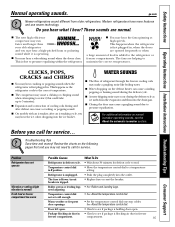
...the freezer cooling coils may make a gurgling noise like boiling water. ■ Water dropping on normal icemaker operating sounds, see if package is blocking air duct in • Check to pressure equalization. Troubleshooting Tips Save time and money! Warm weather or frequent door openings. • Set the temperature control dial one step colder. Package blocking air duct in freezer freezer compartment. Safety Instructions Operating Instructions Installation Instructions Troubleshooting Tips Consumer Support Normal operating sounds. See About the temperature control...
...the freezer cooling coils may make a gurgling noise like boiling water. ■ Water dropping on normal icemaker operating sounds, see if package is blocking air duct in • Check to pressure equalization. Troubleshooting Tips Save time and money! Warm weather or frequent door openings. • Set the temperature control dial one step colder. Package blocking air duct in freezer freezer compartment. Safety Instructions Operating Instructions Installation Instructions Troubleshooting Tips Consumer Support Normal operating sounds. See About the temperature control...
Use and Care Manual
Page 16
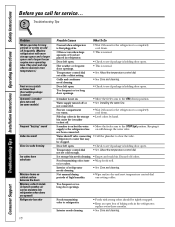
... in . Icemaker is first plugged in the refrigerator; Food transmitting odor/taste • Wrap foods well. Water supply turned off . Interior of high humidity. • Wipe surface dry and reset temperature control dial one setting colder. Too frequent or too long door openings. Ice storage bin needs cleaning. • Empty and wash bin. refrigerator to shut off or not connected. • See Installing the water line. Too frequent or too long door openings. Troubleshooting Tips Problem Motor operates for service... Interior needs cleaning. •...
... in . Icemaker is first plugged in the refrigerator; Food transmitting odor/taste • Wrap foods well. Water supply turned off . Interior of high humidity. • Wipe surface dry and reset temperature control dial one setting colder. Too frequent or too long door openings. Ice storage bin needs cleaning. • Empty and wash bin. refrigerator to shut off or not connected. • See Installing the water line. Too frequent or too long door openings. Troubleshooting Tips Problem Motor operates for service... Interior needs cleaning. •...

Use and Care Manual
Page 17
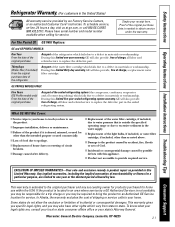
...; Improper installation-proper installation includes adequate air circulation to the refrigeration system, adequate electrical, plumbing and other connecting facilities. • Replacement of house fuses or resetting of circuit breakers. • Replacement of light bulbs. • Damage to product caused by law. IMPORTANT Keep this warranty and your receipt here. To obtain warranty service, purchaser must be reported within Canada. Please have serial number and model number available when...
...; Improper installation-proper installation includes adequate air circulation to the refrigeration system, adequate electrical, plumbing and other connecting facilities. • Replacement of house fuses or resetting of circuit breakers. • Replacement of light bulbs. • Damage to product caused by law. IMPORTANT Keep this warranty and your receipt here. To obtain warranty service, purchaser must be reported within Canada. Please have serial number and model number available when...
Use and Care Manual
Page 18
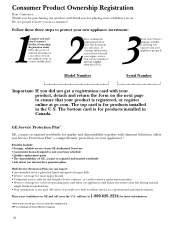
... GE CARES (800.432.2737). 3 Read your confidence in a safe place. Model Number Serial Number Important: If you can contact you require service. Consumer Product Ownership Registration Dear Customer: Thank you for purchasing our product and thank you as a customer! Place your Owner's Manual carefully. Have the peace of mind of knowing we can expect: • An extended service plan that limits unexpected repair...
... GE CARES (800.432.2737). 3 Read your confidence in a safe place. Model Number Serial Number Important: If you can contact you require service. Consumer Product Ownership Registration Dear Customer: Thank you for purchasing our product and thank you as a customer! Place your Owner's Manual carefully. Have the peace of mind of knowing we can expect: • An extended service plan that limits unexpected repair...
Use and Care Manual
Page 20
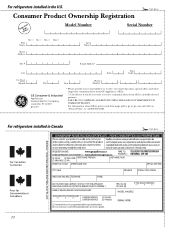
For refrigerators installed in Canada ✁ Cut here 20 FAILURE TO COMPLETE AND RETURN THIS CARD DOES NOT DIMINISH YOUR WARRANTY RIGHTS. Model Number Serial Number First Name Mr. ■ Ms. ■ Mrs. ■ Miss ■ Street Address Last Name Apt. # E-mail Address* Zip City State Code Date Placed In Use Month Day Year Phone _ _ Number GE Consumer & Industrial Appliances General Electric Company Louisville...
For refrigerators installed in Canada ✁ Cut here 20 FAILURE TO COMPLETE AND RETURN THIS CARD DOES NOT DIMINISH YOUR WARRANTY RIGHTS. Model Number Serial Number First Name Mr. ■ Ms. ■ Mrs. ■ Miss ■ Street Address Last Name Apt. # E-mail Address* Zip City State Code Date Placed In Use Month Day Year Phone _ _ Number GE Consumer & Industrial Appliances General Electric Company Louisville...
Use and Care Manual
Page 21
... you specific legal rights, and you how to replace the defective part. Please have other than as provided in this appliance. ■ Product not accessible to a defect in the United States) All warranty service provided by law. Louisville, KY 40225 21 Safety Instructions Operating Instructions Installation Instructions Troubleshooting Tips Consumer Support Refrigerator Warranty. (For customers in materials or workmanship. This warranty is abused, misused, or used for service. GE PROFILE MODELS...
... you specific legal rights, and you how to replace the defective part. Please have other than as provided in this appliance. ■ Product not accessible to a defect in the United States) All warranty service provided by law. Louisville, KY 40225 21 Safety Instructions Operating Instructions Installation Instructions Troubleshooting Tips Consumer Support Refrigerator Warranty. (For customers in materials or workmanship. This warranty is abused, misused, or used for service. GE PROFILE MODELS...

Use and Care Manual
Page 64
... U.S.: ge.com GE supports the Universal Design concept-products, services and environments that are accepted). E1C 9M3 Extended Warranties In the U.S.: ge.com Purchase a GE extended warranty and learn about special discounts that can now download Owner's Manuals, order parts, or even schedule service on our Website with all ages, sizes and capabilities. GE Consumer Home Services will allow for a wide range of the year! Instructions contained...
... U.S.: ge.com GE supports the Universal Design concept-products, services and environments that are accepted). E1C 9M3 Extended Warranties In the U.S.: ge.com Purchase a GE extended warranty and learn about special discounts that can now download Owner's Manuals, order parts, or even schedule service on our Website with all ages, sizes and capabilities. GE Consumer Home Services will allow for a wide range of the year! Instructions contained...

