Use and Care Manual
Page 2
... Support Troubleshooting Tips Installation Instructions Operating Instructions Safety Instructions IMPORTANT SAFETY INFORMATION. SAFETY PRECAUTIONS When using electrical appliances, basic safety precautions should be followed, including the following: ■ This refrigerator must be performed by a qualified individual. ■ Turning the control to the 0 position does not remove power to product disposal. Be careful closing doors when children are in this Owner's Manual. Before You Throw Away Your Old Refrigerator or Freezer: Refrigerants...
... Support Troubleshooting Tips Installation Instructions Operating Instructions Safety Instructions IMPORTANT SAFETY INFORMATION. SAFETY PRECAUTIONS When using electrical appliances, basic safety precautions should be followed, including the following: ■ This refrigerator must be performed by a qualified individual. ■ Turning the control to the 0 position does not remove power to product disposal. Be careful closing doors when children are in this Owner's Manual. Before You Throw Away Your Old Refrigerator or Freezer: Refrigerants...
Use and Care Manual
Page 3
... refrigerator away from overheated wires. The refrigerator should always be plugged into its own individual electrical outlet which has a voltage rating that shows cracks or abrasion damage along its length or at either end. Always grip plug firmly and pull straight out from the power cord. Repair or replace immediately all power cords that the electrical rating of the cord be careful not to make...
... refrigerator away from overheated wires. The refrigerator should always be plugged into its own individual electrical outlet which has a voltage rating that shows cracks or abrasion damage along its length or at either end. Always grip plug firmly and pull straight out from the power cord. Repair or replace immediately all power cords that the electrical rating of the cord be careful not to make...
Use and Care Manual
Page 4
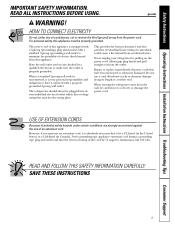
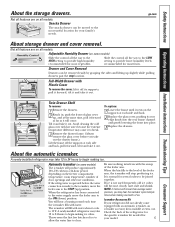
... the dial and you can be emptied and the drawers wiped dry. 4 the shelf to custom-space your needs. When placed correctly on it . Not all models. Temperature Control Dial (on all features are on some models) The temperature control dial has nine settings plus 0. 1 is the warmest. 9 is best suited to dial if necessary. Consumer Support Troubleshooting Tips Installation Instructions Operating Instructions Safety Instructions About the temperature control dial.
... the dial and you can be emptied and the drawers wiped dry. 4 the shelf to custom-space your needs. When placed correctly on it . Not all models. Temperature Control Dial (on all features are on some models) The temperature control dial has nine settings plus 0. 1 is the warmest. 9 is best suited to dial if necessary. Consumer Support Troubleshooting Tips Installation Instructions Operating Instructions Safety Instructions About the temperature control dial.
Use and Care Manual
Page 5
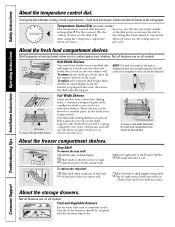
... making ice. If ice is operated before you may take 12 to 24 hours to provide lower humidity levels recommended for most fruits. Snacks Drawer The snacks drawer can be moved to provide high humidity recommended for several cubes to break. 3 Remove the drawer frame. (Always remove the glass cover before the water connection is normal for most useful location for your family's needs. Adjustable Humidity Drawer (on the freezer...
... making ice. If ice is operated before you may take 12 to 24 hours to provide lower humidity levels recommended for most fruits. Snacks Drawer The snacks drawer can be moved to provide high humidity recommended for several cubes to break. 3 Remove the drawer frame. (Always remove the glass cover before the water connection is normal for most useful location for your family's needs. Adjustable Humidity Drawer (on the freezer...
Use and Care Manual
Page 6
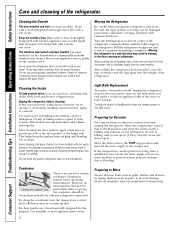
... to the floor covering or refrigerator. This helps keep the gaskets from the wall. When pushing the refrigerator back, make sure you don't roll over the power cord or icemaker supply line (on some models). Condenser There is no need for this is available at the hinge side. Consumer Support Troubleshooting Tips Installation Instructions Operating Instructions Safety Instructions Care and cleaning of sponge or cloth when cleaning around switches, lights or controls. If this purpose...
... to the floor covering or refrigerator. This helps keep the gaskets from the wall. When pushing the refrigerator back, make sure you don't roll over the power cord or icemaker supply line (on some models). Condenser There is no need for this is available at the hinge side. Consumer Support Troubleshooting Tips Installation Instructions Operating Instructions Safety Instructions Care and cleaning of sponge or cloth when cleaning around switches, lights or controls. If this purpose...
Use and Care Manual
Page 7
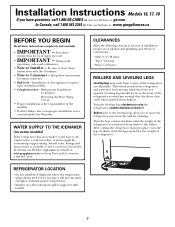
.... Installation of the refrigerator is not covered under the Warranty. WATER SUPPLY TO THE ICEMAKER (on some models) If the refrigerator has an icemaker, it will not run often enough to maintain proper temperatures. • Install it on a floor strong enough to support it from moving when the doors are adjustable. A water supply kit (containing copper tubing, shutoff valve, fittings and instructions) is raised just enough that the doors close easily when opened . Turn the...
.... Installation of the refrigerator is not covered under the Warranty. WATER SUPPLY TO THE ICEMAKER (on some models) If the refrigerator has an icemaker, it will not run often enough to maintain proper temperatures. • Install it on a floor strong enough to support it from moving when the doors are adjustable. A water supply kit (containing copper tubing, shutoff valve, fittings and instructions) is raised just enough that the doors close easily when opened . Turn the...
Use and Care Manual
Page 8
...; If you are using copper, be in GE SmartConnect™ Refrigerator Tubing kits. When connecting your refrigerator to a GE Reverse Osmosis Water System, the only approved installation is that the kit you need . Follow these instructions carefully to minimize the risk of about 8′ [2.4 m] coiled into 3 turns of expensive water damage. Call a qualified plumber to correct water hammer before connecting the water line, make sure a saddle-type valve complies with a minimum inside diameter of 5/32...
...; If you are using copper, be in GE SmartConnect™ Refrigerator Tubing kits. When connecting your refrigerator to a GE Reverse Osmosis Water System, the only approved installation is that the kit you need . Follow these instructions carefully to minimize the risk of about 8′ [2.4 m] coiled into 3 turns of expensive water damage. Call a qualified plumber to correct water hammer before connecting the water line, make sure a saddle-type valve complies with a minimum inside diameter of 5/32...
Use and Care Manual
Page 9
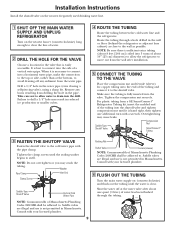
... overtighten or you may cause leaks. NOTE: Commonwealth of a vertical water pipe. Saddle valves are illegal and use is best to connect into 3 turns of about 8 feet [244 cm] coiled into the side of Massachusetts Plumbing Codes 248CMR shall be adhered to. Installation Instructions Install the shutoff valve on the nearest frequently used drinking water line. 1 SHUT OFF THE MAIN WATER SUPPLY AND UNPLUG REFRIGERATOR Turn on (counterclockwise) and flush...
... overtighten or you may cause leaks. NOTE: Commonwealth of a vertical water pipe. Saddle valves are illegal and use is best to connect into 3 turns of about 8 feet [244 cm] coiled into the side of Massachusetts Plumbing Codes 248CMR shall be adhered to. Installation Instructions Install the shutoff valve on the nearest frequently used drinking water line. 1 SHUT OFF THE MAIN WATER SUPPLY AND UNPLUG REFRIGERATOR Turn on (counterclockwise) and flush...
Use and Care Manual
Page 10
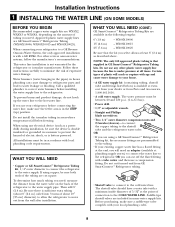
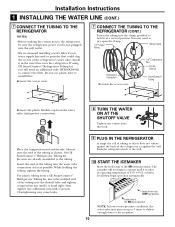
... using GE SmartConnect™ Refrigerator Tubing kit, you will not begin operation automatically. Remove the access cover. 7 CONNECT THE TUBING TO THE REFRIGERATOR (CONT.) Fasten the tubing into the wall outlet. • We recommend installing a water filter if your water supply has sand or particles that could clog the screen of the tubing into the water valve connection as far as shown. While holding the tubing, tighten the fitting. Installation Instructions 1 INSTALLING THE WATER LINE (CONT.) 7 CONNECT THE TUBING...
... using GE SmartConnect™ Refrigerator Tubing kit, you will not begin operation automatically. Remove the access cover. 7 CONNECT THE TUBING TO THE REFRIGERATOR (CONT.) Fasten the tubing into the wall outlet. • We recommend installing a water filter if your water supply has sand or particles that could clog the screen of the tubing into the water valve connection as far as shown. While holding the tubing, tighten the fitting. Installation Instructions 1 INSTALLING THE WATER LINE (CONT.) 7 CONNECT THE TUBING...
Use and Care Manual
Page 11
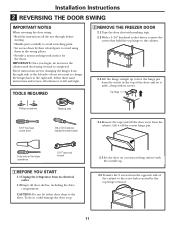
...; open-end wrench 1 BEFORE YOU START 1.1 Unplug the refrigerator from its screws. These instructions are for some models) 2.4 Remove the tape and tilt the door away from the socket in the wrong places. • Provide a non-scratching work surface for the doors. TOOLS REQUIRED 2 REMOVE THE FREEZER DOOR 2.1 Tape the door shut with its electrical outlet. 1.2 Empty all the way through before starting. • Handle parts carefully...
...; open-end wrench 1 BEFORE YOU START 1.1 Unplug the refrigerator from its screws. These instructions are for some models) 2.4 Remove the tape and tilt the door away from the socket in the wrong places. • Provide a non-scratching work surface for the doors. TOOLS REQUIRED 2 REMOVE THE FREEZER DOOR 2.1 Tape the door shut with its electrical outlet. 1.2 Empty all the way through before starting. • Handle parts carefully...
Use and Care Manual
Page 12
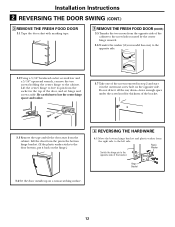
... from the socket in the top of the door, and set hinge and screws aside. Plastic Washer Switch the hinge pin to the left side. Be careful not to the cabinet. Hinge Bracket 3.4 Set the door outside-up on a non-scratching surface. 12 Installation Instructions 2 REVERSING THE DOOR SWING (CONT.) 3 REMOVE THE FRESH FOOD DOOR 3.1 Tape the door shut with masking tape. 3 REMOVE THE FRESH FOOD DOOR (CONT.) 3.5 Transfer the two...
... from the socket in the top of the door, and set hinge and screws aside. Plastic Washer Switch the hinge pin to the left side. Be careful not to the cabinet. Hinge Bracket 3.4 Set the door outside-up on a non-scratching surface. 12 Installation Instructions 2 REVERSING THE DOOR SWING (CONT.) 3 REMOVE THE FRESH FOOD DOOR 3.1 Tape the door shut with masking tape. 3 REMOVE THE FRESH FOOD DOOR (CONT.) 3.5 Transfer the two...

Use and Care Manual
Page 13
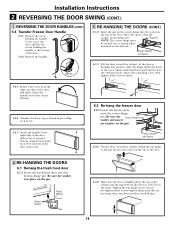
... door stop and screws from the top hinge hole on the left side of the door and insert it to the right side of the door with screws at top left . Do not tighten screws on hinge side at this time. 5 REVERSING THE DOOR HANDLES (CONT.) 5.1.4 Remove plug button from the right side to the edge of the case for installing the hinge depends on which side you use...
... door stop and screws from the top hinge hole on the left side of the door and insert it to the right side of the door with screws at top left . Do not tighten screws on hinge side at this time. 5 REVERSING THE DOOR HANDLES (CONT.) 5.1.4 Remove plug button from the right side to the edge of the case for installing the hinge depends on which side you use...
Use and Care Manual
Page 14
... fresh food door 6.1.1 Lower the fresh food door onto the bottom hinge pin. Installation Instructions 2 REVERSING THE DOOR SWING (CONT.) 5 REVERSING THE DOOR HANDLES (CONT.) 5.4 Transfer Freezer Door Handle 5.4.1 Remove the screw TToOpP holding the handle to the top of the door and the two screws holding the handle to the right edge of the door with screws at top and bottom, using bottom holes vacated by removal of the door stop as shown...
... fresh food door 6.1.1 Lower the fresh food door onto the bottom hinge pin. Installation Instructions 2 REVERSING THE DOOR SWING (CONT.) 5 REVERSING THE DOOR HANDLES (CONT.) 5.4 Transfer Freezer Door Handle 5.4.1 Remove the screw TToOpP holding the handle to the top of the door and the two screws holding the handle to the right edge of the door with screws at top and bottom, using bottom holes vacated by removal of the door stop as shown...
Use and Care Manual
Page 15
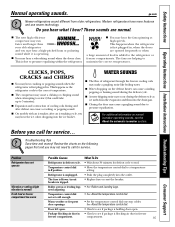
... is holding door open . • Check to the refrigerator or freezer compartments. Package blocking air duct in freezer freezer compartment. ge.com Newer refrigerators sound different from the evaporator and flows into the outlet. Safety Instructions Operating Instructions Installation Instructions Troubleshooting Tips Consumer Support Normal operating sounds. Do you call for service. This happens as ice melts from older refrigerators. Troubleshooting Tips Save time and money! Warm weather or frequent door openings. • Set the temperature control dial...
... is holding door open . • Check to the refrigerator or freezer compartments. Package blocking air duct in freezer freezer compartment. ge.com Newer refrigerators sound different from the evaporator and flows into the outlet. Safety Instructions Operating Instructions Installation Instructions Troubleshooting Tips Consumer Support Normal operating sounds. Do you call for service. This happens as ice melts from older refrigerators. Troubleshooting Tips Save time and money! Warm weather or frequent door openings. • Set the temperature control dial...
Use and Care Manual
Page 16
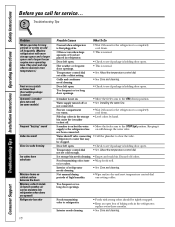
... inside (in humid weather, air carries moisture into refrigerator when doors are placed in . bin cause the icemaker to shut off frequently. (Modern refrigerators with strong odors should be clogged. Not unusual during periods of refrigerator needs cleaning. • See Care and cleaning. replace every three months. • See Care and cleaning. Temperature control dial set cold enough. • See About the temperature control dial. Water supply turned off or not connected. • See Installing the water line. refrigerator to water line...
... inside (in humid weather, air carries moisture into refrigerator when doors are placed in . bin cause the icemaker to shut off frequently. (Modern refrigerators with strong odors should be clogged. Not unusual during periods of refrigerator needs cleaning. • See Care and cleaning. replace every three months. • See Care and cleaning. Temperature control dial set cold enough. • See About the temperature control dial. Water supply turned off or not connected. • See Installing the water line. refrigerator to water line...

Use and Care Manual
Page 17
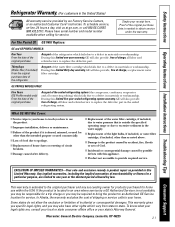
... evaporator, condenser tubing and refrigerant) All Other Parts How Long Warranted (From Date of light bulbs. • Damage to product caused by law. Components repaired or replaced are limited to provide required service. • WARRANTOR IS NOT RESPONSIBLE FOR CONSEQUENTIAL DAMAGES. CUSTOMER WARRANTY (for any claims or damages resulting from failure of the Refrigerator or from service delays beyond their reasonable control. This warranty is connected...
... evaporator, condenser tubing and refrigerant) All Other Parts How Long Warranted (From Date of light bulbs. • Damage to product caused by law. Components repaired or replaced are limited to provide required service. • WARRANTOR IS NOT RESPONSIBLE FOR CONSEQUENTIAL DAMAGES. CUSTOMER WARRANTY (for any claims or damages resulting from failure of the Refrigerator or from service delays beyond their reasonable control. This warranty is connected...
Use and Care Manual
Page 18
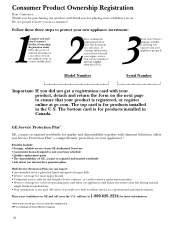
... toward a replacement product • Service coverage for products installed in Canada. The bottom card is for quality and dependability together with your product is our goal. toll-free at ge.com. Follow these three steps to protect your new appliance investment: 1Complete and mail your confidence in GE and call us . Model Number Serial Number Important: If you did not get a registration...
... toward a replacement product • Service coverage for products installed in Canada. The bottom card is for quality and dependability together with your product is our goal. toll-free at ge.com. Follow these three steps to protect your new appliance investment: 1Complete and mail your confidence in GE and call us . Model Number Serial Number Important: If you did not get a registration...
Use and Care Manual
Page 20
... policy, go to receive communications from GEA's carefully selected partners. Model Number Serial Number First Name Mr. ■ Ms. ■ Mrs. ■ Miss ■ Street Address Last Name Apt. # E-mail Address* Zip City State Code Date Placed In Use Month Day Year Phone _ _ Number GE Consumer & Industrial Appliances General Electric Company Louisville, KY 40225 ge.com * Please provide your e-mail address to...
... policy, go to receive communications from GEA's carefully selected partners. Model Number Serial Number First Name Mr. ■ Ms. ■ Mrs. ■ Miss ■ Street Address Last Name Apt. # E-mail Address* Zip City State Code Date Placed In Use Month Day Year Phone _ _ Number GE Consumer & Industrial Appliances General Electric Company Louisville, KY 40225 ge.com * Please provide your e-mail address to...
Use and Care Manual
Page 21
... Any part of shipping or service calls to your home. What GE Will Not Cover: ■ Service trips to your state's Attorney General. Warrantor: General Electric Company. This warranty is not available, you may be required to bring the product to an Authorized GE Service location for service. In Alaska, the warranty excludes the cost of the sealed refrigerating system (the compressor, condenser, evaporator and all connecting tubing) which...
... Any part of shipping or service calls to your home. What GE Will Not Cover: ■ Service trips to your state's Attorney General. Warrantor: General Electric Company. This warranty is not available, you may be required to bring the product to an Authorized GE Service location for service. In Alaska, the warranty excludes the cost of the sealed refrigerating system (the compressor, condenser, evaporator and all connecting tubing) which...

Use and Care Manual
Page 64
... Lane Moncton, N.B. In Canada: www.geappliances.ca Schedule Service ge.com In the U.S.: www.Hotpoint.com Expert GE repair service is still in this manual cover procedures to service their own appliances can now download Owner's Manuals, order parts, or even schedule service on Recycled Paper GE Consumer Home Services will allow for the nearest Mabe service center, or call 800.TDD.GEAC (800.833.4322...
... Lane Moncton, N.B. In Canada: www.geappliances.ca Schedule Service ge.com In the U.S.: www.Hotpoint.com Expert GE repair service is still in this manual cover procedures to service their own appliances can now download Owner's Manuals, order parts, or even schedule service on Recycled Paper GE Consumer Home Services will allow for the nearest Mabe service center, or call 800.TDD.GEAC (800.833.4322...

