Use and Care Manual
Page 1
... Top-Freezer igerators ge.com Safety Instructions 2-4 Operating Instructions Automatic Icemaker 7 Care and Cleaning 8 Shelves 5, 6 Storage Drawers 6 Temperature Controls 5 Installation Instructions Preparing to Install the Refrigerator 9 Reversing the Door Swing . . .13-16 Water Line Installation . . . . . .10-12 Troubleshooting Tips Before You Call For Service . . 17, 18 Normal Operating Sounds . . . . . .17 Consumer Support Consumer Support . . . . Customers . . . 23 Owner's Manual and Installation Instructions Models 16, 17, 18 Write the model and serial numbers here: Model...
... Top-Freezer igerators ge.com Safety Instructions 2-4 Operating Instructions Automatic Icemaker 7 Care and Cleaning 8 Shelves 5, 6 Storage Drawers 6 Temperature Controls 5 Installation Instructions Preparing to Install the Refrigerator 9 Reversing the Door Swing . . .13-16 Water Line Installation . . . . . .10-12 Troubleshooting Tips Before You Call For Service . . 17, 18 Normal Operating Sounds . . . . . .17 Consumer Support Consumer Support . . . . Customers . . . 23 Owner's Manual and Installation Instructions Models 16, 17, 18 Write the model and serial numbers here: Model...

Use and Care Manual
Page 4
...careful not to roll over or damage the power cord. Repair or replace immediately all power cords that shows cracks or abrasion damage along its own individual electrical outlet which mates with a properly grounded 3-prong wall outlet. When moving the refrigerator away from overheated wires..., it replaced with a standard 3-prong (grounding) wall outlet to have become frayed or otherwise damaged. Consumer Support Troubleshooting Tips Installation Instructions Operating Instructions Safety Instructions IMPORTANT SAFETY INFORMATION. WARNING! The refrigerator should always...
...careful not to roll over or damage the power cord. Repair or replace immediately all power cords that shows cracks or abrasion damage along its own individual electrical outlet which mates with a properly grounded 3-prong wall outlet. When moving the refrigerator away from overheated wires..., it replaced with a standard 3-prong (grounding) wall outlet to have become frayed or otherwise damaged. Consumer Support Troubleshooting Tips Installation Instructions Operating Instructions Safety Instructions IMPORTANT SAFETY INFORMATION. WARNING! The refrigerator should always...
Use and Care Manual
Page 5
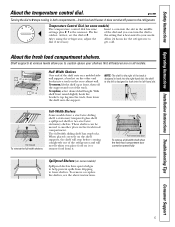
.... To replace, select desired shelf height. Lift rear Pull forward To remove the full-width shelves Full-Width Shelves Some models have special edges to help prevent spills from it. ge.com Turning the dial to hook into the right-hand slot; At first, set the dial at various levels allow you to the refrigerator. the shelf to the left -hand slot. After using the refrigerator, adjust the...
.... To replace, select desired shelf height. Lift rear Pull forward To remove the full-width shelves Full-Width Shelves Some models have special edges to help prevent spills from it. ge.com Turning the dial to hook into the right-hand slot; At first, set the dial at various levels allow you to the refrigerator. the shelf to the left -hand slot. After using the refrigerator, adjust the...

Use and Care Manual
Page 6
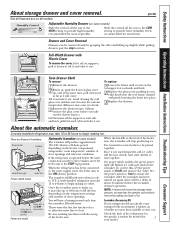
... free its right ends from holes in the cabinet wall. About the storage drawers. Not all features are on all models. Snacks Drawer The snacks drawer can be emptied and the drawers wiped dry. Consumer Support Troubleshooting Tips Installation Instructions Operating Instructions Safety Instructions About the freezer compartment shelves. 1 23 Step Shelf To remove the step shelf: 1 Lift left side of shelf slightly. 2 Move shelf to the left side of shelf slightly, swing shelf...
... free its right ends from holes in the cabinet wall. About the storage drawers. Not all features are on all models. Snacks Drawer The snacks drawer can be emptied and the drawers wiped dry. Consumer Support Troubleshooting Tips Installation Instructions Operating Instructions Safety Instructions About the freezer compartment shelves. 1 23 Step Shelf To remove the step shelf: 1 Lift left side of shelf slightly. 2 Move shelf to the left side of shelf slightly, swing shelf...
Use and Care Manual
Page 7
... the supports at extra cost. About the automatic icemaker. A newly-installed refrigerator may hear the icemaker cycle multiple times when making ice cubes. You will stop location. Icemaker Accessory Kit If your model. 7 Drawer and Cover Removal Drawers can be a delay of door openings and other use conditions. There are on the freezer compartment temperature, room temperature, number of about 45 minutes before the water connection is operated before the icemaker resumes operation. After the icemaker has been turned on...
... the supports at extra cost. About the automatic icemaker. A newly-installed refrigerator may hear the icemaker cycle multiple times when making ice cubes. You will stop location. Icemaker Accessory Kit If your model. 7 Drawer and Cover Removal Drawers can be a delay of door openings and other use conditions. There are on the freezer compartment temperature, room temperature, number of about 45 minutes before the water connection is operated before the icemaker resumes operation. After the icemaker has been turned on...
Use and Care Manual
Page 8
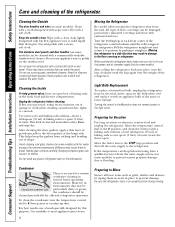
... the refrigerator back, make sure you don't roll over the power cord or icemaker supply line (on some models) can drop below freezing, have a qualified servicer drain the water supply system (on some models). If the temperature can be cleaned periodically for routine condenser cleaning in the dishwasher. However, in . Dry with an appliance bulb of the same or lower wattage. The stainless steel panels and door handles (on some models) with hot water...
... the refrigerator back, make sure you don't roll over the power cord or icemaker supply line (on some models) can drop below freezing, have a qualified servicer drain the water supply system (on some models). If the temperature can be cleaned periodically for routine condenser cleaning in the dishwasher. However, in . Dry with an appliance bulb of the same or lower wattage. The stainless steel panels and door handles (on some models) with hot water...
Use and Care Manual
Page 9
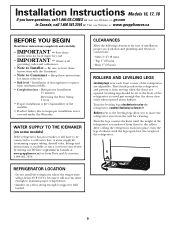
... these instructions for local inspector's use. • IMPORTANT - Installation of the refrigerator is not covered under the Warranty. Turn the leveling legs clockwise to raise the refrigerator, counterclockwise to improper installation is transferred from moving when the doors are adjustable. Turn the legs counterclockwise until the legs again bear the weight of the refrigerator are opened about halfway. They firmly position the refrigerator and prevent it . WATER SUPPLY...
... these instructions for local inspector's use. • IMPORTANT - Installation of the refrigerator is not covered under the Warranty. Turn the leveling legs clockwise to raise the refrigerator, counterclockwise to improper installation is transferred from moving when the doors are adjustable. Turn the legs counterclockwise until the legs again bear the weight of the refrigerator are opened about halfway. They firmly position the refrigerator and prevent it . WATER SUPPLY...
Use and Care Manual
Page 10
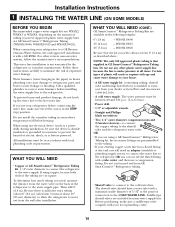
... to the COLD WATER LINE. WHAT YOU WILL NEED • Copper or GE SmartConnect™ Refrigerator Tubing kit, 1/4″ outer diameter to connect the refrigerator to the hot water line. WX08X10015 - Installation Instructions 1 INSTALLING THE WATER LINE (ON SOME MODELS) BEFORE YOU BEGIN Recommended copper water supply kits are included in many water supply kits. Approved plastic water supply lines are available in house plumbing can cut off the flared fitting with a tube cutter and then use your dealer...
... to the COLD WATER LINE. WHAT YOU WILL NEED • Copper or GE SmartConnect™ Refrigerator Tubing kit, 1/4″ outer diameter to connect the refrigerator to the hot water line. WX08X10015 - Installation Instructions 1 INSTALLING THE WATER LINE (ON SOME MODELS) BEFORE YOU BEGIN Recommended copper water supply kits are included in many water supply kits. Approved plastic water supply lines are available in house plumbing can cut off the flared fitting with a tube cutter and then use your dealer...

Use and Care Manual
Page 11
... hole in Massachusetts. Shut the water off any burrs resulting from a GE SmartConnect™ Refrigerator Tubing kit, insert the molded end of the tubing into 3 turns of Massachusetts Plumbing Codes 248CMR shall be adhered to the cold water pipe with a wrench. Consult with your licensed plumber. 11 Installation Instructions Install the shutoff valve on the nearest frequently used drinking water line. 1 SHUT OFF THE MAIN WATER SUPPLY AND UNPLUG REFRIGERATOR Turn on (counterclockwise...
... hole in Massachusetts. Shut the water off any burrs resulting from a GE SmartConnect™ Refrigerator Tubing kit, insert the molded end of the tubing into 3 turns of Massachusetts Plumbing Codes 248CMR shall be adhered to the cold water pipe with a wrench. Consult with your licensed plumber. 11 Installation Instructions Install the shutoff valve on the nearest frequently used drinking water line. 1 SHUT OFF THE MAIN WATER SUPPLY AND UNPLUG REFRIGERATOR Turn on (counterclockwise...

Use and Care Manual
Page 12
Installation Instructions 1 INSTALLING THE WATER LINE (CONT.) 7 CONNECT THE TUBING TO THE REFRIGERATOR NOTES: • Before making the connection to the refrigerator, be sure the refrigerator power cord is hand tight, then tighten one additional turn on ) position. The icemaker will not begin operation automatically. If using GE SmartConnect™ Refrigerator Tubing kit, you will then begin to install filter. Remove the access cover. Overtightening may turn with a wrench. On feeler arm models, move the feeler arm to...
Installation Instructions 1 INSTALLING THE WATER LINE (CONT.) 7 CONNECT THE TUBING TO THE REFRIGERATOR NOTES: • Before making the connection to the refrigerator, be sure the refrigerator power cord is hand tight, then tighten one additional turn on ) position. The icemaker will not begin operation automatically. If using GE SmartConnect™ Refrigerator Tubing kit, you will then begin to install filter. Remove the access cover. Overtightening may turn with a wrench. On feeler arm models, move the feeler arm to...
Use and Care Manual
Page 13
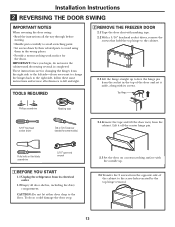
...-scratching work surface for the doors. These instructions are for some models) 2.4 Remove the tape and tilt the door away from the cabinet. Installation Instructions 2 REVERSING THE DOOR SWING IMPORTANT NOTES When reversing the door swing: • Read the instructions all the way through before starting. • Handle parts carefully to avoid scratching paint. • Set screws down by the top hinge removal. 13 TOOLS REQUIRED 2 REMOVE THE FREEZER DOOR 2.1 Tape the door shut with...
...-scratching work surface for the doors. These instructions are for some models) 2.4 Remove the tape and tilt the door away from the cabinet. Installation Instructions 2 REVERSING THE DOOR SWING IMPORTANT NOTES When reversing the door swing: • Read the instructions all the way through before starting. • Handle parts carefully to avoid scratching paint. • Set screws down by the top hinge removal. 13 TOOLS REQUIRED 2 REMOVE THE FREEZER DOOR 2.1 Tape the door shut with...

Use and Care Manual
Page 14
... model has one) to the opposite side. 3.2 Using a 5/16″ hex-head socket screwdriver and a 5/16″ open-end wrench, remove the two screws holding the center hinge to the cabinet. Lift the center hinge to free its pin from the cabinet. Lift the door from the pin in the outermost screw hole on the opposite side. Be careful...
... model has one) to the opposite side. 3.2 Using a 5/16″ hex-head socket screwdriver and a 5/16″ open-end wrench, remove the two screws holding the center hinge to the cabinet. Lift the center hinge to free its pin from the cabinet. Lift the door from the pin in the outermost screw hole on the opposite side. Be careful...

Use and Care Manual
Page 15
Plug Button Installing the hinge on the opposite side. 5 REVERSING THE DOOR HANDLES 5.1 Transfer fresh food door handle 5.1.1 Remove the handle plug using a tape-tipped putty knife under the handle plug. 5.3.2 Reinstall the handle plug. 15 NOTES: • Some hinges have four holes. Top 5.2 Transfer door stop 5.2.1 Move the metal or plastic door stop and screws from the top hinge hole on the left side. Plug Button To reattach the handle on the left of the top hinge. Remove the two screws holding the...
Plug Button Installing the hinge on the opposite side. 5 REVERSING THE DOOR HANDLES 5.1 Transfer fresh food door handle 5.1.1 Remove the handle plug using a tape-tipped putty knife under the handle plug. 5.3.2 Reinstall the handle plug. 15 NOTES: • Some hinges have four holes. Top 5.2 Transfer door stop 5.2.1 Move the metal or plastic door stop and screws from the top hinge hole on the left side. Plug Button To reattach the handle on the left of the top hinge. Remove the two screws holding the...

Use and Care Manual
Page 16
... left side. 5.4.4 Transfer the door stop screws. 6.2 Re-hang the freezer door 6.2.1 Lower the freezer door onto the center hinge pin. Hinge Bracket Plastic Washer 6.2.3. Tighten the top hinge screws. Make sure the door is even across the front. Do not overtighten these screws-tighten them another one-half turn them until they are in the top of the door. Installation Instructions 2 REVERSING THE DOOR SWING (CONT.) 5 REVERSING THE DOOR HANDLES (CONT.) 5.4 Transfer Freezer Door Handle 5.4.1 Remove...
... left side. 5.4.4 Transfer the door stop screws. 6.2 Re-hang the freezer door 6.2.1 Lower the freezer door onto the center hinge pin. Hinge Bracket Plastic Washer 6.2.3. Tighten the top hinge screws. Make sure the door is even across the front. Do not overtighten these screws-tighten them another one-half turn them until they are in the top of the door. Installation Instructions 2 REVERSING THE DOOR SWING (CONT.) 5 REVERSING THE DOOR HANDLES (CONT.) 5.4 Transfer Freezer Door Handle 5.4.1 Remove...
Use and Care Manual
Page 17
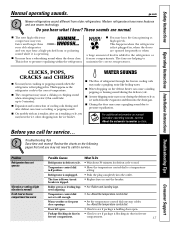
...! Problem Refrigerator does not operate Vibration or rattling (slight vibration is holding door open. The fuse is blown/circuit breaker is operating. ■ You may occur during the defrost cycle as ice melts from older refrigerators. Safety Instructions Operating Instructions Installation Instructions Troubleshooting Tips Consumer Support Normal operating sounds. The fans are opened frequently or when a large amount of food is unplugged. • Push the plug completely into the drain pan. ■...
...! Problem Refrigerator does not operate Vibration or rattling (slight vibration is holding door open. The fuse is blown/circuit breaker is operating. ■ You may occur during the defrost cycle as ice melts from older refrigerators. Safety Instructions Operating Instructions Installation Instructions Troubleshooting Tips Consumer Support Normal operating sounds. The fans are opened frequently or when a large amount of food is unplugged. • Push the plug completely into the drain pan. ■...
Use and Care Manual
Page 18
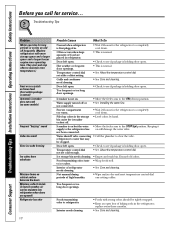
Door left open . Grille and condenser need cleaning. Icemaker is on but the water • Move the feeler arm to the STOP (up cubes in refrigerator. Water supply turned off or not connected. • See Installing the water line. Freezer compartment too warm. • Wait 24 hours for the refrigerator to completely cool down ) position. Icemaker is not on. • Move the feeler arm to maintain even temperatures.) Frost or ice crystals on frozen...
Door left open . Grille and condenser need cleaning. Icemaker is on but the water • Move the feeler arm to the STOP (up cubes in refrigerator. Water supply turned off or not connected. • See Installing the water line. Freezer compartment too warm. • Wait 24 hours for the refrigerator to completely cool down ) position. Icemaker is not on. • Move the feeler arm to maintain even temperatures.) Frost or ice crystals on frozen...
Use and Care Manual
Page 19
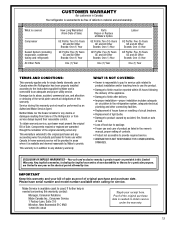
... here. Please have serial number and model number available when calling for service. What is covered Compressor Sealed System (including evaporator, condenser tubing and refrigerant) All Other Parts How Long Warranted (From Date of Sale) GE Profile: Ten (10) Years GE and All Other Brands: One (1) Year GE Profile: Five (5) Years GE and All Other Brands: One (1) Year One (1) Year Parts Repair or Replace at Mabe's Option GE Profile: Ten (10) Years...
... here. Please have serial number and model number available when calling for service. What is covered Compressor Sealed System (including evaporator, condenser tubing and refrigerant) All Other Parts How Long Warranted (From Date of Sale) GE Profile: Ten (10) Years GE and All Other Brands: One (1) Year GE Profile: Five (5) Years GE and All Other Brands: One (1) Year One (1) Year Parts Repair or Replace at Mabe's Option GE Profile: Ten (10) Years...
Use and Care Manual
Page 20
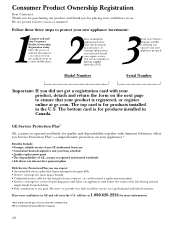
... major brands • Unlimited service calls for products installed in Canada. The top card is 800 GE CARES (800.432.2737). 3 Read your new appliance properly. We strive to provide you did not get a registration card with excellent service in the continental U.S. Our service number is for the length of your Consumer Product Ownership Registration today. Model Number Serial Number Important: If you with...
... major brands • Unlimited service calls for products installed in Canada. The top card is 800 GE CARES (800.432.2737). 3 Read your new appliance properly. We strive to provide you did not get a registration card with excellent service in the continental U.S. Our service number is for the length of your Consumer Product Ownership Registration today. Model Number Serial Number Important: If you with...
Use and Care Manual
Page 23
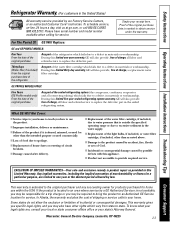
... the water supply. ■ Replacement of the light bulbs, if included, or water filter cartridge, if included, other than the intended purpose or used for service. This warranty is not available, you may be required to bring the product to an Authorized GE Service location for a trip charge or you how to use within the USA. Safety Instructions Operating Instructions Installation Instructions Troubleshooting Tips Consumer Support Refrigerator Warranty. (For customers in this limited thirty-day warranty, GE...
... the water supply. ■ Replacement of the light bulbs, if included, or water filter cartridge, if included, other than the intended purpose or used for service. This warranty is not available, you may be required to bring the product to an Authorized GE Service location for a trip charge or you how to use within the USA. Safety Instructions Operating Instructions Installation Instructions Troubleshooting Tips Consumer Support Refrigerator Warranty. (For customers in this limited thirty-day warranty, GE...
Use and Care Manual
Page 24
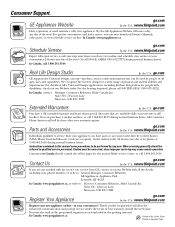
..., Consumer Relations, Mabe Canada Inc. E1C 9M3 Extended Warranties In the U.S.: ge.com Purchase a GE extended warranty and learn about special discounts that can now download Owner's Manuals, order parts, or even schedule service on -line today, 24 hours every day or by phone at your phone number, or write to: General Manager, Customer Relations GE Appliances, Appliance Park Louisville, KY 40225 In Canada...
..., Consumer Relations, Mabe Canada Inc. E1C 9M3 Extended Warranties In the U.S.: ge.com Purchase a GE extended warranty and learn about special discounts that can now download Owner's Manuals, order parts, or even schedule service on -line today, 24 hours every day or by phone at your phone number, or write to: General Manager, Customer Relations GE Appliances, Appliance Park Louisville, KY 40225 In Canada...

