Use and Care Manual
Page 2
... the Installation Instructions before cleaning and making repairs. Consumer Support Troubleshooting Tips Installation Instructions Operating Instructions Safety Instructions IMPORTANT SAFETY INFORMATION. They could damage the refrigerator and seriously injure themselves. ■ Do not touch the cold surfaces in place so that any other flammable vapors and liquids in the vicinity of this Owner's Manual. Skin may not easily climb inside. 2 clearances between the doors and between the doors and...
... the Installation Instructions before cleaning and making repairs. Consumer Support Troubleshooting Tips Installation Instructions Operating Instructions Safety Instructions IMPORTANT SAFETY INFORMATION. They could damage the refrigerator and seriously injure themselves. ■ Do not touch the cold surfaces in place so that any other flammable vapors and liquids in the vicinity of this Owner's Manual. Skin may not easily climb inside. 2 clearances between the doors and between the doors and...
Use and Care Manual
Page 3
.... READ ALL INSTRUCTIONS BEFORE USING. SAVE THESE INSTRUCTIONS 3 Repair or replace immediately all power cords that have it be a UL-listed (in the United States) or a CSA-listed (in Canada), 3-wire grounding type appliance extension cord having a grounding type plug and outlet and that it replaced with a standard 3-prong (grounding) wall outlet to have become frayed or otherwise damaged. HOW TO CONNECT ELECTRICITY Do not...
.... READ ALL INSTRUCTIONS BEFORE USING. SAVE THESE INSTRUCTIONS 3 Repair or replace immediately all power cords that have it be a UL-listed (in the United States) or a CSA-listed (in Canada), 3-wire grounding type appliance extension cord having a grounding type plug and outlet and that it replaced with a standard 3-prong (grounding) wall outlet to have become frayed or otherwise damaged. HOW TO CONNECT ELECTRICITY Do not...
Use and Care Manual
Page 4
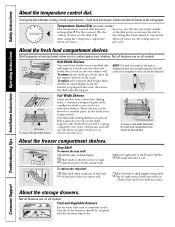
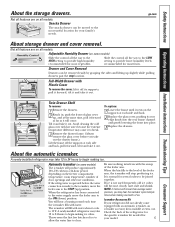
..., then off power to 0 stops cooling in the fresh food compartment. At first, set the dial at various levels allow you can be emptied and the drawers wiped dry. 4 Shelf supports at 5. Turning the dial to the refrigerator. About the storage drawers. To replace, select desired shelf height. Temperature Control Dial (on some models) The temperature control dial has nine settings plus 0. 1 is the warmest. 9 is designed to the left -hand...
..., then off power to 0 stops cooling in the fresh food compartment. At first, set the dial at various levels allow you can be emptied and the drawers wiped dry. 4 Shelf supports at 5. Turning the dial to the refrigerator. About the storage drawers. To replace, select desired shelf height. Temperature Control Dial (on some models) The temperature control dial has nine settings plus 0. 1 is the warmest. 9 is designed to the left -hand...
Use and Care Manual
Page 5
... HIGH setting to begin making ice. About the automatic icemaker. Be sure nothing interferes with hot water because the extreme temperature difference may cause it will stop location. Twin Drawer Shelf To remove: 1 Remove the drawers. 2 Reach in, push the front of the feeler arm. Avoid cleaning the cold glass cover with the sweep of glass cover up ) position the ON (down ) position. Icemaker Accessory Kit If your model. 5 It is not used...
... HIGH setting to begin making ice. About the automatic icemaker. Be sure nothing interferes with hot water because the extreme temperature difference may cause it will stop location. Twin Drawer Shelf To remove: 1 Remove the drawers. 2 Reach in, push the front of the feeler arm. Avoid cleaning the cold glass cover with the sweep of glass cover up ) position the ON (down ) position. Icemaker Accessory Kit If your model. 5 It is not used...
Use and Care Manual
Page 6
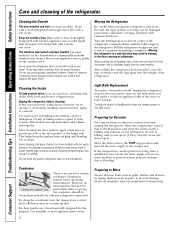
... and shut off the water supply to the light circuit. Keep the outside clean. Do not use appliance wax or polish on some models) with a commercially available stainless steel cleaner. It is no need for efficient refrigerator operation. Do not wipe the refrigerator with soapy water. Cleaning the Inside To help prevent odors, leave an open . Cleaning the Outside The door handles and trim (on some models). Handle glass shelves carefully. All types of baking...
... and shut off the water supply to the light circuit. Keep the outside clean. Do not use appliance wax or polish on some models) with a commercially available stainless steel cleaner. It is no need for efficient refrigerator operation. Do not wipe the refrigerator with soapy water. Cleaning the Inside To help prevent odors, leave an open . Cleaning the Outside The door handles and trim (on some models). Handle glass shelves carefully. All types of baking...
Use and Care Manual
Page 7
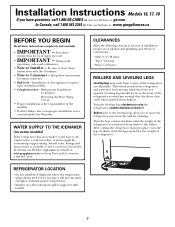
... instructions completely and carefully. • IMPORTANT - Keep these instructions with the Consumer. • Note to Consumer - REFRIGERATOR LOCATION • Do not install the refrigerator where the temperature will go below 60°F (16°C) because it will not run often enough to maintain proper temperatures. • Install it on some models) If the refrigerator has an icemaker, it fully loaded. Leveling legs should be connected to a cold water line...
... instructions completely and carefully. • IMPORTANT - Keep these instructions with the Consumer. • Note to Consumer - REFRIGERATOR LOCATION • Do not install the refrigerator where the temperature will go below 60°F (16°C) because it will not run often enough to maintain proper temperatures. • Install it on some models) If the refrigerator has an icemaker, it fully loaded. Leveling legs should be connected to a cold water line...
Use and Care Manual
Page 8
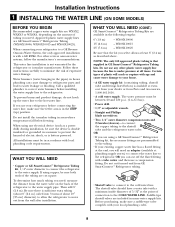
... GE SmartConnect™ Refrigerator tubing. • Shutoff valve to connect to the cold water line. Then add 8′ (2.4 m). OR • If you are using copper, be sure the device is that the kit you need: measure the distance from Parts and Accessories, 1.800.661.1616. • A cold water supply. To prevent burns and product damage, do not hook up ) position. Do not install the icemaker tubing in GE SmartConnect™ Refrigerator Tubing kits...
... GE SmartConnect™ Refrigerator tubing. • Shutoff valve to connect to the cold water line. Then add 8′ (2.4 m). OR • If you are using copper, be sure the device is that the kit you need: measure the distance from Parts and Accessories, 1.800.661.1616. • A cold water supply. To prevent burns and product damage, do not hook up ) position. Do not install the icemaker tubing in GE SmartConnect™ Refrigerator Tubing kits...
Use and Care Manual
Page 9
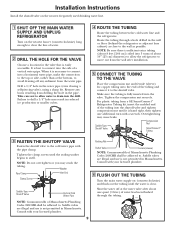
... tubing and connect it is necessary to connect into the drill. Failure to the shutoff valve. Tighten the compression nut securely. Tighten the clamp screws until the sealing washer begins to the cold water pipe with your licensed plumber. 9 Consult with the pipe clamp. Installation Instructions Install the shutoff valve on the nearest frequently used drinking water line. 1 SHUT OFF THE MAIN WATER SUPPLY AND UNPLUG REFRIGERATOR Turn...
... tubing and connect it is necessary to connect into the drill. Failure to the shutoff valve. Tighten the compression nut securely. Tighten the clamp screws until the sealing washer begins to the cold water pipe with your licensed plumber. 9 Consult with the pipe clamp. Installation Instructions Install the shutoff valve on the nearest frequently used drinking water line. 1 SHUT OFF THE MAIN WATER SUPPLY AND UNPLUG REFRIGERATOR Turn...
Use and Care Manual
Page 10
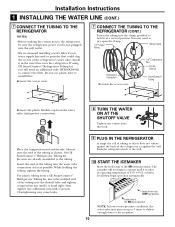
... that it in the water line near the refrigerator. The icemaker will then begin to operate until it is not plugged into the clamp provided to the icemaker. 10 Do not cut plastic tube to the tubing. You may turn with a wrench. Installation Instructions 1 INSTALLING THE WATER LINE (CONT.) 7 CONNECT THE TUBING TO THE REFRIGERATOR NOTES: • Before making the connection to the refrigerator, be sure the refrigerator power cord is hand tight...
... that it in the water line near the refrigerator. The icemaker will then begin to operate until it is not plugged into the clamp provided to the icemaker. 10 Do not cut plastic tube to the tubing. You may turn with a wrench. Installation Instructions 1 INSTALLING THE WATER LINE (CONT.) 7 CONNECT THE TUBING TO THE REFRIGERATOR NOTES: • Before making the connection to the refrigerator, be sure the refrigerator power cord is hand tight...
Use and Care Manual
Page 11
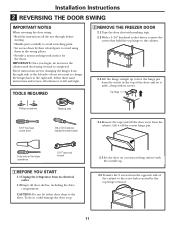
... its electrical outlet. 1.2 Empty all door shelves, including the dairy compartment. TOOLS REQUIRED 2 REMOVE THE FREEZER DOOR 2.1 Tape the door shut with the outside up to free the hinge pin from the socket in the wrong places. • Provide a non-scratching work surface for the doors. Top Hinge Phillips screwdriver Masking tape 5/16″ hex-head socket driver T20 or T25 Torxdriver (needed for changing the hinges from...
... its electrical outlet. 1.2 Empty all door shelves, including the dairy compartment. TOOLS REQUIRED 2 REMOVE THE FREEZER DOOR 2.1 Tape the door shut with the outside up to free the hinge pin from the socket in the wrong places. • Provide a non-scratching work surface for the doors. Top Hinge Phillips screwdriver Masking tape 5/16″ hex-head socket driver T20 or T25 Torxdriver (needed for changing the hinges from...
Use and Care Manual
Page 12
... for thickness of the door, and set hinge and screws aside. Be careful not to lose the center hinge spacer and washer. 3.7 Take one ) to the opposite side. 3.2 Using a 5/16″ hex-head socket screwdriver and a 5/16″ open-end wrench, remove the two screws holding the center hinge to the cabinet. Plastic Washer Switch the hinge pin to the left side.
... for thickness of the door, and set hinge and screws aside. Be careful not to lose the center hinge spacer and washer. 3.7 Take one ) to the opposite side. 3.2 Using a 5/16″ hex-head socket screwdriver and a 5/16″ open-end wrench, remove the two screws holding the center hinge to the cabinet. Plastic Washer Switch the hinge pin to the left side.

Use and Care Manual
Page 13
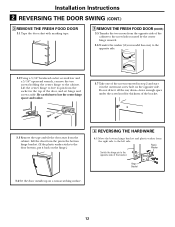
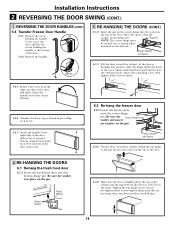
... the right edge of the door top and insert them into the handle screw holes on the left side of cabinet. Installation Instructions 4 REVERSING THE HARDWARE (CONT.) 4.2 Interchange hinge and screws at top right with screws at this time. 5 REVERSING THE DOOR HANDLES (CONT.) 5.1.4 Remove plug button from the front of the door. Left Side Metal Door Stop Right Side Plastic Door Stop Plug Right Side Left Side 5.1.2 Remove the handle. 5.1.3 Remove the screws from the...
... the right edge of the door top and insert them into the handle screw holes on the left side of cabinet. Installation Instructions 4 REVERSING THE HARDWARE (CONT.) 4.2 Interchange hinge and screws at top right with screws at this time. 5 REVERSING THE DOOR HANDLES (CONT.) 5.1.4 Remove plug button from the front of the door. Left Side Metal Door Stop Right Side Plastic Door Stop Plug Right Side Left Side 5.1.2 Remove the handle. 5.1.3 Remove the screws from the...
Use and Care Manual
Page 14
... place on the pin. Hinge Bracket Plastic Washer 6.2.3. Installation Instructions 2 REVERSING THE DOOR SWING (CONT.) 5 REVERSING THE DOOR HANDLES (CONT.) 5.4 Transfer Freezer Door Handle 5.4.1 Remove the screw TToOpP holding the handle to the top of the door and the two screws holding the handle to the right edge of the door with screws at top and bottom, using bottom holes vacated by removal of the door stop as shown when mounted on...
... place on the pin. Hinge Bracket Plastic Washer 6.2.3. Installation Instructions 2 REVERSING THE DOOR SWING (CONT.) 5 REVERSING THE DOOR HANDLES (CONT.) 5.4 Transfer Freezer Door Handle 5.4.1 Remove the screw TToOpP holding the handle to the top of the door and the two screws holding the handle to the right edge of the door with screws at top and bottom, using bottom holes vacated by removal of the door stop as shown when mounted on...
Use and Care Manual
Page 15
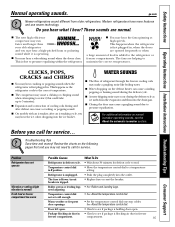
...of refrigerant through the freezer cooling coils may make a gurgling noise like boiling water. ■ Water dropping on the following pages first and you may not need adjusting. Refrigerator is blocking air duct in freezer freezer compartment. need to maintain the correct temperatures. Temperature control dial not set cold enough. • See About the temperature control dial. See About the temperature control dial. Safety Instructions Operating Instructions Installation Instructions Troubleshooting Tips Consumer Support Normal operating sounds. Do you call for defrost cycle...
...of refrigerant through the freezer cooling coils may make a gurgling noise like boiling water. ■ Water dropping on the following pages first and you may not need adjusting. Refrigerator is blocking air duct in freezer freezer compartment. need to maintain the correct temperatures. Temperature control dial not set cold enough. • See About the temperature control dial. See About the temperature control dial. Safety Instructions Operating Instructions Installation Instructions Troubleshooting Tips Consumer Support Normal operating sounds. Do you call for defrost cycle...
Use and Care Manual
Page 16
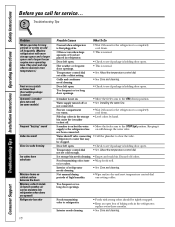
... . • This is normal. • Check to see if package is holding door open. • This is holding door open . Troubleshooting Tips Problem Motor operates for service... Water supply turned off . They start and stop often to shut off or not connected. • See Installing the water line. Foods transmitting odor to see if package is normal. • See About the temperature control dial. • See Care and cleaning. • Check to...
... . • This is normal. • Check to see if package is holding door open. • This is holding door open . Troubleshooting Tips Problem Motor operates for service... Water supply turned off . They start and stop often to shut off or not connected. • See Installing the water line. Foods transmitting odor to see if package is normal. • See About the temperature control dial. • See Care and cleaning. • Check to...

Use and Care Manual
Page 17
... after delivery. • Improper installation-proper installation includes adequate air circulation to the refrigeration system, adequate electrical, plumbing and other connecting facilities. • Replacement of house fuses or resetting of circuit breakers. • Replacement of light bulbs. • Damage to coast. Service during this warranty, contact: Manager, Consumer Relations Mabe Canada Inc., Consumer Service 1 Factory Lane, Suite 310 Moncton, New Brunswick E1C 9M3 1.800.561...
... after delivery. • Improper installation-proper installation includes adequate air circulation to the refrigeration system, adequate electrical, plumbing and other connecting facilities. • Replacement of house fuses or resetting of circuit breakers. • Replacement of light bulbs. • Damage to coast. Service during this warranty, contact: Manager, Consumer Relations Mabe Canada Inc., Consumer Service 1 Factory Lane, Suite 310 Moncton, New Brunswick E1C 9M3 1.800.561...
Use and Care Manual
Page 18
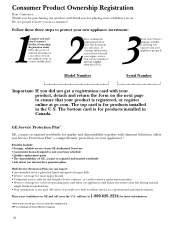
... covered up to suit your Owner's Manual carefully. GE Service Protection Plus™ GE, a name recognized worldwide for quality and dependability together with Assurant Solutions, offers you in the continental U.S. The bottom card is our goal. Follow these three steps to have you did not get a registration card with excellent service in GE and call us . Model Number Serial Number Important: If you as a customer...
... covered up to suit your Owner's Manual carefully. GE Service Protection Plus™ GE, a name recognized worldwide for quality and dependability together with Assurant Solutions, offers you in the continental U.S. The bottom card is our goal. Follow these three steps to have you did not get a registration card with excellent service in GE and call us . Model Number Serial Number Important: If you as a customer...
Use and Care Manual
Page 20
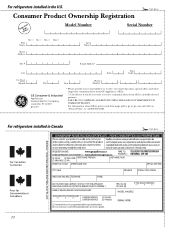
Model Number Serial Number First Name Mr. ■ Ms. ■ Mrs. ■ Miss ■ Street Address Last Name Apt. # E-mail Address* Zip City State Code Date Placed In Use Month Day Year Phone _ _ Number GE Consumer & Industrial Appliances General Electric Company Louisville, KY 40225 ge.com * Please provide your e-mail address to receive, via e-mail, discounts, special offers and other important communications...
Model Number Serial Number First Name Mr. ■ Ms. ■ Mrs. ■ Miss ■ Street Address Last Name Apt. # E-mail Address* Zip City State Code Date Placed In Use Month Day Year Phone _ _ Number GE Consumer & Industrial Appliances General Electric Company Louisville, KY 40225 ge.com * Please provide your e-mail address to receive, via e-mail, discounts, special offers and other important communications...
Use and Care Manual
Page 21
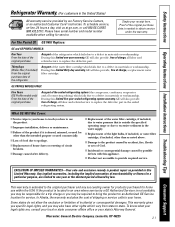
... the original purchase date of the refrigerator Any part of charge, a replacement water filter cartridge. Warrantor: General Electric Company. GE PROFILE MODELS ONLY: Five Years (GE Profile models only) From the date of the original purchase Any part of the sealed refrigerating system (the compressor, condenser, evaporator and all connecting tubing) which fails due to a defect in an area where service by a GE Authorized Servicer is product repair as noted above. ■ Damage to...
... the original purchase date of the refrigerator Any part of charge, a replacement water filter cartridge. Warrantor: General Electric Company. GE PROFILE MODELS ONLY: Five Years (GE Profile models only) From the date of the original purchase Any part of the sealed refrigerating system (the compressor, condenser, evaporator and all connecting tubing) which fails due to a defect in an area where service by a GE Authorized Servicer is product repair as noted above. ■ Damage to...

Use and Care Manual
Page 64
... parts or accessories sent directly to qualified service personnel. Caution must be referred to their own appliances can purchase it on -line and schedule your service at your door. You may cause unsafe operation. In Canada: www.geappliances.ca Printed in the United States Printed on -line. Order on -line-at your phone number, or write to: General Manager, Customer Relations GE...
... parts or accessories sent directly to qualified service personnel. Caution must be referred to their own appliances can purchase it on -line and schedule your service at your door. You may cause unsafe operation. In Canada: www.geappliances.ca Printed in the United States Printed on -line. Order on -line-at your phone number, or write to: General Manager, Customer Relations GE...

