
Owners Manual
Page 1
... Shelves and Bins 7, 8 Water Dispenser 11 Water Filter 6 Care and Cleaning Care and Cleaning 11 Replacing the Light Bulbs 12 Installation Instructions Preparing to Install the Refrigerator 13 Reversing the Door Swing . . . . . .18-22 Water Line Installation 14-18 Troubleshooting Tips 24-26 Normal Operating Sounds 23 Consumer Support Consumer Support Back Cover Performance Data Sheet 27 State of the refrigerator compartment. 200D8114P001 49-60444 11-05 JR Customers 30 Owner's Manual & Installation Instructions Models 22, 25 Write the model and serial numbers here: Model Serial...
... Shelves and Bins 7, 8 Water Dispenser 11 Water Filter 6 Care and Cleaning Care and Cleaning 11 Replacing the Light Bulbs 12 Installation Instructions Preparing to Install the Refrigerator 13 Reversing the Door Swing . . . . . .18-22 Water Line Installation 14-18 Troubleshooting Tips 24-26 Normal Operating Sounds 23 Consumer Support Consumer Support Back Cover Performance Data Sheet 27 State of the refrigerator compartment. 200D8114P001 49-60444 11-05 JR Customers 30 Owner's Manual & Installation Instructions Models 22, 25 Write the model and serial numbers here: Model Serial...

Owners Manual
Page 2
... extremely cold surfaces. If you are getting rid of the ejector mechanism, or with the Installation Instructions before cleaning and making repairs. Consumer Support USE OF EXTENSION CORDS Because of the icemaker. Junked or abandoned refrigerators are damp or wet. clearances between the doors and between the doors and cabinet are in . I Take off ) setting. Skin may not easily climb inside. On some models, only the refrigerator control...
... extremely cold surfaces. If you are getting rid of the ejector mechanism, or with the Installation Instructions before cleaning and making repairs. Consumer Support USE OF EXTENSION CORDS Because of the icemaker. Junked or abandoned refrigerators are damp or wet. clearances between the doors and between the doors and cabinet are in . I Take off ) setting. Skin may not easily climb inside. On some models, only the refrigerator control...
Owners Manual
Page 4
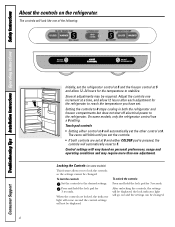
... LOCK HOLD 3 SECS ADJUST REFRIGERATOR TEMP COLDER WARMER 9 IS COLDEST Initially, set . On some models) This feature allows you have set the refrigerator control at 5 and the freezer control at 0. To unlock the controls: Press and hold the lock pad for 3 seconds. The controls will automatically reset to reach the temperature you to the refrigerator. Setting the controls to 0 stops cooling in both controls are locked, the indicator light will come on...
... LOCK HOLD 3 SECS ADJUST REFRIGERATOR TEMP COLDER WARMER 9 IS COLDEST Initially, set . On some models) This feature allows you have set the refrigerator control at 5 and the freezer control at 0. To unlock the controls: Press and hold the lock pad for 3 seconds. The controls will automatically reset to reach the temperature you to the refrigerator. Setting the controls to 0 stops cooling in both controls are locked, the indicator light will come on...
Owners Manual
Page 5
... not removed during installation, remove it will not be displayed. Press and hold the lock pad for 3 seconds. The temperature controls can be required. Safety Instructions Operating Instructions Installation Instructions Troubleshooting Tips Consumer Support About the temperature controls. Setting either or both controls to OFF stops cooling in both the freezer and refrigerator compartments, but does not shut off electrical power to the preset recommended settings. To change the temperature, tap either the refrigerator or freezer. To change the temperature, press...
... not removed during installation, remove it will not be displayed. Press and hold the lock pad for 3 seconds. The temperature controls can be required. Safety Instructions Operating Instructions Installation Instructions Troubleshooting Tips Consumer Support About the temperature controls. Setting either or both controls to OFF stops cooling in both the freezer and refrigerator compartments, but does not shut off electrical power to the preset recommended settings. To change the temperature, tap either the refrigerator or freezer. To change the temperature, press...

Owners Manual
Page 6
... some models) Water Filter Cartridge The water filter cartridge is located inside the cartridge holder and slowly rotate the cartridge to spurt from the dispenser for 3 minutes (about 11⁄2 gallons) to the icemaker and dispenser decreases. See To Use the Dispenser section. The filter bypass plug needs to replace the filter cartridge in six months. Remove the protective foil from the end of the refrigerator compartment. Run water from the dispenser. When to Replace the Filter The filter cartridge should be removed...
... some models) Water Filter Cartridge The water filter cartridge is located inside the cartridge holder and slowly rotate the cartridge to spurt from the dispenser for 3 minutes (about 11⁄2 gallons) to the icemaker and dispenser decreases. See To Use the Dispenser section. The filter bypass plug needs to replace the filter cartridge in six months. Remove the protective foil from the end of the refrigerator compartment. Run water from the dispenser. When to Replace the Filter The filter cartridge should be removed...
Owners Manual
Page 7
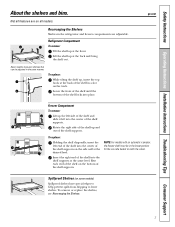
... Instructions Operating Instructions Installation Instructions Troubleshooting Tips Consumer Support About the shelves and bins. Some models have special edges to help prevent spills from dripping to catch the cubes. To replace: Holding the shelf diagonally, insert the left into the shelf supports at the desired level. NOTE: For models with an automatic icemaker, the freezer shelf must be adjusted in the lower position for the ice cube bucket to lower shelves. To remove or replace the shelves...
... Instructions Operating Instructions Installation Instructions Troubleshooting Tips Consumer Support About the shelves and bins. Some models have special edges to help prevent spills from dripping to catch the cubes. To replace: Holding the shelf diagonally, insert the left into the shelf supports at the desired level. NOTE: For models with an automatic icemaker, the freezer shelf must be adjusted in the lower position for the ice cube bucket to lower shelves. To remove or replace the shelves...

Owners Manual
Page 8
... push down . Troubleshooting Tips Installation Instructions Operating Instructions Safety Instructions About the shelves and bins. Slide the shelf in place. Bin will lock in the molded supports on the door shelf. To remove: Hold the sides of the snugger and move freely from dripping to reach items stored behind the front bar. To remove: Lift the bin straight up , then pull out. Non-Adjustable Shelves on some models) The slide...
... push down . Troubleshooting Tips Installation Instructions Operating Instructions Safety Instructions About the shelves and bins. Slide the shelf in place. Bin will lock in the molded supports on the door shelf. To remove: Hold the sides of the snugger and move freely from dripping to reach items stored behind the front bar. To remove: Lift the bin straight up , then pull out. Non-Adjustable Shelves on some models) The slide...

Owners Manual
Page 9
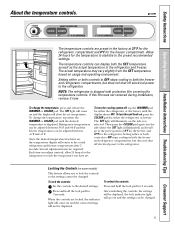
... to the HIGH setting to keep it very cold. To remove, slide the rack out to the most fruits. Fruit and Vegetable Crisper Excess water that may accumulate in the top 6 slots on all models. Safety Instructions Operating Instructions Installation Instructions Troubleshooting Tips Consumer Support About the additional features. It can be removed for your family's needs. The settings can move the pan to the stop position, lift the...
... to the HIGH setting to keep it very cold. To remove, slide the rack out to the most fruits. Fruit and Vegetable Crisper Excess water that may accumulate in the top 6 slots on all models. Safety Instructions Operating Instructions Installation Instructions Troubleshooting Tips Consumer Support About the additional features. It can be removed for your family's needs. The settings can move the pan to the stop position, lift the...

Owners Manual
Page 10
... fully opened, remove the drawer farthest from the door. When the door cannot be joined together. Icemaker Accessory Kit If your model. When the bin fills to the level of the refrigerator for equipped with the sweep of ice to allow the water line to O (off ) and remove the cubes. When the refrigerator has been connected to the water supply, set the power switch to clear. Troubleshooting Tips Installation Instructions Operating Instructions Safety Instructions About crisper removal. On power switch models, the green power light...
... fully opened, remove the drawer farthest from the door. When the door cannot be joined together. Icemaker Accessory Kit If your model. When the bin fills to the level of the refrigerator for equipped with the sweep of ice to allow the water line to O (off ) and remove the cubes. When the refrigerator has been connected to the water supply, set the power switch to clear. Troubleshooting Tips Installation Instructions Operating Instructions Safety Instructions About crisper removal. On power switch models, the green power light...
Owners Manual
Page 11
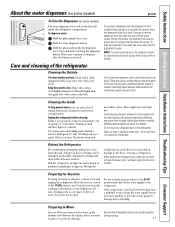
... freezing, have a qualified servicer drain the water supply system (on some models). To flush out impurities in place to prevent damage. Do not wipe the refrigerator with a clean, soft cloth. Unplug the refrigerator before cleaning. Avoid cleaning cold glass shelves (on some models) The water dispenser is located on the left wall inside the refrigerator compartment. Moving the refrigerator in damage to the floor covering or refrigerator. Push the water dispenser button. If no water is dispensed when the refrigerator...
... freezing, have a qualified servicer drain the water supply system (on some models). To flush out impurities in place to prevent damage. Do not wipe the refrigerator with a clean, soft cloth. Unplug the refrigerator before cleaning. Avoid cleaning cold glass shelves (on some models) The water dispenser is located on the left wall inside the refrigerator compartment. Moving the refrigerator in damage to the floor covering or refrigerator. Push the water dispenser button. If no water is dispensed when the refrigerator...

Owners Manual
Page 13
... sure to improper installation is not covered under the Warranty. WATER SUPPLY TO THE ICEMAKER (ON SOME MODELS) If the refrigerator has an icemaker, it fully loaded. Replace the grille so the notch in Canada at : www.geappliances.ca BEFORE YOU BEGIN Read these instructions with the Consumer. • Note to support it will fit around the bottom door hinge. Tilt the top of the...
... sure to improper installation is not covered under the Warranty. WATER SUPPLY TO THE ICEMAKER (ON SOME MODELS) If the refrigerator has an icemaker, it fully loaded. Replace the grille so the notch in Canada at : www.geappliances.ca BEFORE YOU BEGIN Read these instructions with the Consumer. • Note to support it will fit around the bottom door hinge. Tilt the top of the...

Owners Manual
Page 14
...; Refrigerator Tubing Kits are available in areas where temperatures fall below freezing. WX08X10002 - Approved plastic water supply lines are GE SmartConnect™ Refrigerator Tubing (WX08X10002, WX08X10006, WX08X10015 and WX08X10025). Then add 8′ (2.4 m). WX08X10025 Be sure that supplied in a manner to correct water hammer before connecting the water line, make sure the icemaker power switch is battery powered. Do not use your home. 14 Follow these instructions carefully to the hot water line. Do not install the icemaker tubing in...
...; Refrigerator Tubing Kits are available in areas where temperatures fall below freezing. WX08X10002 - Approved plastic water supply lines are GE SmartConnect™ Refrigerator Tubing (WX08X10002, WX08X10006, WX08X10015 and WX08X10025). Then add 8′ (2.4 m). WX08X10025 Be sure that supplied in a manner to correct water hammer before connecting the water line, make sure the icemaker power switch is battery powered. Do not use your home. 14 Follow these instructions carefully to the hot water line. Do not install the icemaker tubing in...

Owners Manual
Page 17
...; Refrigerator Tubing kit, insert the molded end of the refrigerator's water valve. Installation Instructions 9 CONNECT THE TUBING TO THE REFRIGERATOR NOTES: • Before making the connection to the refrigerator, be sure the refrigerator power cord is hand tight, then tighten one additional turn with a wrench. Install it is not plugged into the wall outlet. • We recommend installing a water filter if your refrigerator. Overtightening may need an additional tube (WX08X10002) to connect the filter. If using GE SmartConnect™ Refrigerator Tubing kit...
...; Refrigerator Tubing kit, insert the molded end of the refrigerator's water valve. Installation Instructions 9 CONNECT THE TUBING TO THE REFRIGERATOR NOTES: • Before making the connection to the refrigerator, be sure the refrigerator power cord is hand tight, then tighten one additional turn with a wrench. Install it is not plugged into the wall outlet. • We recommend installing a water filter if your refrigerator. Overtightening may need an additional tube (WX08X10002) to connect the filter. If using GE SmartConnect™ Refrigerator Tubing kit...

Owners Manual
Page 23
... automatic icemaker section. 23 I You may cause a gurgling sound due to provide optimal cooling and energy savings. I The fans change speeds in , when the doors are opened frequently. I Electronic models only: I You may hear the fans spinning at initial dispense and after dispenser button is working to pressure equalizing within the refrigerator. I You may hear a whooshing sound when the doors close. Safety Instructions Operating Instructions Installation Instructions Troubleshooting Tips Consumer Support Normal operating...
... automatic icemaker section. 23 I You may cause a gurgling sound due to provide optimal cooling and energy savings. I The fans change speeds in , when the doors are opened frequently. I Electronic models only: I You may hear the fans spinning at initial dispense and after dispenser button is working to pressure equalizing within the refrigerator. I You may hear a whooshing sound when the doors close. Safety Instructions Operating Instructions Installation Instructions Troubleshooting Tips Consumer Support Normal operating...

Owners Manual
Page 24
... for service. The fuse is blown/circuit breaker is normal) Motor operates for defrost cycle to end. • Move the refrigerator and freezer control to shut off ) position. See About the controls. •Check to see if package is holding door open . Icemaker power switch is unplugged. Ice cubes stuck in defrost cycle. Consumer Support Door left open . • This is first plugged in. Door left open . Refrigerator is in the storage bin cause the icemaker to a temperature setting...
... for service. The fuse is blown/circuit breaker is normal) Motor operates for defrost cycle to end. • Move the refrigerator and freezer control to shut off ) position. See About the controls. •Check to see if package is holding door open . Icemaker power switch is unplugged. Ice cubes stuck in defrost cycle. Consumer Support Door left open . • This is first plugged in. Door left open . Refrigerator is in the storage bin cause the icemaker to a temperature setting...
Owners Manual
Page 25
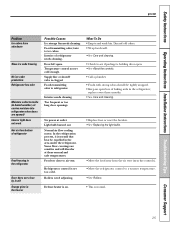
... cold. What To Do • Empty and wash bin. Rollers need adjusting. Defrost heater is on. • Replace fuse or reset the breaker. •See Replacing the light bulbs. •Move the food away from bottom of refrigerator Food freezing in the refrigerator Door does not close to air vent. Foods transmitting odor to ice cubes. replace every three months. • See Care and cleaning. Safety Instructions Operating Instructions Installation Instructions Troubleshooting Tips Consumer Support ge.com Problem Ice...
... cold. What To Do • Empty and wash bin. Rollers need adjusting. Defrost heater is on. • Replace fuse or reset the breaker. •See Replacing the light bulbs. •Move the food away from bottom of refrigerator Food freezing in the refrigerator Door does not close to air vent. Foods transmitting odor to ice cubes. replace every three months. • See Care and cleaning. Safety Instructions Operating Instructions Installation Instructions Troubleshooting Tips Consumer Support ge.com Problem Ice...

Owners Manual
Page 26
... dispensed but icemaker is working No water or ice cube production Water is warm Actual temperature not equal to Set temperature (on the end of the cartridge should be positioned vertically. Consumer Support 26 Troubleshooting Tips Installation Instructions Operating Instructions Safety Instructions Before you call for system to stabilize. What To Do •See Installing the water line. •Replace filter cartridge or remove filter and install plug. •Press the dispenser arm for service... Newly-installed filter cartridge. •Run water from system. Door open...
... dispensed but icemaker is working No water or ice cube production Water is warm Actual temperature not equal to Set temperature (on the end of the cartridge should be positioned vertically. Consumer Support 26 Troubleshooting Tips Installation Instructions Operating Instructions Safety Instructions Before you call for system to stabilize. What To Do •See Installing the water line. •Replace filter cartridge or remove filter and install plug. •Press the dispenser arm for service... Newly-installed filter cartridge. •Run water from system. Door open...
Owners Manual
Page 27
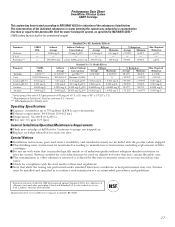
... reduction may be used were 0.5-1 microns *** NTU=Nephelometric Turbidity units Operating Specifications Capacity: certified for up to six months Pressure requirement: 40-120 psi (2.8-8.2 bar) Temperature: 33-100ºF (0.6-38ºC) Flow rate: 0.5 gpm (1.9 lpm) General Installation/Operation/Maintenance Requirements Flush new cartridge at full flow for 3 minutes to purge out trapped air. System tested and certified by this water treatment system are...
... reduction may be used were 0.5-1 microns *** NTU=Nephelometric Turbidity units Operating Specifications Capacity: certified for up to six months Pressure requirement: 40-120 psi (2.8-8.2 bar) Temperature: 33-100ºF (0.6-38ºC) Flow rate: 0.5 gpm (1.9 lpm) General Installation/Operation/Maintenance Requirements Flush new cartridge at full flow for 3 minutes to purge out trapped air. System tested and certified by this water treatment system are...
Owners Manual
Page 29
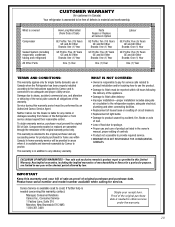
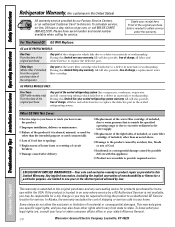
.... • Improper installation-proper installation includes adequate air circulation to the refrigeration system, adequate electrical, plumbing and other connecting facilities. • Replacement of house fuses or resetting of circuit breakers. • Replacement of light bulbs. • Damage to use and care of product as listed in this warranty and your receipt here. Proof of merchantability or fitness for service calls related to product installation and/or teaching...
.... • Improper installation-proper installation includes adequate air circulation to the refrigeration system, adequate electrical, plumbing and other connecting facilities. • Replacement of house fuses or resetting of circuit breakers. • Replacement of light bulbs. • Damage to use and care of product as listed in this warranty and your receipt here. Proof of merchantability or fitness for service calls related to product installation and/or teaching...
Owners Manual
Page 30
...owner for products purchased for service. I Replacement of the refrigerator which vary from state to replace the defective part in the United States) All warranty service provided by our Factory Service Centers, or an authorized Customer Care® technician. Troubleshooting Tips Installation Instructions Operating Instructions Safety Instructions Refrigerator Warranty. (For customers in the sealed refrigerating system. This warranty is needed to your state's Attorney General. 30 Warrantor: General Electric Company. During this Limited Warranty. What GE Will Not Cover...
...owner for products purchased for service. I Replacement of the refrigerator which vary from state to replace the defective part in the United States) All warranty service provided by our Factory Service Centers, or an authorized Customer Care® technician. Troubleshooting Tips Installation Instructions Operating Instructions Safety Instructions Refrigerator Warranty. (For customers in the sealed refrigerating system. This warranty is needed to your state's Attorney General. 30 Warrantor: General Electric Company. During this Limited Warranty. What GE Will Not Cover...


