Use and Care Manual
Page 2
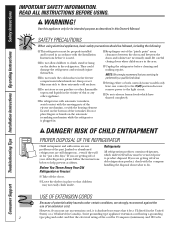
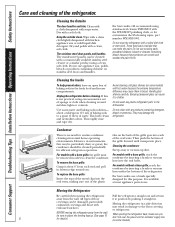
... is used. ■ Do not allow children to product disposal. Be careful closing doors when children are not problems of the past. Junked or abandoned refrigerators are getting rid of an old refrigeration product, check with the heating element located on the automatic icemaking mechanism while the refrigerator is absolutely necessary that it is plugged in accordance with the Installation Instructions before cleaning and making repairs...
... is used. ■ Do not allow children to product disposal. Be careful closing doors when children are not problems of the past. Junked or abandoned refrigerators are getting rid of an old refrigeration product, check with the heating element located on the automatic icemaking mechanism while the refrigerator is absolutely necessary that it is plugged in accordance with the Installation Instructions before cleaning and making repairs...
Use and Care Manual
Page 4
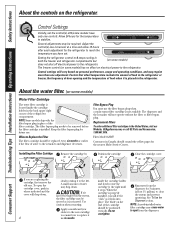
Setting the refrigerator control to 0 stops cooling in both the freezer and refrigerator compartments but (on electrical power to the icemaker and dispenser decreases. About the water filter. (on the end of the cartridge should be replaced every six months or earlier if the flow of water to the refrigerator. The filter bypass plug needs to Replace the Filter The filter cartridge should be positioned vertically. When to be removed before the filter cartridge is removed. Installing the Filter Cartridge Remove the cartridge by Position...
Setting the refrigerator control to 0 stops cooling in both the freezer and refrigerator compartments but (on electrical power to the icemaker and dispenser decreases. About the water filter. (on the end of the cartridge should be replaced every six months or earlier if the flow of water to the refrigerator. The filter bypass plug needs to Replace the Filter The filter cartridge should be positioned vertically. When to be removed before the filter cartridge is removed. Installing the Filter Cartridge Remove the cartridge by Position...
Use and Care Manual
Page 5
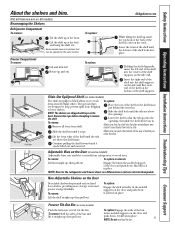
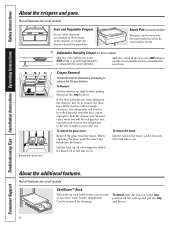
... Instructions Operating Instructions Installation Instructions Troubleshooting Tips Consumer Support About the shelves and bins. Not all features are designed to help prevent spills from refrigerator to remove the shelf. Rotate up ; The special edges are on the back. Slide the shelf out until it can be carried from dripping to side. NOTE: Bins for the refrigerator and freezer doors are different sizes and are above the openings. To replace: Engage the shelf...
... Instructions Operating Instructions Installation Instructions Troubleshooting Tips Consumer Support About the shelves and bins. Not all features are designed to help prevent spills from refrigerator to remove the shelf. Rotate up ; The special edges are on the back. Slide the shelf out until it can be carried from dripping to side. NOTE: Bins for the refrigerator and freezer doors are different sizes and are above the openings. To replace: Engage the shelf...
Use and Care Manual
Page 6
... replacing the glass, push the front edge firmly into the frame. ShelfSaver™ Rack This slide-out rack holds twelve cans of the drawers or under the drawers should be rolled forward until the door opens enough to provide high humidity recommended for most useful location for most fruits. Can be moved to remove the storage drawers. Consumer Support Troubleshooting Tips Installation Instructions Operating Instructions Safety Instructions...
... replacing the glass, push the front edge firmly into the frame. ShelfSaver™ Rack This slide-out rack holds twelve cans of the drawers or under the drawers should be rolled forward until the door opens enough to provide high humidity recommended for most useful location for most fruits. Can be moved to remove the storage drawers. Consumer Support Troubleshooting Tips Installation Instructions Operating Instructions Safety Instructions...
Use and Care Manual
Page 7
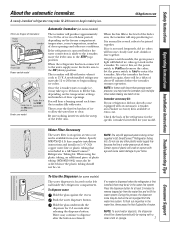
.... To dispense water: Hold the glass against the recess. Water may be a delay of plastic will stop producing ice. During this , set the power switch to clear. Once the icemaker starts to make ice, it cools to begin making ice cubes. Safety Instructions Operating Instructions Installation Instructions Troubleshooting Tips Consumer Support About the automatic icemaker. of water. When the refrigerator has been connected to the water supply, move the feeler arm to the level of icemakers: Power Switch Icemaker Green Power Light Feeler Arm Power switch model Feeler...
.... To dispense water: Hold the glass against the recess. Water may be a delay of plastic will stop producing ice. During this , set the power switch to clear. Once the icemaker starts to make ice, it cools to begin making ice cubes. Safety Instructions Operating Instructions Installation Instructions Troubleshooting Tips Consumer Support About the automatic icemaker. of water. When the refrigerator has been connected to the water supply, move the feeler arm to the level of icemakers: Power Switch Icemaker Green Power Light Feeler Arm Power switch model Feeler...
Use and Care Manual
Page 8
... these products can be cleaned with embossed surfaces. Consumer Support Troubleshooting Tips Installation Instructions Operating Instructions Safety Instructions Care and cleaning of the plastic tabs on stainless steel doors and handles. For best results, GE recommends using a clean, soft cloth. These may leave a residue that may cause them to break. about 6″ from the wall. Thoroughly rinse and wipe dry. For models with kitchen appliance wax or mild...
... these products can be cleaned with embossed surfaces. Consumer Support Troubleshooting Tips Installation Instructions Operating Instructions Safety Instructions Care and cleaning of the plastic tabs on stainless steel doors and handles. For best results, GE recommends using a clean, soft cloth. These may leave a residue that may cause them to break. about 6″ from the wall. Thoroughly rinse and wipe dry. For models with kitchen appliance wax or mild...

Use and Care Manual
Page 9
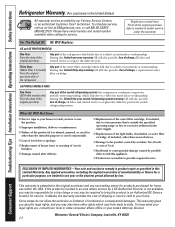
... the STOP (up) position (depending on model) and shut off ) does not remove power to the refrigerator. Be sure the refrigerator stays in . Setting either or both controls to 0 (off the water supply to the light circuit. Some models have a qualified servicer drain the water supply system (on some models) to prevent serious property damage due to the 0 (off . Replace with an appliance bulb of the freezer compartment. The bulb is located behind a light...
... the STOP (up) position (depending on model) and shut off ) does not remove power to the refrigerator. Be sure the refrigerator stays in . Setting either or both controls to 0 (off the water supply to the light circuit. Some models have a qualified servicer drain the water supply system (on some models) to prevent serious property damage due to the 0 (off . Replace with an appliance bulb of the freezer compartment. The bulb is located behind a light...
Use and Care Manual
Page 10
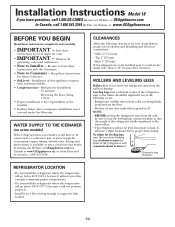
... adjust the leveling legs, turn the leveling legs counterclockwise so that the weight of the refrigerator is not covered under the Warranty. Installation Instructions Model 18 If you to Consumer - Refrigerator Installation 15 minutes Reversing the Door Swing 1 hour • Proper installation is the responsibility of the refrigerator and counterclockwise to improper installation is fully transferred to the front rollers. • The refrigerator will have to be installed next to a cold water line. A water supply kit...
... adjust the leveling legs, turn the leveling legs counterclockwise so that the weight of the refrigerator is not covered under the Warranty. Installation Instructions Model 18 If you to Consumer - Refrigerator Installation 15 minutes Reversing the Door Swing 1 hour • Proper installation is the responsibility of the refrigerator and counterclockwise to improper installation is fully transferred to the front rollers. • The refrigerator will have to be installed next to a cold water line. A water supply kit...
Use and Care Manual
Page 11
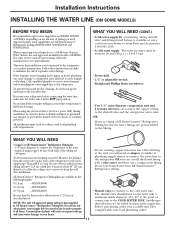
... instructions carefully to the refrigerator. For other plastic water supply line because the line is battery powered. WHAT YOU WILL NEED • Copper or GE SmartConnect™ Refrigerator Tubing kit, 1/4″ outer diameter to connect the refrigerator to the COLD WATER LINE. All installations must be sure both ends of the tubing are cut formed end from Parts and Accessories, 1.800.661.1616. • A cold water supply. Do not install the icemaker tubing in the STOP (up the water line...
... instructions carefully to the refrigerator. For other plastic water supply line because the line is battery powered. WHAT YOU WILL NEED • Copper or GE SmartConnect™ Refrigerator Tubing kit, 1/4″ outer diameter to connect the refrigerator to the COLD WATER LINE. All installations must be sure both ends of the tubing are cut formed end from Parts and Accessories, 1.800.661.1616. • A cold water supply. Do not install the icemaker tubing in the STOP (up the water line...
Use and Care Manual
Page 12
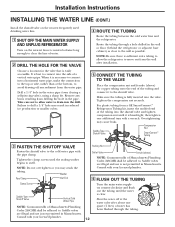
... pipe. Installation Instructions INSTALLING THE WATER LINE (CONT.) Install the shutoff valve on the nearest frequently used drinking water line. 1 SHUT OFF THE MAIN WATER SUPPLY AND UNPLUG REFRIGERATOR Turn on counterclockwise and flush out the tubing until the water is sufficient extra tubing to allow water to drain into the drill. Failure to . Saddle valves are illegal and use is hand-tight; then tighten one quart (1 liter) of the tubing and connect it...
... pipe. Installation Instructions INSTALLING THE WATER LINE (CONT.) Install the shutoff valve on the nearest frequently used drinking water line. 1 SHUT OFF THE MAIN WATER SUPPLY AND UNPLUG REFRIGERATOR Turn on counterclockwise and flush out the tubing until the water is sufficient extra tubing to allow water to drain into the drill. Failure to . Saddle valves are illegal and use is hand-tight; then tighten one quart (1 liter) of the tubing and connect it...
Use and Care Manual
Page 13
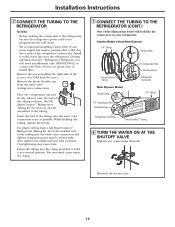
... refrigerator power cord is hand-tight; Install it is not plugged into the water valve connection and tighten compression nut until it in a vertical position. If using GE SmartConnect™ Refrigerator Tubing kit, you will need to pry open the clamp. 7 CONNECT THE TUBING TO THE REFRIGERATOR (CONT.) One of the tubing into the wall outlet. • We recommend installing a water filter if your refrigerator. Fold back the cover. For plastic tubing from the water valve (refrigerator connection...
... refrigerator power cord is hand-tight; Install it is not plugged into the water valve connection and tighten compression nut until it in a vertical position. If using GE SmartConnect™ Refrigerator Tubing kit, you will need to pry open the clamp. 7 CONNECT THE TUBING TO THE REFRIGERATOR (CONT.) One of the tubing into the wall outlet. • We recommend installing a water filter if your refrigerator. Fold back the cover. For plastic tubing from the water valve (refrigerator connection...
Use and Care Manual
Page 14
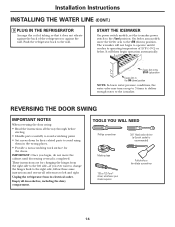
... ever want to change the hinges back to the ON (down ) position NOTE: In lower water pressure conditions, the water valve may turn on ) position. TOOLS YOU WILL NEED Phillips screwdriver 3/8″ Head socket driver (a 6-point socket is completed. START THE ICEMAKER On power switch models, set the icemaker power switch to the l (on up to 3 times to deliver enough water to operate until door-swing reversal is recommended) Masking...
... ever want to change the hinges back to the ON (down ) position NOTE: In lower water pressure conditions, the water valve may turn on ) position. TOOLS YOU WILL NEED Phillips screwdriver 3/8″ Head socket driver (a 6-point socket is completed. START THE ICEMAKER On power switch models, set the icemaker power switch to the l (on up to 3 times to deliver enough water to operate until door-swing reversal is recommended) Masking...
Use and Care Manual
Page 16
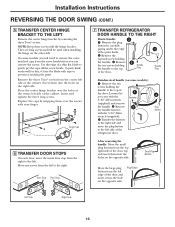
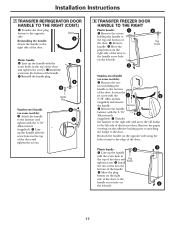
...; Allen wrench Fastener (supplied) and remove the handle. Move any screws from the left side of the cabinet. On some models): Remove the two screws holding the handle to gently pry the caps off the screw heads. (A putty knife works well for this.) Cover the blade with the hinge bracket. Door Stop Door Stop 7 TRANSFER REFRIGERATOR DOOR HANDLE TO THE RIGHT Plastic handle: 3 Remove the plug button by removing the three Torx...
...; Allen wrench Fastener (supplied) and remove the handle. Move any screws from the left side of the cabinet. On some models): Remove the two screws holding the handle to gently pry the caps off the screw heads. (A putty knife works well for this.) Cover the blade with the hinge bracket. Door Stop Door Stop 7 TRANSFER REFRIGERATOR DOOR HANDLE TO THE RIGHT Plastic handle: 3 Remove the plug button by removing the three Torx...
Use and Care Manual
Page 17
... the plug button on the right side of the door to the handle screw hole on the opposite side using the holes closest to the right side of the handle. Install the screw into the bottom of the freezer door. Loosen the set screw with the 3/16″ Allen wrench 1 (supplied). Remove handle. Reinstalling the handle: Attach the handle to the edge of the door. 1 Plastic handle: 3 Line...
... the plug button on the right side of the door to the handle screw hole on the opposite side using the holes closest to the right side of the handle. Install the screw into the bottom of the freezer door. Loosen the set screw with the 3/16″ Allen wrench 1 (supplied). Remove handle. Reinstalling the handle: Attach the handle to the edge of the door. 1 Plastic handle: 3 Line...
Use and Care Manual
Page 19
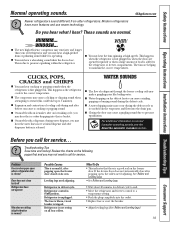
... cooling coils during water dispense, you call for defrost cycle to end. • Move the refrigerator and freezer control to pressure equalization. See Rollers and Leveling Legs. • See Rollers and Leveling Legs. • Wait about 40 minutes for service. Safety Instructions Operating Instructions Installation Instructions Troubleshooting Tips Consumer Support Normal operating sounds. CLICKS, POPS, CRACKS and CHIRPS ■ You may make a gurgling noise like boiling water. ■ Water dropping on the freezer door...
... cooling coils during water dispense, you call for defrost cycle to end. • Move the refrigerator and freezer control to pressure equalization. See Rollers and Leveling Legs. • See Rollers and Leveling Legs. • Wait about 40 minutes for service. Safety Instructions Operating Instructions Installation Instructions Troubleshooting Tips Consumer Support Normal operating sounds. CLICKS, POPS, CRACKS and CHIRPS ■ You may make a gurgling noise like boiling water. ■ Water dropping on the freezer door...
Use and Care Manual
Page 20
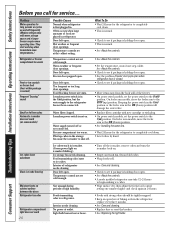
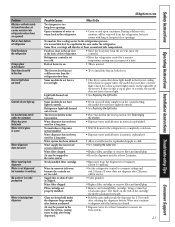
... the doors Refrigerator has odor Refrigerator compartment light does not work (on icemaker blinking.) Ice storage bin needs cleaning. Interior of food are placed in refrigerator. Interior needs cleaning. Door left open . Icemaker power switch is normal) Frequent "buzzing" sound Small or hollow cubes Automatic icemaker does not work 20 Ice cubes stuck in icemaker. (Green power light on some models) Possible Causes Normal when refrigerator is first plugged in the ON (down . • Level cubes by hand. Freezer compartment too warm. Temperature control not set cold enough...
... the doors Refrigerator has odor Refrigerator compartment light does not work (on icemaker blinking.) Ice storage bin needs cleaning. Interior of food are placed in refrigerator. Interior needs cleaning. Door left open . Icemaker power switch is normal) Frequent "buzzing" sound Small or hollow cubes Automatic icemaker does not work 20 Ice cubes stuck in icemaker. (Green power light on some models) Possible Causes Normal when refrigerator is first plugged in the ON (down . • Level cubes by hand. Freezer compartment too warm. Temperature control not set cold enough...
Use and Care Manual
Page 21
... the dispenser button. Filter cartridge not properly installed. Refrigerator control is opaque white, the model does not have lighted controls. • See Replacing the light bulbs. • Place the shelf in the water system. Water filter clogged. Newly-installed filter cartridge. Air may return with long or frequent door openings. If the dome is set too cold. Water may be expelled in the top position. The freezer shelf is frozen because the controls are a different size than the refrigerator door bins. Supply line or shutoff valve is...
... the dispenser button. Filter cartridge not properly installed. Refrigerator control is opaque white, the model does not have lighted controls. • See Replacing the light bulbs. • Place the shelf in the water system. Water filter clogged. Newly-installed filter cartridge. Air may return with long or frequent door openings. If the dome is set too cold. Water may be expelled in the top position. The freezer shelf is frozen because the controls are a different size than the refrigerator door bins. Supply line or shutoff valve is...
Use and Care Manual
Page 25
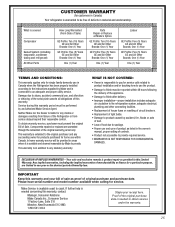
... Service Agent. Service during this warranty. This warranty is responsible to pay for service calls related to product installation and/or teaching how to use and care of product as proof of the original purchase date is needed to obtain service under the warranty. 25 WHAT IS NOT COVERED: • Owner is extended to the original purchaser and any statutory warranty. Please have serial number and model number...
... Service Agent. Service during this warranty. This warranty is responsible to pay for service calls related to product installation and/or teaching how to use and care of product as proof of the original purchase date is needed to obtain service under the warranty. 25 WHAT IS NOT COVERED: • Owner is extended to the original purchaser and any statutory warranty. Please have serial number and model number...
Use and Care Manual
Page 26
... in the water supply. ■ Replacement of charge, all connecting tubing) which fails due to obtain service under the warranty. Any implied warranties, including the implied warranties of the original purchase date is outside the specified operating range or due to excessive sediment in materials or workmanship. Warrantor: General Electric Company. Louisville, KY 40225 26 Consumer Support Troubleshooting Tips Installation Instructions Operating Instructions Safety Instructions Refrigerator Warranty. (For customers in materials or...
... in the water supply. ■ Replacement of charge, all connecting tubing) which fails due to obtain service under the warranty. Any implied warranties, including the implied warranties of the original purchase date is outside the specified operating range or due to excessive sediment in materials or workmanship. Warrantor: General Electric Company. Louisville, KY 40225 26 Consumer Support Troubleshooting Tips Installation Instructions Operating Instructions Safety Instructions Refrigerator Warranty. (For customers in materials or...
Use and Care Manual
Page 27
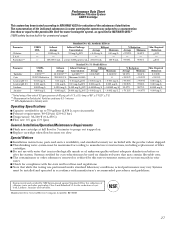
... Particles/ml. up to manufacturer's instructions, including replacement of filter cartridges. ■ Do not use with manufacturer's recommended procedures and guidelines. at full flow for 3 minutes to six months ■ Pressure requirement: 40-120 psi (2.8-8.2 bar) ■ Temperature: 33-100ºF (0.6-38ºC) ■ Flow rate: 0.5 gpm (1.9 lpm) General Installation/Operation/Maintenance Requirements ■ Flush new cartridge at least 10,000 particles...
... Particles/ml. up to manufacturer's instructions, including replacement of filter cartridges. ■ Do not use with manufacturer's recommended procedures and guidelines. at full flow for 3 minutes to six months ■ Pressure requirement: 40-120 psi (2.8-8.2 bar) ■ Temperature: 33-100ºF (0.6-38ºC) ■ Flow rate: 0.5 gpm (1.9 lpm) General Installation/Operation/Maintenance Requirements ■ Flush new cartridge at least 10,000 particles...

