Use and Care Manual
Page 1
... Serial Find these instructions for U.S. Nota al instalador - Be sure to Install the Refrigerator 12 Reversing the Door Swing . . . .21-25 Water Line Installation 17-21 Troubleshooting Tips 26-29 Normal Operating Sounds 26 Consumer Support Consumer Support . . . . .Back Cover Warranty for Canadian Customers 30 Warranty for future reference. Refr Top-Freezer igerators GEAppliances.com Safety Instructions 2-4 Operating Instructions Automatic Icemaker 9 Controls 5 Crispers and Pans 7, 8 Shelves and Bins 6 Care and Cleaning Care and Cleaning 10, 11 Replacing the Light Bulb...
... Serial Find these instructions for U.S. Nota al instalador - Be sure to Install the Refrigerator 12 Reversing the Door Swing . . . .21-25 Water Line Installation 17-21 Troubleshooting Tips 26-29 Normal Operating Sounds 26 Consumer Support Consumer Support . . . . .Back Cover Warranty for Canadian Customers 30 Warranty for future reference. Refr Top-Freezer igerators GEAppliances.com Safety Instructions 2-4 Operating Instructions Automatic Icemaker 9 Controls 5 Crispers and Pans 7, 8 Shelves and Bins 6 Care and Cleaning Care and Cleaning 10, 11 Replacing the Light Bulb...
Use and Care Manual
Page 2
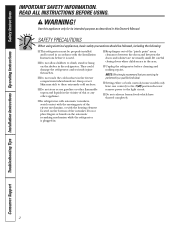
... store or use gasoline or other flammable vapors and liquids in . ■ Keep fingers out of the ejector mechanism, or with the Installation Instructions before cleaning and making repairs. Use this Owner's Manual. NOTE: We strongly recommend that any other appliance. ■ In refrigerators with automatic icemakers, avoid contact with the moving parts of the "pinch point" areas; Consumer Support Troubleshooting Tips Installation Instructions Operating Instructions Safety Instructions IMPORTANT...
... store or use gasoline or other flammable vapors and liquids in . ■ Keep fingers out of the ejector mechanism, or with the Installation Instructions before cleaning and making repairs. Use this Owner's Manual. NOTE: We strongly recommend that any other appliance. ■ In refrigerators with automatic icemakers, avoid contact with the moving parts of the "pinch point" areas; Consumer Support Troubleshooting Tips Installation Instructions Operating Instructions Safety Instructions IMPORTANT...

Use and Care Manual
Page 3
... type plug and outlet and that children may not easily climb inside. RISK OF CHILD ENTRAPMENT PROPER DISPOSAL OF THE REFRIGERATOR Child entrapment and suffocation are getting rid of an extension cord. USE OF EXTENSION CORDS Because of potential safety hazards under federal law must use of your old refrigerator, please follow the instructions below to product disposal. Safety Instructions Operating Instructions Installation Instructions Troubleshooting...
... type plug and outlet and that children may not easily climb inside. RISK OF CHILD ENTRAPMENT PROPER DISPOSAL OF THE REFRIGERATOR Child entrapment and suffocation are getting rid of an extension cord. USE OF EXTENSION CORDS Because of potential safety hazards under federal law must use of your old refrigerator, please follow the instructions below to product disposal. Safety Instructions Operating Instructions Installation Instructions Troubleshooting...
Use and Care Manual
Page 8
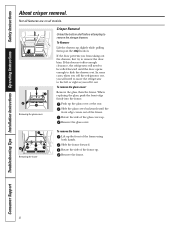
... the stop location. Removing the frame To remove the frame: Lift up . Remove the frame. 8 Consumer Support Troubleshooting Tips Installation Instructions Operating Instructions Safety Instructions About crisper removal. When replacing the glass, push the front edge firmly into the frame. Slide the frame forward. Slide the glass cover backwards until the door opens enough to remove the storage drawers. Rotate the side of the frame up the front of the frame using both...
... the stop location. Removing the frame To remove the frame: Lift up . Remove the frame. 8 Consumer Support Troubleshooting Tips Installation Instructions Operating Instructions Safety Instructions About crisper removal. When replacing the glass, push the front edge firmly into the frame. Slide the frame forward. Slide the glass cover backwards until the door opens enough to remove the storage drawers. Rotate the side of the frame up the front of the frame using both...
Use and Care Manual
Page 9
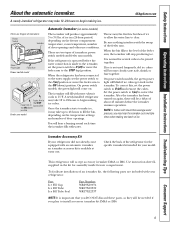
...be needed for assembly inside freezer compartment. Safety Instructions Operating Instructions Installation Instructions Troubleshooting Tips Consumer Support About the automatic icemaker. To correct this, set the power switch to the level of icemakers: Power Switch Icemaker Green Power Light Feeler Arm Power switch model Feeler Arm in the STOP Feeler Arm in the kit for your refrigerator: Part Ice Fill Cup Ice Fill Tube Ice Fill Tube Seal Part Number WR29X10074 WR17X12339 WR17X12337 NOTE: It is not used frequently, old ice cubes will stop producing ice. Check...
...be needed for assembly inside freezer compartment. Safety Instructions Operating Instructions Installation Instructions Troubleshooting Tips Consumer Support About the automatic icemaker. To correct this, set the power switch to the level of icemakers: Power Switch Icemaker Green Power Light Feeler Arm Power switch model Feeler Arm in the STOP Feeler Arm in the kit for your refrigerator: Part Ice Fill Cup Ice Fill Tube Ice Fill Tube Seal Part Number WR29X10074 WR17X12339 WR17X12337 NOTE: It is not used frequently, old ice cubes will stop producing ice. Check...
Use and Care Manual
Page 10
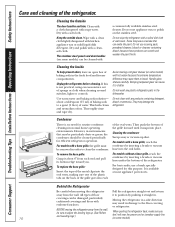
Dry and polish with hot water because the extreme temperature difference may cause them to break. Cleaning the Inside To help prevent odors, leave an open box of water. about 6″ from the wall, be damaged, particularly cushioned coverings and those with any plastic refrigerator parts in the fresh food and freezer compartments. Avoid cleaning cold glass shelves (on some models) with a clean, soft cloth. Do not...
Dry and polish with hot water because the extreme temperature difference may cause them to break. Cleaning the Inside To help prevent odors, leave an open box of water. about 6″ from the wall, be damaged, particularly cushioned coverings and those with any plastic refrigerator parts in the fresh food and freezer compartments. Avoid cleaning cold glass shelves (on some models) with a clean, soft cloth. Do not...
Use and Care Manual
Page 11
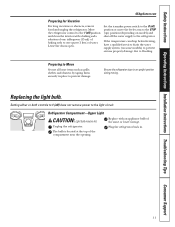
... the feeler arm to the STOP (up) position (depending on some models) to prevent serious property damage due to one quart (1 liter) of the compartment near the opening. The bulb is located at the top of water. Move the refrigerator control to the refrigerator. Leave the doors open. Be sure the refrigerator stays in . 11 Safety Instructions Operating Instructions Installation Instructions Troubleshooting Tips Consumer Support GEAppliances.com Preparing for Vacation...
... the feeler arm to the STOP (up) position (depending on some models) to prevent serious property damage due to one quart (1 liter) of the compartment near the opening. The bulb is located at the top of water. Move the refrigerator control to the refrigerator. Leave the doors open. Be sure the refrigerator stays in . 11 Safety Instructions Operating Instructions Installation Instructions Troubleshooting Tips Consumer Support GEAppliances.com Preparing for Vacation...
Use and Care Manual
Page 12
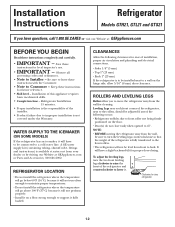
... on the floor. • Door(s) do not close easily when opened to a cold water line. ROLLERS AND LEVELING LEGS Rollers allow 5/16″ (8 mm) door clearance. Installation of the installer. • Product failure due to improper installation is not covered under the Warranty. WATER SUPPLY TO THE ICEMAKER (ON SOME MODELS) If the refrigerator has an icemaker, it will not perform properly. • Install it on a floor strong enough...
... on the floor. • Door(s) do not close easily when opened to a cold water line. ROLLERS AND LEVELING LEGS Rollers allow 5/16″ (8 mm) door clearance. Installation of the installer. • Product failure due to improper installation is not covered under the Warranty. WATER SUPPLY TO THE ICEMAKER (ON SOME MODELS) If the refrigerator has an icemaker, it will not perform properly. • Install it on a floor strong enough...
Use and Care Manual
Page 13
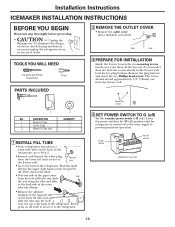
... WILL NEED Flat blade and Phillips screwdrivers Pliers PARTS INCLUDED 2 REMOVE THE OUTLET COVER • Remove the outlet cover with a flat-blade screwdriver. DESCRIPTION 1 Water Fill Tube 2 Ice Fill Guide 3 Water Fill Tube Seal 3 QUANTITY 1 1 1 1 INSTALL FILL TUBE • If the refrigerator already has a water tube inlet on the back of the freezer wall. Power Switch Hole for two plug buttons. The screws should extend approximately 1/2″ (13mm) out from the lower left...
... WILL NEED Flat blade and Phillips screwdrivers Pliers PARTS INCLUDED 2 REMOVE THE OUTLET COVER • Remove the outlet cover with a flat-blade screwdriver. DESCRIPTION 1 Water Fill Tube 2 Ice Fill Guide 3 Water Fill Tube Seal 3 QUANTITY 1 1 1 1 INSTALL FILL TUBE • If the refrigerator already has a water tube inlet on the back of the freezer wall. Power Switch Hole for two plug buttons. The screws should extend approximately 1/2″ (13mm) out from the lower left...
Use and Care Manual
Page 17
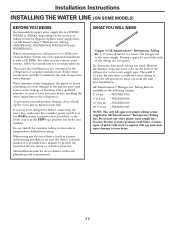
... these instructions carefully to minimize the risk of the refrigerator to a GE Reverse Osmosis Water System, the only approved installation is in GE SmartConnect™ Refrigerator Tubing kits. Call a qualified plumber to correct water hammer before connecting the water line, make sure the icemaker power switch is in the O (off) position (on power switch models) or the feeler arm is with local plumbing code requirements. To prevent burns and product damage, do not hook...
... these instructions carefully to minimize the risk of the refrigerator to a GE Reverse Osmosis Water System, the only approved installation is in GE SmartConnect™ Refrigerator Tubing kits. Call a qualified plumber to correct water hammer before connecting the water line, make sure the icemaker power switch is in the O (off) position (on power switch models) or the feeler arm is with local plumbing code requirements. To prevent burns and product damage, do not hook...
Use and Care Manual
Page 18
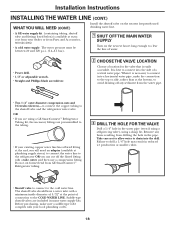
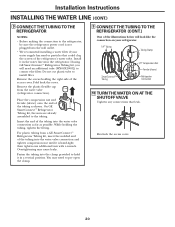
... refrigerator water valve. Before purchasing, make the connection to the top or side, rather than at extra cost from your dealer or from drilling the hole in reduced ice production or smaller cubes. • Shutoff valve to connect to the cold water line. Installation Instructions INSTALLING THE WATER LINE (CONT.) WHAT YOU WILL NEED (CONT.) Install the shutoff valve on the nearest faucet long enough to clear the line of water. • Power...
... refrigerator water valve. Before purchasing, make the connection to the top or side, rather than at extra cost from your dealer or from drilling the hole in reduced ice production or smaller cubes. • Shutoff valve to connect to the cold water line. Installation Instructions INSTALLING THE WATER LINE (CONT.) WHAT YOU WILL NEED (CONT.) Install the shutoff valve on the nearest faucet long enough to clear the line of water. • Power...
Use and Care Manual
Page 19
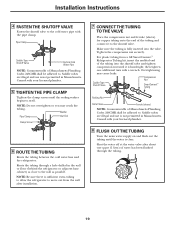
... about one additional turn with the pipe clamp. Overtightening may crush the tubing. Shut the water off at the water valve after installation. 7 CONNECT THE TUBING TO THE VALVE Place the compression nut and ferrule (sleeve) for copper tubing onto the end of the tubing and connect it is sufficient extra tubing to allow the refrigerator to move out from a GE SmartConnect™ Refrigerator Tubing kit, insert the molded...
... about one additional turn with the pipe clamp. Overtightening may crush the tubing. Shut the water off at the water valve after installation. 7 CONNECT THE TUBING TO THE VALVE Place the compression nut and ferrule (sleeve) for copper tubing onto the end of the tubing and connect it is sufficient extra tubing to allow the refrigerator to move out from a GE SmartConnect™ Refrigerator Tubing kit, insert the molded...
Use and Care Manual
Page 20
... cover. Remove the plastic flexible cap from a GE SmartConnect™ Refrigerator Tubing kit, insert the molded end of the tubing into the wall outlet. • We recommend installing a water filter if your refrigerator. 1/4″ Tubing Tubing Clamp SmartConnect™ Tubing 1/4″ Compression Nut Ferrule (sleeve) Refrigerator Connection 10 TURN THE WATER ON AT THE SHUTOFF VALVE Tighten any connections that could clog the screen of the access cover. Installation Instructions INSTALLING THE WATER LINE (CONT.) 9 CONNECT THE TUBING...
... cover. Remove the plastic flexible cap from a GE SmartConnect™ Refrigerator Tubing kit, insert the molded end of the tubing into the wall outlet. • We recommend installing a water filter if your refrigerator. 1/4″ Tubing Tubing Clamp SmartConnect™ Tubing 1/4″ Compression Nut Ferrule (sleeve) Refrigerator Connection 10 TURN THE WATER ON AT THE SHUTOFF VALVE Tighten any connections that could clog the screen of the access cover. Installation Instructions INSTALLING THE WATER LINE (CONT.) 9 CONNECT THE TUBING...
Use and Care Manual
Page 21
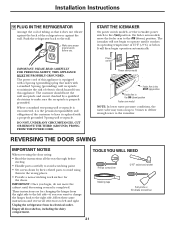
... is encountered, it reaches its electrical outlet. It will not begin to operate until door-swing reversal is equipped with a 3-prong (grounding) plug that it replaced with a properly grounded 3-prong wall receptacle. Power switch Power switch model Feeler Arm in the STOP (up to 3 times to deliver enough water to the icemaker. Make sure proper ground exists before starting. • Handle parts carefully to avoid scratching paint. •...
... is encountered, it reaches its electrical outlet. It will not begin to operate until door-swing reversal is equipped with a 3-prong (grounding) plug that it replaced with a properly grounded 3-prong wall receptacle. Power switch Power switch model Feeler Arm in the STOP (up to 3 times to deliver enough water to the icemaker. Make sure proper ground exists before starting. • Handle parts carefully to avoid scratching paint. •...
Use and Care Manual
Page 26
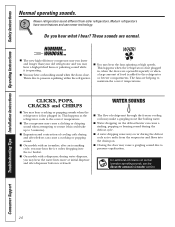
... hear the ice cubes dropping into the drain pan. ■ Closing the door may hear the water lines move at high speeds. WHOOSH... ■ The new high efficiency compressor may run faster and longer than your old refrigerator and you may cause a gurgling sound due to the refrigerator or freezer compartments. This happens as the refrigerator cools to the correct temperature. ■ The compressor may cause...
... hear the ice cubes dropping into the drain pan. ■ Closing the door may hear the water lines move at high speeds. WHOOSH... ■ The new high efficiency compressor may run faster and longer than your old refrigerator and you may cause a gurgling sound due to the refrigerator or freezer compartments. This happens as the refrigerator cools to the correct temperature. ■ The compressor may cause...
Use and Care Manual
Page 27
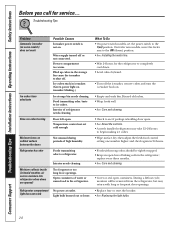
... control in . Temperature controls set cold enough. Warm weather or frequent door openings. Freezer door popped open , the rollers need adjusting. Icemaker power switch is first plugged in 1 (off frequently (Modern refrigerators with plug. 27 Review the charts on its own. See Rollers and Leveling Legs. •See Rollers and Leveling Legs. Normal when refrigerator is in the I (on the freezer door. Safety Instructions Operating Instructions Installation Instructions Troubleshooting Tips Consumer Support Before you may not need to call for service... Troubleshooting...
... control in . Temperature controls set cold enough. Warm weather or frequent door openings. Freezer door popped open , the rollers need adjusting. Icemaker power switch is first plugged in 1 (off frequently (Modern refrigerators with plug. 27 Review the charts on its own. See Rollers and Leveling Legs. •See Rollers and Leveling Legs. Normal when refrigerator is in the I (on the freezer door. Safety Instructions Operating Instructions Installation Instructions Troubleshooting Tips Consumer Support Before you may not need to call for service... Troubleshooting...
Use and Care Manual
Page 28
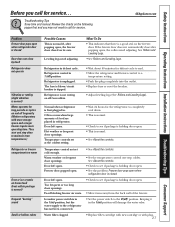
... Support Troubleshooting Tips Installation Instructions Operating Instructions Safety Instructions Before you call for the refrigerator to completely cool down ) position. •See Installing the water line. •Wait 24 hours for service... Troubleshooting Tips Problem Automatic icemaker (on some models) does not work Possible Causes Icemaker power switch is holding door open box of water or warm food in 24 hours. • Foods with long or frequent door openings. •Replace fuse or reset the breaker. •See Replacing the light bulbs...
... Support Troubleshooting Tips Installation Instructions Operating Instructions Safety Instructions Before you call for the refrigerator to completely cool down ) position. •See Installing the water line. •Wait 24 hours for service... Troubleshooting Tips Problem Automatic icemaker (on some models) does not work Possible Causes Icemaker power switch is holding door open box of water or warm food in 24 hours. • Foods with long or frequent door openings. •Replace fuse or reset the breaker. •See Replacing the light bulbs...
Use and Care Manual
Page 29
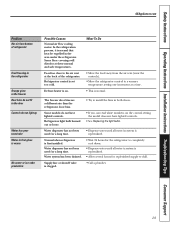
...The freezer door bins are a different size than the refrigerator door bins. Refrigerator light bulb burned out or loose. Water dispenser has not been used for a long time. Defrost heater is on the control setting, the model does not have lighted controls. Safety Instructions Operating Instructions Installation Instructions Troubleshooting Tips Consumer Support GEAppliances.com Problem Hot air from the air vent (near the controls). •Move the refrigerator control to a warmer temperature setting one increment at a time. • This is normal. Water system has been drained.
...The freezer door bins are a different size than the refrigerator door bins. Refrigerator light bulb burned out or loose. Water dispenser has not been used for a long time. Defrost heater is on the control setting, the model does not have lighted controls. Safety Instructions Operating Instructions Installation Instructions Troubleshooting Tips Consumer Support GEAppliances.com Problem Hot air from the air vent (near the controls). •Move the refrigerator control to a warmer temperature setting one increment at a time. • This is normal. Water system has been drained.
Use and Care Manual
Page 30
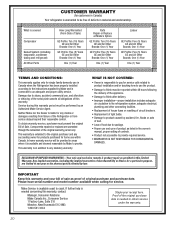
... and is connected to an adequate and proper utility service. Please have serial number and model number available when calling for service. In home warranty service will be provided in this Limited Warranty. Mabe Service is available coast to coast. If further help is needed to obtain service under the warranty. 30 Damage due to abuse, accident, commercial use in the owner's manual, proper setting of controls. • Product...
... and is connected to an adequate and proper utility service. Please have serial number and model number available when calling for service. In home warranty service will be provided in this Limited Warranty. Mabe Service is available coast to coast. If further help is needed to obtain service under the warranty. 30 Damage due to abuse, accident, commercial use in the owner's manual, proper setting of controls. • Product...
Use and Care Manual
Page 31
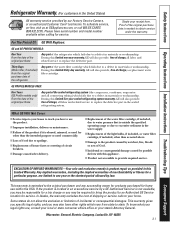
..., free of God. ■ Incidental or consequential damage caused by law. EXCLUSION OF IMPLIED WARRANTIES-Your sole and exclusive remedy is needed to replace the defective part. Warrantor: General Electric Company. Louisville, KY 40225 31 Safety Instructions Operating Instructions Installation Instructions Troubleshooting Tips Consumer Support Refrigerator Warranty. (For customers in this Limited Warranty. Please have other than as provided in the United States) All warranty service provided by a GE Authorized Servicer is located...
..., free of God. ■ Incidental or consequential damage caused by law. EXCLUSION OF IMPLIED WARRANTIES-Your sole and exclusive remedy is needed to replace the defective part. Warrantor: General Electric Company. Louisville, KY 40225 31 Safety Instructions Operating Instructions Installation Instructions Troubleshooting Tips Consumer Support Refrigerator Warranty. (For customers in this Limited Warranty. Please have other than as provided in the United States) All warranty service provided by a GE Authorized Servicer is located...


