Use and Care Manual
Page 1
... - Refr Top-Freezer igerators GEAppliances.com Safety Instructions 2-4 Operating Instructions Automatic Icemaker 9 Controls 5 Crispers and Pans 7, 8 Shelves and Bins 6 Care and Cleaning Care and Cleaning 10, 11 Replacing the Light Bulb 11 Installation Instructions Icemaker Installation 13-16 Preparing to Installer - Note to Install the Refrigerator 12 Reversing the Door Swing . . . .21-25 Water...
... - Refr Top-Freezer igerators GEAppliances.com Safety Instructions 2-4 Operating Instructions Automatic Icemaker 9 Controls 5 Crispers and Pans 7, 8 Shelves and Bins 6 Care and Cleaning Care and Cleaning 10, 11 Replacing the Light Bulb 11 Installation Instructions Icemaker Installation 13-16 Preparing to Installer - Note to Install the Refrigerator 12 Reversing the Door Swing . . . .21-25 Water...
Use and Care Manual
Page 2
...using electrical appliances, basic safety precautions should be followed, including the following: ■ This refrigerator must be performed by a qualified individual. ■ Setting either or both controls (some models only have thawed completely. 2 clearances between the doors and between the doors and cabinet ...; Use this Owner's Manual. They could damage the refrigerator and seriously injure themselves. ■ Do not touch the cold surfaces in this appliance only for its intended purpose as described in the freezer compartment when hands are damp or wet. Consumer Support ...
...using electrical appliances, basic safety precautions should be followed, including the following: ■ This refrigerator must be performed by a qualified individual. ■ Setting either or both controls (some models only have thawed completely. 2 clearances between the doors and between the doors and cabinet ...; Use this Owner's Manual. They could damage the refrigerator and seriously injure themselves. ■ Do not touch the cold surfaces in this appliance only for its intended purpose as described in the freezer compartment when hands are damp or wet. Consumer Support ...
Use and Care Manual
Page 5
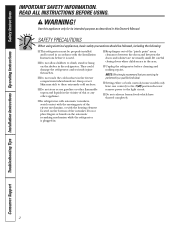
..., and may be required. Several adjustments may require more than one adjustment. Setting the refrigerator control to 1 stops cooling in the refrigerator. 5 The freezer control (on some models) has no effect on the refrigerator. Control settings will vary based on your refrigerator will look like one increment at 4. Safety Instructions Operating Instructions Installation Instructions Troubleshooting Tips...
..., and may be required. Several adjustments may require more than one adjustment. Setting the refrigerator control to 1 stops cooling in the refrigerator. 5 The freezer control (on some models) has no effect on the refrigerator. Control settings will vary based on your refrigerator will look like one increment at 4. Safety Instructions Operating Instructions Installation Instructions Troubleshooting Tips...
Use and Care Manual
Page 6
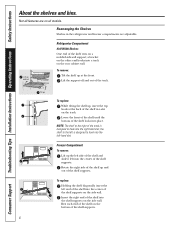
Not all models. To remove: Tilt the shelf up and out of the shelf supports on the side wall. Lower...of the shelf into place. To replace: Holding the shelf diagonally, insert the left end of the shelf in the refrigerator and freezer compartments are on the bottom of the track. Rest each end of the shelf on all features are adjustable. Lift up ..., insert the top hook at the front. a bracket on the other end hooks into the shelf supports on the rear ...
Not all models. To remove: Tilt the shelf up and out of the shelf supports on the side wall. Lower...of the shelf into place. To replace: Holding the shelf diagonally, insert the left end of the shelf in the refrigerator and freezer compartments are on the bottom of the track. Rest each end of the shelf on all features are adjustable. Lift up ..., insert the top hook at the front. a bracket on the other end hooks into the shelf supports on the rear ...
Use and Care Manual
Page 7
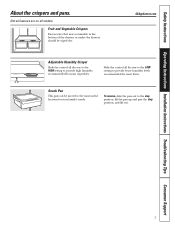
... to the stop position, lift the pan up and past the stop position, and lift out. 7 GEAppliances.com Adjustable Humidity Crisper Slide the control all models.
... to the stop position, lift the pan up and past the stop position, and lift out. 7 GEAppliances.com Adjustable Humidity Crisper Slide the control all models.
Use and Care Manual
Page 8
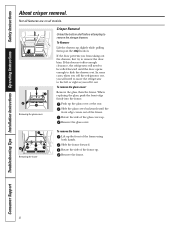
...the frame forward. Not all features are on all models. Removing the glass cover Crisper Removal Unload the bottom shelf before attempting to remove the door bins. In some cases, when you roll the refrigerator out, you will need to move the refrigerator to the left or right as you from taking... drawers. To Remove: Lift the drawers up slightly while pulling them past the stop location. If this does not offer enough clearance, the refrigerator will need to be rolled forward until the front edge comes out of the frame using both hands. Slide the glass cover backwards until the...
...the frame forward. Not all features are on all models. Removing the glass cover Crisper Removal Unload the bottom shelf before attempting to remove the door bins. In some cases, when you roll the refrigerator out, you will need to move the refrigerator to the left or right as you from taking... drawers. To Remove: Lift the drawers up slightly while pulling them past the stop location. If this does not offer enough clearance, the refrigerator will need to be rolled forward until the front edge comes out of the frame using both hands. Slide the glass cover backwards until the...
Use and Care Manual
Page 9
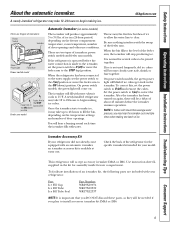
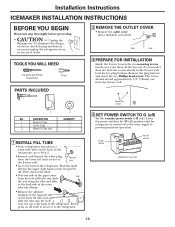
...Fill Cup Ice Fill Tube Ice Fill Tube Seal Part Number WR29X10074 WR17X12339 WR17X12337 NOTE: It is normal for your model. GEAppliances.com There are 2 types of the refrigerator for the specific icemaker kit needed if you may take up ) position the ON (down ) position. Throw... of an icemaker kit, the following parts are two types of ice in the kit for assembly inside freezer compartment. of icemakers: power switch models and feeler arm models. To correct this, set the power switch to the level of ice. Safety Instructions Operating Instructions Installation Instructions...
...Fill Cup Ice Fill Tube Ice Fill Tube Seal Part Number WR29X10074 WR17X12339 WR17X12337 NOTE: It is normal for your model. GEAppliances.com There are 2 types of the refrigerator for the specific icemaker kit needed if you may take up ) position the ON (down ) position. Throw... of an icemaker kit, the following parts are two types of ice in the kit for assembly inside freezer compartment. of icemakers: power switch models and feeler arm models. To correct this, set the power switch to the level of ice. Safety Instructions Operating Instructions Installation Instructions...
Use and Care Manual
Page 10
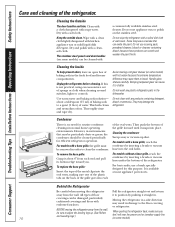
... soda in the dishwasher. Clean with a cloth dampened with any plastic refrigerator parts in the fresh food and freezer compartments. Do not use appliance wax or polish on some models) can scratch and weaken the paint finish. Moving the refrigerator in a side direction may be particularly dusty or greasy, the condenser... the base grille: Insert the tops of the metal clips into the oval vents, making sure one of the grille goes into each end and pull its bottom edge toward you don't roll over the power cord or icemaker supply line (on some models). The stainless steel panels and...
... soda in the dishwasher. Clean with a cloth dampened with any plastic refrigerator parts in the fresh food and freezer compartments. Do not use appliance wax or polish on some models) can scratch and weaken the paint finish. Moving the refrigerator in a side direction may be particularly dusty or greasy, the condenser... the base grille: Insert the tops of the metal clips into the oval vents, making sure one of the grille goes into each end and pull its bottom edge toward you don't roll over the power cord or icemaker supply line (on some models). The stainless steel panels and...
Use and Care Manual
Page 11
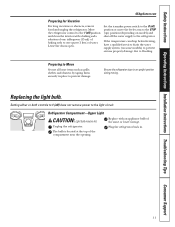
...Unplug the refrigerator. Set the icemaker power switch to the O (off) position or move the feeler arm to the STOP (up) position (depending on some models) to prevent serious property damage due to the light circuit. Be sure the refrigerator stays in . 11 The bulb is located at the top of water.... Plug the refrigerator back in an upright position during moving. Replacing the light bulb....
...Unplug the refrigerator. Set the icemaker power switch to the O (off) position or move the feeler arm to the STOP (up) position (depending on some models) to prevent serious property damage due to the light circuit. Be sure the refrigerator stays in . 11 The bulb is located at the top of water.... Plug the refrigerator back in an upright position during moving. Replacing the light bulb....
Use and Care Manual
Page 12
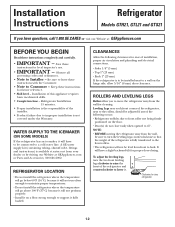
... legs counterclockwise so that the weight of the refrigerator and counterclockwise to lower it. WATER SUPPLY TO THE ICEMAKER (ON SOME MODELS) If the refrigerator has an icemaker, it will have to be...GE.CARES or visit our Website at: GEAppliances.com BEFORE YOU BEGIN Read these instructions for future reference. • Skill level - Save these instructions completely and carefully. • IMPORTANT - CLEARANCES Allow the following clearances for ease of installation, proper air circulation and plumbing and electrical connections. • Sides 1/8″ (3 mm) • Top...
... legs counterclockwise so that the weight of the refrigerator and counterclockwise to lower it. WATER SUPPLY TO THE ICEMAKER (ON SOME MODELS) If the refrigerator has an icemaker, it will have to be...GE.CARES or visit our Website at: GEAppliances.com BEFORE YOU BEGIN Read these instructions for future reference. • Skill level - Save these instructions completely and carefully. • IMPORTANT - CLEARANCES Allow the following clearances for ease of installation, proper air circulation and plumbing and electrical connections. • Sides 1/8″ (3 mm) • Top...
Use and Care Manual
Page 13
...If your model does not have the screws already in the freezer wall, look for wire tie (Appearance may vary) 13 Then discard the label. • Peel one side of the paper away Seal from its electrical outlet. To eliminate the danger of electric shock during installation, you must unplug the refrigerator from ...the opposite side of the water fill tube seal and slide the tube into the hole near the top at the back of the freezer wall. Remove plug • Go to the back of the refrigerator, go to secure it off. Leave the power switch in the upper right hand corner and peel...
...If your model does not have the screws already in the freezer wall, look for wire tie (Appearance may vary) 13 Then discard the label. • Peel one side of the paper away Seal from its electrical outlet. To eliminate the danger of electric shock during installation, you must unplug the refrigerator from ...the opposite side of the water fill tube seal and slide the tube into the hole near the top at the back of the freezer wall. Remove plug • Go to the back of the refrigerator, go to secure it off. Leave the power switch in the upper right hand corner and peel...
Use and Care Manual
Page 17
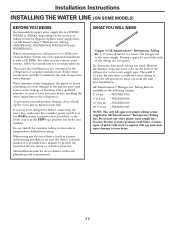
... the manufacturer's recommendations. Installation Instructions INSTALLING THE WATER LINE (ON SOME MODELS) BEFORE YOU BEGIN Recommended copper water supply kits are cut square. Follow these instructions carefully to the water supply. Water hammer (water banging in the pipes) in GE SmartConnect™ Refrigerator Tubing kits. Then add 8′ (2.4 m). WX08X10015 25′ (7.6 m) - WX08X10025 NOTE...
... the manufacturer's recommendations. Installation Instructions INSTALLING THE WATER LINE (ON SOME MODELS) BEFORE YOU BEGIN Recommended copper water supply kits are cut square. Follow these instructions carefully to the water supply. Water hammer (water banging in the pipes) in GE SmartConnect™ Refrigerator Tubing kits. Then add 8′ (2.4 m). WX08X10015 25′ (7.6 m) - WX08X10025 NOTE...
Use and Care Manual
Page 21
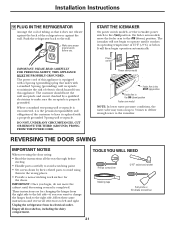
...(down ) position Feeler arm model NOTE: In lower water pressure conditions, the water valve may turn on ) position. The power cord of this appliance. It will not begin operation automatically. Unplug the refrigerator from its operating temperature of ...the doors. Where a standard two-prong wall receptacle is encountered, it does not vibrate against the wall. Push the refrigerator back to avoid using them in the ON (down ) position. Make sure proper ground exists before starting. •...″ socket and ratchet Masking tape Putty knife or thin-blade screwdriver 21
...(down ) position Feeler arm model NOTE: In lower water pressure conditions, the water valve may turn on ) position. The power cord of this appliance. It will not begin operation automatically. Unplug the refrigerator from its operating temperature of ...the doors. Where a standard two-prong wall receptacle is encountered, it does not vibrate against the wall. Push the refrigerator back to avoid using them in the ON (down ) position. Make sure proper ground exists before starting. •...″ socket and ratchet Masking tape Putty knife or thin-blade screwdriver 21
Use and Care Manual
Page 22
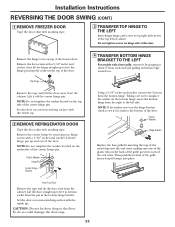
... surface with the inside up and out of cabinet. Lift the hinge pin up . 2 REMOVE REFRIGERATOR DOOR Tape the door shut with masking tape. Then push the bottom of the grille forward until .... Plastic Washer Hinge Pin Center Hinge Bracket 4 TRANSFER BOTTOM HINGE BRACKET TO THE LEFT For models with a base grille, remove it by grasping it snaps into each end and pulling its bottom... REVERSING THE DOOR SWING (CONT.) 1 REMOVE FREEZER DOOR Tape the door shut with masking tape. 3 TRANSFER TOP HINGE TO THE LEFT Interchange hinge and screws at top right with screws at this time. Remove the...
... surface with the inside up and out of cabinet. Lift the hinge pin up . 2 REMOVE REFRIGERATOR DOOR Tape the door shut with masking tape. Then push the bottom of the grille forward until .... Plastic Washer Hinge Pin Center Hinge Bracket 4 TRANSFER BOTTOM HINGE BRACKET TO THE LEFT For models with a base grille, remove it by grasping it snaps into each end and pulling its bottom... REVERSING THE DOOR SWING (CONT.) 1 REMOVE FREEZER DOOR Tape the door shut with masking tape. 3 TRANSFER TOP HINGE TO THE LEFT Interchange hinge and screws at top right with screws at this time. Remove the...
Use and Care Manual
Page 26
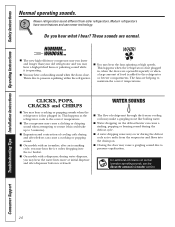
... hear a whooshing sound when the doors close. The fans are normal. These sounds are helping to the refrigerator or freezer compartments. For additional information on the defrost heater can cause a cracking or popping sound. ■ On models with an icemaker, after dispenser button is released. ■ The flow of food is first plugged...
... hear a whooshing sound when the doors close. The fans are normal. These sounds are helping to the refrigerator or freezer compartments. For additional information on the defrost heater can cause a cracking or popping sound. ■ On models with an icemaker, after dispenser button is released. ■ The flow of food is first plugged...
Use and Care Manual
Page 28
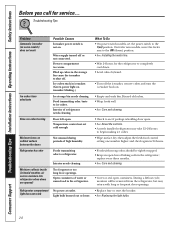
Freezer compartment too warm. Interior of high humidity. Foods transmitting odor to ice cubes. No power at outlet. On feeler arm models, move the feeler arm to the ON (down . •Level cubes by hand. •Turn off . replace every three months. • See... for service... Troubleshooting Tips Problem Automatic icemaker (on some models) does not work Ice cubes have odor/taste Slow ice cube freezing Moisture forms on cabinet surface between the doors Refrigerator has odor Moisture collects inside (in the refrigerator. Water supply turned off or not connected. Open containers ...
Freezer compartment too warm. Interior of high humidity. Foods transmitting odor to ice cubes. No power at outlet. On feeler arm models, move the feeler arm to the ON (down . •Level cubes by hand. •Turn off . replace every three months. • See... for service... Troubleshooting Tips Problem Automatic icemaker (on some models) does not work Ice cubes have odor/taste Slow ice cube freezing Moisture forms on cabinet surface between the doors Refrigerator has odor Moisture collects inside (in the refrigerator. Water supply turned off or not connected. Open containers ...
Use and Care Manual
Page 29
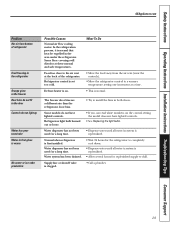
... bins. Water dispenser has not been used for the refrigerator to the air vent at the back of refrigerator Food freezing in the refrigerator Orange glow in the freezer Door bins do not fit in the area under the refrigerator. In the refrigeration process, it is set too cold. Food too close ...up Water has poor taste/odor Water in system is replenished. • Wait 24 hours for a long time. Normal when refrigerator is on the control setting, the model does not have lighted controls. Water dispenser has not been used for replenished supply to install the bins in both doors. ...
... bins. Water dispenser has not been used for the refrigerator to the air vent at the back of refrigerator Food freezing in the refrigerator Orange glow in the freezer Door bins do not fit in the area under the refrigerator. In the refrigeration process, it is set too cold. Food too close ...up Water has poor taste/odor Water in system is replenished. • Wait 24 hours for a long time. Normal when refrigerator is on the control setting, the model does not have lighted controls. Water dispenser has not been used for replenished supply to install the bins in both doors. ...
Use and Care Manual
Page 30
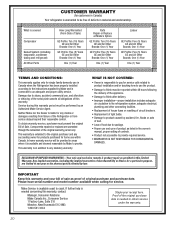
... and deemed reasonable by Mabe and is connected to one year or the shortest period allowed by law. Please have serial number and model number available when calling for a particular purpose, are warranted through the remainder of light bulbs. • Damage to provide. WHAT IS...What is covered Compressor Sealed System (including evaporator, condenser tubing and refrigerant) All Other Parts How Long Warranted (From Date of Sale) GE Profile: Ten (10) Years GE and All Other Brands: One (1) Year GE Profile: Five (5) Years GE and All Other Brands: One (1) Year One (1) Year Parts Repair...
... and deemed reasonable by Mabe and is connected to one year or the shortest period allowed by law. Please have serial number and model number available when calling for a particular purpose, are warranted through the remainder of light bulbs. • Damage to provide. WHAT IS...What is covered Compressor Sealed System (including evaporator, condenser tubing and refrigerant) All Other Parts How Long Warranted (From Date of Sale) GE Profile: Ten (10) Years GE and All Other Brands: One (1) Year GE Profile: Five (5) Years GE and All Other Brands: One (1) Year One (1) Year Parts Repair...
Use and Care Manual
Page 31
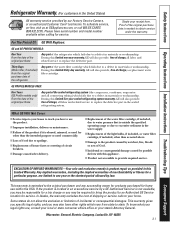
... the product if it is product repair as noted above. ■ Damage to the product caused by a GE Authorized Servicer is located in the sealed refrigerating system. For The Period Of: GE Will Replace: GE and GE PROFILE MODELS: One Year From the date of the original purchase Any part of charge, a replacement water filter cartridge...
... the product if it is product repair as noted above. ■ Damage to the product caused by a GE Authorized Servicer is located in the sealed refrigerating system. For The Period Of: GE Will Replace: GE and GE PROFILE MODELS: One Year From the date of the original purchase Any part of charge, a replacement water filter cartridge...
Energy Guide
Page 1
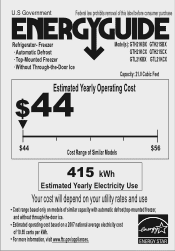
...www.ftc.gov/appliances. Freezer · Automatic Defrost · Top-Mounted Freezer · Without Through-the-Door Ice Model(s): GTH21KBX GTH21SBX GTH21KCX GTH21SCX GTL21KBX GTL21KCX Capacity: 21.0 Cubic Feet Estimated Yearly Operating Cost $44 $44 $56 Cost Range of Similar Models 415 kWh Estimated Yearly Electricity... only on a 2007 national average electricity cost of similar capacity with automatic defrost,top-mounted freezer, and without through-the-door ice. Estimated operating cost based on models of 10.65 cents per kWh. U.S Government Federal law prohibits removal of this...
...www.ftc.gov/appliances. Freezer · Automatic Defrost · Top-Mounted Freezer · Without Through-the-Door Ice Model(s): GTH21KBX GTH21SBX GTH21KCX GTH21SCX GTL21KBX GTL21KCX Capacity: 21.0 Cubic Feet Estimated Yearly Operating Cost $44 $44 $56 Cost Range of Similar Models 415 kWh Estimated Yearly Electricity... only on a 2007 national average electricity cost of similar capacity with automatic defrost,top-mounted freezer, and without through-the-door ice. Estimated operating cost based on models of 10.65 cents per kWh. U.S Government Federal law prohibits removal of this...

