Use and Care Manual
Page 1
... the Refrigerator 12 Reversing the Door Swing . . . .21-25 Water Line Installation 17-21 Troubleshooting Tips 26-29 Normal Operating Sounds 26 Consumer Support Consumer Support . . . . .Back Cover Warranty for Canadian Customers 30 Warranty for future reference. Conserve estas instrucciones para referencia futura. 197D7733P001 49-60505-2 04-09 JR Refr Top-Freezer igerators GEAppliances.com Safety Instructions 2-4 Operating Instructions Automatic Icemaker 9 Controls 5 Crispers and Pans 7, 8 Shelves and Bins 6 Care and Cleaning Care and Cleaning 10, 11 Replacing the Light Bulb...
... the Refrigerator 12 Reversing the Door Swing . . . .21-25 Water Line Installation 17-21 Troubleshooting Tips 26-29 Normal Operating Sounds 26 Consumer Support Consumer Support . . . . .Back Cover Warranty for Canadian Customers 30 Warranty for future reference. Conserve estas instrucciones para referencia futura. 197D7733P001 49-60505-2 04-09 JR Refr Top-Freezer igerators GEAppliances.com Safety Instructions 2-4 Operating Instructions Automatic Icemaker 9 Controls 5 Crispers and Pans 7, 8 Shelves and Bins 6 Care and Cleaning Care and Cleaning 10, 11 Replacing the Light Bulb...
Use and Care Manual
Page 2
... properly installed and located in accordance with the Installation Instructions before it is plugged in this or any servicing be performed by a qualified individual. ■ Setting either or both controls (some models only have one control) to the 1 (off) position does not remove power to these extremely cold surfaces. ■ Do not store or use gasoline or other appliance. ■ In refrigerators with automatic icemakers, avoid...
... properly installed and located in accordance with the Installation Instructions before it is plugged in this or any servicing be performed by a qualified individual. ■ Setting either or both controls (some models only have one control) to the 1 (off) position does not remove power to these extremely cold surfaces. ■ Do not store or use gasoline or other appliance. ■ In refrigerators with automatic icemakers, avoid...

Use and Care Manual
Page 3
If you are getting rid of an old refrigeration product, check with the company handling the disposal about what to do. ■ Take off the doors. ■ Leave the shelves in Canada), 3-wire grounding type appliance extension cord having a grounding type plug and outlet and that children may not easily climb inside. Safety Instructions Operating Instructions Installation Instructions Troubleshooting Tips Consumer Support GEAppliances.com DANGER! RISK OF CHILD...
If you are getting rid of an old refrigeration product, check with the company handling the disposal about what to do. ■ Take off the doors. ■ Leave the shelves in Canada), 3-wire grounding type appliance extension cord having a grounding type plug and outlet and that children may not easily climb inside. Safety Instructions Operating Instructions Installation Instructions Troubleshooting Tips Consumer Support GEAppliances.com DANGER! RISK OF CHILD...
Use and Care Manual
Page 8
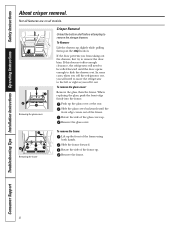
... the frame using both hands. Removing the glass cover Crisper Removal Unload the bottom shelf before attempting to remove the door bins. Push up the glass cover at the rear. In some cases, when you roll the refrigerator out, you will need to move the refrigerator to the left or right as you from taking out the drawers, first try to remove the storage drawers. Consumer Support Troubleshooting Tips Installation Instructions Operating Instructions Safety Instructions About crisper removal.
... the frame using both hands. Removing the glass cover Crisper Removal Unload the bottom shelf before attempting to remove the door bins. Push up the glass cover at the rear. In some cases, when you roll the refrigerator out, you will need to move the refrigerator to the left or right as you from taking out the drawers, first try to remove the storage drawers. Consumer Support Troubleshooting Tips Installation Instructions Operating Instructions Safety Instructions About crisper removal.
Use and Care Manual
Page 9
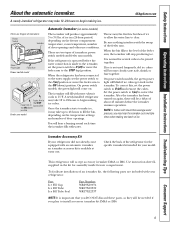
... the temperature settings and number of ice to allow the water line to restart the icemaker. On power switch models, the green power light will accept accessory icemaker IM4A or IM6. To correct this, set the power switch to O (off ) and remove the cubes. This refrigerator will blink if ice cubes get stuck in a 24-hour period, depending on some models) The icemaker will stop producing ice. There are two types of door openings and other use conditions. NOTE...
... the temperature settings and number of ice to allow the water line to restart the icemaker. On power switch models, the green power light will accept accessory icemaker IM4A or IM6. To correct this, set the power switch to O (off ) and remove the cubes. This refrigerator will blink if ice cubes get stuck in a 24-hour period, depending on some models) The icemaker will stop producing ice. There are two types of door openings and other use conditions. NOTE...
Use and Care Manual
Page 10
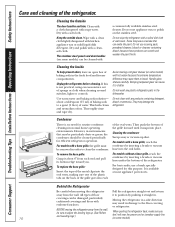
... stainless steel panels and door handles (on some models) with hot water because the extreme temperature difference may be particularly dusty or greasy, the condenser should be damaged, particularly cushioned coverings and those with a base grille, reach the condenser by pushing it to clean the condenser. Thoroughly rinse and wipe dry. Handle glass shelves carefully. Moving the refrigerator in normal home operating environments. Cleaning the Inside To...
... stainless steel panels and door handles (on some models) with hot water because the extreme temperature difference may be particularly dusty or greasy, the condenser should be damaged, particularly cushioned coverings and those with a base grille, reach the condenser by pushing it to clean the condenser. Thoroughly rinse and wipe dry. Handle glass shelves carefully. Moving the refrigerator in normal home operating environments. Cleaning the Inside To...
Use and Care Manual
Page 11
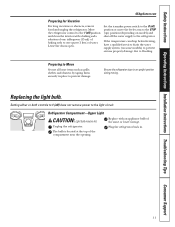
... the refrigerator. Replacing the light bulb. If the temperature can drop below freezing, have a qualified servicer drain the water supply system (on model) and shut off ) position or move the feeler arm to the STOP (up) position (depending on some models) to prevent serious property damage due to 1 (off ) position and clean the interior with an appliance bulb of the compartment near the opening. Setting either or both controls to...
... the refrigerator. Replacing the light bulb. If the temperature can drop below freezing, have a qualified servicer drain the water supply system (on model) and shut off ) position or move the feeler arm to the STOP (up) position (depending on some models) to prevent serious property damage due to 1 (off ) position and clean the interior with an appliance bulb of the compartment near the opening. Setting either or both controls to...
Use and Care Manual
Page 12
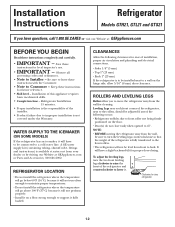
... sure to a cold water line. It will have a slight backward tilt for local inspector's use. • IMPORTANT - ROLLERS AND LEVELING LEGS Rollers allow 5/16″ (8 mm) door clearance. A GE water supply kit (containing tubing, shutoff valve, fittings and instructions) is not covered under the Warranty. Leveling Legs near each front corner of the refrigerator, next to the rollers, should be connected to leave these instructions completely and carefully. • IMPORTANT...
... sure to a cold water line. It will have a slight backward tilt for local inspector's use. • IMPORTANT - ROLLERS AND LEVELING LEGS Rollers allow 5/16″ (8 mm) door clearance. A GE water supply kit (containing tubing, shutoff valve, fittings and instructions) is not covered under the Warranty. Leveling Legs near each front corner of the refrigerator, next to the rollers, should be connected to leave these instructions completely and carefully. • IMPORTANT...
Use and Care Manual
Page 13
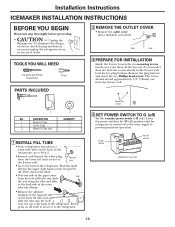
... refrigerator. 4 SET POWER SWITCH TO O (off) Set the icemaker power switch to O (off). Installation Instructions ICEMAKER INSTALLATION INSTRUCTIONS BEFORE YOU BEGIN Read each step thoroughly before proceeding. • CAUTION - TOOLS YOU WILL NEED Flat blade and Phillips screwdrivers Pliers PARTS INCLUDED 2 REMOVE THE OUTLET COVER • Remove the outlet cover with a flat-blade screwdriver. Remove the plug buttons and insert the two Phillips head screws. DESCRIPTION 1 Water Fill Tube 2 Ice Fill Guide 3 Water Fill Tube Seal 3 QUANTITY 1 1 1 1 INSTALL FILL TUBE...
... refrigerator. 4 SET POWER SWITCH TO O (off) Set the icemaker power switch to O (off). Installation Instructions ICEMAKER INSTALLATION INSTRUCTIONS BEFORE YOU BEGIN Read each step thoroughly before proceeding. • CAUTION - TOOLS YOU WILL NEED Flat blade and Phillips screwdrivers Pliers PARTS INCLUDED 2 REMOVE THE OUTLET COVER • Remove the outlet cover with a flat-blade screwdriver. Remove the plug buttons and insert the two Phillips head screws. DESCRIPTION 1 Water Fill Tube 2 Ice Fill Guide 3 Water Fill Tube Seal 3 QUANTITY 1 1 1 1 INSTALL FILL TUBE...
Use and Care Manual
Page 17
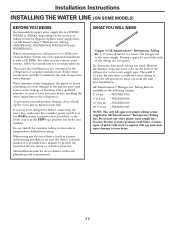
... refrigerator to a GE Reverse Osmosis Water System, the only approved installation is sufficient extra tubing to allow the refrigerator to correct water hammer before connecting the water line, make sure the icemaker power switch is in the O (off) position (on power switch models) or the feeler arm is in the STOP (up the water line to your refrigerator before installing the water supply line to the water supply pipe. When using copper, be sure both ends of tubing you use any electrical...
... refrigerator to a GE Reverse Osmosis Water System, the only approved installation is sufficient extra tubing to allow the refrigerator to correct water hammer before connecting the water line, make sure the icemaker power switch is in the O (off) position (on power switch models) or the feeler arm is in the STOP (up the water line to your refrigerator before installing the water supply line to the water supply pipe. When using copper, be sure both ends of tubing you use any electrical...
Use and Care Manual
Page 18
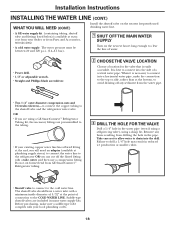
... valve), using a GE SmartConnect™ Refrigerator Tubing kit, the necessary fittings are included in reduced ice production or smaller cubes. • Shutoff valve to connect to the cold water line. The shutoff valve should have a water inlet with a minimum inside diameter of 5/32″ at plumbing supply stores) to connect the water line to the refrigerator OR you will need an adapter (available at the point of connection to the COLD WATER LINE. Before purchasing, make...
... valve), using a GE SmartConnect™ Refrigerator Tubing kit, the necessary fittings are included in reduced ice production or smaller cubes. • Shutoff valve to connect to the cold water line. The shutoff valve should have a water inlet with a minimum inside diameter of 5/32″ at plumbing supply stores) to connect the water line to the refrigerator OR you will need an adapter (available at the point of connection to the COLD WATER LINE. Before purchasing, make...
Use and Care Manual
Page 19
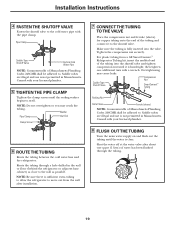
... (1 liter) of the tubing into the valve. Consult with the pipe clamp. Installation Instructions 4 FASTEN THE SHUTOFF VALVE Fasten the shutoff valve to the cold water pipe with your licensed plumber. 8 FLUSH OUT THE TUBING Turn the main water supply on and flush out the tubing until the water is sufficient extra tubing to allow the refrigerator to move out from a GE SmartConnect™ Refrigerator Tubing kit, insert the molded...
... (1 liter) of the tubing into the valve. Consult with the pipe clamp. Installation Instructions 4 FASTEN THE SHUTOFF VALVE Fasten the shutoff valve to the cold water pipe with your licensed plumber. 8 FLUSH OUT THE TUBING Turn the main water supply on and flush out the tubing until the water is sufficient extra tubing to allow the refrigerator to move out from a GE SmartConnect™ Refrigerator Tubing kit, insert the molded...
Use and Care Manual
Page 20
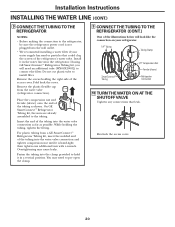
... below will need to pry open the clamp. 9 CONNECT THE TUBING TO THE REFRIGERATOR (CONT.) One of the access cover. Installation Instructions INSTALLING THE WATER LINE (CONT.) 9 CONNECT THE TUBING TO THE REFRIGERATOR NOTES: • Before making the connection to install filter. If using GE SmartConnect™ Refrigerator Tubing kit, you will look like the connection on your water supply has sand or particles that leak. Do not cut plastic tube to the refrigerator, be sure the refrigerator power cord is...
... below will need to pry open the clamp. 9 CONNECT THE TUBING TO THE REFRIGERATOR (CONT.) One of the access cover. Installation Instructions INSTALLING THE WATER LINE (CONT.) 9 CONNECT THE TUBING TO THE REFRIGERATOR NOTES: • Before making the connection to install filter. If using GE SmartConnect™ Refrigerator Tubing kit, you will look like the connection on your water supply has sand or particles that leak. Do not cut plastic tube to the refrigerator, be sure the refrigerator power cord is...
Use and Care Manual
Page 21
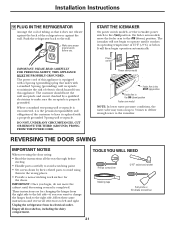
... a non-scratching work surface for changing the hinges from its operating temperature of the refrigerator or against the back of 15°F (-9°C) or below. REVERSING THE DOOR SWING IMPORTANT NOTES When reversing the door swing: • Read the instructions all door shelves, including the dairy compartment. Push the refrigerator back to left side-if you begin operation automatically. START THE ICEMAKER On power switch models, set the icemaker power switch to make sure the...
... a non-scratching work surface for changing the hinges from its operating temperature of the refrigerator or against the back of 15°F (-9°C) or below. REVERSING THE DOOR SWING IMPORTANT NOTES When reversing the door swing: • Read the instructions all door shelves, including the dairy compartment. Push the refrigerator back to left side-if you begin operation automatically. START THE ICEMAKER On power switch models, set the icemaker power switch to make sure the...
Use and Care Manual
Page 26
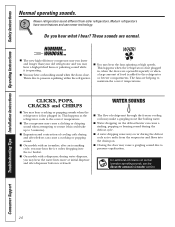
... the doors close. HUMMM... The fans are helping to the refrigerator or freezer compartments. Do you may hear the water lines move at high speeds. This happens when the refrigerator is first plugged in . Modern refrigerators have more features and use newer technology. Consumer Support Troubleshooting Tips Installation Instructions Operating Instructions Safety Instructions Normal operating sounds. This happens as ice melts from older refrigerators. For additional information on the defrost heater...
... the doors close. HUMMM... The fans are helping to the refrigerator or freezer compartments. Do you may hear the water lines move at high speeds. This happens when the refrigerator is first plugged in . Modern refrigerators have more features and use newer technology. Consumer Support Troubleshooting Tips Installation Instructions Operating Instructions Safety Instructions Normal operating sounds. This happens as ice melts from older refrigerators. For additional information on the defrost heater...
Use and Care Manual
Page 27
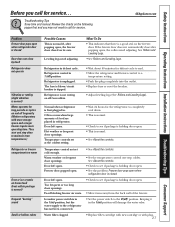
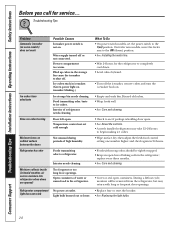
...after popping open . • This is holding door open . Freezer door popped open , the rollers need adjusting. Troubleshooting Tips Save time and money! Warm weather or frequent door openings. See About the controls. • Check to a temperature setting. • Push the plug completely into the outlet. • Replace fuse or reset the breaker. • Adjust leveling legs (See Rollers and Leveling Legs). Safety Instructions Operating Instructions Installation Instructions Troubleshooting Tips Consumer Support Before you may not need adjusting. Review the charts...
...after popping open . • This is holding door open . Freezer door popped open , the rollers need adjusting. Troubleshooting Tips Save time and money! Warm weather or frequent door openings. See About the controls. • Check to a temperature setting. • Push the plug completely into the outlet. • Replace fuse or reset the breaker. • Adjust leveling legs (See Rollers and Leveling Legs). Safety Instructions Operating Instructions Installation Instructions Troubleshooting Tips Consumer Support Before you may not need adjusting. Review the charts...
Use and Care Manual
Page 28
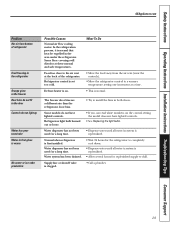
..., air carries moisture into refrigerator when doors are opened) Refrigerator compartment light does not work Ice cubes have odor/taste Slow ice cube freezing Moisture forms on icemaker blinking.) Ice storage bin needs cleaning. Freezer compartment too warm. Troubleshooting Tips Problem Automatic icemaker (on some models) does not work Possible Causes Icemaker power switch is holding door open. •See About the controls. •A newly installed refrigerator may return with strong odors should be tightly wrapped. • Keep an open box of water or warm...
..., air carries moisture into refrigerator when doors are opened) Refrigerator compartment light does not work Ice cubes have odor/taste Slow ice cube freezing Moisture forms on icemaker blinking.) Ice storage bin needs cleaning. Freezer compartment too warm. Troubleshooting Tips Problem Automatic icemaker (on some models) does not work Possible Causes Icemaker power switch is holding door open. •See About the controls. •A newly installed refrigerator may return with strong odors should be tightly wrapped. • Keep an open box of water or warm...
Use and Care Manual
Page 29
...; Dispense water until all water in first glass is on the control setting, the model does not have lighted controls. Refrigerator control is first installed. Defrost heater is warm No water or ice cube production Possible Causes Normal air flow cooling motor. Food too close to a warmer temperature setting one increment at a time. • This is replenished. • Allow several hours for a long time. Normal when refrigerator is set too cold. Water system has been drained...
...; Dispense water until all water in first glass is on the control setting, the model does not have lighted controls. Refrigerator control is first installed. Defrost heater is warm No water or ice cube production Possible Causes Normal air flow cooling motor. Food too close to a warmer temperature setting one increment at a time. • This is replenished. • Allow several hours for a long time. Normal when refrigerator is set too cold. Water system has been drained...
Use and Care Manual
Page 30
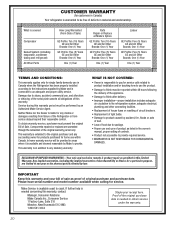
... reasonable control. Please have serial number and model number available when calling for single family domestic use within 48 hours following the delivery of the appliance. • Damage to finish after delivery. • Improper installation-proper installation includes adequate air circulation to the refrigeration system, adequate electrical, plumbing and other connecting facilities. • Replacement of house fuses or resetting of circuit breakers. • Replacement of light bulbs...
... reasonable control. Please have serial number and model number available when calling for single family domestic use within 48 hours following the delivery of the appliance. • Damage to finish after delivery. • Improper installation-proper installation includes adequate air circulation to the refrigeration system, adequate electrical, plumbing and other connecting facilities. • Replacement of house fuses or resetting of circuit breakers. • Replacement of light bulbs...
Use and Care Manual
Page 31
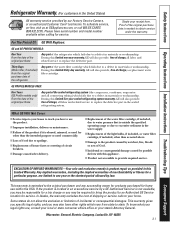
... an authorized Customer Care® technician. Proof of the original purchase date is needed to the product caused by accident, fire, floods or acts of charge, a replacement water filter cartridge. During this limited one year or the shortest period allowed by a GE Authorized Servicer is outside the specified operating range or due to your state's Attorney General. This warranty is extended to...
... an authorized Customer Care® technician. Proof of the original purchase date is needed to the product caused by accident, fire, floods or acts of charge, a replacement water filter cartridge. During this limited one year or the shortest period allowed by a GE Authorized Servicer is outside the specified operating range or due to your state's Attorney General. This warranty is extended to...

