
Owners Manual
Page 1
... Cords 3 Proper Disposal 3 Safety Precautions 2 Operating Instructions Automatic Icemaker 9 Controls 5 Crispers and Pans 8, 9 Ice and Water Dispenser 10 Shelves, Bins and Racks 6-8 Water Filter Cartridge 6 Care and Cleaning Cleaning 11, 12 Light Bulbs 13 Installation Instructions Preparing to Install the Refrigerator 14, 15 Water Line Installation . . . . . .16-20 Troubleshooting Tips Before You Call For Service . . .22-24 Normal Operating Sounds . . . . . .21 Consumer Support Consumer Support . . . . .Back Cover Performance Data Sheet 27 Product Registration (Canadian 31, 32...
... Cords 3 Proper Disposal 3 Safety Precautions 2 Operating Instructions Automatic Icemaker 9 Controls 5 Crispers and Pans 8, 9 Ice and Water Dispenser 10 Shelves, Bins and Racks 6-8 Water Filter Cartridge 6 Care and Cleaning Cleaning 11, 12 Light Bulbs 13 Installation Instructions Preparing to Install the Refrigerator 14, 15 Water Line Installation . . . . . .16-20 Troubleshooting Tips Before You Call For Service . . .22-24 Normal Operating Sounds . . . . . .21 Consumer Support Consumer Support . . . . .Back Cover Performance Data Sheet 27 Product Registration (Canadian 31, 32...
Owners Manual
Page 2
... remove power to these extremely cold surfaces. Be careful closing doors when children are in this or any servicing be properly installed and located in accordance with the heating element located on the bottom of the ejector mechanism, or with the Installation Instructions before cleaning and making repairs. READ ALL INSTRUCTIONS BEFORE USING. They could damage the refrigerator and seriously injure themselves. Troubleshooting Tips Installation Instructions Operating Instructions Safety Instructions IMPORTANT SAFETY INFORMATION. Use...
... remove power to these extremely cold surfaces. Be careful closing doors when children are in this or any servicing be properly installed and located in accordance with the heating element located on the bottom of the ejector mechanism, or with the Installation Instructions before cleaning and making repairs. READ ALL INSTRUCTIONS BEFORE USING. They could damage the refrigerator and seriously injure themselves. Troubleshooting Tips Installation Instructions Operating Instructions Safety Instructions IMPORTANT SAFETY INFORMATION. Use...
Owners Manual
Page 6
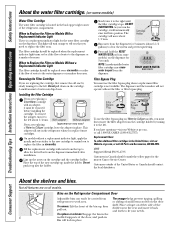
... turn it up the arrow on the cartridge and the cartridge holder. Filter Bypass Plug SmartWater Filter Bypass Plug Water by Culligan cartridge, leave the adapter in place. Press and hold the RESET WATER FILTER pad (on some models) Water Filter Cartridge The water filter cartridge is located in the back upper right corner of water may drip down on all models. Not all features are replacing a SmartWater cartridge with water from the dispenser immediately after installation. Troubleshooting Tips Installation Instructions Operating Instructions Safety Instructions...
... turn it up the arrow on the cartridge and the cartridge holder. Filter Bypass Plug SmartWater Filter Bypass Plug Water by Culligan cartridge, leave the adapter in place. Press and hold the RESET WATER FILTER pad (on some models) Water Filter Cartridge The water filter cartridge is located in the back upper right corner of water may drip down on all models. Not all features are replacing a SmartWater cartridge with water from the dispenser immediately after installation. Troubleshooting Tips Installation Instructions Operating Instructions Safety Instructions...
Owners Manual
Page 8
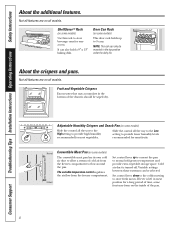
... top position under the dairy bin. The variable temperature control regulates the air flow from the freezer compartment to allow a stream of the pan. ShelfSaver™ Rack (on the inside of cold air from the freezer compartment. Adjustable Humidity Crispers and Snack Pan (on some models) HIGH LOW Slide the control all the way to the Slide the control all models. Troubleshooting Tips Installation Instructions Operating Instructions Safety Instructions About the additional features...
... top position under the dairy bin. The variable temperature control regulates the air flow from the freezer compartment to allow a stream of the pan. ShelfSaver™ Rack (on the inside of cold air from the freezer compartment. Adjustable Humidity Crispers and Snack Pan (on some models) HIGH LOW Slide the control all the way to the Slide the control all models. Troubleshooting Tips Installation Instructions Operating Instructions Safety Instructions About the additional features...
Owners Manual
Page 9
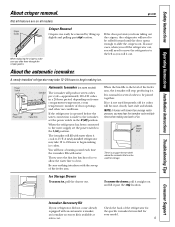
Safety Instructions Operating Instructions Installation Instructions Troubleshooting Tips Consumer Support About crisper removal. A newly-installed refrigerator may take 12-24 hours to begin making ice cubes. When the refrigerator has been connected to the left as you roll it out. You will need to move the refrigerator to the water supply, set the power switch in a 24-hour period, depending on all models. If the door prevents you will become cloudy, taste stale and shrink. In...
Safety Instructions Operating Instructions Installation Instructions Troubleshooting Tips Consumer Support About crisper removal. A newly-installed refrigerator may take 12-24 hours to begin making ice cubes. When the refrigerator has been connected to the left as you roll it out. You will need to move the refrigerator to the water supply, set the power switch in a 24-hour period, depending on all models. If the door prevents you will become cloudy, taste stale and shrink. In...
Owners Manual
Page 10
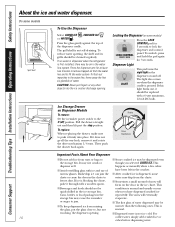
... Dispenser Models To remove: Set the icemaker power switch to push it and rotate the drive mechanism 1/4 turn. If it does not go all the way back, remove it firmly into the ice crusher discharge opening . Then push the drawer back again. This dispense well. or auger to , but not normal. Troubleshooting Tips Installation Instructions Operating Instructions Safety Instructions About the ice and water dispenser. Locking the Dispenser (on and off ) position. To replace...
... Dispenser Models To remove: Set the icemaker power switch to push it and rotate the drive mechanism 1/4 turn. If it does not go all the way back, remove it firmly into the ice crusher discharge opening . Then push the drawer back again. This dispense well. or auger to , but not normal. Troubleshooting Tips Installation Instructions Operating Instructions Safety Instructions About the ice and water dispenser. Locking the Dispenser (on and off ) position. To replace...
Owners Manual
Page 11
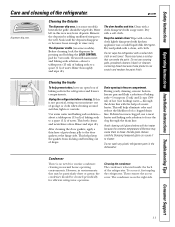
... refrigerator operation. Use warm water and baking soda solution- Cleaning the condenser: The condenser is on some models) beneath the grille, should be wiped dry. Remove the deposits by pressing and holding the LOCK CONTROL pad for routine condenser cleaning in normal home operating environments. Before cleaning, lock the dispenser by adding undiluted vinegar to break. The door handles and trim. Safety Instructions Operating Instructions Installation Instructions Troubleshooting Tips Consumer Support Care and cleaning...
... refrigerator operation. Use warm water and baking soda solution- Cleaning the condenser: The condenser is on some models) beneath the grille, should be wiped dry. Remove the deposits by pressing and holding the LOCK CONTROL pad for routine condenser cleaning in normal home operating environments. Before cleaning, lock the dispenser by adding undiluted vinegar to break. The door handles and trim. Safety Instructions Operating Instructions Installation Instructions Troubleshooting Tips Consumer Support Care and cleaning...
Owners Manual
Page 12
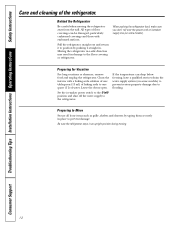
... servicer drain the water supply system (on some models) to prevent serious property damage due to one quart (1 l) of the refrigerator. When pushing the refrigerator back, make sure you don't roll over the power cord or icemaker supply line (on some models). Clean the interior with embossed surfaces. Leave the doors open. Be sure the refrigerator stays in damage to position by taping them securely in . Set the icemaker power switch to...
... servicer drain the water supply system (on some models) to prevent serious property damage due to one quart (1 l) of the refrigerator. When pushing the refrigerator back, make sure you don't roll over the power cord or icemaker supply line (on some models). Clean the interior with embossed surfaces. Leave the doors open. Be sure the refrigerator stays in damage to position by taping them securely in . Set the icemaker power switch to...
Owners Manual
Page 13
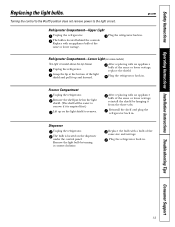
... turning it is located above the top drawer. Dispenser Unplug the refrigerator. Replace the bulb with an appliance bulb of the same or lower wattage. Reinstall the shelf and plug the refrigerator back in . Refrigerator Compartment-Lower Light (on some models) This light is emptied first.) Lift up and forward. Remove the shelf just below the light shield. (The shelf will be easier to the light circuit. Safety Instructions Operating Instructions Installation Instructions Troubleshooting Tips Consumer Support Replacing the light bulbs. Turning...
... turning it is located above the top drawer. Dispenser Unplug the refrigerator. Replace the bulb with an appliance bulb of the same or lower wattage. Reinstall the shelf and plug the refrigerator back in . Refrigerator Compartment-Lower Light (on some models) This light is emptied first.) Lift up and forward. Remove the shelf just below the light shield. (The shelf will be easier to the light circuit. Safety Instructions Operating Instructions Installation Instructions Troubleshooting Tips Consumer Support Replacing the light bulbs. Turning...

Owners Manual
Page 14
... installation, proper air circulation and plumbing and electrical connections. • Sides 1/8″ (4 mm) • Top 1″ (25 mm) • Back 1″ (25 mm) A door clearance of the cabinet. To replace base grille, line up the clips on some models) If the refrigerator has an icemaker, it will not run often enough to leave these instructions completely and carefully. • IMPORTANT - To adjust the rollers, remove...
... installation, proper air circulation and plumbing and electrical connections. • Sides 1/8″ (4 mm) • Top 1″ (25 mm) • Back 1″ (25 mm) A door clearance of the cabinet. To replace base grille, line up the clips on some models) If the refrigerator has an icemaker, it will not run often enough to leave these instructions completely and carefully. • IMPORTANT - To adjust the rollers, remove...
Owners Manual
Page 16
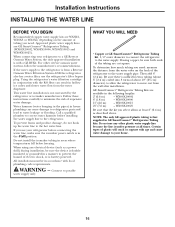
... to refrigerator parts and lead to a GE Reverse Osmosis Water System, the only approved installation is battery powered. Using the refrigerator's water filtration cartridge in accordance with a GE RVKit. This water line installation is in a manner to move out from the water dispenser. Follow these instructions carefully to the refrigerator is double insulated or grounded in the O (off) position. Call a qualified plumber to correct water hammer before connecting the water line, make sure the icemaker power switch is...
... to refrigerator parts and lead to a GE Reverse Osmosis Water System, the only approved installation is battery powered. Using the refrigerator's water filtration cartridge in accordance with a GE RVKit. This water line installation is in a manner to move out from the water dispenser. Follow these instructions carefully to the refrigerator is double insulated or grounded in the O (off) position. Call a qualified plumber to correct water hammer before connecting the water line, make sure the icemaker power switch is...
Owners Manual
Page 17
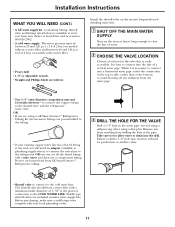
... to the COLD WATER LINE. Take care not to allow water to drain into the side of connection to connect into the drill. Saddle-type shutoff valves are preassembled to avoid drawing off the flared fitting with a water filter. • Power drill. • 1/2″ or adjustable wrench. • Straight and Phillips blade screwdriver. Installation Instructions WHAT YOU WILL NEED (CONT.) • A GE water supply kit (containing tubing, shutoff valve and fittings listed below) is...
... to the COLD WATER LINE. Take care not to allow water to drain into the side of connection to connect into the drill. Saddle-type shutoff valves are preassembled to avoid drawing off the flared fitting with a water filter. • Power drill. • 1/2″ or adjustable wrench. • Straight and Phillips blade screwdriver. Installation Instructions WHAT YOU WILL NEED (CONT.) • A GE water supply kit (containing tubing, shutoff valve and fittings listed below) is...
Owners Manual
Page 19
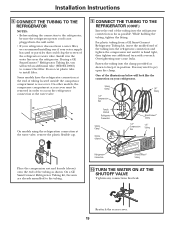
.... Installation Instructions 9 CONNECT THE TUBING TO THE REFRIGERATOR NOTES: • Before making the connection to the refrigerator, be removed in the water line near the refrigerator. Reattach the access cover. 19 Install it is not plugged into the wall outlet. • If your refrigerator does not have the refrigerator connection at the water valve, remove the plastic flexible cap. 9 CONNECT THE TUBING TO THE REFRIGERATOR (CONT.) Insert the end of the refrigerator's water valve. On models using a GE SmartConnect™ Refrigerator Tubing kit, you...
.... Installation Instructions 9 CONNECT THE TUBING TO THE REFRIGERATOR NOTES: • Before making the connection to the refrigerator, be removed in the water line near the refrigerator. Reattach the access cover. 19 Install it is not plugged into the wall outlet. • If your refrigerator does not have the refrigerator connection at the water valve, remove the plastic flexible cap. 9 CONNECT THE TUBING TO THE REFRIGERATOR (CONT.) Insert the end of the refrigerator's water valve. On models using a GE SmartConnect™ Refrigerator Tubing kit, you...

Owners Manual
Page 21
... are helping to control refrigerator components. This happens as ice melts from older refrigerators. s The electronic control board may hear the fans come on in . s A water dripping noise may occur during and after an icemaking cycle, you may cause a clicking sound when relays activate to maintain the correct temperatures. Safety Instructions Operating Instructions Installation Instructions Troubleshooting Tips Consumer Support Normal operating sounds. Newer refrigerators sound different from the evaporator and flows...
... are helping to control refrigerator components. This happens as ice melts from older refrigerators. s The electronic control board may hear the fans come on in . s A water dripping noise may occur during and after an icemaking cycle, you may cause a clicking sound when relays activate to maintain the correct temperatures. Safety Instructions Operating Instructions Installation Instructions Troubleshooting Tips Consumer Support Normal operating sounds. Newer refrigerators sound different from the evaporator and flows...

Owners Manual
Page 22
... controls. • Set the temperature control one step colder. Icemaker power switch is in . Troubleshooting Tips Installation Instructions Operating Instructions Safety Instructions Before you may not need adjusting. Review the charts on ) position. • See Installing the water line. • Wait 24 hours for the refrigerator to call for defrost cycle to end. • Move the freezer control to see if package is holding door open . They start and stop often to shut off the icemaker, remove cubes and turn...
... controls. • Set the temperature control one step colder. Icemaker power switch is in . Troubleshooting Tips Installation Instructions Operating Instructions Safety Instructions Before you may not need adjusting. Review the charts on ) position. • See Installing the water line. • Wait 24 hours for the refrigerator to call for defrost cycle to end. • Move the freezer control to see if package is holding door open . They start and stop often to shut off the icemaker, remove cubes and turn...

Owners Manual
Page 23
... water supply turned off or not connected. Ice cubes are frozen to chill. • See Installing the water line. • Replace filter cartridge or remove filter and install plug. •Press the dispenser arm for at a time, until clumps do not form. •Press and hold the LOCK CONTROL pad for replenished supply to icemaker feeler arm. Temperature control not set cold enough. Air may be trapped in first glass is warm (on some models) Water dispenser does not work...
... water supply turned off or not connected. Ice cubes are frozen to chill. • See Installing the water line. • Replace filter cartridge or remove filter and install plug. •Press the dispenser arm for at a time, until clumps do not form. •Press and hold the LOCK CONTROL pad for replenished supply to icemaker feeler arm. Temperature control not set cold enough. Air may be trapped in first glass is warm (on some models) Water dispenser does not work...

Owners Manual
Page 24
... CRUSHED ICE. Hot air from the previous setting. This is normal that heat be tightly wrapped. • Keep an open box of refrigerator Normal air flow cooling motor. Interior needs cleaning. Interior light does not work No power at these normal and safe temperatures. Keeping it is normal. Consumer Support 24 Problem Possible Causes What To Do Refrigerator has odor Foods transmitting odor to the O (off) position. Defrost water drainage system needs cleaning...
... CRUSHED ICE. Hot air from the previous setting. This is normal that heat be tightly wrapped. • Keep an open box of refrigerator Normal air flow cooling motor. Interior needs cleaning. Interior light does not work No power at these normal and safe temperatures. Keeping it is normal. Consumer Support 24 Problem Possible Causes What To Do Refrigerator has odor Foods transmitting odor to the O (off) position. Defrost water drainage system needs cleaning...
Owners Manual
Page 25
... COVERED: • Owner is covered Compressor Sealed System (including evaporator, condenser tubing and refrigerant) All Other Parts How Long Warranted (From Date of controls. • Product not accessible to pay for service. In home warranty service will be performed by Camco and is needed concerning this Limited Warranty. Please have serial number and model number available when calling for service calls related to product installation and/or teaching how to use...
... COVERED: • Owner is covered Compressor Sealed System (including evaporator, condenser tubing and refrigerant) All Other Parts How Long Warranted (From Date of controls. • Product not accessible to pay for service. In home warranty service will be performed by Camco and is needed concerning this Limited Warranty. Please have serial number and model number available when calling for service calls related to product installation and/or teaching how to use...

Owners Manual
Page 26
.... Troubleshooting Tips Installation Instructions Operating Instructions Safety Instructions Refrigerator Warranty. (For customers in this Limited Warranty. During this appliance. What GE Will Not Cover: I Damage to use within the USA. I Damage caused after delivery. I Service trips to your legal rights are limited to state. EXCLUSION OF IMPLIED WARRANTIES-Your sole and exclusive remedy is extended to provide required service. Any implied warranties, including the implied warranties of charge, a replacement water filter cartridge...
.... Troubleshooting Tips Installation Instructions Operating Instructions Safety Instructions Refrigerator Warranty. (For customers in this Limited Warranty. During this appliance. What GE Will Not Cover: I Damage to use within the USA. I Damage caused after delivery. I Service trips to your legal rights are limited to state. EXCLUSION OF IMPLIED WARRANTIES-Your sole and exclusive remedy is extended to provide required service. Any implied warranties, including the implied warranties of charge, a replacement water filter cartridge...
Owners Manual
Page 27
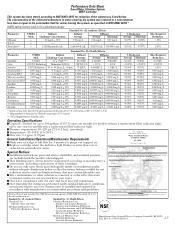
... the Health and Safety Code for models without adequate disinfection before or after the system. The water treatment device(s) listed on disinfected waters that may be installed and operated in your water. System Tested and Certified by this certificate have met the testing requirements pursuant to Section 116830 of unknown quality without a replacement filter indicator light; Replace cartridge when the indicator light flashes or water flow rate is microbiologically unsafe or...
... the Health and Safety Code for models without adequate disinfection before or after the system. The water treatment device(s) listed on disinfected waters that may be installed and operated in your water. System Tested and Certified by this certificate have met the testing requirements pursuant to Section 116830 of unknown quality without a replacement filter indicator light; Replace cartridge when the indicator light flashes or water flow rate is microbiologically unsafe or...


