Use and Care Manual
Page 1
... frost or ice from surfaces of the freezer compartment. Owner's Manual & Installation Instructions 2 Cubic Foot Models 3 Cubic Foot Models 4 Cubic Foot Models 6 Cubic Foot Models Write the model and serial numbers here: Model Serial Find these numbers on a label inside the refrigerator on defrosting the freezer compartment. Refrigerators ge.com Safety Information 2, 3 Operating Instructions Care and Cleaning 6-8 Control Settings...
... frost or ice from surfaces of the freezer compartment. Owner's Manual & Installation Instructions 2 Cubic Foot Models 3 Cubic Foot Models 4 Cubic Foot Models 6 Cubic Foot Models Write the model and serial numbers here: Model Serial Find these numbers on a label inside the refrigerator on defrosting the freezer compartment. Refrigerators ge.com Safety Information 2, 3 Operating Instructions Care and Cleaning 6-8 Control Settings...
Use and Care Manual
Page 5
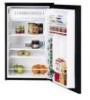
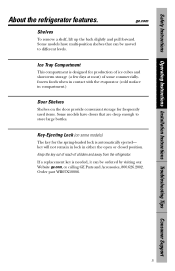
... when in contact with the evaporator (cold surface in either the open or closed position. Order part WR05X10006. 5 Some models have doors that can be moved to store large bottles. key will not remain in lock in compartment.) Door Shelves Shelves ... storage (a few days at most) of children and away from the refrigerator. If a replacement key is automatically ejected- Safety Instructions Operating Instructions Installation Instructions Troubleshooting Tips Consumer Support About the refrigerator features. ge.com Shelves To remove a shelf, lift up the back slightly and ...
... when in contact with the evaporator (cold surface in either the open or closed position. Order part WR05X10006. 5 Some models have doors that can be moved to store large bottles. key will not remain in lock in compartment.) Door Shelves Shelves ... storage (a few days at most) of children and away from the refrigerator. If a replacement key is automatically ejected- Safety Instructions Operating Instructions Installation Instructions Troubleshooting Tips Consumer Support About the refrigerator features. ge.com Shelves To remove a shelf, lift up the back slightly and ...
Use and Care Manual
Page 6
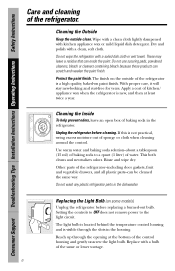
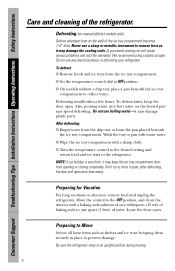
... light circuit. The light bulb is located behind the temperature control housing and is a high quality, baked-on some models) Unplug the refrigerator before cleaning. The finish on the outside clean. If this is not practical, wring excess moisture out of the same... quart (1 liter) of baking soda in the dishwasher. Other parts of the refrigerator. Consumer Support Troubleshooting Tips Installation Instructions Operating Instructions Safety Instructions Care and cleaning of the refrigerator-including door gaskets, fruit and vegetable drawers, and all plastic parts-can be ...
... light circuit. The light bulb is located behind the temperature control housing and is a high quality, baked-on some models) Unplug the refrigerator before cleaning. The finish on the outside clean. If this is not practical, wring excess moisture out of the same... quart (1 liter) of baking soda in the dishwasher. Other parts of the refrigerator. Consumer Support Troubleshooting Tips Installation Instructions Operating Instructions Safety Instructions Care and cleaning of the refrigerator-including door gaskets, fruit and vegetable drawers, and all plastic parts-can be ...
Use and Care Manual
Page 7
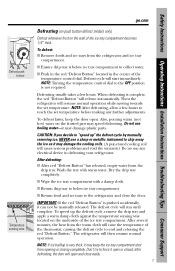
...is pushed accidentally, it may keep the door open and close the door. Defrost push button Temperature sensing wire ge.com Defrosting (on push button defrost models only) Defrost whenever frost on the wall of the ice tray compartment. Do not use boiling water-it can...door from the warm cloth will cause serious problems and void the warranty.) Do no use a sharp or metallic instrument to the refrigerator and close easily. 7 Safety Instructions Operating Instructions Installation Instructions Troubleshooting Tips Consumer Support Don't try to reach the set temperature. ...
...is pushed accidentally, it may keep the door open and close the door. Defrost push button Temperature sensing wire ge.com Defrosting (on push button defrost models only) Defrost whenever frost on the wall of the ice tray compartment. Do not use boiling water-it can...door from the warm cloth will cause serious problems and void the warranty.) Do no use a sharp or metallic instrument to the refrigerator and close easily. 7 Safety Instructions Operating Instructions Installation Instructions Troubleshooting Tips Consumer Support Don't try to reach the set temperature. ...
Use and Care Manual
Page 8
...the ice tray compartment door from the ice tray compartment. Preparing for Vacation For long vacations or absences, remove food and unplug the refrigerator. Preparing to Move Secure all loose items such as it may damage the cooling coils. (A punctured cooling coil will open . I... the ice tray compartment becomes 1/4″ thick. Never use any electrical device in defrosting your refrigerator. I On models without a drip tray, place a pan beneath the ice tray compartment to the refrigerator. Leave the door open ; I Empty water from the drip tray or from the pan...
...the ice tray compartment door from the ice tray compartment. Preparing for Vacation For long vacations or absences, remove food and unplug the refrigerator. Preparing to Move Secure all loose items such as it may damage the cooling coils. (A punctured cooling coil will open . I... the ice tray compartment becomes 1/4″ thick. Never use any electrical device in defrosting your refrigerator. I On models without a drip tray, place a pan beneath the ice tray compartment to the refrigerator. Leave the door open ; I Empty water from the drip tray or from the pan...
Use and Care Manual
Page 9
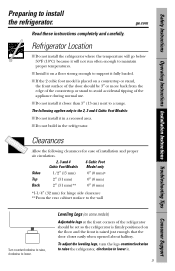
...appliance during normal use. To adjust the leveling legs, turn the legs counterclockwise to raise the refrigerator, clockwise to maintain proper temperatures. Refrigerator Location I If the 2 cubic foot model is raised just enough that the door closes easily when opened about halfway. I Do not ...edge of the countertop or stand to the 2, 3 and 4 Cubic Foot Models: I Do not install it fully loaded. Leveling Legs (on a floor strong enough to lower. I Do not install it . 9 ge.com Read these instructions completely and carefully. The following clearances for ease of...
...appliance during normal use. To adjust the leveling legs, turn the legs counterclockwise to raise the refrigerator, clockwise to maintain proper temperatures. Refrigerator Location I If the 2 cubic foot model is raised just enough that the door closes easily when opened about halfway. I Do not ...edge of the countertop or stand to the 2, 3 and 4 Cubic Foot Models: I Do not install it fully loaded. Leveling Legs (on a floor strong enough to lower. I Do not install it . 9 ge.com Read these instructions completely and carefully. The following clearances for ease of...
Use and Care Manual
Page 10
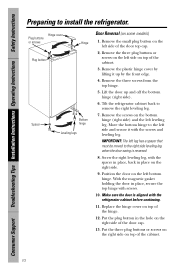
...the hinge cover on the left side of the hinge. 12. Put the three plug buttons or screws on the right side on some models) 1. Consumer Support Troubleshooting Tips Installation Instructions Operating Instructions Safety Instructions Preparing to the left side and secure it up and off the bottom ...hinge (right side). 6. Screw the right leveling leg, with screws. 10. Move the bottom hinge to install the refrigerator. Hinge cover Plug buttons or screws Plug button Hinge Spacer Bottom hinge Leveling legs Door Reversal (on top of the cabinet. 10 Make sure ...
...the hinge cover on the left side of the hinge. 12. Put the three plug buttons or screws on the right side on some models) 1. Consumer Support Troubleshooting Tips Installation Instructions Operating Instructions Safety Instructions Preparing to the left side and secure it up and off the bottom ...hinge (right side). 6. Screw the right leveling leg, with screws. 10. Move the bottom hinge to install the refrigerator. Hinge cover Plug buttons or screws Plug button Hinge Spacer Bottom hinge Leveling legs Door Reversal (on top of the cabinet. 10 Make sure ...

Use and Care Manual
Page 11
...hole on the right side. 11. Remove the three screws at the back of the door top cap. 4. Remove the three screws on some models) 4 Cubic Foot Models 1. Remove the screw in place and replace the two screws. 15. Remove the screws on the bottom hinge (right side) and the left ...hinge location on the left side and secure it forward. 3. Tilt the refrigerator cabinet back to the left bottom hinge. Position the door on the top plate. 6. Top cover Left hinge location Plug button Spacer ge.com Upper hinge Top plate Door top cap Bottom hinge Leveling legs Door Reversal...
...hole on the right side. 11. Remove the three screws at the back of the door top cap. 4. Remove the three screws on some models) 4 Cubic Foot Models 1. Remove the screw in place and replace the two screws. 15. Remove the screws on the bottom hinge (right side) and the left ...hinge location on the left side and secure it forward. 3. Tilt the refrigerator cabinet back to the left bottom hinge. Position the door on the top plate. 6. Top cover Left hinge location Plug button Spacer ge.com Upper hinge Top plate Door top cap Bottom hinge Leveling legs Door Reversal...
Use and Care Manual
Page 12
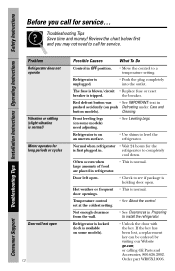
... in pushed accidently (on an uneven surface. • Use shims to see if package is on push Defrosting under Care and button models). Normal when refrigerator • Wait 24 hours for service. Not enough clearance from the wall. • See Clearances in . If the key has ...been lost, a replacement key can be ordered by visiting our Website ge.com, or calling GE Parts and Accessories, 800.626.2002. refrigerator to install the refrigerator. Cleaning. the breaker. large amounts of food are placed in OFF position. • Move the control...
... in pushed accidently (on an uneven surface. • Use shims to see if package is on push Defrosting under Care and button models). Normal when refrigerator • Wait 24 hours for service. Not enough clearance from the wall. • See Clearances in . If the key has ...been lost, a replacement key can be ordered by visiting our Website ge.com, or calling GE Parts and Accessories, 800.626.2002. refrigerator to install the refrigerator. Cleaning. the breaker. large amounts of food are placed in OFF position. • Move the control...
Use and Care Manual
Page 13
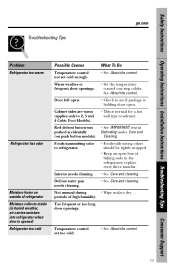
Cabinet sides are warm (applies only to 2, 3 and 4 Cubic Foot Models). • This is holding door open box of baking soda in the refrigerator; Foods transmitting odor to see if package is normal for a hot wall type condenser. Defrost ...dry. Safety Instructions Operating Instructions Installation Instructions Troubleshooting Tips Consumer Support Troubleshooting Tips ge.com Problem Refrigerator too warm Refrigerator has odor Moisture forms on push button models). Door left open. • Check to refrigerator. • Foods with strong odors should be tightly wrapped. • ...
Cabinet sides are warm (applies only to 2, 3 and 4 Cubic Foot Models). • This is holding door open box of baking soda in the refrigerator; Foods transmitting odor to see if package is normal for a hot wall type condenser. Defrost ...dry. Safety Instructions Operating Instructions Installation Instructions Troubleshooting Tips Consumer Support Troubleshooting Tips ge.com Problem Refrigerator too warm Refrigerator has odor Moisture forms on push button models). Door left open. • Check to refrigerator. • Foods with strong odors should be tightly wrapped. • ...
Use and Care Manual
Page 15
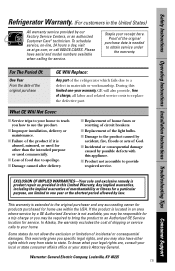
... allow the exclusion or limitation of God. To know what your legal rights are limited to one -year warranty, GE will also provide, free of the refrigerator which vary from state to spoilage. I Incidental or consequential damage caused by our Factory Service Centers, or an authorized.... Proof of the product if it is abused, misused, or used commercially. What GE Will Not Cover: I Failure of the original purchase date is not available, you may also have serial and model numbers available when calling for service. I Improper installation, delivery or maintenance. This warranty...
... allow the exclusion or limitation of God. To know what your legal rights are limited to one -year warranty, GE will also provide, free of the refrigerator which vary from state to spoilage. I Incidental or consequential damage caused by our Factory Service Centers, or an authorized.... Proof of the product if it is abused, misused, or used commercially. What GE Will Not Cover: I Failure of the original purchase date is not available, you may also have serial and model numbers available when calling for service. I Improper installation, delivery or maintenance. This warranty...


