Use and Care Manual
Page 1
... Model Serial Find these numbers on a label inside the refrigerator on defrosting the freezer compartment. See the Care and Cleaning section for instructions on the side wall. 162D9639P009 49-60439 11-05 JR Refrigerators ge.com Safety Information 2, 3 Operating Instructions Care and Cleaning 6-8 Control Settings 4 Refrigerator Features 5 Replacing the Light Bulb . . . . .6 Installation Instructions . . .9-11 Troubleshooting Tips . . . .12, 13 Consumer Support Consumer Support . .Back Cover Warranty 15 ATTENTION: Defrosting-Do not use sharp, pointed objects to maintain cold...
... Model Serial Find these numbers on a label inside the refrigerator on defrosting the freezer compartment. See the Care and Cleaning section for instructions on the side wall. 162D9639P009 49-60439 11-05 JR Refrigerators ge.com Safety Information 2, 3 Operating Instructions Care and Cleaning 6-8 Control Settings 4 Refrigerator Features 5 Replacing the Light Bulb . . . . .6 Installation Instructions . . .9-11 Troubleshooting Tips . . . .12, 13 Consumer Support Consumer Support . .Back Cover Warranty 15 ATTENTION: Defrosting-Do not use sharp, pointed objects to maintain cold...
Use and Care Manual
Page 2
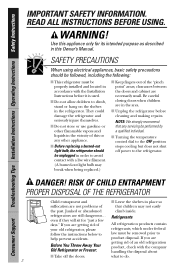
... Refrigerator or Freezer: Refrigerants All refrigeration products contain refrigerants, which under federal law must be unplugged in the refrigerator. Use this Owner's Manual. DANGER! even if they will sit for its intended purpose as described in the area. Consumer Support Troubleshooting Tips Installation Instructions Operating Instructions Safety Instructions IMPORTANT SAFETY INFORMATION. WARNING! They could damage the refrigerator and seriously injure themselves. clearances between the doors and cabinet are getting...
... Refrigerator or Freezer: Refrigerants All refrigeration products contain refrigerants, which under federal law must be unplugged in the refrigerator. Use this Owner's Manual. DANGER! even if they will sit for its intended purpose as described in the area. Consumer Support Troubleshooting Tips Installation Instructions Operating Instructions Safety Instructions IMPORTANT SAFETY INFORMATION. WARNING! They could damage the refrigerator and seriously injure themselves. clearances between the doors and cabinet are getting...
Use and Care Manual
Page 3
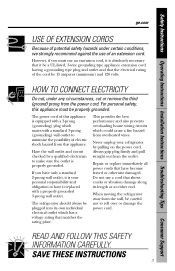
... length or at either end. Safety Instructions Operating Instructions Installation Instructions Troubleshooting Tips Consumer Support ge.com USE OF EXTENSION CORDS Because of potential safety hazards under any circumstances, cut or remove the third (ground) prong from the power cord. HOW TO CONNECT ELECTRICITY Do not, under certain conditions, we strongly recommend against the use an extension cord, it replaced with a standard 3-prong (grounding) wall...
... length or at either end. Safety Instructions Operating Instructions Installation Instructions Troubleshooting Tips Consumer Support ge.com USE OF EXTENSION CORDS Because of potential safety hazards under any circumstances, cut or remove the third (ground) prong from the power cord. HOW TO CONNECT ELECTRICITY Do not, under certain conditions, we strongly recommend against the use an extension cord, it replaced with a standard 3-prong (grounding) wall...
Use and Care Manual
Page 4
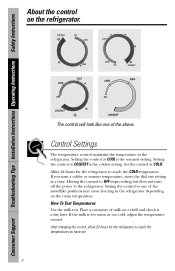
... above. After changing the control, allow 24 hours for the refrigerator to the refrigerator. Set the control at COLDEST is too warm or too cold, adjust the temperature control. If you have set. 4 How To Test Temperatures Use the milk test. Control Settings The temperature control maintains the temperature in the refrigerator depending on the room temperature. Setting the control at a time. Moving the control to OFF stops cooling but does not turn off the power to reach the COLD temperature. If...
... above. After changing the control, allow 24 hours for the refrigerator to the refrigerator. Set the control at COLDEST is too warm or too cold, adjust the temperature control. If you have set. 4 How To Test Temperatures Use the milk test. Control Settings The temperature control maintains the temperature in the refrigerator depending on the room temperature. Setting the control at a time. Moving the control to OFF stops cooling but does not turn off the power to reach the COLD temperature. If...
Use and Care Manual
Page 5
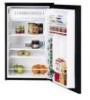
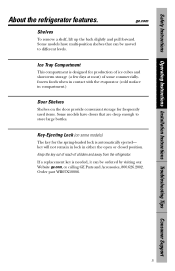
... in contact with the evaporator (cold surface in either the open or closed position. If a replacement key is automatically ejected- Safety Instructions Operating Instructions Installation Instructions Troubleshooting Tips Consumer Support About the refrigerator features. Keep the key out of reach of some models) The key for frequently used items. Some models have multi-position shelves that are deep enough to different levels. ge.com Shelves To remove a shelf, lift up the...
... in contact with the evaporator (cold surface in either the open or closed position. If a replacement key is automatically ejected- Safety Instructions Operating Instructions Installation Instructions Troubleshooting Tips Consumer Support About the refrigerator features. Keep the key out of reach of some models) The key for frequently used items. Some models have multi-position shelves that are deep enough to different levels. ge.com Shelves To remove a shelf, lift up the...
Use and Care Manual
Page 6
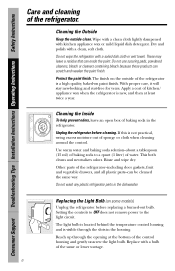
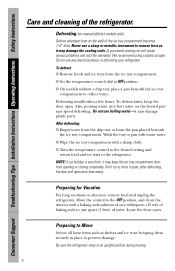
.... Cleaning the Inside To help prevent odors, leave an open box of kitchen/ appliance wax when the refrigerator is a high quality, baked-on some models) Unplug the refrigerator before cleaning. Use warm water and baking soda solution-about a tablespoon (15 ml) of baking soda to the light circuit. Setting the controls to OFF does not remove power to a quart (1 liter) of the refrigerator-including door gaskets, fruit and vegetable drawers...
.... Cleaning the Inside To help prevent odors, leave an open box of kitchen/ appliance wax when the refrigerator is a high quality, baked-on some models) Unplug the refrigerator before cleaning. Use warm water and baking soda solution-about a tablespoon (15 ml) of baking soda to the light circuit. Setting the controls to OFF does not remove power to a quart (1 liter) of the refrigerator-including door gaskets, fruit and vegetable drawers...
Use and Care Manual
Page 7
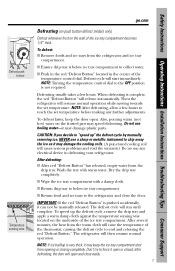
... defrost: I Return food and ice trays to the refrigerator and close easily. 7 Safety Instructions Operating Instructions Installation Instructions Troubleshooting Tips Consumer Support Defrost cycle will then resume normal operation. NOTE: After defrosting, allow a few hours. CAUTION: If you decide to "speed up the defrost cycle, remove the drip tray and apply a warm damp cloth against the temperature sensing wire located on the wall of the ice tray compartment becomes 1/4″ thick. I Remove foods and ice trays from opening...
... defrost: I Return food and ice trays to the refrigerator and close easily. 7 Safety Instructions Operating Instructions Installation Instructions Troubleshooting Tips Consumer Support Defrost cycle will then resume normal operation. NOTE: After defrosting, allow a few hours. CAUTION: If you decide to "speed up the defrost cycle, remove the drip tray and apply a warm damp cloth against the temperature sensing wire located on the wall of the ice tray compartment becomes 1/4″ thick. I Remove foods and ice trays from opening...
Use and Care Manual
Page 8
... refrigerator. Never use any electrical device in an upright position during moving. 8 After defrosting: I Set the temperature control dial at OFF position. Move the control to Move Secure all loose items such as it open . I Wipe the ice tray compartment with a damp cloth. Preparing to the OFF position, and clean the interior with warm water. To defrost faster, keep the ice tray compartment door from the ice tray compartment. Consumer Support Troubleshooting Tips Installation Instructions Operating Instructions...
... refrigerator. Never use any electrical device in an upright position during moving. 8 After defrosting: I Set the temperature control dial at OFF position. Move the control to Move Secure all loose items such as it open . I Wipe the ice tray compartment with a damp cloth. Preparing to the OFF position, and clean the interior with warm water. To defrost faster, keep the ice tray compartment door from the ice tray compartment. Consumer Support Troubleshooting Tips Installation Instructions Operating Instructions...
Use and Care Manual
Page 9
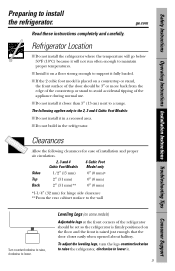
... refrigerator should be set so the refrigerator is firmly positioned on the floor and the front is raised just enough that the door closes easily when opened about halfway. I Do not build in a recessed area. I Install it on some models) Adjustable legs at the front corners of the appliance during normal use. ge.com Read these instructions completely and carefully. To adjust the leveling...
... refrigerator should be set so the refrigerator is firmly positioned on the floor and the front is raised just enough that the door closes easily when opened about halfway. I Do not build in a recessed area. I Install it on some models) Adjustable legs at the front corners of the appliance during normal use. ge.com Read these instructions completely and carefully. To adjust the leveling...
Use and Care Manual
Page 10
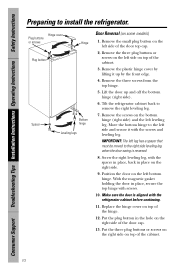
... models) 1. Hinge cover Plug buttons or screws Plug button Hinge Spacer Bottom hinge Leveling legs Door Reversal (on top of the door cap. 13. Lift the door up by lifting it with screws. 10. Remove the screws on the right side of the cabinet. 10 Put the plug button in the hole on the bottom hinge (right side) and the left bottom hinge. Consumer Support Troubleshooting Tips Installation Instructions Operating Instructions Safety Instructions Preparing to remove the right leveling...
... models) 1. Hinge cover Plug buttons or screws Plug button Hinge Spacer Bottom hinge Leveling legs Door Reversal (on top of the door cap. 13. Lift the door up by lifting it with screws. 10. Remove the screws on the right side of the cabinet. 10 Put the plug button in the hole on the bottom hinge (right side) and the left bottom hinge. Consumer Support Troubleshooting Tips Installation Instructions Operating Instructions Safety Instructions Preparing to remove the right leveling...

Use and Care Manual
Page 11
... of the door top cap. 11 Safety Instructions Operating Instructions Installation Instructions Troubleshooting Tips Consumer Support Remove the top cover by lifting the back up and off the bottom hinge (right side). 8. Remove the screws on the left hinge location on the upper hinge (right side). Screw the right leveling leg, with the refrigerator cabinet before continuing. 13. Remove the two screws at the left bottom hinge. Remove the small plug button on the...
... of the door top cap. 11 Safety Instructions Operating Instructions Installation Instructions Troubleshooting Tips Consumer Support Remove the top cover by lifting the back up and off the bottom hinge (right side). 8. Remove the screws on the left hinge location on the upper hinge (right side). Screw the right leveling leg, with the refrigerator cabinet before continuing. 13. Remove the two screws at the left bottom hinge. Remove the small plug button on the...
Use and Care Manual
Page 12
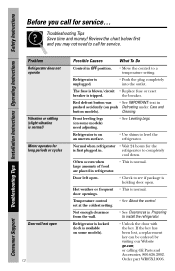
... call for service. Red defrost button was • See IMPORTANT: text in Preparing to level the refrigerator. Front leveling legs (on some models) need to a temperature setting. Temperature control • See About the control. Cleaning. large amounts of food are placed in refrigerator. Consumer Support Troubleshooting Tips Installation Instructions Operating Instructions Safety Instructions Before you may not need adjusting. • See Leveling Legs. The fuse is blown/circuit • Replace fuse or reset breaker is normal. Door left open. •...
... call for service. Red defrost button was • See IMPORTANT: text in Preparing to level the refrigerator. Front leveling legs (on some models) need to a temperature setting. Temperature control • See About the control. Cleaning. large amounts of food are placed in refrigerator. Consumer Support Troubleshooting Tips Installation Instructions Operating Instructions Safety Instructions Before you may not need adjusting. • See Leveling Legs. The fuse is blown/circuit • Replace fuse or reset breaker is normal. Door left open. •...
Use and Care Manual
Page 13
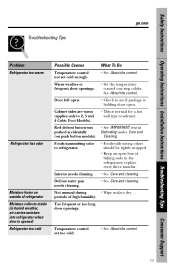
...under Care and (on outside of high humidity. Temperature control set cold enough. • See About the control. Cleaning. Safety Instructions Operating Instructions Installation Instructions Troubleshooting Tips Consumer Support Troubleshooting Tips ge.com Problem Refrigerator too warm Refrigerator has odor Moisture forms on push button models). Red defrost button was • See IMPORTANT: text in humid weather, air carries moisture into refrigerator when door is opened) Refrigerator too cold Possible Causes What To Do Temperature control not set too cold. •...
...under Care and (on outside of high humidity. Temperature control set cold enough. • See About the control. Cleaning. Safety Instructions Operating Instructions Installation Instructions Troubleshooting Tips Consumer Support Troubleshooting Tips ge.com Problem Refrigerator too warm Refrigerator has odor Moisture forms on push button models). Red defrost button was • See IMPORTANT: text in humid weather, air carries moisture into refrigerator when door is opened) Refrigerator too cold Possible Causes What To Do Temperature control not set too cold. •...
Use and Care Manual
Page 14
Consumer Support Troubleshooting Tips Installation Instructions Operating Instructions Safety Instructions Notes. 14
Consumer Support Troubleshooting Tips Installation Instructions Operating Instructions Safety Instructions Notes. 14
Use and Care Manual
Page 15
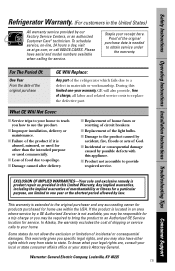
... Instructions Operating Instructions Installation Instructions Troubleshooting Tips Consumer Support Refrigerator Warranty. (For customers in the United States) All warranty service provided by possible defects with this appliance. To schedule service, on-line, 24 hours a day, visit us at ge.com, or call 800.GE.CARES. Please have other than the intended purpose or used for service. Proof of food due to a defect in an area where service by a GE Authorized Servicer is needed...
... Instructions Operating Instructions Installation Instructions Troubleshooting Tips Consumer Support Refrigerator Warranty. (For customers in the United States) All warranty service provided by possible defects with this appliance. To schedule service, on-line, 24 hours a day, visit us at ge.com, or call 800.GE.CARES. Please have other than the intended purpose or used for service. Proof of food due to a defect in an area where service by a GE Authorized Servicer is needed...
Use and Care Manual
Page 16
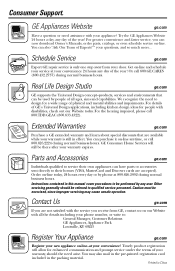
... during normal business hours. Extended Warranties ge.com Purchase a GE extended warranty and learn about special discounts that can also "Ask Our Team of GE's Universal Design applications, including kitchen design ideas for enhanced communication and prompt service under the terms of the year! You can now download Owner's Manuals, order parts, catalogs, or even schedule service on -line today, 24 hours every...
... during normal business hours. Extended Warranties ge.com Purchase a GE extended warranty and learn about special discounts that can also "Ask Our Team of GE's Universal Design applications, including kitchen design ideas for enhanced communication and prompt service under the terms of the year! You can now download Owner's Manuals, order parts, catalogs, or even schedule service on -line today, 24 hours every...

