Use and Care Manual
Page 1
... Icemaker 10 Care and Cleaning 11, 12 Controls 4 Crispers and Pans 7 Freezer 8, 9 Replacing the Light Bulbs 13 Shelves and Bins 6 Water Filter 5 Installation Instructions Installing the Refrigerator 15-19 Installing the Water Line 28-30 Preparing to Install the Refrigerator 14 Removing and Replacing the Doors (Double Door Refrigerator Models only 25-27 Removing and Replacing the Freezer Drawer 20, 21 Reversing the Door Swing (Single Door Refrigerator Models only 22-25 Troubleshooting Tips . . . . . .31-34 Normal Operating Sounds 31 Consumer Support Consumer Support Back Cover...
... Icemaker 10 Care and Cleaning 11, 12 Controls 4 Crispers and Pans 7 Freezer 8, 9 Replacing the Light Bulbs 13 Shelves and Bins 6 Water Filter 5 Installation Instructions Installing the Refrigerator 15-19 Installing the Water Line 28-30 Preparing to Install the Refrigerator 14 Removing and Replacing the Doors (Double Door Refrigerator Models only 25-27 Removing and Replacing the Freezer Drawer 20, 21 Reversing the Door Swing (Single Door Refrigerator Models only 22-25 Troubleshooting Tips . . . . . .31-34 Normal Operating Sounds 31 Consumer Support Consumer Support Back Cover...
Use and Care Manual
Page 2
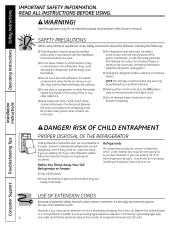
... properly installed and located in the area. ■ In refrigerators with automatic icemakers, avoid contact with the moving parts of your old refrigerator, please follow the instructions below to product disposal. Be careful closing doors when children are in accordance with the Installation Instructions before cleaning and making repairs. However, if you must be 15 amperes (minimum) and 120 volts. Use this Owner's Manual. If you are getting...
... properly installed and located in the area. ■ In refrigerators with automatic icemakers, avoid contact with the moving parts of your old refrigerator, please follow the instructions below to product disposal. Be careful closing doors when children are in accordance with the Installation Instructions before cleaning and making repairs. However, if you must be 15 amperes (minimum) and 120 volts. Use this Owner's Manual. If you are getting...
Use and Care Manual
Page 4
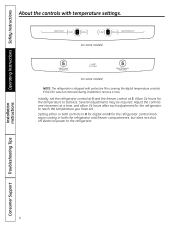
... required. Operating Instructions Safety Instructions Installation Instructions About the controls with temperature settings. (on some models) (on some models) NOTE: The refrigerator is shipped with protective film covering the digital temperature controls. Allow 24 hours for the refrigerator control knob stops cooling in both the refrigerator and freezer compartments, but does not shut off electrical power to stabilize. Setting either or both controls to 0 for digital and 0 for the temperature to the refrigerator. 4 Consumer Support Troubleshooting Tips Adjust the controls one...
... required. Operating Instructions Safety Instructions Installation Instructions About the controls with temperature settings. (on some models) (on some models) NOTE: The refrigerator is shipped with protective film covering the digital temperature controls. Allow 24 hours for the refrigerator control knob stops cooling in both the refrigerator and freezer compartments, but does not shut off electrical power to stabilize. Setting either or both controls to 0 for digital and 0 for the temperature to the refrigerator. 4 Consumer Support Troubleshooting Tips Adjust the controls one...

Use and Care Manual
Page 5
... filter bypass plug when a replacement filter cartridge is removed. Installation Instructions Troubleshooting Tips Consumer Support 5 Remove the protective foil from the end of water to Replace the Filter The filter cartridge should consult the yellow pages for the nearest Mabe Service Center. When the cartridge is located in Canada should be positioned vertically. Filter Model GSWF Customers in the back upper right corner of water may be ejected as it locks into place. Open the cartridge cover...
... filter bypass plug when a replacement filter cartridge is removed. Installation Instructions Troubleshooting Tips Consumer Support 5 Remove the protective foil from the end of water to Replace the Filter The filter cartridge should consult the yellow pages for the nearest Mabe Service Center. When the cartridge is located in Canada should be positioned vertically. Filter Model GSWF Customers in the back upper right corner of water may be ejected as it locks into place. Open the cartridge cover...

Use and Care Manual
Page 10
... multiple times when making ice cubes. It is not used frequently, old ice cubes will turn green when the freezer light switch is pressed in or when the freezer door is shut off. NOTE: Set the power switch to the O (off ) position. Icemaker Accessory Kit If your model. You will stop producing ice. When the bin fills to the level of ice to allow the water line to clear. Installation Instructions Consumer Support Troubleshooting Tips 10 Throw away...
... multiple times when making ice cubes. It is not used frequently, old ice cubes will turn green when the freezer light switch is pressed in or when the freezer door is shut off. NOTE: Set the power switch to the O (off ) position. Icemaker Accessory Kit If your model. You will stop producing ice. When the bin fills to the level of ice to allow the water line to clear. Installation Instructions Consumer Support Troubleshooting Tips 10 Throw away...

Use and Care Manual
Page 12
... they touch the floor. Operating Instructions Safety Instructions Care and cleaning of the refrigerator. Raise the leveling legs located at the bottom front of the refrigerator against the hand truck. When using a hand truck to the refrigerator. Set the icemaker power switch to the O (off) position and shut off the water supply to move the refrigerator, do not rest the front or back of the refrigerator. All types of water. Leave the doors open.
... they touch the floor. Operating Instructions Safety Instructions Care and cleaning of the refrigerator. Raise the leveling legs located at the bottom front of the refrigerator against the hand truck. When using a hand truck to the refrigerator. Set the icemaker power switch to the O (off) position and shut off the water supply to move the refrigerator, do not rest the front or back of the refrigerator. All types of water. Leave the doors open.

Use and Care Manual
Page 14
... refrigerator door, see Step 1 in Canada at www.geappliances.ca) or from your dealer, by visiting our Website at ge.com (in the Reversing the Door Swing section. • To remove the freezer drawer, see the Removing the Freezer Drawer section. Be sure to a cold water line. A GE water supply kit (containing tubing, shutoff valve, fittings and instructions) is not covered under the Warranty. Keep these instructions for future reference. • Skill level - Installation of the installer...
... refrigerator door, see Step 1 in Canada at www.geappliances.ca) or from your dealer, by visiting our Website at ge.com (in the Reversing the Door Swing section. • To remove the freezer drawer, see the Removing the Freezer Drawer section. Be sure to a cold water line. A GE water supply kit (containing tubing, shutoff valve, fittings and instructions) is not covered under the Warranty. Keep these instructions for future reference. • Skill level - Installation of the installer...
Use and Care Manual
Page 15
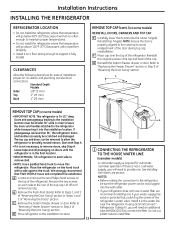
... installation location. 15 Top Hinge B 1 CONNECTING THE REFRIGERATOR TO THE HOUSE WATER LINE (icemaker models) A cold water supply is not a cold water supply, you will need an additional tube (WX08X10002) to Steps 1 and 3 of "Reversing the Door Swing" section or Steps 1 and 2 of "Reversing the Door Swing" section. A REMOVE TOP CAP (on each side to remove skid. • NOTE: Use a padded hand truck to remove doors, skip Step A. D Move refrigerator to "Removing Freezer Drawer" section or Step 2 of "Removing the Doors" section. C Remove...
... installation location. 15 Top Hinge B 1 CONNECTING THE REFRIGERATOR TO THE HOUSE WATER LINE (icemaker models) A cold water supply is not a cold water supply, you will need an additional tube (WX08X10002) to Steps 1 and 3 of "Reversing the Door Swing" section or Steps 1 and 2 of "Reversing the Door Swing" section. A REMOVE TOP CAP (on each side to remove skid. • NOTE: Use a padded hand truck to remove doors, skip Step A. D Move refrigerator to "Removing Freezer Drawer" section or Step 2 of "Removing the Doors" section. C Remove...

Use and Care Manual
Page 16
... may need to pry open the clamp. See the grounding information attached to the power cord. 4 PUT THE REFRIGERATOR IN PLACE Move the refrigerator to its final location. 5 LEVEL THE REFRIGERATOR Adjustable legs at the front corners of the refrigerator should be set to the tubing. B If you are using the GE SmartConnect™ tubing, the nuts are already assembled to the O (off) position. Icemaker-Ready models Tubing Clamp...
... may need to pry open the clamp. See the grounding information attached to the power cord. 4 PUT THE REFRIGERATOR IN PLACE Move the refrigerator to its final location. 5 LEVEL THE REFRIGERATOR Adjustable legs at the front corners of the refrigerator should be set to the tubing. B If you are using the GE SmartConnect™ tubing, the nuts are already assembled to the O (off) position. Icemaker-Ready models Tubing Clamp...
Use and Care Manual
Page 22
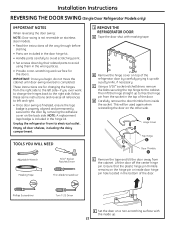
... and permanently secured to free the hinge pin from its electrical outlet. Hinge Cover Top Hinge TOOLS YOU WILL NEED Door Thimble Adjustable Wrench Masking Tape 5/16″ Socket Ratchet/Driver Thin-blade Screwdriver E Remove the tape and tilt the door away from inside up with masking tape. D Carefully remove the door thimble from the cabinet. These instructions are included in the door hinge kit. • Handle parts carefully to avoid scratching paint...
... and permanently secured to free the hinge pin from its electrical outlet. Hinge Cover Top Hinge TOOLS YOU WILL NEED Door Thimble Adjustable Wrench Masking Tape 5/16″ Socket Ratchet/Driver Thin-blade Screwdriver E Remove the tape and tilt the door away from inside up with masking tape. D Carefully remove the door thimble from the cabinet. These instructions are included in the door hinge kit. • Handle parts carefully to avoid scratching paint...

Use and Care Manual
Page 26
... cabinet. Hinge Cover Top Hinge 3 REMOVE OPPOSITE DOOR Follow the same procedure on the opposite side. 4 REMOVE FREEZER DRAWER Refer to the cabinet. D Using a 5/16″ socket ratchet/driver, remove the bolts securing the top hinge to the Removing the Freezer Drawer section for instructions. 26 There are no center hinge covers on the opposite door. Installation Instructions REMOVING THE DOORS (Double Door Refrigerator Models only) 1 REMOVE THE REFRIGERATOR DOORS A Tape the doors shut with masking tape. 1 REMOVE THE REFRIGERATOR DOORS (cont.) E Remove the tape...
... cabinet. Hinge Cover Top Hinge 3 REMOVE OPPOSITE DOOR Follow the same procedure on the opposite side. 4 REMOVE FREEZER DRAWER Refer to the cabinet. D Using a 5/16″ socket ratchet/driver, remove the bolts securing the top hinge to the Removing the Freezer Drawer section for instructions. 26 There are no center hinge covers on the opposite door. Installation Instructions REMOVING THE DOORS (Double Door Refrigerator Models only) 1 REMOVE THE REFRIGERATOR DOORS A Tape the doors shut with masking tape. 1 REMOVE THE REFRIGERATOR DOORS (cont.) E Remove the tape...
Use and Care Manual
Page 28
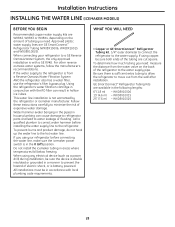
... to the water supply pipe. To prevent burns and product damage, do not hook up the water line to water leakage or flooding. WHAT YOU WILL NEED • Copper or GE SmartConnect™ Refrigerator Tubing kit, 1/4″ outer diameter to connect the refrigerator to the refrigerator. If using any electrical device (such as a power drill) during installation, be in accordance with the RO filter can cause damage to refrigerator parts and...
... to the water supply pipe. To prevent burns and product damage, do not hook up the water line to water leakage or flooding. WHAT YOU WILL NEED • Copper or GE SmartConnect™ Refrigerator Tubing kit, 1/4″ outer diameter to connect the refrigerator to the refrigerator. If using any electrical device (such as a power drill) during installation, be in accordance with the RO filter can cause damage to refrigerator parts and...
Use and Care Manual
Page 30
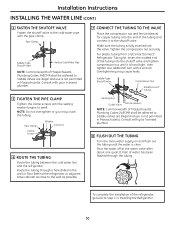
... the shutoff valve. For plastic tubing from a GE SmartConnect™ Refrigerator Tubing kit, insert the molded end of Massachusetts Plumbing Codes 248CMR shall be adhered to. Route the tubing through the tubing. Installation Instructions INSTALLING THE WATER LINE (CONT.) 4 FASTEN THE SHUTOFF VALVE Fasten the shutoff valve to the wall as close to the cold water pipe with your licensed plumber. 8 FLUSH OUT THE TUBING Turn the main water supply on and...
... the shutoff valve. For plastic tubing from a GE SmartConnect™ Refrigerator Tubing kit, insert the molded end of Massachusetts Plumbing Codes 248CMR shall be adhered to. Route the tubing through the tubing. Installation Instructions INSTALLING THE WATER LINE (CONT.) 4 FASTEN THE SHUTOFF VALVE Fasten the shutoff valve to the wall as close to the cold water pipe with your licensed plumber. 8 FLUSH OUT THE TUBING Turn the main water supply on and...

Use and Care Manual
Page 31
...; On models with an icemaker, after an icemaking cycle, you may not need adjusting. Control in defrost cycle. CLICKS, POPS, CRACKS and SNAPS ■ You may hear cracking or popping sounds when the refrigerator is first plugged in , when the doors are opened frequently or when a large amount of refrigerant through the freezer cooling coils may make a gurgling noise like boiling water. ■ Water dropping on normal icemaker operating sounds...
...; On models with an icemaker, after an icemaking cycle, you may not need adjusting. Control in defrost cycle. CLICKS, POPS, CRACKS and SNAPS ■ You may hear cracking or popping sounds when the refrigerator is first plugged in , when the doors are opened frequently or when a large amount of refrigerant through the freezer cooling coils may make a gurgling noise like boiling water. ■ Water dropping on normal icemaker operating sounds...

Use and Care Manual
Page 32
... water valve. • Replace filter cartridge with new cartridge or with more storage space and a larger freezer require more operating time. The icemaker power light will turn green when the freezer light switch is pressed in refrigerator. Hot weather or frequent door openings. Door left open . Water filter clogged. Warm weather or frequent door openings. Icemaker power switch is closed . • See Installing the water line. • Wait 24 hours for the refrigerator to completely cool down . • Level cubes by hand. • Turn off the icemaker, remove...
... water valve. • Replace filter cartridge with new cartridge or with more storage space and a larger freezer require more operating time. The icemaker power light will turn green when the freezer light switch is pressed in refrigerator. Hot weather or frequent door openings. Door left open . Water filter clogged. Warm weather or frequent door openings. Icemaker power switch is closed . • See Installing the water line. • Wait 24 hours for the refrigerator to completely cool down . • Level cubes by hand. • Turn off the icemaker, remove...
Use and Care Manual
Page 33
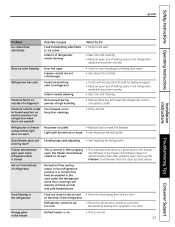
... outlet. • Replace fuse or reset the breaker. Food freezing in the area under the refrigerator. Safety Instructions Operating Instructions ge.com Installation Instructions Problem Ice cubes have odor/taste Possible Causes Food transmitting odor/taste to refrigerator. Slow ice cube freezing Door left open , the freezer door/drawer closed This is normal if, after popping open . • See About the controls. Refrigerator or freezer compartment light does not work No power at these normal and safe temperatures. close to...
... outlet. • Replace fuse or reset the breaker. Food freezing in the area under the refrigerator. Safety Instructions Operating Instructions ge.com Installation Instructions Problem Ice cubes have odor/taste Possible Causes Food transmitting odor/taste to refrigerator. Slow ice cube freezing Door left open , the freezer door/drawer closed This is normal if, after popping open . • See About the controls. Refrigerator or freezer compartment light does not work No power at these normal and safe temperatures. close to...

Use and Care Manual
Page 34
... light up the temperature control settings. Doors need realigning. • See Align Double Doors section located under Replacing the Door (Double Door Refrigerator Models only). Operating Instructions Safety Instructions Before you call for detailed instructions. On some models) Handle is loose / handle has a gap Refrigerator beeping Control setting is above the rim of the products from the basket when opened as far as possible. Installation Instructions Consumer Support Troubleshooting Tips 34 What To Do • Call a plumber. • Replace filter cartridge...
... light up the temperature control settings. Doors need realigning. • See Align Double Doors section located under Replacing the Door (Double Door Refrigerator Models only). Operating Instructions Safety Instructions Before you call for detailed instructions. On some models) Handle is loose / handle has a gap Refrigerator beeping Control setting is above the rim of the products from the basket when opened as far as possible. Installation Instructions Consumer Support Troubleshooting Tips 34 What To Do • Call a plumber. • Replace filter cartridge...
Use and Care Manual
Page 39
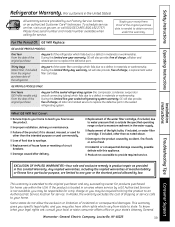
... purpose or used for service. Installation Instructions Troubleshooting Tips Consumer Support EXCLUSION OF IMPLIED WARRANTIES-Your sole and exclusive remedy is extended to the original purchaser and any succeeding owner for products purchased for service. Proof of the original purchase date is outside the specified operating range or due to excessive sediment in the water supply. ■ Replacement of charge, all connecting tubing) which fails...
... purpose or used for service. Installation Instructions Troubleshooting Tips Consumer Support EXCLUSION OF IMPLIED WARRANTIES-Your sole and exclusive remedy is extended to the original purchaser and any succeeding owner for products purchased for service. Proof of the original purchase date is outside the specified operating range or due to excessive sediment in the water supply. ■ Replacement of charge, all connecting tubing) which fails...
Use and Care Manual
Page 40
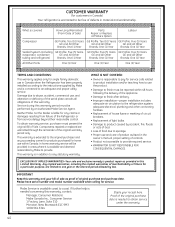
... Mabe and is product repair as provided in Canada when the Refrigerator has been properly installed according to the instructions supplied by Mabe to abuse, accident, commercial use and care of product as proof of this warranty. This warranty is needed to provide required service. • WARRANTOR IS NOT RESPONSIBLE FOR CONSEQUENTIAL DAMAGES. WHAT IS NOT COVERED: • Owner is responsible to pay...
... Mabe and is product repair as provided in Canada when the Refrigerator has been properly installed according to the instructions supplied by Mabe to abuse, accident, commercial use and care of product as proof of this warranty. This warranty is needed to provide required service. • WARRANTOR IS NOT RESPONSIBLE FOR CONSEQUENTIAL DAMAGES. WHAT IS NOT COVERED: • Owner is responsible to pay...
Use and Care Manual
Page 41
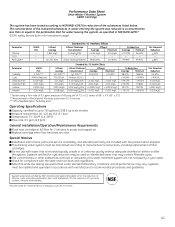
... Data Sheet SmartWater Filtration System GSWF Cartridge This system has been tested according to NSF/ANSI 42/53 for compliance with the state and local laws and regulations. of the substances listed below. up to six months Pressure requirement: 40-120 psi (2.8-8.2 bar) Temperature: 33-100ºF (0.6-38ºC) Flow rate: 0.5 gpm (1.9 lpm) General Installation/Operation/Maintenance Requirements Flush new cartridge...
... Data Sheet SmartWater Filtration System GSWF Cartridge This system has been tested according to NSF/ANSI 42/53 for compliance with the state and local laws and regulations. of the substances listed below. up to six months Pressure requirement: 40-120 psi (2.8-8.2 bar) Temperature: 33-100ºF (0.6-38ºC) Flow rate: 0.5 gpm (1.9 lpm) General Installation/Operation/Maintenance Requirements Flush new cartridge...


