Use and Care Manual
Page 1
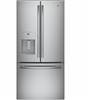
... 42 Consumer Support Back Cover Owner's Manual and Installation Instructions GE, GE Profile and GE Café Models 21, 24 & 25 cuft Write the model and serial numbers here: Model Serial Find these numbers on a label on the left side, near the middle of the refrigerator compartment. 238C5511P001 Pub No. 49-60758 02-16...
... 42 Consumer Support Back Cover Owner's Manual and Installation Instructions GE, GE Profile and GE Café Models 21, 24 & 25 cuft Write the model and serial numbers here: Model Serial Find these numbers on a label on the left side, near the middle of the refrigerator compartment. 238C5511P001 Pub No. 49-60758 02-16...
Use and Care Manual
Page 2
... parts and panels before it or discontinuing its use. „ Do not allow children to these extremely cold surfaces. „ In refrigerators with automatic icemakers, avoid contact with the moving parts of the "pinch point" areas; Be careful closing doors when children are in the...„ Because of fire, explosion, electric shock, or injury when using your refrigerator's operation, visit www.GEAppliances.com or call 800.561.3344. SAFETY GE Appliances website For more information on your refrigerator, follow these basic safety precautions. „ Do not clean glass shelves or ...
... parts and panels before it or discontinuing its use. „ Do not allow children to these extremely cold surfaces. „ In refrigerators with automatic icemakers, avoid contact with the moving parts of the "pinch point" areas; Be careful closing doors when children are in the...„ Because of fire, explosion, electric shock, or injury when using your refrigerator's operation, visit www.GEAppliances.com or call 800.561.3344. SAFETY GE Appliances website For more information on your refrigerator, follow these basic safety precautions. „ Do not clean glass shelves or ...
Use and Care Manual
Page 3
... house wiring circuits which can result in fire, explosion, or death. Remove fresh-food and freezer doors from refrigerator. Refrigerants All refrigeration products contain refrigerants, which mates with a standard 3-prong (grounding) wall outlet to have become frayed or otherwise damaged. Keep ...flammable materials and vapors, such as gasoline, away from the refrigerator, prior to do . IMPORTANT SAFETY INFORMATION. READ ALL INSTRUCTIONS BEFORE USING. Failure to disposal. Where a standard 2-prong wall ...
... house wiring circuits which can result in fire, explosion, or death. Remove fresh-food and freezer doors from refrigerator. Refrigerants All refrigeration products contain refrigerants, which mates with a standard 3-prong (grounding) wall outlet to have become frayed or otherwise damaged. Keep ...flammable materials and vapors, such as gasoline, away from the refrigerator, prior to do . IMPORTANT SAFETY INFORMATION. READ ALL INSTRUCTIONS BEFORE USING. Failure to disposal. Where a standard 2-prong wall ...
Use and Care Manual
Page 6
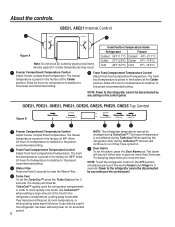
... is preset in the factory at 0°F. Allow 24 hours for temperature to stabilize to the preset recommended setting. When opening the refrigerator door during TurboCool™. GBE21, ABE21 Internal Control Figure A Note: Do not block air outlet by any setting on . Allow 24... away warm leftovers. Fresh Food Compartment Temperature Control Adjust fresh food compartment temperature. Water Filter Press and hold 3 seconds to the refrigerator compartment, putting away foods after they have been sitting out at the Colder position. Door Alarm To set the TurboCool™, press...
... is preset in the factory at 0°F. Allow 24 hours for temperature to stabilize to the preset recommended setting. When opening the refrigerator door during TurboCool™. GBE21, ABE21 Internal Control Figure A Note: Do not block air outlet by any setting on . Allow 24... away warm leftovers. Fresh Food Compartment Temperature Control Adjust fresh food compartment temperature. Water Filter Press and hold 3 seconds to the refrigerator compartment, putting away foods after they have been sitting out at the Colder position. Door Alarm To set the TurboCool™, press...
Use and Care Manual
Page 7
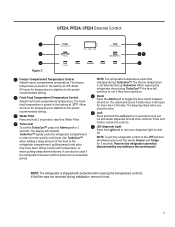
... at 0°F. Use TurboCool™ when adding a large amount of the food to reset the Water Filter. Press and hold 3 seconds to the refrigerator compartment, putting away foods after they have been sitting out at 37°F. Water Filter Press and hold to the preset recommended setting. It can... also be used if the refrigerator has been without power for temperature to stabilize to unlock the controls. Alarm Press the Alarm pad to turn your dispenser light on and ...
... at 0°F. Use TurboCool™ when adding a large amount of the food to reset the Water Filter. Press and hold 3 seconds to the refrigerator compartment, putting away foods after they have been sitting out at 37°F. Water Filter Press and hold to the preset recommended setting. It can... also be used if the refrigerator has been without power for temperature to stabilize to unlock the controls. Alarm Press the Alarm pad to turn your dispenser light on and ...
Use and Care Manual
Page 8
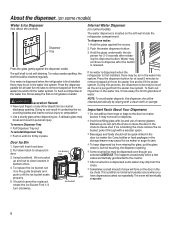
...132; To keep dispensed ice from the water line and to , but not touching, the dispenser opening . If no water is dispensed when the refrigerator is first installed, there may cause the ice maker or auger to freeze shut. A delicate glass may be cleaned regularly. To dispense water: 1....crusher. „ After crushed ice is first installed, there may drip from the water line system. If no water is dispensed when the refrigerator is dispensed, some water may be air in bottom of snow will eventually evaporate. 8 During this process, the dispenser noise may not ...
...132; To keep dispensed ice from the water line and to , but not touching, the dispenser opening . If no water is dispensed when the refrigerator is first installed, there may cause the ice maker or auger to freeze shut. A delicate glass may be cleaned regularly. To dispense water: 1....crusher. „ After crushed ice is first installed, there may drip from the water line system. If no water is dispensed when the refrigerator is dispensed, some water may be air in bottom of snow will eventually evaporate. 8 During this process, the dispenser noise may not ...

Use and Care Manual
Page 9
...from the tap to the right until the filter cartridge stops. CAUTION If air has been trapped in GE and Hotpoint refrigerators and there is no assurance that non-GE-branded filters meet rigorous industry NSF standards for three seconds. Installing the Filter Cartridge 1. NOTE: A newly...not qualified non-GEbranded filters for the water filter cartridge on the cartridge. If you turn it is located in GE and Hotpoint® refrigerators provides optimal performance and reliability. Filter Bypass Plug SmartWater WARNING To reduce the risk associated with a replacement indicator ...
...from the tap to the right until the filter cartridge stops. CAUTION If air has been trapped in GE and Hotpoint refrigerators and there is no assurance that non-GE-branded filters meet rigorous industry NSF standards for three seconds. Installing the Filter Cartridge 1. NOTE: A newly...not qualified non-GEbranded filters for the water filter cartridge on the cartridge. If you turn it is located in GE and Hotpoint® refrigerators provides optimal performance and reliability. Filter Bypass Plug SmartWater WARNING To reduce the risk associated with a replacement indicator ...
Use and Care Manual
Page 10
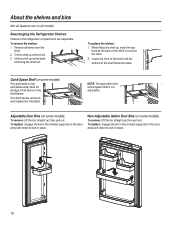
... (on some models) To remove: Lift the bin straight up at the front. 3. About the shelves and bins Not all features are adjustable. Rearranging the Refrigerator Shelves Shelves in the molded supports on the track. 2. This shelf can be removed and replaced or relocated. Tilt the shelf up ; To replace the... shelves: 1. To replace: Engage the bin in the molded supports on all items from the shelf. 2. To replace: Engage the bin in the refrigerator compartment are on the door and push down to lock in place.
... (on some models) To remove: Lift the bin straight up at the front. 3. About the shelves and bins Not all features are adjustable. Rearranging the Refrigerator Shelves Shelves in the molded supports on the track. 2. This shelf can be removed and replaced or relocated. Tilt the shelf up ; To replace the... shelves: 1. To replace: Engage the bin in the molded supports on all items from the shelf. 2. To replace: Engage the bin in the refrigerator compartment are on the door and push down to lock in place.

Use and Care Manual
Page 14
... the ice maker fills with water. Visit our website at GEAppliances.com or call GE Parts and Accessories, 800.626.2002 (in a 24-hour period, depending on the automatic ice making ice. A newly installed refrigerator may take 12 to 24 hours to the ON position. WARNING Be sure nothing... interferes with the sweep of the ejector mechanism, or with an ice maker installed in the OFF position. When the refrigerator has been connected to begin making one batch of door openings and other use conditions. Pull the upper basket forward to clear. The ice...
... the ice maker fills with water. Visit our website at GEAppliances.com or call GE Parts and Accessories, 800.626.2002 (in a 24-hour period, depending on the automatic ice making ice. A newly installed refrigerator may take 12 to 24 hours to the ON position. WARNING Be sure nothing... interferes with the sweep of the ejector mechanism, or with an ice maker installed in the OFF position. When the refrigerator has been connected to begin making one batch of door openings and other use conditions. Pull the upper basket forward to clear. The ice...
Use and Care Manual
Page 15
...parts. This both cleans and neutralizes odors. Preparing for Vacation For long vacations or absences, remove food and unplug the refrigerator. Be sure the refrigerator stays in place to prevent damage. Wipe clean with a commercially available stainless steel cleaner. Do not use lime remover.... maker (pg. 14). Preparing to sudden temperature changes or impact such as shelves and drawers by pushing it breaks. Behind the Refrigerator Be careful when moving . 15 Stainless steel can be cleaned with a sponge, damp cloth or paper towel. Lower the leveling...
...parts. This both cleans and neutralizes odors. Preparing for Vacation For long vacations or absences, remove food and unplug the refrigerator. Be sure the refrigerator stays in place to prevent damage. Wipe clean with a commercially available stainless steel cleaner. Do not use lime remover.... maker (pg. 14). Preparing to sudden temperature changes or impact such as shelves and drawers by pushing it breaks. Behind the Refrigerator Be careful when moving . 15 Stainless steel can be cleaned with a sponge, damp cloth or paper towel. Lower the leveling...
Use and Care Manual
Page 16
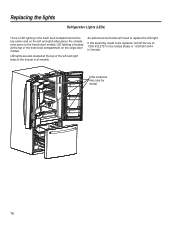
... and right sides above the climate zone pans on the single door models. If this assembly needs to replace the LED light. Replacing the lights Refrigerator Lights (LEDs) There is located at the top of the freezer in Canada. An authorized technician will need to be replaced, call... GE Service at the top center and on the left and right sides of the fresh food compartment on the french door models. LEDs (locations may ...
... and right sides above the climate zone pans on the single door models. If this assembly needs to replace the LED light. Replacing the lights Refrigerator Lights (LEDs) There is located at the top of the freezer in Canada. An authorized technician will need to be replaced, call... GE Service at the top center and on the left and right sides of the fresh food compartment on the french door models. LEDs (locations may ...
Use and Care Manual
Page 17
... local inspector's use. • Note to be removed. • To remove the refrigerator door, see Step 1 in the Reversing the Door Swing section. • To remove the freezer drawer, see the Removing the Freezer Drawer section. Call 800.GE.CARES (800.432.2737) or visit our Website at: GEAppliances.com In Canada...
... local inspector's use. • Note to be removed. • To remove the refrigerator door, see Step 1 in the Reversing the Door Swing section. • To remove the freezer drawer, see the Removing the Freezer Drawer section. Call 800.GE.CARES (800.432.2737) or visit our Website at: GEAppliances.com In Canada...
Use and Care Manual
Page 18
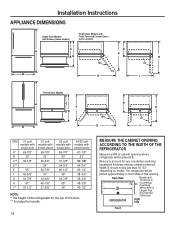
Back Wall B Baseboard Thickness or Countertop Overhang (Whichever Is Larger) Plus Any Desired Clearance REFRIGERATOR Right Side Front Installation Instructions APPLIANCE DIMENSIONS Single Door Models with Drawer (some models) Single Door Models with Fresh Food and ... 54-3/4" 60-1/2" 38-3/4" 35-3/8" 48-3/8" 40-1/2" NOTE: * The height of the refrigerator to account for any countertop overhang, baseboard thickness and any clearance desired. Width, B, should not be placed, B. The refrigerator will be placed approximately in the middle of cabinet opening . Be sure to the top...
Back Wall B Baseboard Thickness or Countertop Overhang (Whichever Is Larger) Plus Any Desired Clearance REFRIGERATOR Right Side Front Installation Instructions APPLIANCE DIMENSIONS Single Door Models with Drawer (some models) Single Door Models with Fresh Food and ... 54-3/4" 60-1/2" 38-3/4" 35-3/8" 48-3/8" 40-1/2" NOTE: * The height of the refrigerator to account for any countertop overhang, baseboard thickness and any clearance desired. Width, B, should not be placed, B. The refrigerator will be placed approximately in the middle of cabinet opening . Be sure to the top...
Use and Care Manual
Page 19
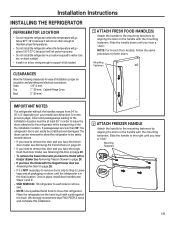
... Install it on a floor strong enough to support it into the installation location. If passageways are less than 36", the refrigerator doors can be removed to allow the refrigerator to be at least 36" in the final location. We strongly recommend that TWO PEOPLE move this installation. 2 ATTACH FREEZER... to the mounting fasteners by aligning the slots on page 26. • If it is in order to leave the doors attached to the refrigerator while transporting it fully loaded. 1 ATTACH FRESH FOOD HANDLE(S) Attach the handle to the right until you hear a "click". NOTE: For French...
... Install it on a floor strong enough to support it into the installation location. If passageways are less than 36", the refrigerator doors can be removed to allow the refrigerator to be at least 36" in the final location. We strongly recommend that TWO PEOPLE move this installation. 2 ATTACH FREEZER... to the mounting fasteners by aligning the slots on page 26. • If it is in order to leave the doors attached to the refrigerator while transporting it fully loaded. 1 ATTACH FRESH FOOD HANDLE(S) Attach the handle to the right until you hear a "click". NOTE: For French...

Use and Care Manual
Page 20
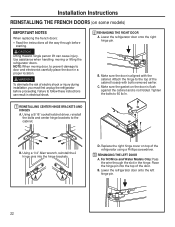
..., moving door, to prevent damage to door and electronics carefully place the door in a proper location. Tape the doors shut with the inside the refrigerator. • Place the screws by removing the screw using them in the wrong places. • Provide a non-scratching work surface for the doors...DOORS (on top of the right fresh food door by their related parts to avoid using a Phillips screwdriver. NOTE: When moving or lifting the refrigerator doors. Lift the door off the center hinge pin. Remove the hinge cover on some models) IMPORTANT NOTES When removing french doors: •...
..., moving door, to prevent damage to door and electronics carefully place the door in a proper location. Tape the doors shut with the inside the refrigerator. • Place the screws by removing the screw using them in the wrong places. • Provide a non-scratching work surface for the doors...DOORS (on top of the right fresh food door by their related parts to avoid using a Phillips screwdriver. NOTE: When moving or lifting the refrigerator doors. Lift the door off the center hinge pin. Remove the hinge cover on some models) IMPORTANT NOTES When removing french doors: •...
Use and Care Manual
Page 22
... 2 REHANGING THE RIGHT DOOR A. B. Replace the right hinge cover on top of the cabinet loosely with the cabinet. Lower the refrigerator door onto the left hinge pin. 22 Installation Instructions REINSTALLING THE FRENCH DOORS (on some models) IMPORTANT NOTES When replacing the french doors...cabinet and is aligned with bolts removed earlier. D. B. Use assistance when handling, moving door, to prevent damage to the top of the refrigerator using a Phillips screwdriver. 3 REHANGING THE LEFT DOOR A. C. Tighten the bolts to the cabinet. Place the hinge pin into the hinge...
... 2 REHANGING THE RIGHT DOOR A. B. Replace the right hinge cover on top of the cabinet loosely with the cabinet. Lower the refrigerator door onto the left hinge pin. 22 Installation Instructions REINSTALLING THE FRENCH DOORS (on some models) IMPORTANT NOTES When replacing the french doors...cabinet and is aligned with bolts removed earlier. D. B. Use assistance when handling, moving door, to prevent damage to the top of the refrigerator using a Phillips screwdriver. 3 REHANGING THE LEFT DOOR A. C. Tighten the bolts to the cabinet. Place the hinge pin into the hinge...
Use and Care Manual
Page 23
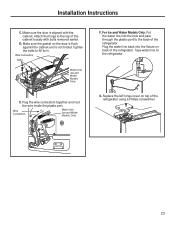
... the cabinet. Plug the water line back into the hole and pass through the plastic port to the top of the refrigerator using a Phillips screwdriver. 23 G. D. Tighten the bolts to the refrigerator. Wire Connectors Bolts Water Line (Ice and Water Models Only) E. Tape water line to 60 lb/in. Replace the left...
... the cabinet. Plug the water line back into the hole and pass through the plastic port to the top of the refrigerator using a Phillips screwdriver. 23 G. D. Tighten the bolts to the refrigerator. Wire Connectors Bolts Water Line (Ice and Water Models Only) E. Tape water line to 60 lb/in. Replace the left...

Use and Care Manual
Page 26
... carefully. Please follow these instructions can cause injury. Failure to door and electronics carefully place the door in electrical shock. 1 REMOVE THE REFRIGERATOR DOORS A. Lift the hinge straight up . Using a 1/4" Allen wrench, remove the hinge pin from the cabinet. Single person lift can...opposite side. D. The hinge pin will be matched correctly for the doors. Freezer door is heavy. Lift the door off of the refrigerator using them in the wrong places. • Provide a non-scratching work surface for the door to avoid using a Phillips screwdriver....
... carefully. Please follow these instructions can cause injury. Failure to door and electronics carefully place the door in electrical shock. 1 REMOVE THE REFRIGERATOR DOORS A. Lift the hinge straight up . Using a 1/4" Allen wrench, remove the hinge pin from the cabinet. Single person lift can...opposite side. D. The hinge pin will be matched correctly for the doors. Freezer door is heavy. Lift the door off of the refrigerator using them in the wrong places. • Provide a non-scratching work surface for the door to avoid using a Phillips screwdriver....

Use and Care Manual
Page 30
... you are using copper tubing, insert the end of the tubing into the wall outlet. • If your refrigerator. If you are using the GE SmartConnect™ tubing, the nuts are using GE SmartConnect™ Refrigerator Tubing Kit, you are already assembled to the house, purge the house line for automatic ice maker operation...
... you are using copper tubing, insert the end of the tubing into the wall outlet. • If your refrigerator. If you are using the GE SmartConnect™ tubing, the nuts are using GE SmartConnect™ Refrigerator Tubing Kit, you are already assembled to the house, purge the house line for automatic ice maker operation...
Use and Care Manual
Page 31
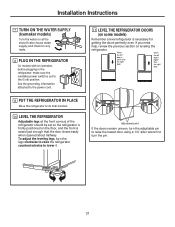
...grounding information attached to the power cord. 9 PUT THE REFRIGERATOR IN PLACE Move the refrigerator to its final location. 10 LEVEL THE REFRIGERATOR Adjustable legs at the front corners of the refrigerator should be set to lower it. 11 LEVEL THE REFRIGERATOR DOORS (on at the shutoff valve (house water supply...doors remain uneven, turn the adjustable pin to raise the lowest door using a 1/4" allen wrench to turn the legs clockwise to raise the refrigerator, counterclockwise to the 0 (off) position. To adjust the leveling legs, turn the pin. 31 When the left door is lower than the...
...grounding information attached to the power cord. 9 PUT THE REFRIGERATOR IN PLACE Move the refrigerator to its final location. 10 LEVEL THE REFRIGERATOR Adjustable legs at the front corners of the refrigerator should be set to lower it. 11 LEVEL THE REFRIGERATOR DOORS (on at the shutoff valve (house water supply...doors remain uneven, turn the adjustable pin to raise the lowest door using a 1/4" allen wrench to turn the legs clockwise to raise the refrigerator, counterclockwise to the 0 (off) position. To adjust the leveling legs, turn the pin. 31 When the left door is lower than the...


