
Owners Manual
Page 1
Disposall® Food Waste Disposer ge.com Safety Information Connecting Electricity 2, 3 Safety Precautions 2 Installation Instructions Attaching the Discharge Elbow 6 Components and Installation of Sink Flange 5 Connecting Disposer to Sink Flange 7 Dimensions/Typical Installations 8 Dishwasher Connection 6 Operating Instructions Batch Feed Models 9 Care and Maintenance 10 Continuous Feed Models 9 Troubleshooting Tips Before You Call for Service 11 Customer Service Warranty 12 Owner...
Disposall® Food Waste Disposer ge.com Safety Information Connecting Electricity 2, 3 Safety Precautions 2 Installation Instructions Attaching the Discharge Elbow 6 Components and Installation of Sink Flange 5 Connecting Disposer to Sink Flange 7 Dimensions/Typical Installations 8 Dishwasher Connection 6 Operating Instructions Batch Feed Models 9 Care and Maintenance 10 Continuous Feed Models 9 Troubleshooting Tips Before You Call for Service 11 Customer Service Warranty 12 Owner...

Owners Manual
Page 2
...Owner's Manual. INSTRUCTIONS PERTAINING TO A RISK OF FIRE, ELECTRIC SHOCK OR INJURY TO PERSONS WARNING! For Models Equipped with electrical power and procedures, call a qualified electrician. This appliance is properly grounded. d) Large whole bones. b) Caustic drain cleaners or similar ... are not familiar with a Grounded Cord: GROUNDING INSTRUCTIONS: This appliance must be grounded. When using the appliance. The plug must be plugged into the disposer. have a proper outlet installed by a waste disposer, do not put fingers or hands into a disposer: a) Clam or oyster shells....
...Owner's Manual. INSTRUCTIONS PERTAINING TO A RISK OF FIRE, ELECTRIC SHOCK OR INJURY TO PERSONS WARNING! For Models Equipped with electrical power and procedures, call a qualified electrician. This appliance is properly grounded. d) Large whole bones. b) Caustic drain cleaners or similar ... are not familiar with a Grounded Cord: GROUNDING INSTRUCTIONS: This appliance must be grounded. When using the appliance. The plug must be plugged into the disposer. have a proper outlet installed by a waste disposer, do not put fingers or hands into a disposer: a) Clam or oyster shells....

Owners Manual
Page 3
... wire. 4. The power cord and/or connections must be attached to whether the appliance is properly grounded. A. Install the cable connector in length. If a plug-in cord is used in the with the National Electrical Code, Section 422 and/or local codes and ordinances. SAVE THESE INSTRUCTIONS 3 ge.com WARNING! Wire the disposer directly into the...
... wire. 4. The power cord and/or connections must be attached to whether the appliance is properly grounded. A. Install the cable connector in length. If a plug-in cord is used in the with the National Electrical Code, Section 422 and/or local codes and ordinances. SAVE THESE INSTRUCTIONS 3 ge.com WARNING! Wire the disposer directly into the...

Owners Manual
Page 4
...Consumer. • Note to improper installation is the responsibility of any materials to leave these instructions for cast sinks) • Stepped rubber drain adapter • Wire nuts • Cable connector • Flexible drain pipe • Power cord kit (Part Number PM3X215GDS) 4 ...sink surfaces must be free of the installer. • Product failure due to Consumer - Remove old disposer or sink flange assembly. 3. Installation Instructions Disposer If you have questions, call 1-800-GECARES or visit our Website at: ge.com BEFORE YOU BEGIN Read these instructions ...
...Consumer. • Note to improper installation is the responsibility of any materials to leave these instructions for cast sinks) • Stepped rubber drain adapter • Wire nuts • Cable connector • Flexible drain pipe • Power cord kit (Part Number PM3X215GDS) 4 ...sink surfaces must be free of the installer. • Product failure due to Consumer - Remove old disposer or sink flange assembly. 3. Installation Instructions Disposer If you have questions, call 1-800-GECARES or visit our Website at: ge.com BEFORE YOU BEGIN Read these instructions ...

Owners Manual
Page 5
... may want to insert the stopper in the sink and fill with batch feed model Screws Discharge Elbow INSTALLATION OF SINK FLANGE (Read completely before you use putty instead of the sink flange. Unscrew the support ring from the disposer by the factory. If no leaks. F. From under the sink. Raise the mount...
... may want to insert the stopper in the sink and fill with batch feed model Screws Discharge Elbow INSTALLATION OF SINK FLANGE (Read completely before you use putty instead of the sink flange. Unscrew the support ring from the disposer by the factory. If no leaks. F. From under the sink. Raise the mount...
Owners Manual
Page 6
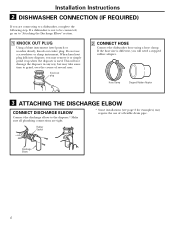
... hose clamp. Rubber Gasket Discharge Elbow 6 If a dishwasher is used. If the hose size is different, you will not damage the disposer in any way, but may take some time to a dishwasher, complete the following step. Hose Clamp Stepped Rubber Adapter 3 ATTACHING THE ... CONNECT DISCHARGE ELBOW Connect the discharge elbow to the disposer.* Make sure all plumbing connections are connecting to grind, over the course of a flexible drain pipe. Installation Instructions 2 DISHWASHER CONNECTION (IF REQUIRED) If you are tight. * Some installations (see page 8 for examples) may require the ...
... hose clamp. Rubber Gasket Discharge Elbow 6 If a dishwasher is used. If the hose size is different, you will not damage the disposer in any way, but may take some time to a dishwasher, complete the following step. Hose Clamp Stepped Rubber Adapter 3 ATTACHING THE ... CONNECT DISCHARGE ELBOW Connect the discharge elbow to the disposer.* Make sure all plumbing connections are connecting to grind, over the course of a flexible drain pipe. Installation Instructions 2 DISHWASHER CONNECTION (IF REQUIRED) If you are tight. * Some installations (see page 8 for examples) may require the ...
Owners Manual
Page 7
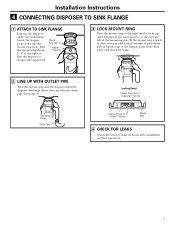
... ring is temporarily supported. Turn the mount ring about 1/4″ to the right so that the disposer is hard to the hopper projection. Installation Instructions 4 CONNECTING DISPOSER TO SINK FLANGE 1 ATTACH TO SINK FLANGE Line up the disposer under the sink flange. Locking Detail Hopper Projection in "Supported" Position Discharge Elbow Outlet Pipe Hopper...
... ring is temporarily supported. Turn the mount ring about 1/4″ to the right so that the disposer is hard to the hopper projection. Installation Instructions 4 CONNECTING DISPOSER TO SINK FLANGE 1 ATTACH TO SINK FLANGE Line up the disposer under the sink flange. Locking Detail Hopper Projection in "Supported" Position Discharge Elbow Outlet Pipe Hopper...
Owners Manual
Page 8
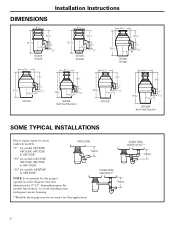
.../2" GFB1060F Batch Feed Operation SOME TYPICAL INSTALLATIONS Direct replacement for most makes & models. *9″ for model GFC320F, GFC520F, GFC325F, & GFC525F. *10″ for models GFC530F, GFC535F, GFC720F & GFC1020F. *12″ for this application. 8 SINGLE BOWL *Approx. DOUBLE BOWL END OUTLET** NOTE: It is essential for the proper operation of the disposer that this dimension...
.../2" GFB1060F Batch Feed Operation SOME TYPICAL INSTALLATIONS Direct replacement for most makes & models. *9″ for model GFC320F, GFC520F, GFC325F, & GFC525F. *10″ for models GFC530F, GFC535F, GFC720F & GFC1020F. *12″ for this application. 8 SINGLE BOWL *Approx. DOUBLE BOWL END OUTLET** NOTE: It is essential for the proper operation of the disposer that this dimension...

Owners Manual
Page 9
...neck of cold water. D. Batch Feed Models A. Scrape in food waste. Oval Handle C. Insert the stopper to ON. Continuous Feed Models A. C. Scrape in food waste. D. Run the disposer for approximately 25 seconds after shredding ...Installation Instructions Operating Instructions Troubleshooting Tips Consumer Support Operating instructions. ge.com This disposer uses anti-jam swivel impellers that make a clicking sound as they can be alarmed that the largest slot lines up with the switch plunger. B. The disposer is actually increasing torque (grinding power...
...neck of cold water. D. Batch Feed Models A. Scrape in food waste. Oval Handle C. Insert the stopper to ON. Continuous Feed Models A. C. Scrape in food waste. D. Run the disposer for approximately 25 seconds after shredding ...Installation Instructions Operating Instructions Troubleshooting Tips Consumer Support Operating instructions. ge.com This disposer uses anti-jam swivel impellers that make a clicking sound as they can be alarmed that the largest slot lines up with the switch plunger. B. The disposer is actually increasing torque (grinding power...

Owners Manual
Page 11
...lodged between the turntable and the grind ring. Improper seating of the disposer. Support ring not tightened properly. 3. ge.com SAFETY NOTE: Before investigating, you must disconnect the power supply. Push the button in until it has been tripped. The ...Installation Instructions Operating Instructions Troubleshooting Tips Consumer Support Before you call for service. The overload control prevents the motor from operating should overloading occur. Troubleshooting Tips Save time and money! Problem Loud noises (other than those during grinding of elbow flange screws. *Batch Feed...
...lodged between the turntable and the grind ring. Improper seating of the disposer. Support ring not tightened properly. 3. ge.com SAFETY NOTE: Before investigating, you must disconnect the power supply. Push the button in until it has been tripped. The ...Installation Instructions Operating Instructions Troubleshooting Tips Consumer Support Before you call for service. The overload control prevents the motor from operating should overloading occur. Troubleshooting Tips Save time and money! Problem Loud noises (other than those during grinding of elbow flange screws. *Batch Feed...

Owners Manual
Page 12
... allow the exclusion or limitation of circuit breakers. Troubleshooting Tips Operating Instructions Installation Instructions Safety Instructions Disposer Warranty. This warranty is abused, misused, or used commercially. I Product not accessible to functional parts only (appearance parts are limited to one -year warranty, GE will also provide, free of merchantability or fitness for a particular purpose...
... allow the exclusion or limitation of circuit breakers. Troubleshooting Tips Operating Instructions Installation Instructions Safety Instructions Disposer Warranty. This warranty is abused, misused, or used commercially. I Product not accessible to functional parts only (appearance parts are limited to one -year warranty, GE will also provide, free of merchantability or fitness for a particular purpose...
