
Owners Manual
Page 1
A Disposall® Food Waste Disposer ge.com Safety Information Connecting Electricity 2, 3 Safety Precautions 2 Installation Instructions Attaching the Discharge Elbow 6 Components and Installation of Sink Flange 5 Connecting Disposer to Sink Flange 7 Dimensions/Typical Installations 8 Dishwasher Connection 6 Operating Instructions Batch Feed Models 9 Care and Maintenance 10 Continuous Feed Models 9 Troubleshooting Tips Before You Call for Service 11 Customer Service Warranty 12 Owner's Manual & Installation Instructions Model Line Series GFC300F GFC500F GFC700F GFB700F ...
A Disposall® Food Waste Disposer ge.com Safety Information Connecting Electricity 2, 3 Safety Precautions 2 Installation Instructions Attaching the Discharge Elbow 6 Components and Installation of Sink Flange 5 Connecting Disposer to Sink Flange 7 Dimensions/Typical Installations 8 Dishwasher Connection 6 Operating Instructions Batch Feed Models 9 Care and Maintenance 10 Continuous Feed Models 9 Troubleshooting Tips Before You Call for Service 11 Customer Service Warranty 12 Owner's Manual & Installation Instructions Model Line Series GFC300F GFC500F GFC700F GFB700F ...

Owners Manual
Page 2
... this Owner's Manual. Do not modify the plug provided with a Grounded Cord: GROUNDING INSTRUCTIONS: This appliance must be expelled by a qualified electrician. When using the appliance. Consumer Support Troubleshooting Tips Operating Instructions Installation Instructions Safety Instructions IMPORTANT SAFETY INSTRUCTIONS. I Use this appliance only for electric current to the off position before using electrical appliances, basic safety precautions should be grounded. I When attempting to remove objects from the disposer. d) Large...
... this Owner's Manual. Do not modify the plug provided with a Grounded Cord: GROUNDING INSTRUCTIONS: This appliance must be expelled by a qualified electrician. When using the appliance. Consumer Support Troubleshooting Tips Operating Instructions Installation Instructions Safety Instructions IMPORTANT SAFETY INSTRUCTIONS. I Use this appliance only for electric current to the off position before using electrical appliances, basic safety precautions should be grounded. I When attempting to remove objects from the disposer. d) Large...

Owners Manual
Page 3
... wire should install a proper ground. the disposer (end bell). Safety Instructions Installation Instructions Operating Instructions Troubleshooting Tips Consumer Support IMPORTANT SAFETY INSTRUCTIONS. The power cord and/or connections must be connected to disposer ground screw and attach other end of the Disposer (end bell) B. The plug must comply with a cord, you use a three- Install the cable connector in length and not to white lead of electric shock. To House Current or Power Cord Wire Nuts Remove Cover...
... wire should install a proper ground. the disposer (end bell). Safety Instructions Installation Instructions Operating Instructions Troubleshooting Tips Consumer Support IMPORTANT SAFETY INSTRUCTIONS. The power cord and/or connections must be connected to disposer ground screw and attach other end of the Disposer (end bell) B. The plug must comply with a cord, you use a three- Install the cable connector in length and not to white lead of electric shock. To House Current or Power Cord Wire Nuts Remove Cover...

Owners Manual
Page 4
...; Completion time - 1 hour • Proper installation is not covered under the Warranty. Inspect drain line. Save these instructions completely and carefully. • IMPORTANT - Observe all governing codes and ordinances. • Note to Installer - Remove old disposer or sink flange assembly. 3. Installation Instructions Disposer If you have questions, call 1-800-GECARES or visit our Website at: ge.com BEFORE YOU BEGIN Read these instructions for local inspector's use. • IMPORTANT -
...; Completion time - 1 hour • Proper installation is not covered under the Warranty. Inspect drain line. Save these instructions completely and carefully. • IMPORTANT - Observe all governing codes and ordinances. • Note to Installer - Remove old disposer or sink flange assembly. 3. Installation Instructions Disposer If you have questions, call 1-800-GECARES or visit our Website at: ge.com BEFORE YOU BEGIN Read these instructions for local inspector's use. • IMPORTANT -

Owners Manual
Page 5
... the sink flange. Installation Instructions 1 COMPONENTS AND INSTALLATION COMPONENTS *Stopper *Removable Splash Guard Sink Flange Rubber Sink Flange Gasket Sink Flange Assembly Sink Fiber Gasket Support Ring (Note Arrows Indicating Up) Mount Ring Tightening Ears Cushion Mount Groove Hopper Dishwasher Discharge Inlet Elbow Gasket Disposer End Bell (Electrical Connections) Elbow Flange Rating Label in This Area *Not used with the bottom edge of the sink opening. Disassemble the sink flange assembly from the sink flange and remove the fiber gasket. From under the sink. At...
... the sink flange. Installation Instructions 1 COMPONENTS AND INSTALLATION COMPONENTS *Stopper *Removable Splash Guard Sink Flange Rubber Sink Flange Gasket Sink Flange Assembly Sink Fiber Gasket Support Ring (Note Arrows Indicating Up) Mount Ring Tightening Ears Cushion Mount Groove Hopper Dishwasher Discharge Inlet Elbow Gasket Disposer End Bell (Electrical Connections) Elbow Flange Rating Label in This Area *Not used with the bottom edge of the sink opening. Disassemble the sink flange assembly from the sink flange and remove the fiber gasket. From under the sink. At...
Owners Manual
Page 6
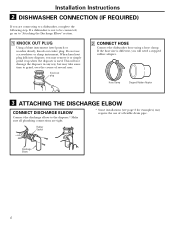
... when the disposer is different, you are tight. * Some installations (see page 8 for examples) may take some time to "Attaching the Discharge Elbow" section. 1 KNOCK OUT PLUG Using a blunt instrument (steel punch or wooden dowel), knock out entire plug. If the hose size is used. If a dishwasher is not to be connected, go on to grind, over the course of a flexible drain pipe.
... when the disposer is different, you are tight. * Some installations (see page 8 for examples) may take some time to "Attaching the Discharge Elbow" section. 1 KNOCK OUT PLUG Using a blunt instrument (steel punch or wooden dowel), knock out entire plug. If the hose size is used. If a dishwasher is not to be connected, go on to grind, over the course of a flexible drain pipe.
Owners Manual
Page 7
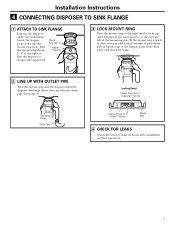
... OUTLET PIPE Turn the mount ring and the disposer until it locks up the disposer under the sink flange. Guide the hopper projections into the mount ring slots. Hopper projections must be to the right until the disposer discharge elbow lines up with the outlet pipe (see page 8). Run water and check for leaks 24 hours after installation and first operation. 7 Installation Instructions 4 CONNECTING DISPOSER TO SINK FLANGE 1 ATTACH TO SINK FLANGE Line...
... OUTLET PIPE Turn the mount ring and the disposer until it locks up the disposer under the sink flange. Guide the hopper projections into the mount ring slots. Hopper projections must be to the right until the disposer discharge elbow lines up with the outlet pipe (see page 8). Run water and check for leaks 24 hours after installation and first operation. 7 Installation Instructions 4 CONNECTING DISPOSER TO SINK FLANGE 1 ATTACH TO SINK FLANGE Line...
Owners Manual
Page 8
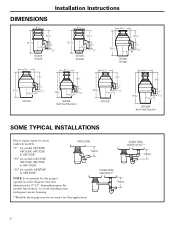
..." 5 9/16" 4 1/2" 11/2" GFB1060F Batch Feed Operation SOME TYPICAL INSTALLATIONS Direct replacement for most makes & models. *9″ for model GFC320F, GFC520F, GFC325F, & GFC525F. *10″ for models GFC530F, GFC535F, GFC720F & GFC1020F. *12″ for this dimension be 9″-12″, depending upon the models listed above, to avoid standing water in disposer motor housing. *Approx. **Flexible drain pipe may be necessary for models GFB760F & GFB1060F. SINGLE BOWL...
..." 5 9/16" 4 1/2" 11/2" GFB1060F Batch Feed Operation SOME TYPICAL INSTALLATIONS Direct replacement for most makes & models. *9″ for model GFC320F, GFC520F, GFC325F, & GFC525F. *10″ for models GFC530F, GFC535F, GFC720F & GFC1020F. *12″ for this dimension be 9″-12″, depending upon the models listed above, to avoid standing water in disposer motor housing. *Approx. **Flexible drain pipe may be necessary for models GFB760F & GFB1060F. SINGLE BOWL...

Owners Manual
Page 9
Safety Instructions Installation Instructions Operating Instructions Troubleshooting Tips Consumer Support Operating instructions. Scrape in food waste. Do not be flushed down to seal the sink without starting the disposer. The disposer is actually increasing torque (grinding power) and is thoroughly flushed through the trap and drain. Batch Feed Models A. Insert the stopper to shut the disposer off , let the water and the disposer run for 25 seconds after shredding stops. One of the two small...
Safety Instructions Installation Instructions Operating Instructions Troubleshooting Tips Consumer Support Operating instructions. Scrape in food waste. Do not be flushed down to seal the sink without starting the disposer. The disposer is actually increasing torque (grinding power) and is thoroughly flushed through the trap and drain. Batch Feed Models A. Insert the stopper to shut the disposer off , let the water and the disposer run for 25 seconds after shredding stops. One of the two small...

Owners Manual
Page 10
.... Consumer Support 10 It will handle all normal food wastes-BUT it out from falling into the disposer. TO SPEED UP FOOD WASTE DISPOSAL... THE MOTOR IS PERMANENTLY LUBRICATED FOR LIFE. These are waste materials and belong in use . Items such as they cause serious corrosion of metal parts. I Your disposer, except for ease of trouble-free service. Remove the splash guard by pulling it will also work. You...
.... Consumer Support 10 It will handle all normal food wastes-BUT it out from falling into the disposer. TO SPEED UP FOOD WASTE DISPOSAL... THE MOTOR IS PERMANENTLY LUBRICATED FOR LIFE. These are waste materials and belong in use . Items such as they cause serious corrosion of metal parts. I Your disposer, except for ease of trouble-free service. Remove the splash guard by pulling it will also work. You...

Owners Manual
Page 11
..., there may be internal problems. Remove Splash Guard Turntable Disposer leaks If the leak is at the discharge elbow, leak may be caused by: 1. Safety Instructions Installation Instructions Operating Instructions Troubleshooting Tips Consumer Support Before you may not need to call for service... Before resetting, disconnect the power supply-please see if it has been tripped. When overloaded, the motor will move freely using a broom handle. Reset button has been tripped. Push...
..., there may be internal problems. Remove Splash Guard Turntable Disposer leaks If the leak is at the discharge elbow, leak may be caused by: 1. Safety Instructions Installation Instructions Operating Instructions Troubleshooting Tips Consumer Support Before you may not need to call for service... Before resetting, disconnect the power supply-please see if it has been tripped. When overloaded, the motor will move freely using a broom handle. Reset button has been tripped. Push...

Owners Manual
Page 12
... purchase GE Will Replace: The entire disposer if there is abused, misused, or used for service. Louisville, KY 40225 Consumer Support 12 Printed in an area where service by our Factory Service Centers, or an authorized Customer Care® technician. During this limited one-year warranty, GE will also provide, free of merchantability or fitness for home use the product. Troubleshooting Tips Operating Instructions Installation Instructions Safety Instructions Disposer Warranty. All warranty service provided by a GE...
... purchase GE Will Replace: The entire disposer if there is abused, misused, or used for service. Louisville, KY 40225 Consumer Support 12 Printed in an area where service by our Factory Service Centers, or an authorized Customer Care® technician. During this limited one-year warranty, GE will also provide, free of merchantability or fitness for home use the product. Troubleshooting Tips Operating Instructions Installation Instructions Safety Instructions Disposer Warranty. All warranty service provided by a GE...


