

Owners Manual
Page 1
A Disposall® Food Waste Disposer ge.com Safety Information Connecting Electricity 2, 3 Safety Precautions 2 Installation Instructions Attaching the Discharge Elbow 6 Components and Installation of Sink Flange 5 Connecting Disposer to Sink Flange 7 Dimensions/Typical Installations 8 Dishwasher Connection 6 Operating Instructions Batch Feed Models 9 Care and Maintenance 10 Continuous Feed Models 9 Troubleshooting Tips Before You Call for Service 11 Customer Service...
A Disposall® Food Waste Disposer ge.com Safety Information Connecting Electricity 2, 3 Safety Precautions 2 Installation Instructions Attaching the Discharge Elbow 6 Components and Installation of Sink Flange 5 Connecting Disposer to Sink Flange 7 Dimensions/Typical Installations 8 Dishwasher Connection 6 Operating Instructions Batch Feed Models 9 Care and Maintenance 10 Continuous Feed Models 9 Troubleshooting Tips Before You Call for Service 11 Customer Service...

Owners Manual
Page 2
...equipped with a qualified electrician or serviceman if you are in accordance with a Grounded Cord: GROUNDING INSTRUCTIONS: This appliance must be followed, including the following into a waste disposer. I Use this manual. d) Large whole bones. INSTRUCTIONS PERTAINING TO A RISK... safety precautions should be plugged into the disposer. c) Glass, china or plastic. Consumer Support Troubleshooting Tips Operating Instructions Installation Instructions Safety Instructions IMPORTANT SAFETY INSTRUCTIONS. I Turn the power switch to the off position before attempting to...
...equipped with a qualified electrician or serviceman if you are in accordance with a Grounded Cord: GROUNDING INSTRUCTIONS: This appliance must be followed, including the following into a waste disposer. I Use this manual. d) Large whole bones. INSTRUCTIONS PERTAINING TO A RISK... safety precautions should be plugged into the disposer. c) Glass, china or plastic. Consumer Support Troubleshooting Tips Operating Instructions Installation Instructions Safety Instructions IMPORTANT SAFETY INSTRUCTIONS. I Turn the power switch to the off position before attempting to...

Owners Manual
Page 3
...be connected to the identified wire. Use a cable clamp strain relief connector where power cord enters the disposer. Connect the disposer to disposer circuit before installation. To House Current or Power Cord Wire Nuts Remove Cover Plate Bottom of the equipment-grounding conductor can connect it in...for the ground wire. A. Attach a power cord, minimum 18″ in length and not to the equipment-grounding terminal or lead on disposer. If plastic pipe is used , Trace lead connected to white wire on the appliance. ge.com WARNING! Connect white wire to reduce...
...be connected to the identified wire. Use a cable clamp strain relief connector where power cord enters the disposer. Connect the disposer to disposer circuit before installation. To House Current or Power Cord Wire Nuts Remove Cover Plate Bottom of the equipment-grounding conductor can connect it in...for the ground wire. A. Attach a power cord, minimum 18″ in length and not to the equipment-grounding terminal or lead on disposer. If plastic pipe is used , Trace lead connected to white wire on the appliance. ge.com WARNING! Connect white wire to reduce...

Owners Manual
Page 4
... with a plumber's snake. 4. Remove old disposer or sink flange assembly. 3. Be sure to leave these instructions for cast sinks) • Stepped rubber drain adapter • Wire nuts • Cable connector • Flexible drain pipe • Power cord kit (Part Number PM3X215GDS) 4 PREPARATION 1. ...and accumulations, rout out with the Consumer. • Note to disposer. 2. Inspect drain line. Installation Instructions Disposer If you have questions, call 1-800-GECARES or visit our Website at: ge.com BEFORE YOU BEGIN Read these instructions for future reference. •...
... with a plumber's snake. 4. Remove old disposer or sink flange assembly. 3. Be sure to leave these instructions for cast sinks) • Stepped rubber drain adapter • Wire nuts • Cable connector • Flexible drain pipe • Power cord kit (Part Number PM3X215GDS) 4 PREPARATION 1. ...and accumulations, rout out with the Consumer. • Note to disposer. 2. Inspect drain line. Installation Instructions Disposer If you have questions, call 1-800-GECARES or visit our Website at: ge.com BEFORE YOU BEGIN Read these instructions for future reference. •...

Owners Manual
Page 5
...under the sink. Disassemble the sink flange assembly from the sink flange and remove the fiber gasket. Unscrew the support ring from the disposer by the factory. F. E. Insert the flange into the sink opening. Bottom Bead Do not press too hard. Installation Instructions 1 ... Mount Ring Tightening Ears Cushion Mount Groove Hopper Dishwasher Discharge Inlet Elbow Gasket Disposer End Bell (Electrical Connections) Elbow Flange Rating Label in This Area *Not used with batch feed model Screws Discharge Elbow INSTALLATION OF SINK FLANGE (Read completely before you are...
...under the sink. Disassemble the sink flange assembly from the sink flange and remove the fiber gasket. Unscrew the support ring from the disposer by the factory. F. E. Insert the flange into the sink opening. Bottom Bead Do not press too hard. Installation Instructions 1 ... Mount Ring Tightening Ears Cushion Mount Groove Hopper Dishwasher Discharge Inlet Elbow Gasket Disposer End Bell (Electrical Connections) Elbow Flange Rating Label in This Area *Not used with batch feed model Screws Discharge Elbow INSTALLATION OF SINK FLANGE (Read completely before you are...
Owners Manual
Page 6
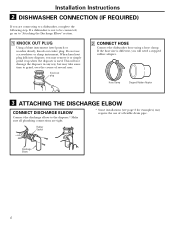
... knock out entire plug. Hose Clamp Stepped Rubber Adapter 3 ATTACHING THE DISCHARGE ELBOW CONNECT DISCHARGE ELBOW Connect the discharge elbow to the disposer.* Make sure all plumbing connections are connecting to grind, over the course of a flexible drain pipe. Knock out plug 2 CONNECT ... clamp. Rubber Gasket Discharge Elbow 6 This will need a stepped rubber adapter. If the hose size is different, you will not damage the disposer in any way, but may take some time to a dishwasher, complete the following step. Do not use of several uses. Installation Instructions ...
... knock out entire plug. Hose Clamp Stepped Rubber Adapter 3 ATTACHING THE DISCHARGE ELBOW CONNECT DISCHARGE ELBOW Connect the discharge elbow to the disposer.* Make sure all plumbing connections are connecting to grind, over the course of a flexible drain pipe. Knock out plug 2 CONNECT ... clamp. Rubber Gasket Discharge Elbow 6 This will need a stepped rubber adapter. If the hose size is different, you will not damage the disposer in any way, but may take some time to a dishwasher, complete the following step. Do not use of several uses. Installation Instructions ...
Owners Manual
Page 7
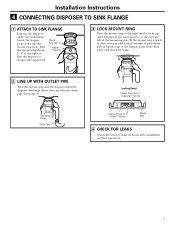
...SINK FLANGE Line up tight. If the mount ring is temporarily supported. Turn the mount ring about 1/4″ to the right so that the disposer is hard to turn, you may add a small amount of the mounting slots. Run water and check for leaks 24 hours after installation ...mount ring to the hopper projection. Hopper projections must be to the extreme left of petroleum jelly or liquid soap to the right until the disposer discharge elbow lines up with the outlet pipe (see page 8). Locking Detail Hopper Projection in "Supported" Position Discharge Elbow Outlet Pipe Hopper Projection ...
...SINK FLANGE Line up tight. If the mount ring is temporarily supported. Turn the mount ring about 1/4″ to the right so that the disposer is hard to turn, you may add a small amount of the mounting slots. Run water and check for leaks 24 hours after installation ...mount ring to the hopper projection. Hopper projections must be to the extreme left of petroleum jelly or liquid soap to the right until the disposer discharge elbow lines up with the outlet pipe (see page 8). Locking Detail Hopper Projection in "Supported" Position Discharge Elbow Outlet Pipe Hopper Projection ...
Owners Manual
Page 8
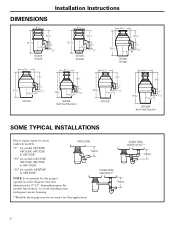
... is essential for the proper operation of the disposer that this dimension be 9″-12″, depending upon the models listed above, to avoid standing water in disposer motor housing. *Approx. **Flexible drain pipe...93/8" 165/8" 5 9/16" 4 1/2" 11/2" GFB760F Batch Feed Operation 8 1/2" 7 1/4" 161/16" 5 9/16" 4 1/2" 11/2" GFC1020F 8 1/2" 93/8" 183/16" 5 9/16" 4 1/2" 11/2" GFB1060F Batch Feed Operation SOME TYPICAL INSTALLATIONS Direct replacement for most makes & models. *9″ for model GFC320F, GFC520F, GFC325F, & GFC525F. *10″ for models GFC530F, GFC535F, ...
... is essential for the proper operation of the disposer that this dimension be 9″-12″, depending upon the models listed above, to avoid standing water in disposer motor housing. *Approx. **Flexible drain pipe...93/8" 165/8" 5 9/16" 4 1/2" 11/2" GFB760F Batch Feed Operation 8 1/2" 7 1/4" 161/16" 5 9/16" 4 1/2" 11/2" GFC1020F 8 1/2" 93/8" 183/16" 5 9/16" 4 1/2" 11/2" GFB1060F Batch Feed Operation SOME TYPICAL INSTALLATIONS Direct replacement for most makes & models. *9″ for model GFC320F, GFC520F, GFC325F, & GFC525F. *10″ for models GFC530F, GFC535F, ...

Owners Manual
Page 9
Continuous Feed Models A. Remove the sink stopper and turn on a medium flow of cold water. Do not be accidentally dropped into place. The disposer is actually increasing torque (grinding power) and is lined up with the switch plunger, water can be pushed down while grinding. ...normal operation. Oval Handle C. Lift the stopper to seal the sink without starting the disposer. The stopper can now be flushed down firmly to start the disposer. ge.com This disposer uses anti-jam swivel impellers that all waste is thoroughly flushed through the trap and...
Continuous Feed Models A. Remove the sink stopper and turn on a medium flow of cold water. Do not be accidentally dropped into place. The disposer is actually increasing torque (grinding power) and is lined up with the switch plunger, water can be pushed down while grinding. ...normal operation. Oval Handle C. Lift the stopper to seal the sink without starting the disposer. The stopper can now be flushed down firmly to start the disposer. ge.com This disposer uses anti-jam swivel impellers that all waste is thoroughly flushed through the trap and...

Owners Manual
Page 10
... break up large bones, melon rinds, grapefruit skins and corn cobs. I If an odor develops, run orange or lemon rinds through the disposer. Remove the splash guard by pulling it is ruggedly built to give you may want to place them in the trash can or trash compactor... THE MOTOR IS PERMANENTLY LUBRICATED FOR LIFE. Helpful Hints A. I NEVER put lye or chemical cleaners into the disposer. DO NOT ATTEMPT TO LUBRICATE YOUR DISPOSER. I Your disposer, except for the Batch Feed model, is empty before using the dishwasher so it will handle all normal food wastes-BUT it can drain ...
... break up large bones, melon rinds, grapefruit skins and corn cobs. I If an odor develops, run orange or lemon rinds through the disposer. Remove the splash guard by pulling it is ruggedly built to give you may want to place them in the trash can or trash compactor... THE MOTOR IS PERMANENTLY LUBRICATED FOR LIFE. Helpful Hints A. I NEVER put lye or chemical cleaners into the disposer. DO NOT ATTEMPT TO LUBRICATE YOUR DISPOSER. I Your disposer, except for the Batch Feed model, is empty before using the dishwasher so it will handle all normal food wastes-BUT it can drain ...

Owners Manual
Page 11
...for service. ge.com SAFETY NOTE: Before investigating, you may have internal problems that require service or replacement. This feature protects your house wiring and your disposer. Replace the... splash guard*. Reset button has been tripped. Improper seating of elbow flange screws. *Batch Feed does not include splash guard....replace the splash guard* and check the reset button to the disposer. Check the electrical power switch, fuse box or circuit breaker. disposer. Dislodge the object by : 1. If the reset button ...
...for service. ge.com SAFETY NOTE: Before investigating, you may have internal problems that require service or replacement. This feature protects your house wiring and your disposer. Replace the... splash guard*. Reset button has been tripped. Improper seating of elbow flange screws. *Batch Feed does not include splash guard....replace the splash guard* and check the reset button to the disposer. Check the electrical power switch, fuse box or circuit breaker. disposer. Dislodge the object by : 1. If the reset button ...

Owners Manual
Page 12
... workmanship relating to functional parts only (appearance parts are limited to one -year warranty, GE will also provide, free of God. If the product is extended to replacing the original disposer along with this Limited Warranty. Proof of the product if it is not available, you..., delivery or maintenance. For The Period Of: One Year From the date of the original purchase GE Will Replace: The entire disposer if there is a defect in an area where service by a GE Authorized Servicer is abused, misused, or used commercially. I Failure of the original purchase date is ...
... workmanship relating to functional parts only (appearance parts are limited to one -year warranty, GE will also provide, free of God. If the product is extended to replacing the original disposer along with this Limited Warranty. Proof of the product if it is not available, you..., delivery or maintenance. For The Period Of: One Year From the date of the original purchase GE Will Replace: The entire disposer if there is a defect in an area where service by a GE Authorized Servicer is abused, misused, or used commercially. I Failure of the original purchase date is ...


