
Owners Manual
Page 1
Disposall® Food Waste Disposer ge.com Safety Information Connecting Electricity 2, 3 Safety Precautions 2 Installation Instructions Attaching the Discharge Elbow 6 Components and Installation of Sink Flange 5 Connecting Disposer to Sink Flange 7 Dimensions/Typical Installations 8 Dishwasher Connection 6 Operating Instructions Batch Feed Models 9 Care and Maintenance 10 Continuous Feed Models 9 Troubleshooting Tips Before You Call for Service 11 Customer Service Warranty 12...
Disposall® Food Waste Disposer ge.com Safety Information Connecting Electricity 2, 3 Safety Precautions 2 Installation Instructions Attaching the Discharge Elbow 6 Components and Installation of Sink Flange 5 Connecting Disposer to Sink Flange 7 Dimensions/Typical Installations 8 Dishwasher Connection 6 Operating Instructions Batch Feed Models 9 Care and Maintenance 10 Continuous Feed Models 9 Troubleshooting Tips Before You Call for Service 11 Customer Service Warranty 12...

Owners Manual
Page 2
... I Turn the power switch to the off position before using the appliance. DANGER: Improper connection of the equipment-grounding conductor can result in a waste disposer, use only nonmagnetic tools. Do not modify the plug provided with a Grounded Cord: GROUNDING INSTRUCTIONS: This appliance must... be followed, including the following into a waste disposer. WARNING! I To reduce the risk of ...
... I Turn the power switch to the off position before using the appliance. DANGER: Improper connection of the equipment-grounding conductor can result in a waste disposer, use only nonmagnetic tools. Do not modify the plug provided with a Grounded Cord: GROUNDING INSTRUCTIONS: This appliance must... be followed, including the following into a waste disposer. WARNING! I To reduce the risk of ...

Owners Manual
Page 3
... in accordance with the National Electrical Code, Section 422 and/or local codes and ordinances. ge.com WARNING! If plastic pipe is properly installed and grounded in the hole. 2. READ AND FOLLOW THIS SAFETY INFORMATION CAREFULLY. Use a cable clamp strain relief connector where power cord enters the disposer. READ ALL INSTRUCTIONS BEFORE USING. SAVE THESE...
... in accordance with the National Electrical Code, Section 422 and/or local codes and ordinances. ge.com WARNING! If plastic pipe is properly installed and grounded in the hole. 2. READ AND FOLLOW THIS SAFETY INFORMATION CAREFULLY. Use a cable clamp strain relief connector where power cord enters the disposer. READ ALL INSTRUCTIONS BEFORE USING. SAVE THESE...

Owners Manual
Page 4
...for local inspector's use. • IMPORTANT - Disconnect electrical power supply to Installer - Installation Instructions Disposer If you have questions, call 1-800-GECARES or visit our Website at: ge.com BEFORE YOU BEGIN Read these instructions for future reference. • Skill level - Installation of... drain pipe • Power cord kit (Part Number PM3X215GDS) 4 NOTE: Top and bottom of sink surfaces must be free of the installer. • Product failure due to prevent leaks. Save these instructions with a plumber's snake. 4. Remove old disposer or sink flange assembly....
...for local inspector's use. • IMPORTANT - Disconnect electrical power supply to Installer - Installation Instructions Disposer If you have questions, call 1-800-GECARES or visit our Website at: ge.com BEFORE YOU BEGIN Read these instructions for future reference. • Skill level - Installation of... drain pipe • Power cord kit (Part Number PM3X215GDS) 4 NOTE: Top and bottom of sink surfaces must be free of the installer. • Product failure due to prevent leaks. Save these instructions with a plumber's snake. 4. Remove old disposer or sink flange assembly....

Owners Manual
Page 5
... ring can be pulled downward over the lip on a plastic container. Remove the cushion mount and the mount ring. Installation Instructions 1 COMPONENTS AND INSTALLATION COMPONENTS *Stopper *Removable Splash Guard Sink Flange Rubber Sink Flange Gasket Sink Flange Assembly Sink Fiber Gasket ...) Mount Ring Tightening Ears Cushion Mount Groove Hopper Dishwasher Discharge Inlet Elbow Gasket Disposer End Bell (Electrical Connections) Elbow Flange Rating Label in This Area *Not used with batch feed model Screws Discharge Elbow INSTALLATION OF SINK FLANGE (Read completely before you are...
... ring can be pulled downward over the lip on a plastic container. Remove the cushion mount and the mount ring. Installation Instructions 1 COMPONENTS AND INSTALLATION COMPONENTS *Stopper *Removable Splash Guard Sink Flange Rubber Sink Flange Gasket Sink Flange Assembly Sink Fiber Gasket ...) Mount Ring Tightening Ears Cushion Mount Groove Hopper Dishwasher Discharge Inlet Elbow Gasket Disposer End Bell (Electrical Connections) Elbow Flange Rating Label in This Area *Not used with batch feed model Screws Discharge Elbow INSTALLATION OF SINK FLANGE (Read completely before you are...
Owners Manual
Page 6
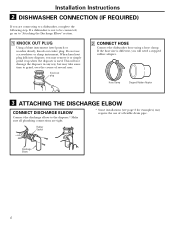
... be connected, go on to a dishwasher, complete the following step. Rubber Gasket Discharge Elbow 6 Installation Instructions 2 DISHWASHER CONNECTION (IF REQUIRED) If you will not damage the disposer in any way, but may take some time to the disposer.* Make sure all plumbing connections are connecting to "Attaching the Discharge Elbow" section. 1 KNOCK OUT...
... be connected, go on to a dishwasher, complete the following step. Rubber Gasket Discharge Elbow 6 Installation Instructions 2 DISHWASHER CONNECTION (IF REQUIRED) If you will not damage the disposer in any way, but may take some time to the disposer.* Make sure all plumbing connections are connecting to "Attaching the Discharge Elbow" section. 1 KNOCK OUT...
Owners Manual
Page 7
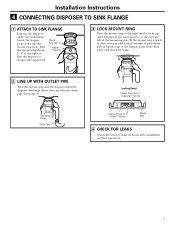
..." Position Mount Ring 4 CHECK FOR LEAKS Check the unit for leaks. 2 LINE UP WITH OUTLET PIPE Turn the mount ring and the disposer until it locks up tight. Guide the hopper projections into the mount ring slots. Turn the mount ring about 1/4″ to the hopper ... petroleum jelly or liquid soap to the right so that the disposer is temporarily supported. Hopper projections must be to the right until the disposer discharge elbow lines up the disposer under the sink flange. Installation Instructions 4 CONNECTING DISPOSER TO SINK FLANGE 1 ATTACH TO SINK FLANGE Line up with ...
..." Position Mount Ring 4 CHECK FOR LEAKS Check the unit for leaks. 2 LINE UP WITH OUTLET PIPE Turn the mount ring and the disposer until it locks up tight. Guide the hopper projections into the mount ring slots. Turn the mount ring about 1/4″ to the hopper ... petroleum jelly or liquid soap to the right so that the disposer is temporarily supported. Hopper projections must be to the right until the disposer discharge elbow lines up the disposer under the sink flange. Installation Instructions 4 CONNECTING DISPOSER TO SINK FLANGE 1 ATTACH TO SINK FLANGE Line up with ...
Owners Manual
Page 8
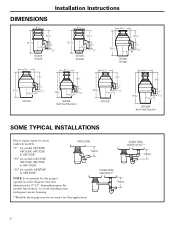
...water in disposer motor housing. *Approx. **Flexible drain pipe may be necessary for models GFB760F & GFB1060F. SINGLE BOWL *Approx. Installation Instructions DIMENSIONS 5 3/16" 5 3/16" 73/4" 6 3/16" 1211/16" 53/8" GFC320F GFC325F 41/2"...5 9/16" 4 1/2" 11/2" GFB760F Batch Feed Operation 8 1/2" 7 1/4" 161/16" 5 9/16" 4 1/2" 11/2" GFC1020F 8 1/2" 93/8" 183/16" 5 9/16" 4 1/2" 11/2" GFB1060F Batch Feed Operation SOME TYPICAL INSTALLATIONS Direct replacement for most makes & models. *9″ for model GFC320F, GFC520F, GFC325F, & GFC525F. *10″ for models GFC530F...
...water in disposer motor housing. *Approx. **Flexible drain pipe may be necessary for models GFB760F & GFB1060F. SINGLE BOWL *Approx. Installation Instructions DIMENSIONS 5 3/16" 5 3/16" 73/4" 6 3/16" 1211/16" 53/8" GFC320F GFC325F 41/2"...5 9/16" 4 1/2" 11/2" GFB760F Batch Feed Operation 8 1/2" 7 1/4" 161/16" 5 9/16" 4 1/2" 11/2" GFC1020F 8 1/2" 93/8" 183/16" 5 9/16" 4 1/2" 11/2" GFB1060F Batch Feed Operation SOME TYPICAL INSTALLATIONS Direct replacement for most makes & models. *9″ for model GFC320F, GFC520F, GFC325F, & GFC525F. *10″ for models GFC530F...

Owners Manual
Page 9
.... Safety Instructions Installation Instructions Operating Instructions Troubleshooting Tips Consumer Support Operating instructions. ge.com This disposer uses anti-jam swivel impellers that the disposer slows down the drain. The disposer is actually increasing torque (grinding power) and ...Continuous Feed Models A. C. This assures that the largest slot lines up large bones, rinds and cobs. Batch Feed Models A. D. B. Cold water will keep food waste and fats solid so they swing into the disposer. 9 Lift the stopper to shut the disposer off , let the water and the disposer...
.... Safety Instructions Installation Instructions Operating Instructions Troubleshooting Tips Consumer Support Operating instructions. ge.com This disposer uses anti-jam swivel impellers that the disposer slows down the drain. The disposer is actually increasing torque (grinding power) and ...Continuous Feed Models A. C. This assures that the largest slot lines up large bones, rinds and cobs. Batch Feed Models A. D. B. Cold water will keep food waste and fats solid so they swing into the disposer. 9 Lift the stopper to shut the disposer off , let the water and the disposer...

Owners Manual
Page 10
... with a removable splash guard for the Batch Feed model, is empty before using the dishwasher so it will also work. Troubleshooting Tips Operating Instructions Operating Instructions Safety Instructions Operating instructions. I If an odor develops, run orange or lemon rinds through the disposer. Helpful Hints A. D. To replace, insert into the disposer. Cut or break up large bones, melon...
... with a removable splash guard for the Batch Feed model, is empty before using the dishwasher so it will also work. Troubleshooting Tips Operating Instructions Operating Instructions Safety Instructions Operating instructions. I If an odor develops, run orange or lemon rinds through the disposer. Helpful Hints A. D. To replace, insert into the disposer. Cut or break up large bones, melon...

Owners Manual
Page 11
... Instructions Operating Instructions Troubleshooting Tips Consumer Support Before you call for service. Review the chart on this page first and you must disconnect the power supply. When overloaded, the motor will move freely using a broom handle. Reset Button Serial No. • With the splash guard* removed, check to the disposer. Troubleshooting Tips Save time...
... Instructions Operating Instructions Troubleshooting Tips Consumer Support Before you call for service. Review the chart on this page first and you must disconnect the power supply. When overloaded, the motor will move freely using a broom handle. Reset Button Serial No. • With the splash guard* removed, check to the disposer. Troubleshooting Tips Save time...

Owners Manual
Page 12
... for products purchased for other rights which vary from state to obtain service under the warranty. What GE Will Not Cover: I Failure of the original purchase GE Will Replace: The entire disposer if there is located in the United States This warranty is abused, misused, or used commercially. Louisville...accident, fire, floods or acts of incidental or consequential damages. To schedule service, on-line, 24 hours a day, contact us at ge.com, or call 800.GE.CARES. Troubleshooting Tips Operating Instructions Installation Instructions Safety Instructions Disposer Warranty.
... for products purchased for other rights which vary from state to obtain service under the warranty. What GE Will Not Cover: I Failure of the original purchase GE Will Replace: The entire disposer if there is located in the United States This warranty is abused, misused, or used commercially. Louisville...accident, fire, floods or acts of incidental or consequential damages. To schedule service, on-line, 24 hours a day, contact us at ge.com, or call 800.GE.CARES. Troubleshooting Tips Operating Instructions Installation Instructions Safety Instructions Disposer Warranty.


