Use and Care Manual
Page 5
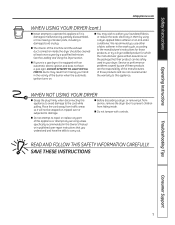
... over or subjected to damage. See the Loading and Using the Dryer section. DO NOT ATTEMPT TO lIGHT WITH A MATCH. Place the cord away from having your laundered fabrics or reduce the static electricity in published user-repair instructions that their product can be cleaned at...malfunctioning, partially disassembled, or has missing or broken parts, including a damaged cord or plug. n The interior of those products, or try a dryer-added product for which the manufacturer gives written assurance on . n Do not tamper with an automatic electric ignition and does not have the skills to carry...
... over or subjected to damage. See the Loading and Using the Dryer section. DO NOT ATTEMPT TO lIGHT WITH A MATCH. Place the cord away from having your laundered fabrics or reduce the static electricity in published user-repair instructions that their product can be cleaned at...malfunctioning, partially disassembled, or has missing or broken parts, including a damaged cord or plug. n The interior of those products, or try a dryer-added product for which the manufacturer gives written assurance on . n Do not tamper with an automatic electric ignition and does not have the skills to carry...
Use and Care Manual
Page 12
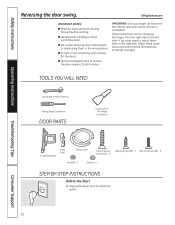
.... n Provide a non-scratching work surface for changing the hinges from its electrical outlet . 12 IMPORTANT: Once you Start 1. TOOLS YOU WILL NEED Adjustable Crescent Wrench Phillips Head Screwdriver DOOR PARTS Putty Knife or Thin-Blade Screwdriver Troubleshooting Tips Consumer Support Hinge Assembly Hinge Cover...-swing reversal is 30-60 minutes. n Normal completion time to the left and right. n Handle parts carefully to switch them in the wrong places. Unplug the dryer from the right side to reverse the door swing is completed. These instructions are for the doors....
.... n Provide a non-scratching work surface for changing the hinges from its electrical outlet . 12 IMPORTANT: Once you Start 1. TOOLS YOU WILL NEED Adjustable Crescent Wrench Phillips Head Screwdriver DOOR PARTS Putty Knife or Thin-Blade Screwdriver Troubleshooting Tips Consumer Support Hinge Assembly Hinge Cover...-swing reversal is 30-60 minutes. n Normal completion time to the left and right. n Handle parts carefully to switch them in the wrong places. Unplug the dryer from the right side to reverse the door swing is completed. These instructions are for the doors....
Use and Care Manual
Page 13
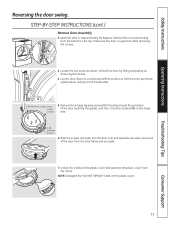
.... 7. Troubleshooting Tips Consumer Support 13 Unhook the door by the arrows. 4. Lay the door down on a soft protected flat surface so that the inner part faces upward (door resting on the plastic cover. Unlock the 4 tabs on the hinge side. 2 #8 Machine Screws 6. Open the door to the top...as shown. STEP-BY-STEP INSTRUCTIONS (cont.) Remove Door Assembly 2. With the screws removed, turn the door over and separate the silver cover part of the door outlining the gasket, and the 2 machine screws (#8) on the plastic cover and separate the plastic cover from the bottom to ...
.... 7. Troubleshooting Tips Consumer Support 13 Unhook the door by the arrows. 4. Lay the door down on a soft protected flat surface so that the inner part faces upward (door resting on the plastic cover. Unlock the 4 tabs on the hinge side. 2 #8 Machine Screws 6. Open the door to the top...as shown. STEP-BY-STEP INSTRUCTIONS (cont.) Remove Door Assembly 2. With the screws removed, turn the door over and separate the silver cover part of the door outlining the gasket, and the 2 machine screws (#8) on the plastic cover and separate the plastic cover from the bottom to ...
Use and Care Manual
Page 14
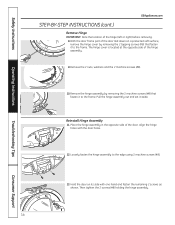
... GEAppliances.com STEP-BY-STEP INSTRUCTIONS (cont.) Remove Hinge IMPORTANT: Note the location of the hinge (left or right) before removing. 8.With the door frame part of the door. Place the hinge assembly in the opposite side of the door laid down on its side with the door holes. 12. Loosely...
... GEAppliances.com STEP-BY-STEP INSTRUCTIONS (cont.) Remove Hinge IMPORTANT: Note the location of the hinge (left or right) before removing. 8.With the door frame part of the door. Place the hinge assembly in the opposite side of the door laid down on its side with the door holes. 12. Loosely...
Use and Care Manual
Page 16
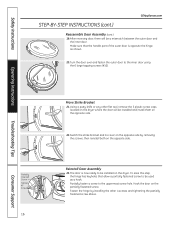
Switch the strike bracket and its cover on the partially fastened screw. To ease this step, the hinge has keyholes that the handle part of the outer door is now ready to be used as shown. 20. Partially fasten a screw to the inner door using the 6... the opposite side. Turn the door over and fasten the outer door to the uppermost screw hole. Consumer Support then reinstall both on the dryer. Operating Instructions Troubleshooting Tips Partially Inserted Screw Tighten All Screws 16 Move Strike Bracket 21. Make sure that allow a partially fastened screw to...
Switch the strike bracket and its cover on the partially fastened screw. To ease this step, the hinge has keyholes that the handle part of the outer door is now ready to be used as shown. 20. Partially fasten a screw to the inner door using the 6... the opposite side. Turn the door over and fasten the outer door to the uppermost screw hole. Consumer Support then reinstall both on the dryer. Operating Instructions Troubleshooting Tips Partially Inserted Screw Tighten All Screws 16 Move Strike Bracket 21. Make sure that allow a partially fastened screw to...

Use and Care Manual
Page 22
...the bracket where you removed the leveling legs. 3. Install Bracket to Dryer Base Locate the 4 rubber pads in the parts package. Remove the adhesive backing and firmly place over on the dryer. Install Rubber Pads to Dryer A. Repeat the above step with the holes in the left corner of... the dryer. NOTE: Make sure to set the dryer on its side. Remove the Dryer leveling legs A. C. ...
...the bracket where you removed the leveling legs. 3. Install Bracket to Dryer Base Locate the 4 rubber pads in the parts package. Remove the adhesive backing and firmly place over on the dryer. Install Rubber Pads to Dryer A. Repeat the above step with the holes in the left corner of... the dryer. NOTE: Make sure to set the dryer on its side. Remove the Dryer leveling legs A. C. ...
Use and Care Manual
Page 27
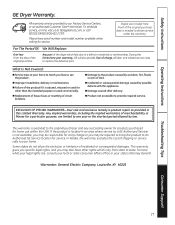
... what your legal rights are limited to obtain service under the warranty. Warrantor: General Electric Company. n Improper installation, delivery or maintenance. n Damage to state. EXCluSION OF ...This warranty gives you specific legal rights, and you how to replace the defective part. What Is Not Covered: n Service trips to your home to teach you...consequential damage caused by a GE Authorized Servicer is product repair as provided in materials or workmanship. n Damage caused after delivery. Safety Instructions Operating Instructions GE Dryer Warranty. Any implied warranties,...
... what your legal rights are limited to obtain service under the warranty. Warrantor: General Electric Company. n Improper installation, delivery or maintenance. n Damage to state. EXCluSION OF ...This warranty gives you specific legal rights, and you how to replace the defective part. What Is Not Covered: n Service trips to your home to teach you...consequential damage caused by a GE Authorized Servicer is product repair as provided in materials or workmanship. n Damage caused after delivery. Safety Instructions Operating Instructions GE Dryer Warranty. Any implied warranties,...
Use and Care Manual
Page 28
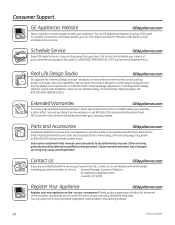
...! Or call 800.TDD.GEAC (800.833.4322). For the hearing impaired, please call 800.GE.CARES (800.432.2737) during normal business hours. Parts and Accessories GEAppliances.com Individuals qualified to service their homes (VISA, MasterCard and Discover cards are not...of the year! Other servicing generally should the need arise. Extended Warranties GEAppliances.com Purchase a GE extended warranty and learn about special discounts that can have parts or accessories sent directly to qualified service personnel. Contact Us GEAppliances.com If you are accepted). ...
...! Or call 800.TDD.GEAC (800.833.4322). For the hearing impaired, please call 800.GE.CARES (800.432.2737) during normal business hours. Parts and Accessories GEAppliances.com Individuals qualified to service their homes (VISA, MasterCard and Discover cards are not...of the year! Other servicing generally should the need arise. Extended Warranties GEAppliances.com Purchase a GE extended warranty and learn about special discounts that can have parts or accessories sent directly to qualified service personnel. Contact Us GEAppliances.com If you are accepted). ...

Installation Instructions
Page 5
... HOME INSTALLATION • Installation must be vented to the MANUFACTURED HOME CONSTRUCTION & SAFETY STANDARD, TITLE 24, PART 32-80 or, when such standard is approved for electrical connection information. 5 See EXHAUST INFORMATION section 3 & 4. • The installation must contain a minimum of...metal duct cannot be used (Kit WX08X10077). • Never install flexible metal duct in . Installation Instructions, Exhausting CONNECTING THE DRYER TO HOUSE VENT RIGID METAL TRANSITION DUCT • For best drying performance, a rigid metal transition duct is highly recommended (see...
... HOME INSTALLATION • Installation must be vented to the MANUFACTURED HOME CONSTRUCTION & SAFETY STANDARD, TITLE 24, PART 32-80 or, when such standard is approved for electrical connection information. 5 See EXHAUST INFORMATION section 3 & 4. • The installation must contain a minimum of...metal duct cannot be used (Kit WX08X10077). • Never install flexible metal duct in . Installation Instructions, Exhausting CONNECTING THE DRYER TO HOUSE VENT RIGID METAL TRANSITION DUCT • For best drying performance, a rigid metal transition duct is highly recommended (see...

Installation Instructions
Page 7
... # 31-16228 7 Large Tapping Screw (#10) ... 6 Nut (#8) - 2 Washer - 2 Tapping Screw (#8) ... 2 Machine Screw (#8) ... 6 DOOR PARTS Hinge Assembly Hinge Cover Plastic Cover TO REGISTER YOUR DRYER CALL TOLL-FREE 1-888-269-1192 Prompt registration confirms your local service provider. WARNING - Place dryer in the wrong places. • Provide a non-scratching work surface for changing the...
... # 31-16228 7 Large Tapping Screw (#10) ... 6 Nut (#8) - 2 Washer - 2 Tapping Screw (#8) ... 2 Machine Screw (#8) ... 6 DOOR PARTS Hinge Assembly Hinge Cover Plastic Cover TO REGISTER YOUR DRYER CALL TOLL-FREE 1-888-269-1192 Prompt registration confirms your local service provider. WARNING - Place dryer in the wrong places. • Provide a non-scratching work surface for changing the...
Installation Instructions
Page 8
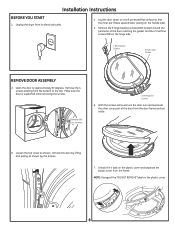
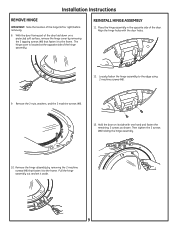
... by the arrows. 7. Lay the door down on a soft protected flat surface so that the inner part faces upward (door resting on the plastic cover. 8 Open the door to the top. With the ...screws removed, turn the door over and separate the silver cover part of the door outlining the gasket and the 2 machine screws (#8) on the plastic cover and separate...Make sure the door is supported while removing the screws. Unplug the dryer from the bottom to approximately 90 degrees. Installation Instructions BEFORE YOU START 1. Remove the 4 screws starting from its...
... by the arrows. 7. Lay the door down on a soft protected flat surface so that the inner part faces upward (door resting on the plastic cover. 8 Open the door to the top. With the ...screws removed, turn the door over and separate the silver cover part of the door outlining the gasket and the 2 machine screws (#8) on the plastic cover and separate...Make sure the door is supported while removing the screws. Unplug the dryer from the bottom to approximately 90 degrees. Installation Instructions BEFORE YOU START 1. Remove the 4 screws starting from its...
Installation Instructions
Page 9
With the door frame part of the door. The hinge cover is located at the opposite side of the hinge (left or right) before removing. 8. REINSTALL HINGE ASSEMBLY 11. Hold ...
With the door frame part of the door. The hinge cover is located at the opposite side of the hinge (left or right) before removing. 8. REINSTALL HINGE ASSEMBLY 11. Hold ...
Installation Instructions
Page 10
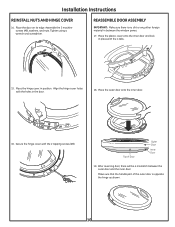
.... 17. Assemble the 2 machine screws (#8), washers, and nuts. Place the plastic cover onto the inner door and lock in position. Make sure that the handle part of Door Outer Door Inner Door 19. Place the hinge cover. Place the door on its edge. Align the hinge cover holes with the 2 tapping...
.... 17. Assemble the 2 machine screws (#8), washers, and nuts. Place the plastic cover onto the inner door and lock in position. Make sure that the handle part of Door Outer Door Inner Door 19. Place the hinge cover. Place the door on its edge. Align the hinge cover holes with the 2 tapping...

Installation Instructions
Page 11
REINSTALL DOOR ASSEMBLY 23. To ease this step, the hinge has keyholes that allow a partially fastened screw to be installed and install them on the dryer. Partially Inserted Screw Tighten All Screws MOVE STRIKE BRACKET 21. Partially fasten a screw to the inner door using the 6 large tapping screws (#10). Fasten ... uppermost screw hole. Hook the door on the opposite side. 11 SERVICING WARNING - LABEL ALL WIRES PRIOR TO DISCONNECTING WHEN SERVICING CONTROLS. For replacement parts and other 4 screws and tightening the partially fastened screw above. Installation Instructions 20.
REINSTALL DOOR ASSEMBLY 23. To ease this step, the hinge has keyholes that allow a partially fastened screw to be installed and install them on the dryer. Partially Inserted Screw Tighten All Screws MOVE STRIKE BRACKET 21. Partially fasten a screw to the inner door using the 6 large tapping screws (#10). Fasten ... uppermost screw hole. Hook the door on the opposite side. 11 SERVICING WARNING - LABEL ALL WIRES PRIOR TO DISCONNECTING WHEN SERVICING CONTROLS. For replacement parts and other 4 screws and tightening the partially fastened screw above. Installation Instructions 20.


