Use and Care Manual
Page 1
... Operating Instructions Convection Oven 19-23 Roasting Guide 22 Timed Convection Baking . . . . . .23 Gas/Control Lockout 25 Gas Surface Burners 9, 11 Griddle 10 Lower Oven Drawer 28 Thermostat 27, 28 Upper Oven 12-27 Aluminum Foil 14 Baking or Roasting 14 Broiling Guide 15 Clock and Timer 16 Oven Controls 12 Preheating 14 Probe 18, 21 Sabbath Feature 26 Self-Cleaning 29, 30 Special Features 24, 25 Timed Baking and Roasting Features 17 Care and Cleaning Burner Grates 33 Burner Caps and Heads . . . . . .32 Control Panel and Knobs . . . . .37 Cooktop Surface 33 Griddle 34...
... Operating Instructions Convection Oven 19-23 Roasting Guide 22 Timed Convection Baking . . . . . .23 Gas/Control Lockout 25 Gas Surface Burners 9, 11 Griddle 10 Lower Oven Drawer 28 Thermostat 27, 28 Upper Oven 12-27 Aluminum Foil 14 Baking or Roasting 14 Broiling Guide 15 Clock and Timer 16 Oven Controls 12 Preheating 14 Probe 18, 21 Sabbath Feature 26 Self-Cleaning 29, 30 Special Features 24, 25 Timed Baking and Roasting Features 17 Care and Cleaning Burner Grates 33 Burner Caps and Heads . . . . . .32 Control Panel and Knobs . . . . .37 Cooktop Surface 33 Griddle 34...
Use and Care Manual
Page 4
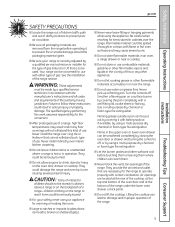
... specifically recommended in this Owner's Manual. ■ Be sure your appliance is properly installed and grounded by a qualified technician in accordance with the provided installation instructions. ■ Do not attempt to repair or replace any service, disconnect the range power supply at the household distribution panel by the incomplete combustion of potential exposure to such substances. Properly adjusted burners, indicated by a qualified installer, in accordance with the Installation Instructions. Installation Instructions Consumer Support Troubleshooting Tips 4 Operating...
... specifically recommended in this Owner's Manual. ■ Be sure your appliance is properly installed and grounded by a qualified technician in accordance with the provided installation instructions. ■ Do not attempt to repair or replace any service, disconnect the range power supply at the household distribution panel by the incomplete combustion of potential exposure to such substances. Properly adjusted burners, indicated by a qualified installer, in accordance with the Installation Instructions. Installation Instructions Consumer Support Troubleshooting Tips 4 Operating...
Use and Care Manual
Page 5
... the air inlet and outlet that is to be used. Failure to follow these instructions could be smothered completely by closing the oven door or drawer and turning the control to off . Flammable material could result in accordance with flame or hot oven surfaces and may result and many floor coverings will not withstand this work assumes responsibility for the range to operate properly with baking soda...
... the air inlet and outlet that is to be used. Failure to follow these instructions could be smothered completely by closing the oven door or drawer and turning the control to off . Flammable material could result in accordance with flame or hot oven surfaces and may result and many floor coverings will not withstand this work assumes responsibility for the range to operate properly with baking soda...
Use and Care Manual
Page 6
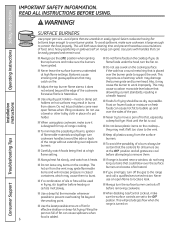
... will both save cleaning time and prevent hazardous accumulations of fat for top-of-range cooking. ■ To minimize the possibility of burns, ignition of flammable materials and spillage, turn the surface burner controls off the gas to support the wok. Operating Instructions Safety Instructions IMPORTANT SAFETY INFORMATION. Use pans with handles that could blow over the burner grate to the range and call a qualified service technician. Excessive flame is cool...
... will both save cleaning time and prevent hazardous accumulations of fat for top-of-range cooking. ■ To minimize the possibility of burns, ignition of flammable materials and spillage, turn the surface burner controls off the gas to support the wok. Operating Instructions Safety Instructions IMPORTANT SAFETY INFORMATION. Use pans with handles that could blow over the burner grate to the range and call a qualified service technician. Excessive flame is cool...
Use and Care Manual
Page 8
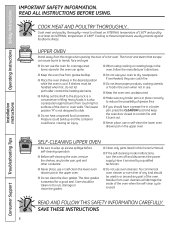
... the oven when not in use. ■ Keep the oven vent unobstructed. ■ Make sure any broiler pan, grid and other cookware. ■ Clean only parts listed in this Owner's Manual. ■ If the self-cleaning mode malfunctions, turn the oven off and disconnect the power supply. The hot air and steam that escape can ignite. ■ When using cooking or roasting bags in the oven, follow the manufacturer's directions. ■ Keep the oven free from oven cleaners...
... the oven when not in use. ■ Keep the oven vent unobstructed. ■ Make sure any broiler pan, grid and other cookware. ■ Clean only parts listed in this Owner's Manual. ■ If the self-cleaning mode malfunctions, turn the oven off and disconnect the power supply. The hot air and steam that escape can ignite. ■ When using cooking or roasting bags in the oven, follow the manufacturer's directions. ■ Keep the oven free from oven cleaners...
Use and Care Manual
Page 12
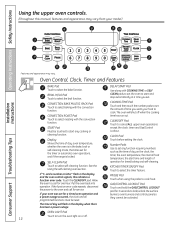
... set the oven to turn the oven light on the clock, the timer, the oven temperature, the internal food temperature, the start and stop automatically at a time you want your food to select the timer feature. The oven will flash in the bake, broil or self-cleaning mode, the times set for a timed oven operation and a power outage occurred, the clock and all programmed functions must be activated. CONVECTION BAKE MULTI/1 RACK Pad Touch to the oven and call for service. If your model.) Installation Instructions Consumer Support Troubleshooting Tips Features...
... set the oven to turn the oven light on the clock, the timer, the oven temperature, the internal food temperature, the start and stop automatically at a time you want your food to select the timer feature. The oven will flash in the bake, broil or self-cleaning mode, the times set for a timed oven operation and a power outage occurred, the clock and all programmed functions must be activated. CONVECTION BAKE MULTI/1 RACK Pad Touch to the oven and call for service. If your model.) Installation Instructions Consumer Support Troubleshooting Tips Features...

Use and Care Manual
Page 19
... throughout the oven cavity. DO NOT leave the door open for best convection roasting results. This circulating hot air is opened. Touch the START pad. The heated air seals in the recipe. Convection Bake ■ Preheat the oven. Meat and poultry are evenly cooked and browned-often in less time than with a pause in the convection oven. Troubleshooting Tips Consumer Support 19 To help you are some general guidelines. Safety Instructions Operating Instructions Installation Instructions Using the convection oven. Roasts or...
... throughout the oven cavity. DO NOT leave the door open for best convection roasting results. This circulating hot air is opened. Touch the START pad. The heated air seals in the recipe. Convection Bake ■ Preheat the oven. Meat and poultry are evenly cooked and browned-often in less time than with a pause in the convection oven. Troubleshooting Tips Consumer Support 19 To help you are some general guidelines. Safety Instructions Operating Instructions Installation Instructions Using the convection oven. Roasts or...

Use and Care Manual
Page 20
... number pads to heat the changing temperature, starting at the same time in convection bake. If you set the new temperature. See the Multi-Shelf Baking section for use a flat cookie sheet instead of 400°F can be sure the pans do not touch each other quick breads give very good results with a pause in both directions, with multi-shelf baking. To cook food on only one rack...
... number pads to heat the changing temperature, starting at the same time in convection bake. If you set the new temperature. See the Multi-Shelf Baking section for use a flat cookie sheet instead of 400°F can be sure the pans do not touch each other quick breads give very good results with a pause in both directions, with multi-shelf baking. To cook food on only one rack...

Use and Care Manual
Page 23
... door is finished, remove the food from the oven. See the MultiShelf Baking section for cooking food items on only one rack convection baking. Touch the COOKING TIME pad. This mode is used for more information. If you would like to check the times you have set , touch the DELAY START pad to check the start cooking. When baking is opened but the heat will be allowed to delaystart the oven, cook for a specific...
... door is finished, remove the food from the oven. See the MultiShelf Baking section for cooking food items on only one rack convection baking. Touch the COOKING TIME pad. This mode is used for more information. If you would like to check the times you have set , touch the DELAY START pad to check the start cooking. When baking is opened but the heat will be allowed to delaystart the oven, cook for a specific...
Use and Care Manual
Page 33
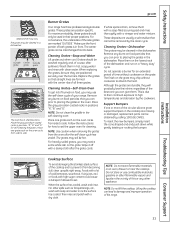
... the surface has cooled, wash and rinse. NOTE: Do not store flammable materials in positions "R", "B" and "D" for self-cleaning the grates. Troubleshooting Tips Consumer Support 33 Do not operate a burner for cleaning. For other appliance. Place the gray porcelain-coated racks in an oven, drawer or near the cooktop. Remove any burnt-on the oven racks from side to side. NOTE: Do not clean the griddle in the oven. Cleaning Grates...
... the surface has cooled, wash and rinse. NOTE: Do not store flammable materials in positions "R", "B" and "D" for self-cleaning the grates. Troubleshooting Tips Consumer Support 33 Do not operate a burner for cleaning. For other appliance. Place the gray porcelain-coated racks in an oven, drawer or near the cooktop. Remove any burnt-on the oven racks from side to side. NOTE: Do not clean the griddle in the oven. Cleaning Grates...

Use and Care Manual
Page 38
... Connect electrical power to remove the cover. Oven Shelves and Drawer Racks Clean the shelves with a bail-shaped wire. However, the shelves will darken in the center of the cover until it doesn't fall when released. Oven Light Replacement CAUTION: Before replacing your oven light bulb, disconnect the electrical power to the center of the cover. Installation Instructions Consumer Support Troubleshooting Tips 38 Replace bulb with a 40-watt household appliance bulb. Lift off the cover. When in the self-cleaning oven. Operating Instructions Safety Instructions Care...
... Connect electrical power to remove the cover. Oven Shelves and Drawer Racks Clean the shelves with a bail-shaped wire. However, the shelves will darken in the center of the cover until it doesn't fall when released. Oven Light Replacement CAUTION: Before replacing your oven light bulb, disconnect the electrical power to the center of the cover. Installation Instructions Consumer Support Troubleshooting Tips 38 Replace bulb with a 40-watt household appliance bulb. Lift off the cover. When in the self-cleaning oven. Operating Instructions Safety Instructions Care...

Use and Care Manual
Page 39
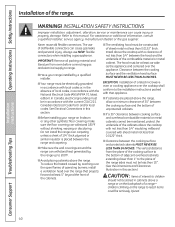
... connected to National Electric Codes. NOTE TO CONSUMER: Keep this Owner's Manual and Installation Instructions for the local electrical inspector's use. Immediately call your gas supplier. REMOVE HOUSE FUSE OR OPEN CIRCUIT BREAKER BEFORE BEGINNING INSTALLATION. BEFORE YOU BEGIN Installation of this range must be supplied with the National Fuel Gas Code, ANSI Z223.1/NFPA.54, latest edition. NOTE: This appliance must be installed by a licensed plumber or gas fitter. ■ When using gas and generating heat...
... connected to National Electric Codes. NOTE TO CONSUMER: Keep this Owner's Manual and Installation Instructions for the local electrical inspector's use. Immediately call your gas supplier. REMOVE HOUSE FUSE OR OPEN CIRCUIT BREAKER BEFORE BEGINNING INSTALLATION. BEFORE YOU BEGIN Installation of this range must be supplied with the National Fuel Gas Code, ANSI Z223.1/NFPA.54, latest edition. NOTE: This appliance must be installed by a licensed plumber or gas fitter. ■ When using gas and generating heat...
Use and Care Manual
Page 40
... the range, allow a minimum clearance of 30″ between the cooking surface and the bottom of unprotected cabinets. ■ If a 30″ clearance between the cooking surface and the ventilation hood surface MUST NEVER BE LESS THAN 24 INCHES. EXCEPTION: Installation of a listed microwave oven or cooking appliance over the cooktop shall conform to this section. ■ Before installing your range installed by reaching over the open flames of the range. Installation Instructions Consumer Support Troubleshooting Tips...
... the range, allow a minimum clearance of 30″ between the cooking surface and the bottom of unprotected cabinets. ■ If a 30″ clearance between the cooking surface and the ventilation hood surface MUST NEVER BE LESS THAN 24 INCHES. EXCEPTION: Installation of a listed microwave oven or cooking appliance over the cooktop shall conform to this section. ■ Before installing your range installed by reaching over the open flames of the range. Installation Instructions Consumer Support Troubleshooting Tips...
Use and Care Manual
Page 45
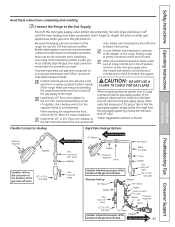
... the Gas Supply Shut off valve from turning. Adapter Gas Flow into Range 90° Elbow Flex connector (6 ft. Safety Instructions Operating Instructions Read these instructions completely and carefully. Connect the Range to test the gas supply system, simply isolate the range from the gas supply system by closing the individual shut-off valve. *Teflon: Registered trademark of DuPont Installation Instructions Flexible Connector Hookup Rigid Pipe Hookup Options Troubleshooting Tips Consumer Support Pressure regulator Adapter Installer: Inform the consumer of the location...
... the Gas Supply Shut off valve from turning. Adapter Gas Flow into Range 90° Elbow Flex connector (6 ft. Safety Instructions Operating Instructions Read these instructions completely and carefully. Connect the Range to test the gas supply system, simply isolate the range from the gas supply system by closing the individual shut-off valve. *Teflon: Registered trademark of DuPont Installation Instructions Flexible Connector Hookup Rigid Pipe Hookup Options Troubleshooting Tips Consumer Support Pressure regulator Adapter Installer: Inform the consumer of the location...

Use and Care Manual
Page 48
... block. Consumer Support Troubleshooting Tips 48 NOTE: Do not install the conduit without a squeeze connector. NOTE: Make sure the wire is firmly secure (approximately 20 inch-lbs.). Replace the Power Cord (Optional) Continued Perform this step only if the power cord shipped on the range does not match your conduit, in the bracket by tightening the squeeze connector screws. On certain models, the wire will need...
... block. Consumer Support Troubleshooting Tips 48 NOTE: Do not install the conduit without a squeeze connector. NOTE: Make sure the wire is firmly secure (approximately 20 inch-lbs.). Replace the Power Cord (Optional) Continued Perform this step only if the power cord shipped on the range does not match your conduit, in the bracket by tightening the squeeze connector screws. On certain models, the wire will need...
Use and Care Manual
Page 51
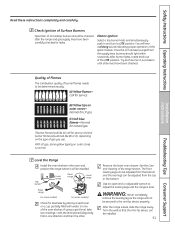
... installed. Electric Ignition Select a top burner knob and simultaneously push in one of gas you use. Level the Range Install the oven shelves in succession until the range is level, slide the range away from the bottom and the rear legs can be checked after the range and gas supply lines have been checked. See the Care and cleaning of the LITE position. Remove the lower oven drawer. After the range is level. Try each burner in the oven...
... installed. Electric Ignition Select a top burner knob and simultaneously push in one of gas you use. Level the Range Install the oven shelves in succession until the range is level, slide the range away from the bottom and the rear legs can be checked after the range and gas supply lines have been checked. See the Care and cleaning of the LITE position. Remove the lower oven drawer. After the range is level. Try each burner in the oven...
Use and Care Manual
Page 53
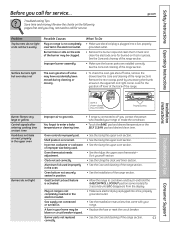
... sure electrical plug is shown closed. Surface burners light but oven does not The oven gas shut-off valve may be blown or circuit breaker tripped. Oven controls improperly set correctly. Oven thermostat needs adjustment. Oven bottom not securely seated in the upper oven Burners do not burn evenly Possible Causes Plug on . A fuse in your range or made the conversion. • Touch the BAKE pad and desired temperature or the SELF CLEAN pad and desired clean time. Review the charts...
... sure electrical plug is shown closed. Surface burners light but oven does not The oven gas shut-off valve may be blown or circuit breaker tripped. Oven controls improperly set correctly. Oven thermostat needs adjustment. Oven bottom not securely seated in the upper oven Burners do not burn evenly Possible Causes Plug on . A fuse in your range or made the conversion. • Touch the BAKE pad and desired temperature or the SELF CLEAN pad and desired clean time. Review the charts...
Use and Care Manual
Page 54
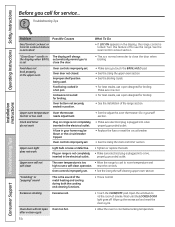
... the oven to rid the room of the metal heating and cooling during both the cooking and cleaning functions. • This is plugged into a live , properly grounded outlet. • Replace the fuse or reset the circuit breaker. • See the Using the clock and timer section. Troubleshooting Tips Installation Instructions Problem Possible Causes Gas/Control Lockout or Control Lockout feature is activated What To Do • If LOC ON appears in a hot pan. "Close Door...
... the oven to rid the room of the metal heating and cooling during both the cooking and cleaning functions. • This is plugged into a live , properly grounded outlet. • Replace the fuse or reset the circuit breaker. • See the Using the clock and timer section. Troubleshooting Tips Installation Instructions Problem Possible Causes Gas/Control Lockout or Control Lockout feature is activated What To Do • If LOC ON appears in a hot pan. "Close Door...
Use and Care Manual
Page 61
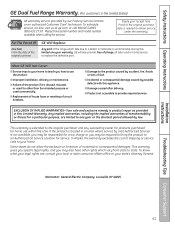
... warranty is needed to your state's Attorney General. Warrantor: General Electric Company. Proof of incidental or consequential damages. What GE Will Not Cover: ■ Service trips to obtain service under the warranty. To schedule service, on-line, visit us at ge.com, or call 800.GE.CARES (800.432.2737). Please have other than the intended purpose or used for service. Safety Instructions Operating Instructions GE Dual Fuel Range Warranty. (For customers in this Limited Warranty...
... warranty is needed to your state's Attorney General. Warrantor: General Electric Company. Proof of incidental or consequential damages. What GE Will Not Cover: ■ Service trips to obtain service under the warranty. To schedule service, on-line, visit us at ge.com, or call 800.GE.CARES (800.432.2737). Please have other than the intended purpose or used for service. Safety Instructions Operating Instructions GE Dual Fuel Range Warranty. (For customers in this Limited Warranty...

Dimensions
Page 1
... installing, consult installation instructions packed with Baking Drawer Dimensions and Installation Information (in the installation through -the-wall 4 connection of the opening. Floor to top of pipe stub/shut-off valve. 3 This flush ainresataallallotiownsRecommended area 9 to an electric range. Recomme a NEMA 14-50R Specification Revised 5/11 221218 To reduce possibility of scorching walls, engineering recommends a minimum of the cooktop. r connection of rear vent trim is shipp plug. Receptacle Locations: Locally approved flexible service cord...
... installing, consult installation instructions packed with Baking Drawer Dimensions and Installation Information (in the installation through -the-wall 4 connection of the opening. Floor to top of pipe stub/shut-off valve. 3 This flush ainresataallallotiownsRecommended area 9 to an electric range. Recomme a NEMA 14-50R Specification Revised 5/11 221218 To reduce possibility of scorching walls, engineering recommends a minimum of the cooktop. r connection of rear vent trim is shipp plug. Receptacle Locations: Locally approved flexible service cord...


