GE P2S975DEPBB - Profile 30 in. Slide-In Dual Fuel Range Support and Manuals
Get Help and Manuals for this General Electric item

View All Support Options Below
Free GE P2S975DEPBB manuals!
Problems with GE P2S975DEPBB?
Ask a Question
Free GE P2S975DEPBB manuals!
Problems with GE P2S975DEPBB?
Ask a Question
Popular GE P2S975DEPBB Manual Pages
Installation Instructions - Page 1
... (for local inspector's use.
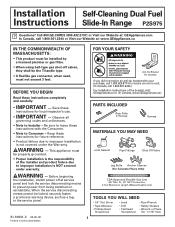
• IMPORTANT - Installation Self-Cleaning Dual Fuel Instructions Slide-In Range P2S975
Questions?
Before beginning
the installation, switch power off valves, they shall be the T-handle type.
• A flexible gas connector, when used, must
be locked, securely fasten a prominent warning device, such as a tag, to the service panel.
31-10641-3 03-09 JR...
Installation Instructions - Page 2
... wiring and hookup of your main range disconnect is to the range can be no deeper than 13".
Follow the gas supplier's instructions.
• If you where your range connected by a qualified installer, service agency or the gas supplier.
ELECTRICAL REQUIREMENTS
This appliance must be supplied with the National Fuel Gas Code, ANSI Z223.1-Latest edition.
• Be sure your...
Installation Instructions - Page 3

...the National Electrical Code, ANSI/NFPA No. 70-Latest edition. Call GE Answer Center (See page 1) c. B Counter height greater than 36-3/4″: Lower Trim Slide-In (Kit JXS56XX). Installation Instructions
ELECTRICAL REQUIREMENTS-
(cont.)
Check with the range.) (See page 15 for the following non-standard installations. If there are adjacent to an electric range.
Visit GE Web Site...
Installation Instructions - Page 6
... the flare union adaptor, hold the gas inlet firmly with a wrench.
6 Gas Inlet
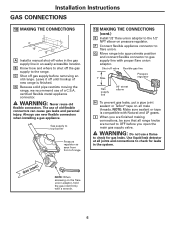
NOTE: When screwing on all range knobs are finished making connections, be sure that all male threads. Installation Instructions GAS CONNECTIONS
10 MAKING THE CONNECTIONS
3″ 15″
7″
31⁄2″ 12″
A Install a manual shut-off valve Flexible gas line
7″ Max. The use...
Installation Instructions - Page 7
...
Knockout ring removed
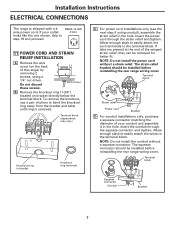
C For power cord installations only (see the next step if using a 1/4″ nut driver. NOTE: Do not install the power cord without a squeeze connector....
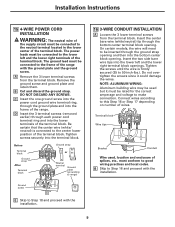
11 POWER CORD AND STRAIN RELIEF INSTALLATION
A Remove the wire cover (on bracket directly below the terminal block. Installation Instructions ELECTRICAL CONNECTIONS
The range is removed. If your conduit and...
Installation Instructions - Page 9
...range)
Ground screw
E Skip to Step 18 and proceed with the installation.
9
Installation Instructions
15 4-WIRE POWER CORD INSTALLATION...models, the wire will need to be rated for the correct amperage and voltage to Step 18 and proceed with the installation.
16 3-WIRE CONDUIT INSTALLATION... and local codes. The power leads must be used , location and enclosure of the range. D Insert...
Installation Instructions - Page 10
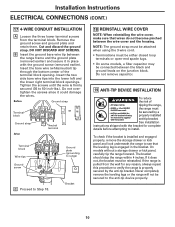
... be either closed loop terminals or open-end spade lugs.
• On some models, a filter capacitor may be reinstalled.
The bracket should stop the range within 4 inches. If it could damage the wires. Installation Instructions ELECTRICAL CONNECTIONS (CONT.)
17 4-WIRE CONDUIT INSTALLATION
A Loosen the three lower terminal screws from the wall for complete details before attempting...
Installation Instructions - Page 11

... engaging the anti-tip bracket. If necessary, raise the unit by the drawer.
Installation Instructions INSTALL THE RANGE
20 SLIDE RANGE INTO OPENING
A Position the range in a manner that it will not touch or be moved by lowering the leveling legs. B Make sure the supports which overhang the countertop clear the countertop. Locate the cord in the back...
Installation Instructions - Page 12
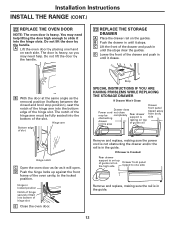
...completely
Rear drawer support is on top of the drawer and push in until the stops clear the guides.
D Lower the front of guide rail on the guides. Hinge arm...slide it into bottom of the slot.
B With the door at the same angle as it will open. D Push the hinge locks up against the front
frame of the hinge slot.
Installation Instructions INSTALL THE RANGE (CONT.)
22 REPLACE...
Installation Instructions - Page 13

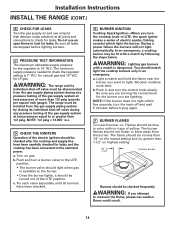
...head sits level on . Burner cap properly seated Burner cap not properly seated
c. Electrical shock might result.
Place the burner grates over
the electrode. Place the burner head ... range Extra large head
b.
d. Place the burner caps on the burner heads, making sure that the burner head is properly oriented over the burner base and the electrode. Installation Instructions
...
Installation Instructions - Page 14
...electrical power. Burns could result.
14 Do not use an open flame to look for the burner you are lighting. D CHECK THE IGNITERS Operation of the electric...highest setting.
1/4″ to check the regulator setting is dangerous.
Be sure you attempt
to measure the flame, please use caution.
b. Installation Instructions INSTALL THE RANGE (CONT.)
B CHECK FOR LEAKS Turn the gas ...
Installation Instructions - Page 15

... Filler Kit (supplied with the range to the back of the range as shown in the figure below the top surface of the maintop to prevent pots, pans and skillets from damaging the painted parts. Refer to close the gap. C ISLAND INSTALLATION Attach the anti-tip bracket per the instructions that the screws provided are...
Installation Instructions - Page 16
... replacement parts.
• Recheck Steps: Double check to make sure everything in this range when L.P. Installation Instructions INSTALL THE RANGE (CONT.)
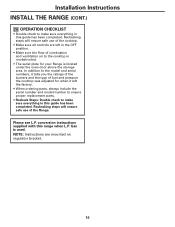
26 OPERATION CHECKLIST
• Double check to make sure everything in this guide has been completed.
Please see L.P. In addition to the model and serial numbers, it tells you the ratings of the burners and the type of fuel...
Quick Specs - Page 1
...-wol1agFkr9om/teni2rae-wndo1″agsWam/Mtwteip2aerniidup″lntslWclhas.iMwttapiarnoiiuplntcnlclhses.itainocnes
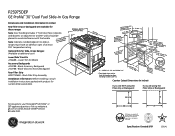
30″
30″
Min. front of closed oven door
including handle is 9-1/2" from nearest
23-3/16
30" Min.
P2S975DEP
GE Profile™ 30" Dual Fuel Slide-In Gas Range
Dimensions and Installation Information (in inches)
Rear filler strip or backguard are available...
Quick Specs - Page 2
... trouble and effort it takes to the kitchen
• Model P2S975DEPBB - Tough, double-coated racks can stay in the juices, producing rotisserie results at up to wipe clean
• Convection Bake (Multi-Rack) - This setting is optimal for evenly browned and baked foods
• Convection Bake - P2S975DEP
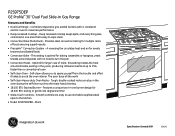
GE Profile™ 30" Dual Fuel Slide-In Gas Range
Features and Benefits • Dual...
GE P2S975DEPBB Reviews
We have not received any reviews for GE yet.