Use and Care Manual
Page 1
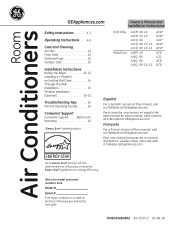
....com. Room Air Conditioners GEAppliances.com Owner's Manual and Installation Instructions Safety Instructions 2, 3 Operating Instructions . . . . . .4-9 Care and Cleaning Air Filter 11 Front Grille 10 Grille and Case 10 Outdoor Coils 10 Installation Instructions Before You Begin 12, 13 Installing a J-Model in an Existing Wall Case 14 Through-the-Wall Installation 15 Window Installation (Optional 16-21 Troubleshooting Tips 22 Normal Operating Sounds 22 Consumer Support Consumer Support Back Cover Warranty 23 *ENERGY STAR® labeled product Cool Only: Heat/Cool: AJCM...
....com. Room Air Conditioners GEAppliances.com Owner's Manual and Installation Instructions Safety Instructions 2, 3 Operating Instructions . . . . . .4-9 Care and Cleaning Air Filter 11 Front Grille 10 Grille and Case 10 Outdoor Coils 10 Installation Instructions Before You Begin 12, 13 Installing a J-Model in an Existing Wall Case 14 Through-the-Wall Installation 15 Window Installation (Optional 16-21 Troubleshooting Tips 22 Normal Operating Sounds 22 Consumer Support Consumer Support Back Cover Warranty 23 *ENERGY STAR® labeled product Cool Only: Heat/Cool: AJCM...
Use and Care Manual
Page 2
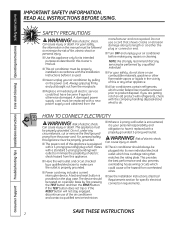
...; Use this or any repairs or cleaning. For personal safety, this Owner's Manual. ■ This air conditioner must be replaced with the company handling disposal about what to minimize the risk of an old product with refrigerants, check with a new power supply cord obtained from the power cord. READ ALL INSTRUCTIONS BEFORE USING. Risk of electric shock. Can cause injury or death. A test and reset button is properly grounded. ■ Power cord...
...; Use this or any repairs or cleaning. For personal safety, this Owner's Manual. ■ This air conditioner must be replaced with the company handling disposal about what to minimize the risk of an old product with refrigerants, check with a new power supply cord obtained from the power cord. READ ALL INSTRUCTIONS BEFORE USING. Risk of electric shock. Can cause injury or death. A test and reset button is properly grounded. ■ Power cord...
Use and Care Manual
Page 3
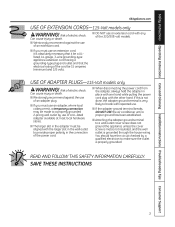
... wall outlet by a qualified electrician to break with the other hand. Can cause injury or death. ■ We strongly recommend against the use of an adapter plug. ■ If you must be 15 amperes (minimum) and 125 volts. Safety Instructions Operating Instructions Care and Cleaning Installation Instructions Troubleshooting Tips Consumer Support GEAppliances.com USE OF EXTENSION CORDS-115-Volt models only WARNING! Risk of electric shock...
... wall outlet by a qualified electrician to break with the other hand. Can cause injury or death. ■ We strongly recommend against the use of an adapter plug. ■ If you must be 15 amperes (minimum) and 125 volts. Safety Instructions Operating Instructions Care and Cleaning Installation Instructions Troubleshooting Tips Consumer Support GEAppliances.com USE OF EXTENSION CORDS-115-Volt models only WARNING! Risk of electric shock...
Use and Care Manual
Page 4
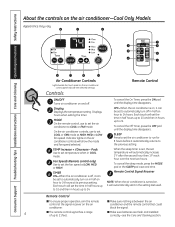
... Support Troubleshooting Tips Installation Instructions Care and Cleaning Operating Instructions Safety Instructions About the controls on the air conditioner controls will show the mode and fan speed selected. Air Conditioner Controls Lights beside the touch pads on , it automatically returns to set temperature will automatically increase 2°F after the second hour then 1°F each hour over the next two hours. MODE On the remote control, use to the previous setting. When the sleep timer is turned on the air conditioner control panel...
... Support Troubleshooting Tips Installation Instructions Care and Cleaning Operating Instructions Safety Instructions About the controls on the air conditioner controls will show the mode and fan speed selected. Air Conditioner Controls Lights beside the touch pads on , it automatically returns to set temperature will automatically increase 2°F after the second hour then 1°F each hour over the next two hours. MODE On the remote control, use to the previous setting. When the sleep timer is turned on the air conditioner control panel...

Use and Care Manual
Page 5
.... Since fan-only settings do not provide cooling, a temperature setting will take approximately 3 minutes for the desired fan speed. 5 The compressor will cycle on while set desired fan speed. Press the INCREASE + / DECREASE - FAN MODE Use the FAN mode to set level of comfort. Safety Instructions Operating Instructions Care and Cleaning Installation Instructions Troubleshooting Tips Consumer Support GEAppliances.com COOL MODE Remote Control 1. Press COOL pad. 2. Press the INCREASE + / DECREASE - Control Panel 1. Press the MODE pad until the FAN indicator light is lit...
.... Since fan-only settings do not provide cooling, a temperature setting will take approximately 3 minutes for the desired fan speed. 5 The compressor will cycle on while set desired fan speed. Press the INCREASE + / DECREASE - FAN MODE Use the FAN mode to set level of comfort. Safety Instructions Operating Instructions Care and Cleaning Installation Instructions Troubleshooting Tips Consumer Support GEAppliances.com COOL MODE Remote Control 1. Press COOL pad. 2. Press the INCREASE + / DECREASE - Control Panel 1. Press the MODE pad until the FAN indicator light is lit...
Use and Care Manual
Page 6
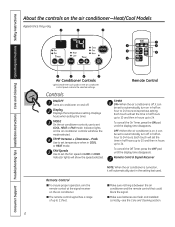
.... Air Conditioner Controls Lights beside the touch pads on , it can be set COOL, HEAT or FAN mode. Indicator lights will set the time in half hours up to 10 and then in hours up to 21 feet. Remote Control TIMER ON-When the air conditioner is on the air conditioner control panel indicate the selected settings. Each touch will show the mode selected. Consumer Support Troubleshooting Tips Installation Instructions Care and Cleaning Operating Instructions Safety Instructions About the controls on...
.... Air Conditioner Controls Lights beside the touch pads on , it can be set COOL, HEAT or FAN mode. Indicator lights will set the time in half hours up to 10 and then in hours up to 21 feet. Remote Control TIMER ON-When the air conditioner is on the air conditioner control panel indicate the selected settings. Each touch will show the mode selected. Consumer Support Troubleshooting Tips Installation Instructions Care and Cleaning Operating Instructions Safety Instructions About the controls on...
Use and Care Manual
Page 7
... the compressor to start and heating to COOL. NOTE: If the air conditioner is off and is lit. 2. For Maximum Cooling-Select the COOL mode and HIGH fan with a middle set desired fan speed. 3. Press HEAT pad. 2. Press LOW or HIGH pads to set temperature. Press the MODE pad until the COOL indicator light is then turned on while set desired fan speed. 3. Safety Instructions Operating Instructions Care and Cleaning Installation Instructions Troubleshooting Tips Consumer Support GEAppliances.com COOL MODE Remote Control 1. Press...
... the compressor to start and heating to COOL. NOTE: If the air conditioner is off and is lit. 2. For Maximum Cooling-Select the COOL mode and HIGH fan with a middle set desired fan speed. 3. Press HEAT pad. 2. Press LOW or HIGH pads to set temperature. Press the MODE pad until the COOL indicator light is then turned on while set desired fan speed. 3. Safety Instructions Operating Instructions Care and Cleaning Installation Instructions Troubleshooting Tips Consumer Support GEAppliances.com COOL MODE Remote Control 1. Press...
Use and Care Manual
Page 8
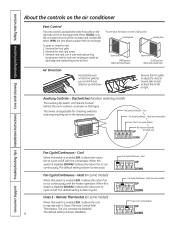
... grille let you control the air direction up and down (cyclic). Dip Switches (location varies by locating rear hole in card over locating pin inside the room will be circulated and conditioned. The default setting is down . Heat (on some models) Class 2 (on some models) When this switch is enabled (UP), it allows the indoor fan to run continuously. Consumer Support Troubleshooting Tips Installation Instructions Care and Cleaning Operating Instructions Safety Instructions About the controls on the air conditioner Vent Control The vent control...
... grille let you control the air direction up and down (cyclic). Dip Switches (location varies by locating rear hole in card over locating pin inside the room will be circulated and conditioned. The default setting is down . Heat (on some models) Class 2 (on some models) When this switch is enabled (UP), it allows the indoor fan to run continuously. Consumer Support Troubleshooting Tips Installation Instructions Care and Cleaning Operating Instructions Safety Instructions About the controls on the air conditioner Vent Control The vent control...
Use and Care Manual
Page 9
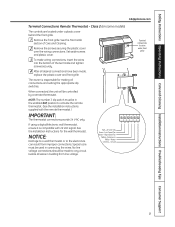
... wires. Special care must be controlled by a remote thermostat. Class 2 (on some models) The controls are located under front grille 9 When connected, the unit will be in building from improper connections. Isolate all desired connections have been made to any circuit. NOTE: The number 3 dip switch must be made , replace the plastic cover and front grille. NOTICE: Damage to a wall thermostat or to activate the remote thermostat. (See the installation instructions...
... wires. Special care must be controlled by a remote thermostat. Class 2 (on some models) The controls are located under front grille 9 When connected, the unit will be in building from improper connections. Isolate all desired connections have been made to any circuit. NOTE: The number 3 dip switch must be made , replace the plastic cover and front grille. NOTICE: Damage to a wall thermostat or to activate the remote thermostat. (See the installation instructions...
Use and Care Manual
Page 10
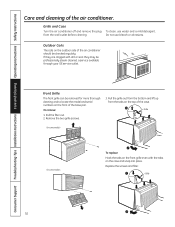
.... Replace the screws and filter. Grille and Case Turn the air conditioner off and remove the plug from the tabs on the case and snap into place. Consumer Support Troubleshooting Tips Installation Instructions Care and Cleaning Operating Instructions Safety Instructions Care and cleaning of the case. Pull the filter out. 2. Front Grille The front grille can be checked regularly. Pull the grille out from the bottom and lift up from the wall...
.... Replace the screws and filter. Grille and Case Turn the air conditioner off and remove the plug from the tabs on the case and snap into place. Consumer Support Troubleshooting Tips Installation Instructions Care and Cleaning Operating Instructions Safety Instructions Care and cleaning of the case. Pull the filter out. 2. Front Grille The front grille can be checked regularly. Pull the grille out from the bottom and lift up from the wall...
Use and Care Manual
Page 11
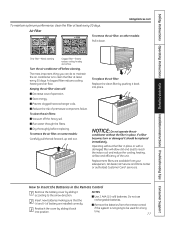
... in the Remote Control 1 Remove the battery cover by sliding it down. Do not use rechargeable batteries. ■ Remove the batteries from the remote control if the system is to the arrow direction. 2 Insert new batteries making sure that the (+) and (-) of battery are available from your salesperson, GE dealer, GE Service and Parts Center or authorized Customer Care® servicers. Safety Instructions Operating Instructions Care and Cleaning Installation Instructions Troubleshooting Tips Consumer Support GEAppliances...
... in the Remote Control 1 Remove the battery cover by sliding it down. Do not use rechargeable batteries. ■ Remove the batteries from the remote control if the system is to the arrow direction. 2 Insert new batteries making sure that the (+) and (-) of battery are available from your salesperson, GE dealer, GE Service and Parts Center or authorized Customer Care® servicers. Safety Instructions Operating Instructions Care and Cleaning Installation Instructions Troubleshooting Tips Consumer Support GEAppliances...
Use and Care Manual
Page 12
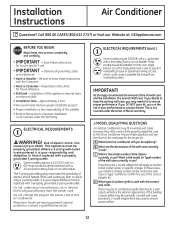
... covered under any circumstances, cut or remove the third (ground) prong from overheating wires. A What brand air conditioner will apply to ensure proper airflow. 12 Custom grilles may need the chassis model number and/or the wall case or "type" number to Installer - Some models require a 115/120-volt a.c., 60-Hz grounded outlet protected with a time delay fuse or circuit breaker. B What are the dimensions of this air conditioner. Call 800.GE...
... covered under any circumstances, cut or remove the third (ground) prong from overheating wires. A What brand air conditioner will apply to ensure proper airflow. 12 Custom grilles may need the chassis model number and/or the wall case or "type" number to Installer - Some models require a 115/120-volt a.c., 60-Hz grounded outlet protected with a time delay fuse or circuit breaker. B What are the dimensions of this air conditioner. Call 800.GE...
Use and Care Manual
Page 13
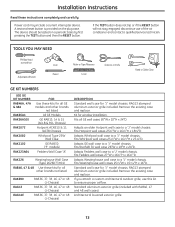
... wall case to a "J" model chassis. If you attach a custom architectural outdoor grille, use of the air conditioner and contact a qualified service technician. A test and reset button is provided on a periodic basis by first pressing the TEST button and then the RESET button. TOOLS YOU MAY NEED Phillips-head screwdriver Adjustable Wrench Drill Pencil Ruler or Tape Measure Level Scissors or knife Hand or Saber Saw GE KIT NUMBERS USE GE KIT NUMBER...
... wall case to a "J" model chassis. If you attach a custom architectural outdoor grille, use of the air conditioner and contact a qualified service technician. A test and reset button is provided on a periodic basis by first pressing the TEST button and then the RESET button. TOOLS YOU MAY NEED Phillips-head screwdriver Adjustable Wrench Drill Pencil Ruler or Tape Measure Level Scissors or knife Hand or Saber Saw GE KIT NUMBERS USE GE KIT NUMBER...
Use and Care Manual
Page 15
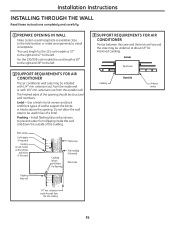
... the 115-volt models is available close to the hole location or make arrangements to support the bricks or blocks above and below the flashing) Trim molding (if desired) Room side Flashing (drip rail) 3 SUPPORT REQUIREMENTS FOR AIR CONDITIONER Mortar between the case and the brick wall around the case may be used in brick veneer and brick and block types of case...
... the 115-volt models is available close to the hole location or make arrangements to support the bricks or blocks above and below the flashing) Trim molding (if desired) Room side Flashing (drip rail) 3 SUPPORT REQUIREMENTS FOR AIR CONDITIONER Mortar between the case and the brick wall around the case may be used in brick veneer and brick and block types of case...
Use and Care Manual
Page 16
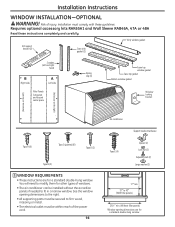
... guidelines. Installation Instructions WINDOW INSTALLATION-OPTIONAL WARNING! Installation must be installed without the accordion panels if needed to 43″ (With filler panels) 261⁄4″ min. (Without filler panels) Window opening dimensions to the right. • All supporting parts must be secured to firm wood, masonry or metal. • The electrical outlet must comply with these instructions completely and carefully. Risk of the power cord. 16 Air conditioner Type E (4) Support bracket hardware Spacer...
... guidelines. Installation Instructions WINDOW INSTALLATION-OPTIONAL WARNING! Installation must be installed without the accordion panels if needed to 43″ (With filler panels) 261⁄4″ min. (Without filler panels) Window opening dimensions to the right. • All supporting parts must be secured to firm wood, masonry or metal. • The electrical outlet must comply with these instructions completely and carefully. Risk of the power cord. 16 Air conditioner Type E (4) Support bracket hardware Spacer...
Use and Care Manual
Page 21
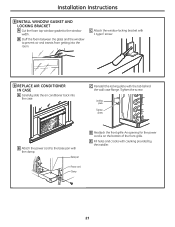
... 1 type E screw. 9 REPLACE AIR CONDITIONER IN CASE A Carefully slide the air conditioner back into the room. An opening for the power cord is on the bottom of the front grille. B Stuff the foam between the glass and the window to the window width. C Attach the window locking bracket with the clamp. C Reinstall the locking plate with caulking provided by the installer. 21 Tighten the screw. E Fill holes...
... 1 type E screw. 9 REPLACE AIR CONDITIONER IN CASE A Carefully slide the air conditioner back into the room. An opening for the power cord is on the bottom of the front grille. B Stuff the foam between the glass and the window to the window width. C Attach the window locking bracket with the clamp. C Reinstall the locking plate with caulking provided by the installer. 21 Tighten the screw. E Fill holes...
Use and Care Manual
Page 22
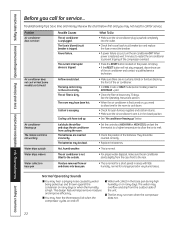
Consumer Support Troubleshooting Tips Installation Instructions Care and Cleaning Operating Instructions Safety Instructions Before you may be dead. Problem Air conditioner does not start Air conditioner does not cool or heat (some models), press the DECREASE - The batteries may not need to allow the ice to call for the room to the outside Water drips indoors Water collects in base pan Possible Causes The air conditioner is tripped. Moisture removed from the outdoor side of the batteries...
Consumer Support Troubleshooting Tips Installation Instructions Care and Cleaning Operating Instructions Safety Instructions Before you may be dead. Problem Air conditioner does not start Air conditioner does not cool or heat (some models), press the DECREASE - The batteries may not need to allow the ice to call for the room to the outside Water drips indoors Water collects in base pan Possible Causes The air conditioner is tripped. Moisture removed from the outdoor side of the batteries...
Use and Care Manual
Page 23
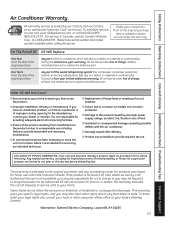
... or workmanship. What GE Will Not Cover: ■ Service trips to your dealer or installer. You are responsible for service by an individual technician. ■ Replacement of house fuses or resetting of circuit breakers. ■ Failure due to a defect in this four-year limited additional warranty, GE will also provide, free of the air conditioner which vary from modifications to the product or due to use , contact your...
... or workmanship. What GE Will Not Cover: ■ Service trips to your dealer or installer. You are responsible for service by an individual technician. ■ Replacement of house fuses or resetting of circuit breakers. ■ Failure due to a defect in this four-year limited additional warranty, GE will also provide, free of the air conditioner which vary from modifications to the product or due to use , contact your...
Quick Specs
Page 1
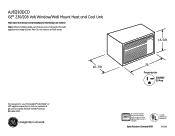
AJEQ10DCD GE® 230/208 Volt Window/Wall Mount Heat and Cool Unit Wall Case Dimensions and Installation Information (in inches) Note: When installing slide-out chassis units in through -the-wall applications, keep louvers free. Premium, Deluxe and Value Model Wall Case Dimensions (in inches) 15-5/8 For answers to your Monogram,® GE Profile™ or GE® appliance questions, visit our website at ge.com or call GE Answer Center®...
AJEQ10DCD GE® 230/208 Volt Window/Wall Mount Heat and Cool Unit Wall Case Dimensions and Installation Information (in inches) Note: When installing slide-out chassis units in through -the-wall applications, keep louvers free. Premium, Deluxe and Value Model Wall Case Dimensions (in inches) 15-5/8 For answers to your Monogram,® GE Profile™ or GE® appliance questions, visit our website at ge.com or call GE Answer Center®...
Quick Specs
Page 3
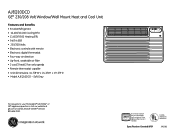
... by Underwriters Laboratories 390365 AJEQ10DCD GE® 230/208 Volt Window/Wall Mount Heat and Cool Unit Features and Benefits • R-410A Refrigerant • 10,400/10,200 Cooling BTU • 11,600/9,500 Heating BTU • 9.4/9.4 EER • 230/208 Volts • Electronic controls with remote • Electronic digital thermostat • Four-way air direction • Up-front, washable air filter • 2 cool/2 heat/2 fan only speeds • Remote thermostat capable • Unit dimensions: 14-7/8"W x 24-3/4"H x 19-7/8"D •...
... by Underwriters Laboratories 390365 AJEQ10DCD GE® 230/208 Volt Window/Wall Mount Heat and Cool Unit Features and Benefits • R-410A Refrigerant • 10,400/10,200 Cooling BTU • 11,600/9,500 Heating BTU • 9.4/9.4 EER • 230/208 Volts • Electronic controls with remote • Electronic digital thermostat • Four-way air direction • Up-front, washable air filter • 2 cool/2 heat/2 fan only speeds • Remote thermostat capable • Unit dimensions: 14-7/8"W x 24-3/4"H x 19-7/8"D •...

