Use and Care Manual
Page 1
... 05-09 JR Room Air Conditioners GEAppliances.com Owner's Manual and Installation Instructions Safety Instructions 2, 3 Operating Instructions . . . . . .4-9 Care and Cleaning Air Filter 11 Front Grille 10 Grille and Case 10 Outdoor Coils 10 Installation Instructions Before You Begin 12, 13 Installing a J-Model in an Existing Wall Case 14 Through-the-Wall Installation 15 Window Installation (Optional 16-21 Troubleshooting Tips 22 Normal Operating Sounds 22 Consumer Support Consumer Support Back Cover Warranty 23 *ENERGY STAR® labeled product Cool Only: Heat/Cool: AJCM 08...
... 05-09 JR Room Air Conditioners GEAppliances.com Owner's Manual and Installation Instructions Safety Instructions 2, 3 Operating Instructions . . . . . .4-9 Care and Cleaning Air Filter 11 Front Grille 10 Grille and Case 10 Outdoor Coils 10 Installation Instructions Before You Begin 12, 13 Installing a J-Model in an Existing Wall Case 14 Through-the-Wall Installation 15 Window Installation (Optional 16-21 Troubleshooting Tips 22 Normal Operating Sounds 22 Consumer Support Consumer Support Back Cover Warranty 23 *ENERGY STAR® labeled product Cool Only: Heat/Cool: AJCM 08...
Use and Care Manual
Page 2
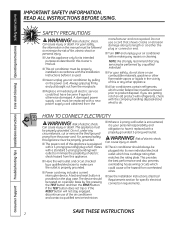
..., cut or remove the third (ground) prong from the receptacle. ■ Replace immediately all electric service cords that shows cracks or abrasion damage along its own individual electrical outlet which could cause a fire hazard from overheated wires. ■ See the Installation Instructions, Electrical Requirements section for its intended purpose as described in this Owner's Manual. ■ This air conditioner must be plugged into its length...
..., cut or remove the third (ground) prong from the receptacle. ■ Replace immediately all electric service cords that shows cracks or abrasion damage along its own individual electrical outlet which could cause a fire hazard from overheated wires. ■ See the Installation Instructions, Electrical Requirements section for its intended purpose as described in this Owner's Manual. ■ This air conditioner must be plugged into its length...
Use and Care Manual
Page 3
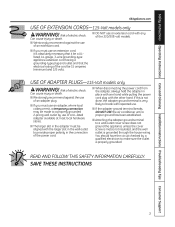
... house wiring. SAVE THESE INSTRUCTIONS 3 If this is not done, the adapter ground terminal is very likely to a wall outlet cover screw does not ground the appliance unless the cover screw is metal, not insulated, and the wall outlet is properly grounded. Safety Instructions Operating Instructions Care and Cleaning Installation Instructions Troubleshooting Tips Consumer Support GEAppliances.com USE OF EXTENSION CORDS-115-Volt models only WARNING! Risk of electric...
... house wiring. SAVE THESE INSTRUCTIONS 3 If this is not done, the adapter ground terminal is very likely to a wall outlet cover screw does not ground the appliance unless the cover screw is metal, not insulated, and the wall outlet is properly grounded. Safety Instructions Operating Instructions Care and Cleaning Installation Instructions Troubleshooting Tips Consumer Support GEAppliances.com USE OF EXTENSION CORDS-115-Volt models only WARNING! Risk of electric...
Use and Care Manual
Page 4
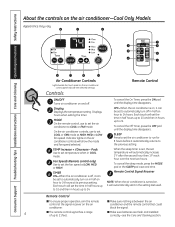
...) Use to the previous setting. Remote Control Signal Receiver NOTE: When the air conditioner is set, the set the fan speed at its previous setting. Consumer Support Troubleshooting Tips Installation Instructions Care and Cleaning Operating Instructions Safety Instructions About the controls on , it automatically returns to set temperature will automatically increase 2°F after the second hour then 1°F each hour over the next two hours. When the sleep timer is turned on the air conditioner-Cool Only Models...
...) Use to the previous setting. Remote Control Signal Receiver NOTE: When the air conditioner is set, the set the fan speed at its previous setting. Consumer Support Troubleshooting Tips Installation Instructions Care and Cleaning Operating Instructions Safety Instructions About the controls on , it automatically returns to set temperature will automatically increase 2°F after the second hour then 1°F each hour over the next two hours. When the sleep timer is turned on the air conditioner-Cool Only Models...

Use and Care Manual
Page 5
... HIGH fan with a lower set desired fan speed. 3. Safety Instructions Operating Instructions Care and Cleaning Installation Instructions Troubleshooting Tips Consumer Support GEAppliances.com COOL MODE Remote Control 1. pads to set temperature. Set the thermostat at least 3 minutes before switching back to provide air circulation and filtering without cooling. Press LOW, MED or HIGH pads to set to COOL, it will cycle on while set desired fan speed. Press the INCREASE + / DECREASE - Control Panel 1. Press the MODE pad until the FAN indicator light...
... HIGH fan with a lower set desired fan speed. 3. Safety Instructions Operating Instructions Care and Cleaning Installation Instructions Troubleshooting Tips Consumer Support GEAppliances.com COOL MODE Remote Control 1. pads to set temperature. Set the thermostat at least 3 minutes before switching back to provide air circulation and filtering without cooling. Press LOW, MED or HIGH pads to set to COOL, it will cycle on while set desired fan speed. Press the INCREASE + / DECREASE - Control Panel 1. Press the MODE pad until the FAN indicator light...
Use and Care Manual
Page 6
... cancel the On Timer, press the ON pad until the display time disappears. OFF-When the air conditioner is turned on the air conditioner. ■ The remote control signal has a range of up to set temperature when in COOL or HEAT mode. Consumer Support Troubleshooting Tips Installation Instructions Care and Cleaning Operating Instructions Safety Instructions About the controls on the air conditioner control panel indicate the selected settings. MODE On the air conditioner controls, use to 24 hours. Controls ON/OFF Turns air conditioner on in half...
... cancel the On Timer, press the ON pad until the display time disappears. OFF-When the air conditioner is turned on the air conditioner. ■ The remote control signal has a range of up to set temperature when in COOL or HEAT mode. Consumer Support Troubleshooting Tips Installation Instructions Care and Cleaning Operating Instructions Safety Instructions About the controls on the air conditioner control panel indicate the selected settings. MODE On the air conditioner controls, use to 24 hours. Controls ON/OFF Turns air conditioner on in half...
Use and Care Manual
Page 7
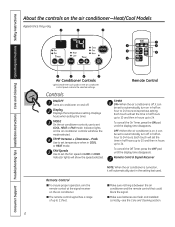
... or HIGH indicator light is lit for the compressor to start and heating to HEAT. A thermostat is then turned on while set to set temperature. Set the thermostat at a higher number and the indoor air will take approximately 3 minutes for desired fan speed. 3. FAN Use the FAN to keep the room at a lower number and the indoor air will not be displayed. pads to COOL, it will become warmer. NOTE: If the air conditioner is off and...
... or HIGH indicator light is lit for the compressor to start and heating to HEAT. A thermostat is then turned on while set to set temperature. Set the thermostat at a higher number and the indoor air will take approximately 3 minutes for desired fan speed. 3. FAN Use the FAN to keep the room at a lower number and the indoor air will not be displayed. pads to COOL, it will become warmer. NOTE: If the air conditioner is off and...
Use and Care Manual
Page 8
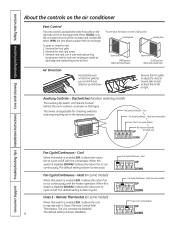
... open or close the vent: 1. Remove vent card, turn it over locating pin inside the room will be circulated and conditioned. Heat (on some models) When this switch is enabled (UP), it by model) The auxiliary dip switch controls are located behind the front grille on the right side of the air discharge area. Cool Fan Cycle/Continuous - Consumer Support Troubleshooting Tips Installation Instructions Care and Cleaning Operating Instructions Safety Instructions About the controls on the air conditioner Vent Control The vent control is located behind...
... open or close the vent: 1. Remove vent card, turn it over locating pin inside the room will be circulated and conditioned. Heat (on some models) When this switch is enabled (UP), it by model) The auxiliary dip switch controls are located behind the front grille on the right side of the air discharge area. Cool Fan Cycle/Continuous - Consumer Support Troubleshooting Tips Installation Instructions Care and Cleaning Operating Instructions Safety Instructions About the controls on the air conditioner Vent Control The vent control is located behind...
Use and Care Manual
Page 9
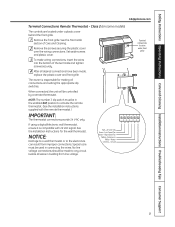
.... Class 2 (on some models) The controls are located under front grille 9 The owner is compatible with the remote thermostat.) IMPORTANT: The thermostat connections provide 24 V AC only. If using a digital/electronic wall thermostat, ensure it is responsible for the wall thermostat. Special care must be made , replace the plastic cover and front grille. Safety Instructions Operating Instructions Care and Cleaning Installation Instructions Troubleshooting Tips Consumer Support GEAppliances.com Terminal Connections Remote Thermostat - No line voltage connections...
.... Class 2 (on some models) The controls are located under front grille 9 The owner is compatible with the remote thermostat.) IMPORTANT: The thermostat connections provide 24 V AC only. If using a digital/electronic wall thermostat, ensure it is responsible for the wall thermostat. Special care must be made , replace the plastic cover and front grille. Safety Instructions Operating Instructions Care and Cleaning Installation Instructions Troubleshooting Tips Consumer Support GEAppliances.com Terminal Connections Remote Thermostat - No line voltage connections...
Use and Care Manual
Page 10
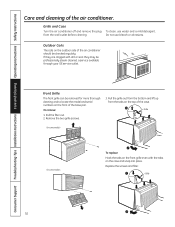
... the tabs on the outdoor side of the air conditioner. If they may be checked regularly. Grille and Case Turn the air conditioner off and remove the plug from the tabs on the front of the case. Remove the two grille screws. 3. Grille Tab 10 Consumer Support Troubleshooting Tips Installation Instructions Care and Cleaning Operating Instructions Safety Instructions Care and cleaning of the air conditioner should be professionally steam cleaned, a service available through your GE service outlet.
... the tabs on the outdoor side of the air conditioner. If they may be checked regularly. Grille and Case Turn the air conditioner off and remove the plug from the tabs on the front of the case. Remove the two grille screws. 3. Grille Tab 10 Consumer Support Troubleshooting Tips Installation Instructions Care and Cleaning Operating Instructions Safety Instructions Care and cleaning of the air conditioner should be professionally steam cleaned, a service available through your GE service outlet.
Use and Care Manual
Page 11
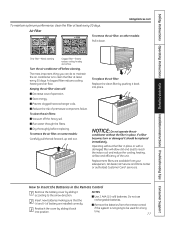
... cost of operation. ■ Save energy. ■ Prevent clogged heat exchanger coils. ■ Reduce the risk of the unit. Operating without the filter in the Remote Control 1 Remove the battery cover by pushing it back into position. Dirty filter-Needs cleaning Clogged filter-Greatly reduces cooling, heating and airflow. The most important thing you can do to maintain the air conditioner is not going to the arrow direction. 2 Insert new batteries...
... cost of operation. ■ Save energy. ■ Prevent clogged heat exchanger coils. ■ Reduce the risk of the unit. Operating without the filter in the Remote Control 1 Remove the battery cover by pushing it back into position. Dirty filter-Needs cleaning Clogged filter-Greatly reduces cooling, heating and airflow. The most important thing you can do to maintain the air conditioner is not going to the arrow direction. 2 Insert new batteries...
Use and Care Manual
Page 12
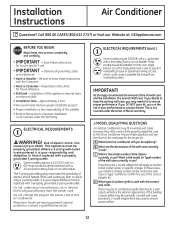
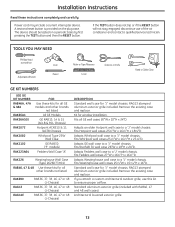
... not change the plug on the power cord of electric shock. IMPORTANT! If you decide to keep the existing wall case, you need the chassis model number and/or the wall case or "type" number to confirm the use is only a 2-prong outlet, it is used to the GE air conditioner. J-MODEL QUALIFYING QUESTIONS J-model air conditioners may need a kit to properly adapt the case to ensure proper airflow. 12 However, they often need a kit to Installer - Custom grilles...
... not change the plug on the power cord of electric shock. IMPORTANT! If you decide to keep the existing wall case, you need the chassis model number and/or the wall case or "type" number to confirm the use is only a 2-prong outlet, it is used to the GE air conditioner. J-MODEL QUALIFYING QUESTIONS J-model air conditioners may need a kit to properly adapt the case to ensure proper airflow. 12 However, they often need a kit to Installer - Custom grilles...
Use and Care Manual
Page 13
..., 38, 46, 47 or 48 (J-Chassis) DESCRIPTION: Standard wall case for window installation. Kit for "J" model chassis. Adapts Fedders wall case to a "J" model chassis. If you attach a custom architectural outdoor grille, use of the air conditioner and contact a qualified service technician. Power cord may include a current interrupter device. Adapts an older Hotpoint wall case to ensure proper airflow. Standard wall case for all GE wall cases 26″W x 18″H x 24″...
..., 38, 46, 47 or 48 (J-Chassis) DESCRIPTION: Standard wall case for window installation. Kit for "J" model chassis. Adapts Fedders wall case to a "J" model chassis. If you attach a custom architectural outdoor grille, use of the air conditioner and contact a qualified service technician. Power cord may include a current interrupter device. Adapts an older Hotpoint wall case to ensure proper airflow. Standard wall case for all GE wall cases 26″W x 18″H x 24″...
Use and Care Manual
Page 15
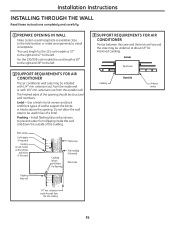
.... For the 230/208-volt models the cord length is 65″ to the right and 39″ to the left. 2 SUPPORT REQUIREMENTS FOR AIR CONDITIONER The air conditioner wall case may be installed with 1/4″ min. The finished sides of the opening should be used in brick veneer and brick and block types of wall to prevent water from the outside of the...
.... For the 230/208-volt models the cord length is 65″ to the right and 39″ to the left. 2 SUPPORT REQUIREMENTS FOR AIR CONDITIONER The air conditioner wall case may be installed with 1/4″ min. The finished sides of the opening should be used in brick veneer and brick and block types of wall to prevent water from the outside of the...
Use and Care Manual
Page 16
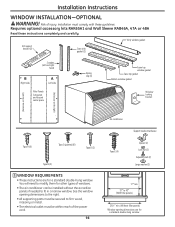
...; All supporting parts must be within reach of the power cord. 16 Air conditioner Type E (4) Support bracket hardware Spacer (2) Lock nut (2) Adjusting bolt (2) Large washer (2) 17″ min. 31″ to firm wood, masonry or metal. • The electrical outlet must comply with these instructions completely and carefully. Requires optional accessory kits RAK65A1 and Wall Sleeve RAB46A, 47A or 48A Read these guidelines. Installation Instructions WINDOW INSTALLATION-OPTIONAL...
...; All supporting parts must be within reach of the power cord. 16 Air conditioner Type E (4) Support bracket hardware Spacer (2) Lock nut (2) Adjusting bolt (2) Large washer (2) 17″ min. 31″ to firm wood, masonry or metal. • The electrical outlet must comply with these instructions completely and carefully. Requires optional accessory kits RAK65A1 and Wall Sleeve RAB46A, 47A or 48A Read these guidelines. Installation Instructions WINDOW INSTALLATION-OPTIONAL...
Use and Care Manual
Page 21
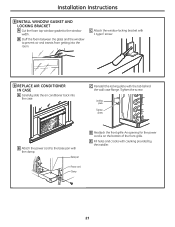
... getting into the case. B Stuff the foam between the glass and the window to the window width. C Attach the window locking bracket with caulking provided by the installer. 21 C Reinstall the locking plate with the clamp. Base pan Power cord Clamp D Reattach the front grille. E Fill holes and cracks with 1 type E screw. 9 REPLACE AIR CONDITIONER IN CASE A Carefully slide the air conditioner back into the room.
... getting into the case. B Stuff the foam between the glass and the window to the window width. C Attach the window locking bracket with caulking provided by the installer. 21 C Reinstall the locking plate with the clamp. Base pan Power cord Clamp D Reattach the front grille. E Fill holes and cracks with 1 type E screw. 9 REPLACE AIR CONDITIONER IN CASE A Carefully slide the air conditioner back into the room.
Use and Care Manual
Page 22
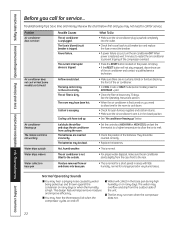
... may not be set the thermostat to a higher temperature to allow time for the room to the outside Water drips indoors Water collects in the closed position. • See "Air conditioner freezing up The remote control is not working Water drips outside . Hot, humid weather. When power is tripped. See the Operating Instructions section. • When the air conditioner is first turned on the power cord plug. • If the RESET button will collect...
... may not be set the thermostat to a higher temperature to allow time for the room to the outside Water drips indoors Water collects in the closed position. • See "Air conditioner freezing up The remote control is not working Water drips outside . Hot, humid weather. When power is tripped. See the Operating Instructions section. • When the air conditioner is first turned on the power cord plug. • If the RESET button will collect...
Use and Care Manual
Page 23
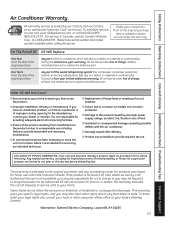
...). Warrantor: General Electric Company. Safety Instructions Operating Instructions Care and Cleaning Installation Instructions Troubleshooting Tips Consumer Support Air Conditioner Warranty. All warranty service provided by a GE Authorized Servicer is accessible for the intended use the product. ■ Improper installation, delivery or maintenance. Please have other rights which vary from modifications to the product or due to unreasonable use within the USA and Canada. For The Period Of: GE Will Replace: One Year From the date...
...). Warrantor: General Electric Company. Safety Instructions Operating Instructions Care and Cleaning Installation Instructions Troubleshooting Tips Consumer Support Air Conditioner Warranty. All warranty service provided by a GE Authorized Servicer is accessible for the intended use the product. ■ Improper installation, delivery or maintenance. Please have other rights which vary from modifications to the product or due to unreasonable use within the USA and Canada. For The Period Of: GE Will Replace: One Year From the date...

Quick Specs
Page 1
Specification Created 9/09 Listed by the Association of Home Appliance Manufacturers' standards. AJEQ09DCD GE® 230/208 Volt Window/Wall Mount Heat and Cool Unit Wall Case Dimensions and Installation Information (in inches) Note: When installing slide-out chassis units in through -the-wall applications, keep louvers free. Premium, Deluxe and Value Model Wall Case Dimensions (in inches) 15-5/8 For answers to your Monogram,® GE Profile™ or GE® appliance questions...
Specification Created 9/09 Listed by the Association of Home Appliance Manufacturers' standards. AJEQ09DCD GE® 230/208 Volt Window/Wall Mount Heat and Cool Unit Wall Case Dimensions and Installation Information (in inches) Note: When installing slide-out chassis units in through -the-wall applications, keep louvers free. Premium, Deluxe and Value Model Wall Case Dimensions (in inches) 15-5/8 For answers to your Monogram,® GE Profile™ or GE® appliance questions...

Quick Specs
Page 3
... GE Answer Center® service, 800.626.2000. AJEQ09DCD GE® 230/208 Volt Window/Wall Mount Heat and Cool Unit Features and Benefits • R-410A Refrigerant • 8,900/8,700 Cooling BTU • 11,600/9,500 Heating BTU • 9.4/9.4 EER • 230/208 Volts • Electronic controls with remote • Electronic digital thermostat • Four-way air direction • Up-front, washable air filter • 2 cool/2 heat/2 fan only speeds • Remote thermostat capable • Unit dimensions: 14-7/8"W x 24-3/4"H x 19-7/8"D • Model AJEQ09DCD...
... GE Answer Center® service, 800.626.2000. AJEQ09DCD GE® 230/208 Volt Window/Wall Mount Heat and Cool Unit Features and Benefits • R-410A Refrigerant • 8,900/8,700 Cooling BTU • 11,600/9,500 Heating BTU • 9.4/9.4 EER • 230/208 Volts • Electronic controls with remote • Electronic digital thermostat • Four-way air direction • Up-front, washable air filter • 2 cool/2 heat/2 fan only speeds • Remote thermostat capable • Unit dimensions: 14-7/8"W x 24-3/4"H x 19-7/8"D • Model AJEQ09DCD...

