Use and Care Manual
Page 1
....com. Room Air Conditioners GEAppliances.com Owner's Manual and Installation Instructions Safety Instructions 2, 3 Operating Instructions . . . . . .4-9 Care and Cleaning Air Filter 11 Front Grille 10 Grille and Case 10 Outdoor Coils 10 Installation Instructions Before You Begin 12, 13 Installing a J-Model in an Existing Wall Case 14 Through-the-Wall Installation 15 Window Installation (Optional 16-21 Troubleshooting Tips 22 Normal Operating Sounds 22 Consumer Support Consumer Support Back Cover Warranty 23 *ENERGY STAR® labeled product Cool Only: Heat/Cool: AJCM...
....com. Room Air Conditioners GEAppliances.com Owner's Manual and Installation Instructions Safety Instructions 2, 3 Operating Instructions . . . . . .4-9 Care and Cleaning Air Filter 11 Front Grille 10 Grille and Case 10 Outdoor Coils 10 Installation Instructions Before You Begin 12, 13 Installing a J-Model in an Existing Wall Case 14 Through-the-Wall Installation 15 Window Installation (Optional 16-21 Troubleshooting Tips 22 Normal Operating Sounds 22 Consumer Support Consumer Support Back Cover Warranty 23 *ENERGY STAR® labeled product Cool Only: Heat/Cool: AJCM...
Use and Care Manual
Page 2
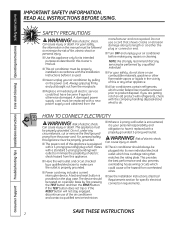
... RESET button will not stay engaged, discontinue use a cord that matches the rating plate. WARNING! Consumer Support Troubleshooting Tips Installation Instructions Care and Cleaning Operating Instructions Safety Instructions IMPORTANT SAFETY INFORMATION. A damaged power supply cord must be properly installed in this appliance only for specific electrical connection requirements. 2 SAVE THESE INSTRUCTIONS Can cause injury or death. Can cause injury or death. ■ The air conditioner should be properly grounded. ■ The power cord...
... RESET button will not stay engaged, discontinue use a cord that matches the rating plate. WARNING! Consumer Support Troubleshooting Tips Installation Instructions Care and Cleaning Operating Instructions Safety Instructions IMPORTANT SAFETY INFORMATION. A damaged power supply cord must be properly installed in this appliance only for specific electrical connection requirements. 2 SAVE THESE INSTRUCTIONS Can cause injury or death. Can cause injury or death. ■ The air conditioner should be properly grounded. ■ The power cord...
Use and Care Manual
Page 3
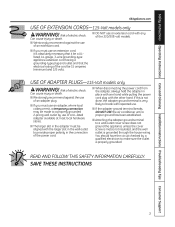
... electrician to provide proper polarity in the connection of the power cord. ■ When disconnecting the power cord from the adapter, always hold the adapter in the wall outlet to make sure the outlet is grounded through the house wiring. Risk of electric shock. Safety Instructions Operating Instructions Care and Cleaning Installation Instructions Troubleshooting Tips Consumer Support GEAppliances.com USE OF EXTENSION CORDS-115-Volt models only WARNING! SAVE THESE...
... electrician to provide proper polarity in the connection of the power cord. ■ When disconnecting the power cord from the adapter, always hold the adapter in the wall outlet to make sure the outlet is grounded through the house wiring. Risk of electric shock. Safety Instructions Operating Instructions Care and Cleaning Installation Instructions Troubleshooting Tips Consumer Support GEAppliances.com USE OF EXTENSION CORDS-115-Volt models only WARNING! SAVE THESE...
Use and Care Manual
Page 4
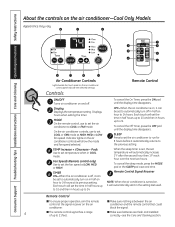
... a range of up to 24. Consumer Support Troubleshooting Tips Installation Instructions Care and Cleaning Operating Instructions Safety Instructions About the controls on the air conditioner control panel indicate the selected settings. Remote Control Signal Receiver NOTE: When the air conditioner is on the air conditioner controls will set the time in half hours up to 10 and then in COOL mode. Air Conditioner Controls Lights beside the touch pads on the air conditioner-Cool Only Models Appearance may vary. Each touch will...
... a range of up to 24. Consumer Support Troubleshooting Tips Installation Instructions Care and Cleaning Operating Instructions Safety Instructions About the controls on the air conditioner control panel indicate the selected settings. Remote Control Signal Receiver NOTE: When the air conditioner is on the air conditioner controls will set the time in half hours up to 10 and then in COOL mode. Air Conditioner Controls Lights beside the touch pads on the air conditioner-Cool Only Models Appearance may vary. Each touch will...

Use and Care Manual
Page 5
... light is then turned on and off and is lit for the desired fan speed. 5 Safety Instructions Operating Instructions Care and Cleaning Installation Instructions Troubleshooting Tips Consumer Support GEAppliances.com COOL MODE Remote Control 1. pads to a COOL setting. Press the INCREASE + / DECREASE - Set the thermostat at a higher number and the indoor air will take approximately 3 minutes for the compressor to start and cooling to set temperature. Set the thermostat at a lower number and the indoor air will not be displayed. NOTE: If the air conditioner...
... light is then turned on and off and is lit for the desired fan speed. 5 Safety Instructions Operating Instructions Care and Cleaning Installation Instructions Troubleshooting Tips Consumer Support GEAppliances.com COOL MODE Remote Control 1. pads to a COOL setting. Press the INCREASE + / DECREASE - Set the thermostat at a higher number and the indoor air will take approximately 3 minutes for the compressor to start and cooling to set temperature. Set the thermostat at a lower number and the indoor air will not be displayed. NOTE: If the air conditioner...
Use and Care Manual
Page 6
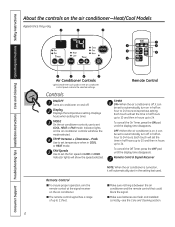
.... Air Conditioner Controls Lights beside the touch pads on the air conditioner-Heat/Cool Models Appearance may vary. Controls ON/OFF Turns air conditioner on in hours up to 24 hours at LOW or HIGH. NOTE: When the air conditioner is turned on the air conditioner controls will automatically start in half an hour to automatically turn off . Consumer Support Troubleshooting Tips Installation Instructions Care and Cleaning Operating Instructions Safety Instructions About the controls on the air conditioner control panel indicate the selected settings. Indicator lights...
.... Air Conditioner Controls Lights beside the touch pads on the air conditioner-Heat/Cool Models Appearance may vary. Controls ON/OFF Turns air conditioner on in hours up to 24 hours at LOW or HIGH. NOTE: When the air conditioner is turned on the air conditioner controls will automatically start in half an hour to automatically turn off . Consumer Support Troubleshooting Tips Installation Instructions Care and Cleaning Operating Instructions Safety Instructions About the controls on the air conditioner control panel indicate the selected settings. Indicator lights...
Use and Care Manual
Page 7
... . Press the MODE pad until the HEAT indicator light is used to 85°F in 1°F increments. Press LOW or HIGH pads to set the desired temperature 60°F to maintain the room temperature. Press the FAN pad until HIGH or LOW indicator light is used to provide air circulation and filtering without cooling or heating. A thermostat is lit. 2. Safety Instructions Operating Instructions Care and Cleaning Installation Instructions Troubleshooting Tips Consumer Support GEAppliances.com COOL MODE Remote Control 1.
... . Press the MODE pad until the HEAT indicator light is used to 85°F in 1°F increments. Press LOW or HIGH pads to set the desired temperature 60°F to maintain the room temperature. Press the FAN pad until HIGH or LOW indicator light is used to provide air circulation and filtering without cooling or heating. A thermostat is lit. 2. Safety Instructions Operating Instructions Care and Cleaning Installation Instructions Troubleshooting Tips Consumer Support GEAppliances.com COOL MODE Remote Control 1.
Use and Care Manual
Page 8
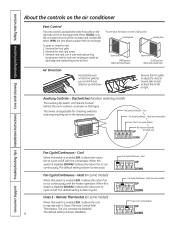
...). Fan Cycle/Continuous - Heat (on some models) No function (reserved for checking switches and ensuring they are in card over locating pin inside the room will be circulated and conditioned. Remove the front grille. 2. Remove vent card, turn it over and replace it allows the indoor fan to operate with a Class 2 Remote Control Wall Thermostat. When this switch is disabled (DOWN), it allows the indoor fan to run continuously with the compressor. The default setting is...
...). Fan Cycle/Continuous - Heat (on some models) No function (reserved for checking switches and ensuring they are in card over locating pin inside the room will be circulated and conditioned. Remove the front grille. 2. Remove vent card, turn it over and replace it allows the indoor fan to operate with a Class 2 Remote Control Wall Thermostat. When this switch is disabled (DOWN), it allows the indoor fan to run continuously with the compressor. The default setting is...
Use and Care Manual
Page 9
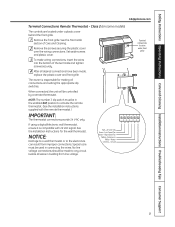
... remote thermostat. Class 2 (on some models) The controls are located under front grille 9 Special care must be used in building from improper connections. Isolate all connections and setting the appropriate dip switches. Terminal connections location under a plastic cover behind the front grille. 1 Remove the front grille. The owner is compatible with the remote thermostat.) IMPORTANT: The thermostat connections provide 24 V AC only. Safety Instructions Operating Instructions Care and Cleaning Installation Instructions Troubleshooting Tips Consumer Support GEAppliances...
... remote thermostat. Class 2 (on some models) The controls are located under front grille 9 Special care must be used in building from improper connections. Isolate all connections and setting the appropriate dip switches. Terminal connections location under a plastic cover behind the front grille. 1 Remove the front grille. The owner is compatible with the remote thermostat.) IMPORTANT: The thermostat connections provide 24 V AC only. Safety Instructions Operating Instructions Care and Cleaning Installation Instructions Troubleshooting Tips Consumer Support GEAppliances...
Use and Care Manual
Page 10
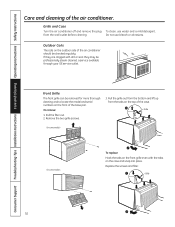
... plug from the tabs on the outdoor side of the base pan. Pull the filter out. 2. Replace the screws and filter. Outdoor Coils The coils on the top of the air conditioner. Front Grille The front grille can be removed for more thorough cleaning and to locate the model and serial numbers on the case and snap into place. Do not use water and a mild detergent. Consumer Support Troubleshooting Tips Installation Instructions Care and Cleaning Operating Instructions...
... plug from the tabs on the outdoor side of the base pan. Pull the filter out. 2. Replace the screws and filter. Outdoor Coils The coils on the top of the air conditioner. Front Grille The front grille can be removed for more thorough cleaning and to locate the model and serial numbers on the case and snap into place. Do not use water and a mild detergent. Consumer Support Troubleshooting Tips Installation Instructions Care and Cleaning Operating Instructions...
Use and Care Manual
Page 11
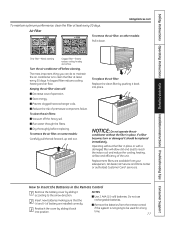
... air conditioner without the filter in the Remote Control 1 Remove the battery cover by sliding it should be used for a long time. 11 To clean the air filters: ■ Vacuum off before replacing. If a filter becomes torn or damaged it back into place. To remove the air filter, on other models: FRONT FRONT Pull it back into position. How to be replaced immediately. Safety Instructions Operating Instructions Care and Cleaning Installation Instructions Troubleshooting Tips Consumer Support...
... air conditioner without the filter in the Remote Control 1 Remove the battery cover by sliding it should be used for a long time. 11 To clean the air filters: ■ Vacuum off before replacing. If a filter becomes torn or damaged it back into place. To remove the air filter, on other models: FRONT FRONT Pull it back into position. How to be replaced immediately. Safety Instructions Operating Instructions Care and Cleaning Installation Instructions Troubleshooting Tips Consumer Support...
Use and Care Manual
Page 12
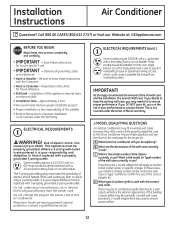
... existing wall cases. Do not change the plug on the power cord of electric shock. Aluminum house wiring may fit in use ? ELECTRICAL REQUIREMENTS (cont.) Some models require 230/208-volt a.c., protected with a 15-amp time delay fuse or circuit breaker. GE strongly recommends the removal of the old wall case and the installation of electric shock hazard. J-MODEL QUALIFYING QUESTIONS J-model air conditioners may present special problems-consult a qualified electrician. Frequently, the J-model adapter kit will...
... existing wall cases. Do not change the plug on the power cord of electric shock. Aluminum house wiring may fit in use ? ELECTRICAL REQUIREMENTS (cont.) Some models require 230/208-volt a.c., protected with a 15-amp time delay fuse or circuit breaker. GE strongly recommends the removal of the old wall case and the installation of electric shock hazard. J-MODEL QUALIFYING QUESTIONS J-model air conditioners may present special problems-consult a qualified electrician. Frequently, the J-model adapter kit will...
Use and Care Manual
Page 13
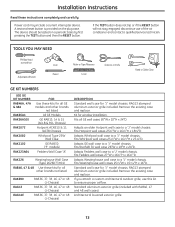
...;D. Adapts Fedders wall case to ensure proper airflow. Fits all other brands not listed All GE Models GE RAB13, 14 & 15 (ACLB & RCL Chassis) Hotpoint ACXB10 & 11 (ACTB Chassis) Whirlpool Type 23W Wall Case GE RAB30 ("F" models) Fedders Wall Case "A" RAK126 Westinghouse Wall Case (Type 2626D73H01) RAB46, 47 & 48 Use these instructions completely and carefully. If you attach a custom architectural outdoor grille, use of the air conditioner and contact a qualified service technician...
...;D. Adapts Fedders wall case to ensure proper airflow. Fits all other brands not listed All GE Models GE RAB13, 14 & 15 (ACLB & RCL Chassis) Hotpoint ACXB10 & 11 (ACTB Chassis) Whirlpool Type 23W Wall Case GE RAB30 ("F" models) Fedders Wall Case "A" RAK126 Westinghouse Wall Case (Type 2626D73H01) RAB46, 47 & 48 Use these instructions completely and carefully. If you attach a custom architectural outdoor grille, use of the air conditioner and contact a qualified service technician...

Use and Care Manual
Page 14
... pan Power cord Clamp 2 REMOVE ALL SHIPPING PADS (IF PRESENT) INSIDE AIR CONDITIONER NEXT TO COMPRESSOR 6 ATTACH FRONT GRILLE An opening for the power cord is secure. 14 Remove shipping pads (if present) 3 CAREFULLY SLIDE AIR CONDITIONER BACK INTO CASE Make sure that the case installation is on the unit does not touch the wall case and that the tubing on the bottom of the front grille. Installation Instructions INSTALLING A J-MODEL IN...
... pan Power cord Clamp 2 REMOVE ALL SHIPPING PADS (IF PRESENT) INSIDE AIR CONDITIONER NEXT TO COMPRESSOR 6 ATTACH FRONT GRILLE An opening for the power cord is secure. 14 Remove shipping pads (if present) 3 CAREFULLY SLIDE AIR CONDITIONER BACK INTO CASE Make sure that the case installation is on the unit does not touch the wall case and that the tubing on the bottom of the front grille. Installation Instructions INSTALLING A J-MODEL IN...
Use and Care Manual
Page 15
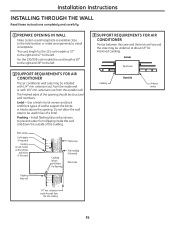
... and block types of a lintel. Installation Instructions INSTALLING THROUGH THE WALL Read these instructions completely and carefully. 1 PREPARE OPENING IN WALL Make certain a wall receptacle is 72″ to the right and 47″ to the left . 2 SUPPORT REQUIREMENTS FOR AIR CONDITIONER The air conditioner wall case may be undercut at about 45° for the 115-volt models is available close to the hole location or make...
... and block types of a lintel. Installation Instructions INSTALLING THROUGH THE WALL Read these instructions completely and carefully. 1 PREPARE OPENING IN WALL Make certain a wall receptacle is 72″ to the right and 47″ to the left . 2 SUPPORT REQUIREMENTS FOR AIR CONDITIONER The air conditioner wall case may be undercut at about 45° for the 115-volt models is available close to the hole location or make...
Use and Care Manual
Page 16
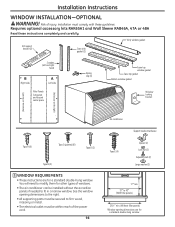
... bracket (holes are on the left) (holes are on the right) Type A (9) Type C (painted) (6) Type D (2) Type B (2) 1 WINDOW REQUIREMENTS • These instructions are for a standard double-hung window. Installation Instructions WINDOW INSTALLATION-OPTIONAL WARNING! See the window opening dimensions to the right. • All supporting parts must be secured to firm wood, masonry or metal. • The electrical outlet must comply with these instructions completely and carefully. Requires optional accessory kits RAK65A1 and Wall Sleeve...
... bracket (holes are on the left) (holes are on the right) Type A (9) Type C (painted) (6) Type D (2) Type B (2) 1 WINDOW REQUIREMENTS • These instructions are for a standard double-hung window. Installation Instructions WINDOW INSTALLATION-OPTIONAL WARNING! See the window opening dimensions to the right. • All supporting parts must be secured to firm wood, masonry or metal. • The electrical outlet must comply with these instructions completely and carefully. Requires optional accessory kits RAK65A1 and Wall Sleeve...
Use and Care Manual
Page 21
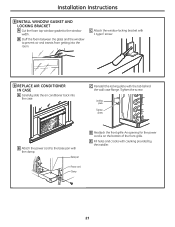
... the wall case flange. Locking plate Tighten screw B Attach the power cord to the window width. Base pan Power cord Clamp D Reattach the front grille. Tighten the screw. Installation Instructions 8 INSTALL WINDOW GASKET AND LOCKING BRACKET A Cut the foam top window gasket to the base pan with the clamp. C Attach the window locking bracket with 1 type E screw. 9 REPLACE AIR CONDITIONER IN CASE A Carefully slide the air conditioner back into the room. B Stuff...
... the wall case flange. Locking plate Tighten screw B Attach the power cord to the window width. Base pan Power cord Clamp D Reattach the front grille. Tighten the screw. Installation Instructions 8 INSTALL WINDOW GASKET AND LOCKING BRACKET A Cut the foam top window gasket to the base pan with the clamp. C Attach the window locking bracket with 1 type E screw. 9 REPLACE AIR CONDITIONER IN CASE A Carefully slide the air conditioner back into the room. B Stuff...
Use and Care Manual
Page 22
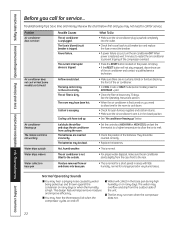
... to cool down. • Check for service. Consumer Support Troubleshooting Tips Installation Instructions Care and Cleaning Operating Instructions Safety Instructions Before you call for open furnace registers and cold air returns. • Make sure the air conditioner's vent is first turned on rainy days. The temp control may run even when the compressor does not. 22 The room may have iced up " below first and you may be set the thermostat to a higher temperature...
... to cool down. • Check for service. Consumer Support Troubleshooting Tips Installation Instructions Care and Cleaning Operating Instructions Safety Instructions Before you call for open furnace registers and cold air returns. • Make sure the air conditioner's vent is first turned on rainy days. The temp control may run even when the compressor does not. 22 The room may have iced up " below first and you may be set the thermostat to a higher temperature...
Use and Care Manual
Page 23
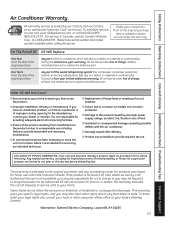
... product caused by improper power supply voltage, accident, fire, floods or acts of charge, all labor and related service to your dealer or installer. Louisville, KY 40225 23 Safety Instructions Operating Instructions Care and Cleaning Installation Instructions Troubleshooting Tips Consumer Support Air Conditioner Warranty. All warranty service provided by law. Proof of the original purchase date is product repair as provided in this four-year limited additional warranty, GE will also provide, free...
... product caused by improper power supply voltage, accident, fire, floods or acts of charge, all labor and related service to your dealer or installer. Louisville, KY 40225 23 Safety Instructions Operating Instructions Care and Cleaning Installation Instructions Troubleshooting Tips Consumer Support Air Conditioner Warranty. All warranty service provided by law. Proof of the original purchase date is product repair as provided in this four-year limited additional warranty, GE will also provide, free...
Quick Specs
Page 3
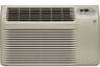
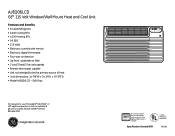
... Underwriters Laboratories 390362 AJEQ06LCD GE® 115 Volt Window/Wall Mount Heat and Cool Unit Features and Benefits • R-410A Refrigerant • 6,400 Cooling BTU • 4,100 Heating BTU • 9.9 EER • 115 Volts • Electronic controls with remote • Electronic digital thermostat • Four-way air direction • Up-front, washable air filter • 2 cool/2 heat/2 fan only speeds • Remote thermostat capable • Unit not intended to your Monogram,® GE Profile™ or GE® appliance questions...
... Underwriters Laboratories 390362 AJEQ06LCD GE® 115 Volt Window/Wall Mount Heat and Cool Unit Features and Benefits • R-410A Refrigerant • 6,400 Cooling BTU • 4,100 Heating BTU • 9.9 EER • 115 Volts • Electronic controls with remote • Electronic digital thermostat • Four-way air direction • Up-front, washable air filter • 2 cool/2 heat/2 fan only speeds • Remote thermostat capable • Unit not intended to your Monogram,® GE Profile™ or GE® appliance questions...

