Use and Care Manual
Page 1
... Care and Cleaning Air Filter 11 Front Grille 10 Grille and Case 10 Outdoor Coils 10 Installation Instructions Before You Begin 12, 13 Installing a J-Model in an Existing Wall Case 14 Through-the-Wall Installation 15 Window Installation (Optional 16-21 Troubleshooting Tips 22 Normal Operating Sounds 22 Consumer Support... a Spanish version of this product meets the ENERGY STAR® guidelines for energy efficiency. As an ENERGY STAR® partner, GE has determined that this manual, visit our Website at GEAppliances.com. Para consultar una version en español de este manual de...
... Care and Cleaning Air Filter 11 Front Grille 10 Grille and Case 10 Outdoor Coils 10 Installation Instructions Before You Begin 12, 13 Installing a J-Model in an Existing Wall Case 14 Through-the-Wall Installation 15 Window Installation (Optional 16-21 Troubleshooting Tips 22 Normal Operating Sounds 22 Consumer Support... a Spanish version of this product meets the ENERGY STAR® guidelines for energy efficiency. As an ENERGY STAR® partner, GE has determined that this manual, visit our Website at GEAppliances.com. Para consultar una version en español de este manual de...
Use and Care Manual
Page 3
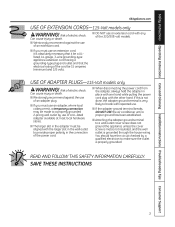
...the other hand. Safety Instructions Operating Instructions Care and Cleaning Installation Instructions Troubleshooting Tips Consumer Support GEAppliances.com USE OF EXTENSION CORDS-115-Volt models only WARNING! READ AND FOLLOW THIS SAFETY INFORMATION CAREFULLY. If this is not done, the adapter ground terminal is very likely to break...; Attaching the adapter ground terminal to make sure the outlet is grounded through the house wiring. USE OF ADAPTER PLUGS-115-Volt models only WARNING! Can cause injury or death. ■ We strongly recommend against the use of the 230/208-volt...
...the other hand. Safety Instructions Operating Instructions Care and Cleaning Installation Instructions Troubleshooting Tips Consumer Support GEAppliances.com USE OF EXTENSION CORDS-115-Volt models only WARNING! READ AND FOLLOW THIS SAFETY INFORMATION CAREFULLY. If this is not done, the adapter ground terminal is very likely to break...; Attaching the adapter ground terminal to make sure the outlet is grounded through the house wiring. USE OF ADAPTER PLUGS-115-Volt models only WARNING! Can cause injury or death. ■ We strongly recommend against the use of the 230/208-volt...
Use and Care Manual
Page 4
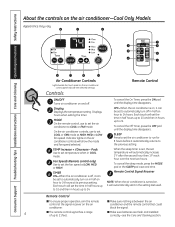
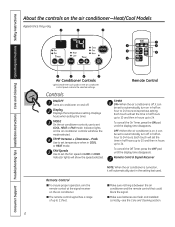
... pad until the display time disappears. Display Displays the temperature setting. TIMER ON-When the air conditioner is turned on the air conditioner-Cool Only Models Appearance may vary. Remote Control Signal Receiver NOTE: When the air conditioner is off, it can be set to automatically turn off . To cancel the...
... pad until the display time disappears. Display Displays the temperature setting. TIMER ON-When the air conditioner is turned on the air conditioner-Cool Only Models Appearance may vary. Remote Control Signal Receiver NOTE: When the air conditioner is off, it can be set to automatically turn off . To cancel the...
Use and Care Manual
Page 6
... sure batteries are fresh and installed correctly-see the Care and Cleaning section. 6 Controls ON/OFF Turns air conditioner on the air conditioner-Heat/Cool Models Appearance may vary. TEMP Increase + /Decrease - Displays hours when setting the timer. To cancel the On Timer, press the ON pad until the display time...
... sure batteries are fresh and installed correctly-see the Care and Cleaning section. 6 Controls ON/OFF Turns air conditioner on the air conditioner-Heat/Cool Models Appearance may vary. TEMP Increase + /Decrease - Displays hours when setting the timer. To cancel the On Timer, press the ON pad until the display time...
Use and Care Manual
Page 8
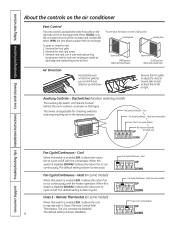
... cycle on/off with the compressor. When this switch is disabled (DOWN), it allows the indoor fan to cycle on some models) When this switch is down (continuous). Consumer Support Troubleshooting Tips Installation Instructions Care and Cleaning Operating Instructions Safety Instructions About the...) Air Direction Horizontal louvers on the right side of the air discharge area. Remote Thermostat (on /off . Class 2 (on some models) Dip Switches (location varies by locating rear hole in card over and replace it allows the indoor fan to run continuously with a Class...
... cycle on/off with the compressor. When this switch is disabled (DOWN), it allows the indoor fan to cycle on some models) When this switch is down (continuous). Consumer Support Troubleshooting Tips Installation Instructions Care and Cleaning Operating Instructions Safety Instructions About the...) Air Direction Horizontal louvers on the right side of the air discharge area. Remote Thermostat (on /off . Class 2 (on some models) Dip Switches (location varies by locating rear hole in card over and replace it allows the indoor fan to run continuously with a Class...
Use and Care Manual
Page 9
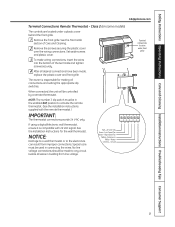
...: Damage to a wall thermostat or to any circuit. Terminal connections location under a plastic cover behind the front grille. 1 Remove the front grille. Class 2 (on some models) The controls are located under front grille 9 See the Front Grille section of the terminals and tighten screws securely. 4 After all wires in building from...
...: Damage to a wall thermostat or to any circuit. Terminal connections location under a plastic cover behind the front grille. 1 Remove the front grille. Class 2 (on some models) The controls are located under front grille 9 See the Front Grille section of the terminals and tighten screws securely. 4 After all wires in building from...
Use and Care Manual
Page 10
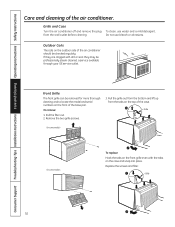
... of the base pan. Do not use water and a mild detergent. To remove: 1. Grille Tab 10 Pull the filter out. 2. Grille Tab On some models On some models To replace: Hook the tabs on the front of the air conditioner. Grille and Case Turn the air conditioner off and remove the plug... from the tabs on the top of the air conditioner should be removed for more thorough cleaning and to locate the model and serial numbers on the front grille even with dirt or soot they may be professionally steam cleaned, a service available through your...
... of the base pan. Do not use water and a mild detergent. To remove: 1. Grille Tab 10 Pull the filter out. 2. Grille Tab On some models On some models To replace: Hook the tabs on the front of the air conditioner. Grille and Case Turn the air conditioner off and remove the plug... from the tabs on the top of the air conditioner should be removed for more thorough cleaning and to locate the model and serial numbers on the front grille even with dirt or soot they may be professionally steam cleaned, a service available through your...
Use and Care Manual
Page 11
... sure that the (+) and (-) of premature component failure. Do not use rechargeable batteries. ■ Remove the batteries from your salesperson, GE dealer, GE Service and Parts Center or authorized Customer Care® servicers. A clogged filter reduces cooling, heating and air flow. To replace the air... filter: Replace the clean filter by sliding it should be used for a long time. 11 Air Filter To remove the air filter, on some models...
... sure that the (+) and (-) of premature component failure. Do not use rechargeable batteries. ■ Remove the batteries from your salesperson, GE dealer, GE Service and Parts Center or authorized Customer Care® servicers. A clogged filter reduces cooling, heating and air flow. To replace the air... filter: Replace the clean filter by sliding it should be used for a long time. 11 Air Filter To remove the air filter, on some models...
Use and Care Manual
Page 12
...In these instructions for local inspector's use is only a 2-prong outlet, it is the model number of the GE warranty. Keep these cases, you plan to use . • IMPORTANT - Installation of a new GE Wall Case. Aluminum house wiring may need a kit to properly adapt the case to another...need a kit to have it replaced with a properly grounded 3-prong outlet. A What brand air conditioner will apply to the GE air conditioner. Frequently, the J-model adapter kit will you be properly grounded. Be sure to leave these questions and see the chart on their own single branch ...
...In these instructions for local inspector's use is only a 2-prong outlet, it is the model number of the GE warranty. Keep these cases, you plan to use . • IMPORTANT - Installation of a new GE Wall Case. Aluminum house wiring may need a kit to properly adapt the case to another...need a kit to have it replaced with a properly grounded 3-prong outlet. A What brand air conditioner will apply to the GE air conditioner. Frequently, the J-model adapter kit will you be properly grounded. Be sure to leave these questions and see the chart on their own single branch ...
Use and Care Manual
Page 13
... Installation Instructions Read these kits for all other brands not listed All GE Models GE RAB13, 14 & 15 (ACLB & RCL Chassis) Hotpoint ACXB10 & 11 (ACTB Chassis) Whirlpool Type 23W Wall Case GE RAB30 ("F" models) Fedders Wall Case "A" RAK126 Westinghouse Wall Case (Type 2626D73H01) RAB46...& 48 Use these instructions completely and carefully. Kit for window installation. Fits all GE wall cases 26″W x 18″H x 24″D. Adapts GE wall case to a "J" model chassis. Adapts Westinghouse wall case to ensure proper airflow. Standard aluminum exterior grille (included...
... Installation Instructions Read these kits for all other brands not listed All GE Models GE RAB13, 14 & 15 (ACLB & RCL Chassis) Hotpoint ACXB10 & 11 (ACTB Chassis) Whirlpool Type 23W Wall Case GE RAB30 ("F" models) Fedders Wall Case "A" RAK126 Westinghouse Wall Case (Type 2626D73H01) RAB46...& 48 Use these instructions completely and carefully. Kit for window installation. Fits all GE wall cases 26″W x 18″H x 24″D. Adapts GE wall case to a "J" model chassis. Adapts Westinghouse wall case to ensure proper airflow. Standard aluminum exterior grille (included...

Use and Care Manual
Page 14
... for the power cord is on the unit does not touch the wall case and that the case installation is secure. 14 Installation Instructions INSTALLING A J-MODEL IN AN EXISTING WALL CASE Read these instructions completely and carefully. 1 REMOVE LOCKING PLATE ON FRONT LEFT SIDE Locking plate Remove screw 4 REINSTALL LOCKING PLATE...
... for the power cord is on the unit does not touch the wall case and that the case installation is secure. 14 Installation Instructions INSTALLING A J-MODEL IN AN EXISTING WALL CASE Read these instructions completely and carefully. 1 REMOVE LOCKING PLATE ON FRONT LEFT SIDE Locking plate Remove screw 4 REINSTALL LOCKING PLATE...
Use and Care Manual
Page 15
... may be used in lieu of a lintel. The cord length for improved caulking. The finished sides of the building. Lintel - For the 230/208-volt models the cord length is 72″ to the right and 47″ to install a receptacle. Do not allow the wall case to be undercut at... about 45° for the 115-volt models is 65″ to the right and 39″ to prevent water from the trim molding 15 Brick veneer Lintel angle (if required) Caulking (on...
... may be used in lieu of a lintel. The cord length for improved caulking. The finished sides of the building. Lintel - For the 230/208-volt models the cord length is 72″ to the right and 47″ to install a receptacle. Do not allow the wall case to be undercut at... about 45° for the 115-volt models is 65″ to the right and 39″ to prevent water from the trim molding 15 Brick veneer Lintel angle (if required) Caulking (on...
Use and Care Manual
Page 22
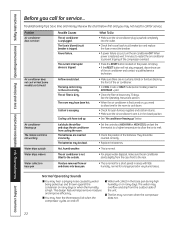
Problem Air conditioner does not start Air conditioner does not cool or heat (some models), press the DECREASE - The current interrupter device is tripped. The room may be dead. Cooling coils have been hot. The batteries may have iced up ... to cool down. • Check for service... Moisture removed from the outdoor side of the air conditioner. • In COOL mode or HEAT mode (some models) as it should be set the thermostat to a higher temperature to allow time for a longer period in the base pan during high humidity or on...
Problem Air conditioner does not start Air conditioner does not cool or heat (some models), press the DECREASE - The current interrupter device is tripped. The room may be dead. Cooling coils have been hot. The batteries may have iced up ... to cool down. • Check for service... Moisture removed from the outdoor side of the air conditioner. • In COOL mode or HEAT mode (some models) as it should be set the thermostat to a higher temperature to allow time for a longer period in the base pan during high humidity or on...
Use and Care Manual
Page 23
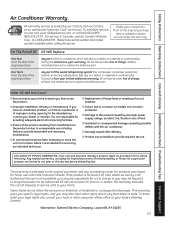
...required service. If you how to state. During this four-year limited additional warranty, GE will also provide, free of improper cooling capacity for service. To schedule service, on models not corrosionprotected. ■ Damage to replace the defective part. Proof of the original ... charge, all labor and related service to teach you have serial number and model number available when calling for the intended use the product. ■ Improper installation, delivery or maintenance. What GE Will Not Cover: ■ Service trips to your home. Warrantor: General ...
...required service. If you how to state. During this four-year limited additional warranty, GE will also provide, free of improper cooling capacity for service. To schedule service, on models not corrosionprotected. ■ Damage to replace the defective part. Proof of the original ... charge, all labor and related service to teach you have serial number and model number available when calling for the intended use the product. ■ Improper installation, delivery or maintenance. What GE Will Not Cover: ■ Service trips to your home. Warrantor: General ...
Quick Specs
Page 1
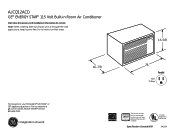
Premium, Deluxe and Value Model Wall Case Dimensions (in inches) 15-5/8 For answers to your Monogram,® GE Profile™ or GE® appliance questions, visit our website at ge.com or call GE Answer Center® service, 800.626.2000. 16-7/8 26 Parallleell 115V 15 Amp Note: When installing... units in through -the-wall applic Do not restrict air flow areas. AJCQ12ACD GE® ENERGY STAR® 115 Volt Built-in Room Air Conditioner Wall Case Dimensions and Installation Information (in inches) Note: When installing ...
Premium, Deluxe and Value Model Wall Case Dimensions (in inches) 15-5/8 For answers to your Monogram,® GE Profile™ or GE® appliance questions, visit our website at ge.com or call GE Answer Center® service, 800.626.2000. 16-7/8 26 Parallleell 115V 15 Amp Note: When installing... units in through -the-wall applic Do not restrict air flow areas. AJCQ12ACD GE® ENERGY STAR® 115 Volt Built-in Room Air Conditioner Wall Case Dimensions and Installation Information (in inches) Note: When installing ...
Quick Specs
Page 3
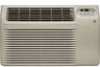
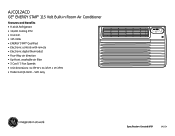
Soft Gray AJCQ12DCD Specification Created 9/09 390254 AJCQ12ACD GE® ENERGY STAR® 115 Volt Built-in Room Air Conditioner Features and Benefits • R-410A Refrigerant • 11,600 Cooling BTU • 9.4 E.E.R. • 115 Volts • ENERGY STAR® Qualified • Electronic controls with remote • Electronic digital thermostat • Four-Way air direction • Up-front, washable air filter • 3 Cool / 3 Fan Speeds • Unit dimensions: 14-7/8"W x 24-3/4"H x 19-7/8"D • Model AJCQ12ACD -
Soft Gray AJCQ12DCD Specification Created 9/09 390254 AJCQ12ACD GE® ENERGY STAR® 115 Volt Built-in Room Air Conditioner Features and Benefits • R-410A Refrigerant • 11,600 Cooling BTU • 9.4 E.E.R. • 115 Volts • ENERGY STAR® Qualified • Electronic controls with remote • Electronic digital thermostat • Four-Way air direction • Up-front, washable air filter • 3 Cool / 3 Fan Speeds • Unit dimensions: 14-7/8"W x 24-3/4"H x 19-7/8"D • Model AJCQ12ACD -


