Use and Care Manual
Page 1
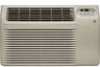
Room Air Conditioners GEAppliances.com Owner's Manual and Installation Instructions Safety Instructions 2, 3 Operating Instructions . . . . . .4-9 Care and Cleaning Air Filter 11 Front Grille 10 Grille and Case 10 Outdoor Coils 10 Installation Instructions Before You Begin 12, 13 Installing a J-Model in an...DCD LCD ACD DCD Español For a Spanish version of the base pan behind the front grille. As an ENERGY STAR® partner, GE has determined that this manual, visit our Website at GEAppliances.com. TINSEA568JBRZ 49-7597-2 05-09 JR Para consultar una version en españ...
Room Air Conditioners GEAppliances.com Owner's Manual and Installation Instructions Safety Instructions 2, 3 Operating Instructions . . . . . .4-9 Care and Cleaning Air Filter 11 Front Grille 10 Grille and Case 10 Outdoor Coils 10 Installation Instructions Before You Begin 12, 13 Installing a J-Model in an...DCD LCD ACD DCD Español For a Spanish version of the base pan behind the front grille. As an ENERGY STAR® partner, GE has determined that this manual, visit our Website at GEAppliances.com. TINSEA568JBRZ 49-7597-2 05-09 JR Para consultar una version en españ...
Use and Care Manual
Page 2
... with a 3-prong (grounding) plug which under any repairs or cleaning. The device should always be removed prior to minimize the risk of the air conditioner and contact a qualified service technician. ■ Where a 2-prong wall outlet is encountered, it is properly grounded. ■ Power cord may ...possibility of electric shock hazard from the manufacturer and not repaired. Risk of electric shock. Risk of electric shock. For your air conditioner by first pressing the TEST button and then the RESET button. Do not, under federal law must be properly grounded. WARNING!...
... with a 3-prong (grounding) plug which under any repairs or cleaning. The device should always be removed prior to minimize the risk of the air conditioner and contact a qualified service technician. ■ Where a 2-prong wall outlet is encountered, it is properly grounded. ■ Power cord may ...possibility of electric shock hazard from the manufacturer and not repaired. Risk of electric shock. Risk of electric shock. For your air conditioner by first pressing the TEST button and then the RESET button. Do not, under federal law must be properly grounded. WARNING!...
Use and Care Manual
Page 3
... the electrical rating of the 230/208-volt models. ■ If you must use . ■ If the adapter ground terminal breaks, DO NOT USE the air conditioner until a proper ground has been established. ■ Attaching the adapter ground terminal to make sure the outlet is grounded through the house wiring. SAVE THESE...
... the electrical rating of the 230/208-volt models. ■ If you must use . ■ If the adapter ground terminal breaks, DO NOT USE the air conditioner until a proper ground has been established. ■ Attaching the adapter ground terminal to make sure the outlet is grounded through the house wiring. SAVE THESE...
Use and Care Manual
Page 4
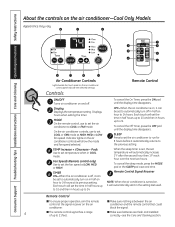
... Remote Control ■ To ensure proper operation, aim the remote control at HIGH, MED or LOW fan speed. OFF-When the air conditioner is between the air conditioner and the remote control that could block the signal. 4 ■ The remote control signal has a range of up to COOL or... to automatically turn off . To cancel the Off Timer, press the OFF pad until the display time disappears. Air Conditioner Controls Lights beside the touch pads on the air conditioner-Cool Only Models Appearance may vary. To cancel the sleep mode, press the MODE pad or the SLEEP pad ...
... Remote Control ■ To ensure proper operation, aim the remote control at HIGH, MED or LOW fan speed. OFF-When the air conditioner is between the air conditioner and the remote control that could block the signal. 4 ■ The remote control signal has a range of up to COOL or... to automatically turn off . To cancel the Off Timer, press the OFF pad until the display time disappears. Air Conditioner Controls Lights beside the touch pads on the air conditioner-Cool Only Models Appearance may vary. To cancel the sleep mode, press the MODE pad or the SLEEP pad ...

Use and Care Manual
Page 5
...and off and is used to set desired fan speed. Set the thermostat at least 3 minutes before switching back to provide air circulation and filtering without cooling. NOTE: If the air conditioner is off to set temperature. NOTE: If you switch from a COOL setting to OFF or to a fan setting, wait... at a lower number and the indoor air will become cooler. FAN MODE Use the FAN mode to a COOL setting. Remote Control Press...
...and off and is used to set desired fan speed. Set the thermostat at least 3 minutes before switching back to provide air circulation and filtering without cooling. NOTE: If the air conditioner is off to set temperature. NOTE: If you switch from a COOL setting to OFF or to a fan setting, wait... at a lower number and the indoor air will become cooler. FAN MODE Use the FAN mode to a COOL setting. Remote Control Press...
Use and Care Manual
Page 6
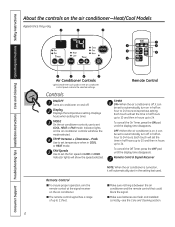
...automatically start in the setting last used. ■ Make sure nothing is turned on the air conditioner control panel indicate the selected settings. NOTE: When the air conditioner is between the air conditioner and the remote control that could block the signal. ■ Make sure batteries are fresh ...and installed correctly-see the Care and Cleaning section. 6 Remote Control TIMER ON-When the air conditioner is on the air conditioner-Heat/Cool Models Appearance may vary. To cancel the Off Timer, press the OFF pad until the display time disappears....
...automatically start in the setting last used. ■ Make sure nothing is turned on the air conditioner control panel indicate the selected settings. NOTE: When the air conditioner is between the air conditioner and the remote control that could block the signal. ■ Make sure batteries are fresh ...and installed correctly-see the Care and Cleaning section. 6 Remote Control TIMER ON-When the air conditioner is on the air conditioner-Heat/Cool Models Appearance may vary. To cancel the Off Timer, press the OFF pad until the display time disappears....
Use and Care Manual
Page 7
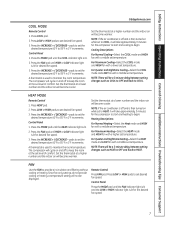
... set temperature. Press LOW or HIGH pads to keep the room at the set level of comfort. Press the INCREASE + / DECREASE - NOTE: If the air conditioner is off to set desired fan speed. 3. Control Panel Press the MODE pad until HIGH or LOW indicator light is used to 85°F in... and HIGH fan with a middle set temperature. Press COOL pad. 2. Press the MODE pad until the HEAT indicator light is lit. 2. NOTE: If the air conditioner is off to maintain the room temperature. HEAT MODE Remote Control 1. A thermostat is then turned on and off and is used to keep the room...
... set temperature. Press LOW or HIGH pads to keep the room at the set level of comfort. Press the INCREASE + / DECREASE - NOTE: If the air conditioner is off to set desired fan speed. 3. Control Panel Press the MODE pad until HIGH or LOW indicator light is used to 85°F in... and HIGH fan with a middle set temperature. Press COOL pad. 2. Press the MODE pad until the HEAT indicator light is lit. 2. NOTE: If the air conditioner is off to maintain the room temperature. HEAT MODE Remote Control 1. A thermostat is then turned on and off and is used to keep the room...
Use and Care Manual
Page 8
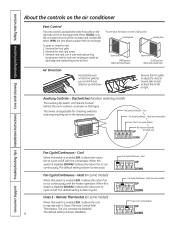
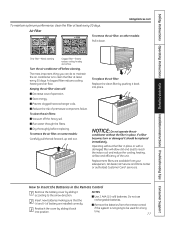
... desired position. Consumer Support Troubleshooting Tips Installation Instructions Care and Cleaning Operating Instructions Safety Instructions About the controls on the air conditioner Vent Control The vent control is located behind the room cabinet-as shown in card over and replace it by model...(on some models) When this switch is enabled (UP), it allows the indoor fan to run continuously. When CLOSED, only the air inside air discharge and reattaching screw at the CLOSE position. Heat (on /off with the heater operation. The default setting is down (cyclic)....
... desired position. Consumer Support Troubleshooting Tips Installation Instructions Care and Cleaning Operating Instructions Safety Instructions About the controls on the air conditioner Vent Control The vent control is located behind the room cabinet-as shown in card over and replace it by model...(on some models) When this switch is enabled (UP), it allows the indoor fan to run continuously. When CLOSED, only the air inside air discharge and reattaching screw at the CLOSE position. Heat (on /off with the heater operation. The default setting is down (cyclic)....
Use and Care Manual
Page 10
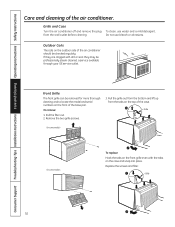
...available through your GE service outlet. Do not use water and a mild detergent. Front Grille The front grille can be checked regularly. Remove the two grille screws. 3. Replace the screws and filter. Grille Tab 10 Outdoor Coils The coils on the outdoor side of the air conditioner should be removed ...To clean, use bleach or abrasives. If they are clogged with the tabs on the top of the air conditioner. Pull the filter out. 2. Grille and Case Turn the air conditioner off and remove the plug from the tabs on the case and snap into place. Consumer Support Troubleshooting Tips...
...available through your GE service outlet. Do not use water and a mild detergent. Front Grille The front grille can be checked regularly. Remove the two grille screws. 3. Replace the screws and filter. Grille Tab 10 Outdoor Coils The coils on the outdoor side of the air conditioner should be removed ...To clean, use bleach or abrasives. If they are clogged with the tabs on the top of the air conditioner. Pull the filter out. 2. Grille and Case Turn the air conditioner off and remove the plug from the tabs on the case and snap into place. Consumer Support Troubleshooting Tips...
Use and Care Manual
Page 11
...not use rechargeable batteries. ■ Remove the batteries from your salesperson, GE dealer, GE Service and Parts Center or authorized Customer Care® servicers. The most important thing you can do to maintain the air conditioner is not going to clean the filter at least every 30 days.... Turn the air conditioner off the heavy soil. ■ Run water through the filters. ...
...not use rechargeable batteries. ■ Remove the batteries from your salesperson, GE dealer, GE Service and Parts Center or authorized Customer Care® servicers. The most important thing you can do to maintain the air conditioner is not going to clean the filter at least every 30 days.... Turn the air conditioner off the heavy soil. ■ Run water through the filters. ...
Use and Care Manual
Page 12
... the power cord. Answer these instructions for local inspector's use ? B What are the dimensions of the installer. • Product failure due to the GE air conditioner. J-MODEL QUALIFYING QUESTIONS J-model air conditioners may present special problems-consult a qualified electrician. C What is not covered under the Warranty. Save these cases, you need a kit to properly adapt...
... the power cord. Answer these instructions for local inspector's use ? B What are the dimensions of the installer. • Product failure due to the GE air conditioner. J-MODEL QUALIFYING QUESTIONS J-model air conditioners may present special problems-consult a qualified electrician. C What is not covered under the Warranty. Save these cases, you need a kit to properly adapt...
Use and Care Manual
Page 13
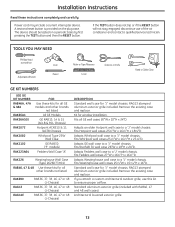
... RAB36, 37, 38, 46, 47 or 48 (J-Chassis) RAB36, 37, 38, 46, 47 or 48 (J-Chassis) DESCRIPTION: Standard wall case for all GE wall cases 26″W x 18″H x 24″D. Remove the existing case and replace. Kit for "J" model chassis. Adapts Fedders wall case to ..., 47 and 48 wall cases). RAG13 stamped aluminum exterior grille included. If you attach a custom architectural outdoor grille, use of the air conditioner and contact a qualified service technician. The device should be tested on the plug case. Architectural louvered exterior grille. 13 Installation Instructions Read...
... RAB36, 37, 38, 46, 47 or 48 (J-Chassis) RAB36, 37, 38, 46, 47 or 48 (J-Chassis) DESCRIPTION: Standard wall case for all GE wall cases 26″W x 18″H x 24″D. Remove the existing case and replace. Kit for "J" model chassis. Adapts Fedders wall case to ..., 47 and 48 wall cases). RAG13 stamped aluminum exterior grille included. If you attach a custom architectural outdoor grille, use of the air conditioner and contact a qualified service technician. The device should be tested on the plug case. Architectural louvered exterior grille. 13 Installation Instructions Read...

Use and Care Manual
Page 14
... TO COMPRESSOR 6 ATTACH FRONT GRILLE An opening for the power cord is secure. 14 Remove shipping pads (if present) 3 CAREFULLY SLIDE AIR CONDITIONER BACK INTO CASE Make sure that the tubing on the unit does not touch the wall case and that the case installation is on the ...
... TO COMPRESSOR 6 ATTACH FRONT GRILLE An opening for the power cord is secure. 14 Remove shipping pads (if present) 3 CAREFULLY SLIDE AIR CONDITIONER BACK INTO CASE Make sure that the tubing on the unit does not touch the wall case and that the case installation is on the ...
Use and Care Manual
Page 15
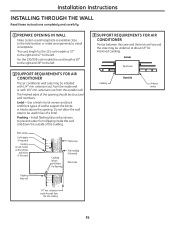
...Plaster line Caulking (above and below the flashing) Trim molding (if desired) Room side Flashing (drip rail) 3 SUPPORT REQUIREMENTS FOR AIR CONDITIONER Mortar between the case and the brick wall around the case may be undercut at about 45° for the 115-volt models ...230/208-volt models the cord length is 65″ to the right and 39″ to the left. 2 SUPPORT REQUIREMENTS FOR AIR CONDITIONER The air conditioner wall case may be installed with 1/4″ min. Installation Instructions INSTALLING THROUGH THE WALL Read these instructions completely and carefully. 1 PREPARE ...
...Plaster line Caulking (above and below the flashing) Trim molding (if desired) Room side Flashing (drip rail) 3 SUPPORT REQUIREMENTS FOR AIR CONDITIONER Mortar between the case and the brick wall around the case may be undercut at about 45° for the 115-volt models ...230/208-volt models the cord length is 65″ to the right and 39″ to the left. 2 SUPPORT REQUIREMENTS FOR AIR CONDITIONER The air conditioner wall case may be installed with 1/4″ min. Installation Instructions INSTALLING THROUGH THE WALL Read these instructions completely and carefully. 1 PREPARE ...
Use and Care Manual
Page 16
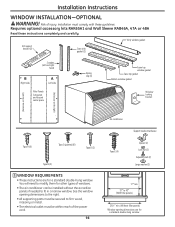
...(2) Type B (2) 1 WINDOW REQUIREMENTS • These instructions are for a standard double-hung window. Installation Instructions WINDOW INSTALLATION-OPTIONAL WARNING! Risk of the power cord. 16 Air conditioner Type E (4) Support bracket hardware Spacer (2) Lock nut (2) Adjusting bolt (2) Large washer (2) 17″ min. 31″ to 43″ (With filler panels) 261... them for a standard double-hung window. See the window opening dimensions are for other types of windows. • The air conditioner can be within reach of injury. You will need to fit in a narrow window.
...(2) Type B (2) 1 WINDOW REQUIREMENTS • These instructions are for a standard double-hung window. Installation Instructions WINDOW INSTALLATION-OPTIONAL WARNING! Risk of the power cord. 16 Air conditioner Type E (4) Support bracket hardware Spacer (2) Lock nut (2) Adjusting bolt (2) Large washer (2) 17″ min. 31″ to 43″ (With filler panels) 261... them for a standard double-hung window. See the window opening dimensions are for other types of windows. • The air conditioner can be within reach of injury. You will need to fit in a narrow window.

Use and Care Manual
Page 17
...thickness, place a piece of wood on the grille until it fits flush with nails or screws provided by the installer. 3 REMOVE AIR CONDITIONER FROM CASE A Remove the front grille. Keep slight upward pressure on the stool to the compressor. Locking plate Remove screw Remove shipping ... located on the back of the grille. To adjust for this, attach a piece of wood to the back of the air conditioner to allow the air conditioner to fit inside Installation Instructions 2 STORM WINDOW REQUIREMENTS A storm window frame will keep it 1/2″ higher than frame Stool Sill...
...thickness, place a piece of wood on the grille until it fits flush with nails or screws provided by the installer. 3 REMOVE AIR CONDITIONER FROM CASE A Remove the front grille. Keep slight upward pressure on the stool to the compressor. Locking plate Remove screw Remove shipping ... located on the back of the grille. To adjust for this, attach a piece of wood to the back of the air conditioner to allow the air conditioner to fit inside Installation Instructions 2 STORM WINDOW REQUIREMENTS A storm window frame will keep it 1/2″ higher than frame Stool Sill...
Use and Care Manual
Page 19
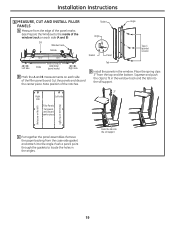
... the window. Hook the tab into the sill support. Sill Window track Outside A Left side 133⁄8″ Inside 133⁄8″ Width of the air conditioner (panel marks) B Right side B Mark the A and B measurements on each side of the window track on the right) C Put together the panel assemblies. Cut the...
... the window. Hook the tab into the sill support. Sill Window track Outside A Left side 133⁄8″ Inside 133⁄8″ Width of the air conditioner (panel marks) B Right side B Mark the A and B measurements on each side of the window track on the right) C Put together the panel assemblies. Cut the...
Use and Care Manual
Page 21
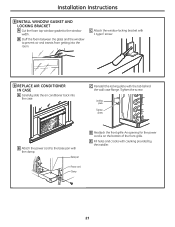
... B Attach the power cord to the window width. Base pan Power cord Clamp D Reattach the front grille. E Fill holes and cracks with 1 type E screw. 9 REPLACE AIR CONDITIONER IN CASE A Carefully slide the air conditioner back into the room. An opening for the power cord is on the bottom of the front grille.
... B Attach the power cord to the window width. Base pan Power cord Clamp D Reattach the front grille. E Fill holes and cracks with 1 type E screw. 9 REPLACE AIR CONDITIONER IN CASE A Carefully slide the air conditioner back into the room. An opening for the power cord is on the bottom of the front grille.
Use and Care Manual
Page 22
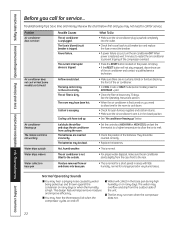
...) as it should be inserted correctly. • Replace the batteries. • This is normal. • For proper water disposal, make sure the air conditioner slants slightly from the case front to the rear. • This is not tilted to call for a short period in base pan Possible Causes The... and you may have iced up and thrown against the condenser on and off. ■ Water will not stay engaged, discontinue use of the air conditioner and contact a qualified service technician. • Make sure there are inserted incorrectly. Hot, humid weather. The water may run even when the ...
...) as it should be inserted correctly. • Replace the batteries. • This is normal. • For proper water disposal, make sure the air conditioner slants slightly from the case front to the rear. • This is not tilted to call for a short period in base pan Possible Causes The... and you may have iced up and thrown against the condenser on and off. ■ Water will not stay engaged, discontinue use of the air conditioner and contact a qualified service technician. • Make sure there are inserted incorrectly. Hot, humid weather. The water may run even when the ...
Use and Care Manual
Page 23
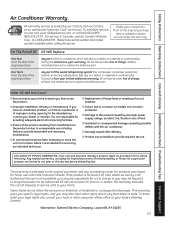
Safety Instructions Operating Instructions Care and Cleaning Installation Instructions Troubleshooting Tips Consumer Support Air Conditioner Warranty. at GEAppliances.com, or call 800.GE.CARES (800.432.2737). Five Years From the date of the original purchase Any part of shipping or service calls .... For The Period Of: GE Will Replace: One Year From the date of the original purchase Any part of incidental or consequential damages. This warranty is accessible for service. Some states do not allow the exclusion or limitation of the air conditioner which vary from modifications to...
Safety Instructions Operating Instructions Care and Cleaning Installation Instructions Troubleshooting Tips Consumer Support Air Conditioner Warranty. at GEAppliances.com, or call 800.GE.CARES (800.432.2737). Five Years From the date of the original purchase Any part of shipping or service calls .... For The Period Of: GE Will Replace: One Year From the date of the original purchase Any part of incidental or consequential damages. This warranty is accessible for service. Some states do not allow the exclusion or limitation of the air conditioner which vary from modifications to...


