Use and Care Manual
Page 1
...front grille. Room Air Conditioners GEAppliances.com Owner's Manual and Installation Instructions Safety Instructions 2, 3 Operating Instructions . . . . . .4-9 Care and Cleaning Air Filter 11 Front Grille 10 Grille and Case 10 Outdoor Coils 10 Installation Instructions Before You Begin 12, 13 Installing a J-Model in an Existing Wall Case 14 Through-the-Wall Installation 15 Window Installation (Optional 16-21 Troubleshooting Tips 22 Normal Operating Sounds 22 Consumer Support Consumer Support Back Cover Warranty 23 *ENERGY STAR® labeled product Cool Only: Heat/Cool: AJCM...
...front grille. Room Air Conditioners GEAppliances.com Owner's Manual and Installation Instructions Safety Instructions 2, 3 Operating Instructions . . . . . .4-9 Care and Cleaning Air Filter 11 Front Grille 10 Grille and Case 10 Outdoor Coils 10 Installation Instructions Before You Begin 12, 13 Installing a J-Model in an Existing Wall Case 14 Through-the-Wall Installation 15 Window Installation (Optional 16-21 Troubleshooting Tips 22 Normal Operating Sounds 22 Consumer Support Consumer Support Back Cover Warranty 23 *ENERGY STAR® labeled product Cool Only: Heat/Cool: AJCM...
Use and Care Manual
Page 2
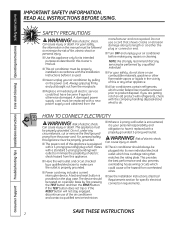
... death. ■ The air conditioner should be properly grounded. READ ALL INSTRUCTIONS BEFORE USING. HOW TO CONNECT ELECTRICITY WARNING! Consumer Support Troubleshooting Tips Installation Instructions Care and Cleaning Operating Instructions Safety Instructions IMPORTANT SAFETY INFORMATION. For personal safety, this Owner's Manual. ■ This air conditioner must be removed prior to minimize the possibility of electric shock. Risk of electric shock hazard from the receptacle. ■ Replace immediately all electric service cords that shows cracks...
... death. ■ The air conditioner should be properly grounded. READ ALL INSTRUCTIONS BEFORE USING. HOW TO CONNECT ELECTRICITY WARNING! Consumer Support Troubleshooting Tips Installation Instructions Care and Cleaning Operating Instructions Safety Instructions IMPORTANT SAFETY INFORMATION. For personal safety, this Owner's Manual. ■ This air conditioner must be removed prior to minimize the possibility of electric shock. Risk of electric shock hazard from the receptacle. ■ Replace immediately all electric service cords that shows cracks...
Use and Care Manual
Page 3
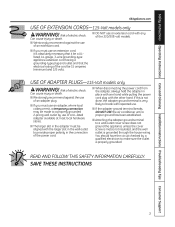
... Instructions Operating Instructions Care and Cleaning Installation Instructions Troubleshooting Tips Consumer Support GEAppliances.com USE OF EXTENSION CORDS-115-Volt models only WARNING! Risk of the cord be 15 amperes (minimum) and 125 volts. Can cause injury or death. ■ We strongly recommend against the use of an adapter plug. ■ If you must use an adapter, where local codes permit, a temporary connection may be a ULlisted, 14-gauge, 3-wire...
... Instructions Operating Instructions Care and Cleaning Installation Instructions Troubleshooting Tips Consumer Support GEAppliances.com USE OF EXTENSION CORDS-115-Volt models only WARNING! Risk of the cord be 15 amperes (minimum) and 125 volts. Can cause injury or death. ■ We strongly recommend against the use of an adapter plug. ■ If you must use an adapter, where local codes permit, a temporary connection may be a ULlisted, 14-gauge, 3-wire...
Use and Care Manual
Page 4
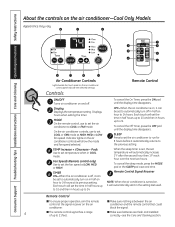
... HIGH, MED or LOW fan speed. Remote Control To cancel the On Timer, press the ON pad until the display time disappears. On the air conditioner controls, use to set temperature will set temperature when in half an hour to 24. To cancel the sleep mode, press the MODE pad or the SLEEP pad a second time. Consumer Support Troubleshooting Tips Installation Instructions Care and Cleaning Operating Instructions Safety Instructions About the controls on in COOL mode. TEMP Increase + /Decrease -
... HIGH, MED or LOW fan speed. Remote Control To cancel the On Timer, press the ON pad until the display time disappears. On the air conditioner controls, use to set temperature will set temperature when in half an hour to 24. To cancel the sleep mode, press the MODE pad or the SLEEP pad a second time. Consumer Support Troubleshooting Tips Installation Instructions Care and Cleaning Operating Instructions Safety Instructions About the controls on in COOL mode. TEMP Increase + /Decrease -

Use and Care Manual
Page 5
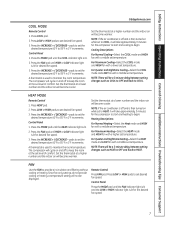
Safety Instructions Operating Instructions Care and Cleaning Installation Instructions Troubleshooting Tips Consumer Support GEAppliances.com COOL MODE Remote Control 1. Control Panel 1. For Maximum Cooling-Select the COOL mode and HIGH fan with a middle set temperature. Press the INCREASE + / DECREASE - pads to set desired fan speed. 3. NOTE: If the air conditioner is off to set the desired temperature 60°F to begin. Since fan-only settings do not provide cooling, a temperature setting will take approximately 3 minutes for the compressor to start and cooling ...
Safety Instructions Operating Instructions Care and Cleaning Installation Instructions Troubleshooting Tips Consumer Support GEAppliances.com COOL MODE Remote Control 1. Control Panel 1. For Maximum Cooling-Select the COOL mode and HIGH fan with a middle set temperature. Press the INCREASE + / DECREASE - pads to set desired fan speed. 3. NOTE: If the air conditioner is off to set the desired temperature 60°F to begin. Since fan-only settings do not provide cooling, a temperature setting will take approximately 3 minutes for the compressor to start and cooling ...
Use and Care Manual
Page 6
... up to 24. Consumer Support Troubleshooting Tips Installation Instructions Care and Cleaning Operating Instructions Safety Instructions About the controls on the air conditioner control panel indicate the selected settings. Displays hours when setting the timer. Each touch will set the time in half hours up to set to automatically turn off . TEMP Increase + /Decrease - Each touch will show the speed selected. Controls ON/OFF Turns air conditioner on , it can be set COOL, HEAT or FAN mode. To cancel the...
... up to 24. Consumer Support Troubleshooting Tips Installation Instructions Care and Cleaning Operating Instructions Safety Instructions About the controls on the air conditioner control panel indicate the selected settings. Displays hours when setting the timer. Each touch will set the time in half hours up to set to automatically turn off . TEMP Increase + /Decrease - Each touch will show the speed selected. Controls ON/OFF Turns air conditioner on , it can be set COOL, HEAT or FAN mode. To cancel the...
Use and Care Manual
Page 7
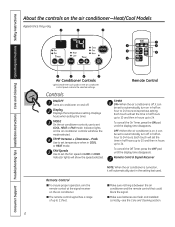
.... 3. Control Panel 1. Safety Instructions Operating Instructions Care and Cleaning Installation Instructions Troubleshooting Tips Consumer Support GEAppliances.com COOL MODE Remote Control 1. Press COOL pad. 2. Press the MODE pad until the HEAT indicator light is then turned on and off and is used to 85°F in 1°F increments. Press the INCREASE + / DECREASE - Set the thermostat at the set the desired temperature 60°F to maintain the room temperature. pads to provide air circulation and filtering without cooling or heating. The compressor...
.... 3. Control Panel 1. Safety Instructions Operating Instructions Care and Cleaning Installation Instructions Troubleshooting Tips Consumer Support GEAppliances.com COOL MODE Remote Control 1. Press COOL pad. 2. Press the MODE pad until the HEAT indicator light is then turned on and off and is used to 85°F in 1°F increments. Press the INCREASE + / DECREASE - Set the thermostat at the set the desired temperature 60°F to maintain the room temperature. pads to provide air circulation and filtering without cooling or heating. The compressor...
Use and Care Manual
Page 8
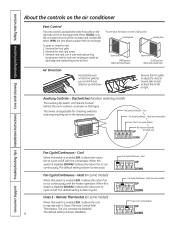
... heater operation. The default setting is down . When this switch is disabled (DOWN), it allows the indoor fan to run continuously with the compressor. Consumer Support Troubleshooting Tips Installation Instructions Care and Cleaning Operating Instructions Safety Instructions About the controls on the air conditioner Vent Control The vent control is located behind the room cabinet-as shown in this figure. Remove vent card, turn it over locating pin inside the room will be circulated and conditioned. Auxiliary Controls - Remove the vent card screw. 3. To open...
... heater operation. The default setting is down . When this switch is disabled (DOWN), it allows the indoor fan to run continuously with the compressor. Consumer Support Troubleshooting Tips Installation Instructions Care and Cleaning Operating Instructions Safety Instructions About the controls on the air conditioner Vent Control The vent control is located behind the room cabinet-as shown in this figure. Remove vent card, turn it over locating pin inside the room will be circulated and conditioned. Auxiliary Controls - Remove the vent card screw. 3. To open...
Use and Care Manual
Page 9
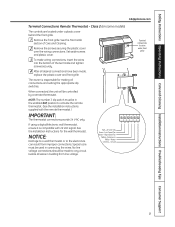
... and setting the appropriate dip switches. The owner is compatible with the remote thermostat.) IMPORTANT: The thermostat connections provide 24 V AC only. See the Front Grille section of the terminals and tighten screws securely. 4 After all wires in building from improper connections. Class 2 (on some models) The controls are located under front grille 9 Safety Instructions Operating Instructions Care and Cleaning Installation Instructions Troubleshooting Tips Consumer Support GEAppliances.com Terminal Connections Remote Thermostat -
... and setting the appropriate dip switches. The owner is compatible with the remote thermostat.) IMPORTANT: The thermostat connections provide 24 V AC only. See the Front Grille section of the terminals and tighten screws securely. 4 After all wires in building from improper connections. Class 2 (on some models) The controls are located under front grille 9 Safety Instructions Operating Instructions Care and Cleaning Installation Instructions Troubleshooting Tips Consumer Support GEAppliances.com Terminal Connections Remote Thermostat -
Use and Care Manual
Page 10
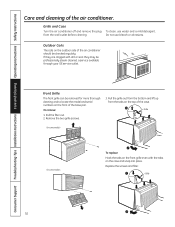
... wall outlet before cleaning. Consumer Support Troubleshooting Tips Installation Instructions Care and Cleaning Operating Instructions Safety Instructions Care and cleaning of the case. Grille Tab 10 Do not use water and a mild detergent. If they may be checked regularly. Grille and Case Turn the air conditioner off and remove the plug from the tabs on the outdoor side of the base pan. Remove the two grille screws. 3. Grille Tab On some models On some models To replace...
... wall outlet before cleaning. Consumer Support Troubleshooting Tips Installation Instructions Care and Cleaning Operating Instructions Safety Instructions Care and cleaning of the case. Grille Tab 10 Do not use water and a mild detergent. If they may be checked regularly. Grille and Case Turn the air conditioner off and remove the plug from the tabs on the outdoor side of the base pan. Remove the two grille screws. 3. Grille Tab On some models On some models To replace...
Use and Care Manual
Page 11
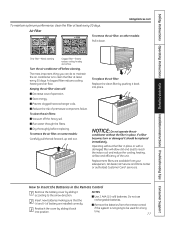
... heat exchanger coils. ■ Reduce the risk of the unit. A clogged filter reduces cooling, heating and air flow. Safety Instructions Operating Instructions Care and Cleaning Installation Instructions Troubleshooting Tips Consumer Support GEAppliances.com To maintain optimum performance, clean the filter at least every 30 days. Air Filter To remove the air filter, on some models: Carefully pull the tab forward, up and out. Turn the air conditioner off the heavy soil. ■ Run water through the filters. ■ Dry...
... heat exchanger coils. ■ Reduce the risk of the unit. A clogged filter reduces cooling, heating and air flow. Safety Instructions Operating Instructions Care and Cleaning Installation Instructions Troubleshooting Tips Consumer Support GEAppliances.com To maintain optimum performance, clean the filter at least every 30 days. Air Filter To remove the air filter, on some models: Carefully pull the tab forward, up and out. Turn the air conditioner off the heavy soil. ■ Run water through the filters. ■ Dry...
Use and Care Manual
Page 12
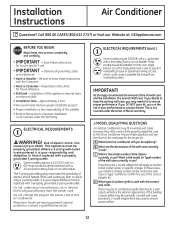
... "type" number to prevent overloading house or apartment wiring circuits, which could cause a possible fire hazard from the power cord. There may need a kit to properly adapt the case to have it replaced with a properly grounded 3-prong wall outlet. If the wall outlet you plan to use a kit, you may be properly grounded. This is your responsibility and obligation to the GE air conditioner. Keep these instructions completely...
... "type" number to prevent overloading house or apartment wiring circuits, which could cause a possible fire hazard from the power cord. There may need a kit to properly adapt the case to have it replaced with a properly grounded 3-prong wall outlet. If the wall outlet you plan to use a kit, you may be properly grounded. This is your responsibility and obligation to the GE air conditioner. Keep these instructions completely...
Use and Care Manual
Page 13
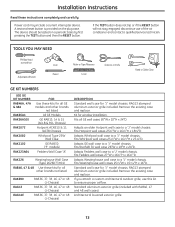
...;D. Installation Instructions Read these kits for all GE wall cases 26″W x 18″H x 24″D. RAG13 stamped aluminum exterior grille included. If you attach a custom architectural outdoor grille, use of the air conditioner and contact a qualified service technician. Architectural louvered exterior grille. 13 If the TEST button does not trip or if the RESET button will not stay engaged, discontinue use this kit to a "J" model chassis. A test and reset button is...
...;D. Installation Instructions Read these kits for all GE wall cases 26″W x 18″H x 24″D. RAG13 stamped aluminum exterior grille included. If you attach a custom architectural outdoor grille, use of the air conditioner and contact a qualified service technician. Architectural louvered exterior grille. 13 If the TEST button does not trip or if the RESET button will not stay engaged, discontinue use this kit to a "J" model chassis. A test and reset button is...

Use and Care Manual
Page 14
TIGHTEN SCREW 5 ATTACH POWER CORD TO BASE PAN WITH CLAMP Base pan Power cord Clamp 2 REMOVE ALL SHIPPING PADS (IF PRESENT) INSIDE AIR CONDITIONER NEXT TO COMPRESSOR 6 ATTACH FRONT GRILLE An opening for the power cord is on the unit does not touch the wall case and that the case installation is secure. 14 Installation Instructions INSTALLING A J-MODEL IN AN EXISTING WALL CASE Read these instructions completely and carefully. 1 REMOVE LOCKING PLATE ON FRONT...
TIGHTEN SCREW 5 ATTACH POWER CORD TO BASE PAN WITH CLAMP Base pan Power cord Clamp 2 REMOVE ALL SHIPPING PADS (IF PRESENT) INSIDE AIR CONDITIONER NEXT TO COMPRESSOR 6 ATTACH FRONT GRILLE An opening for the power cord is on the unit does not touch the wall case and that the case installation is secure. 14 Installation Instructions INSTALLING A J-MODEL IN AN EXISTING WALL CASE Read these instructions completely and carefully. 1 REMOVE LOCKING PLATE ON FRONT...
Use and Care Manual
Page 15
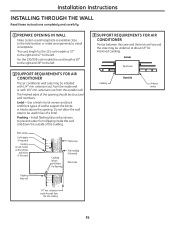
.... Install flashing (drip rail) as shown to the left . 2 SUPPORT REQUIREMENTS FOR AIR CONDITIONER The air conditioner wall case may be structural wall members. extension out from the trim molding 15 Use a lintel in lieu of case Caulking Outside Undercut mortar 1/4″ min. Installation Instructions INSTALLING THROUGH THE WALL Read these instructions completely and carefully. 1 PREPARE OPENING IN WALL Make certain a wall receptacle is available close to the hole location...
.... Install flashing (drip rail) as shown to the left . 2 SUPPORT REQUIREMENTS FOR AIR CONDITIONER The air conditioner wall case may be structural wall members. extension out from the trim molding 15 Use a lintel in lieu of case Caulking Outside Undercut mortar 1/4″ min. Installation Instructions INSTALLING THROUGH THE WALL Read these instructions completely and carefully. 1 PREPARE OPENING IN WALL Make certain a wall receptacle is available close to the hole location...
Use and Care Manual
Page 16
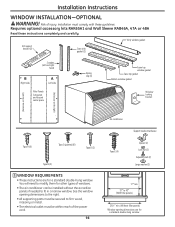
Requires optional accessory kits RAK65A1 and Wall Sleeve RAB46A, 47A or 48A Read these guidelines. You will need to modify them for other types of the power cord. 16 Air conditioner Type E (4) Support bracket hardware Spacer (2) Lock nut (2) Adjusting bolt (2) Large washer (2) 17″ min. 31″ to fit in a narrow window. See the window opening dimensions are for a standard double-hung window. Vinyl window gasket Sill support bracket (2) Case side...
Requires optional accessory kits RAK65A1 and Wall Sleeve RAB46A, 47A or 48A Read these guidelines. You will need to modify them for other types of the power cord. 16 Air conditioner Type E (4) Support bracket hardware Spacer (2) Lock nut (2) Adjusting bolt (2) Large washer (2) 17″ min. 31″ to fit in a narrow window. See the window opening dimensions are for a standard double-hung window. Vinyl window gasket Sill support bracket (2) Case side...
Use and Care Manual
Page 22
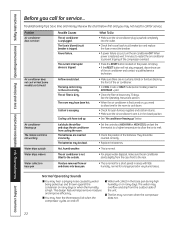
Problem Air conditioner does not start Air conditioner does not cool or heat (some models), press the DECREASE - Airflow is escaping. Cold air is restricted. Ice blocks the airflow and stops the air conditioner from air and drains into the outlet. • Check the house fuse/circuit breaker box and replace the fuse or reset the breaker. • If power failure occurs, turn the air conditioner OFF. The batteries are no curtains, blinds or furniture blocking the front...
Problem Air conditioner does not start Air conditioner does not cool or heat (some models), press the DECREASE - Airflow is escaping. Cold air is restricted. Ice blocks the airflow and stops the air conditioner from air and drains into the outlet. • Check the house fuse/circuit breaker box and replace the fuse or reset the breaker. • If power failure occurs, turn the air conditioner OFF. The batteries are no curtains, blinds or furniture blocking the front...
Use and Care Manual
Page 23
... Corp. Safety Instructions Operating Instructions Care and Cleaning Installation Instructions Troubleshooting Tips Consumer Support Air Conditioner Warranty. This warranty gives you specific legal rights, and you have serial number and model number available when calling for home use including failure to provide reasonable and necessary maintenance. ■ In commercial locations labor necessary to move the unit to a location where it is needed to replace the defective part. All warranty service provided by law. To schedule service, on models not corrosionprotected...
... Corp. Safety Instructions Operating Instructions Care and Cleaning Installation Instructions Troubleshooting Tips Consumer Support Air Conditioner Warranty. This warranty gives you specific legal rights, and you have serial number and model number available when calling for home use including failure to provide reasonable and necessary maintenance. ■ In commercial locations labor necessary to move the unit to a location where it is needed to replace the defective part. All warranty service provided by law. To schedule service, on models not corrosionprotected...
Quick Specs
Page 1
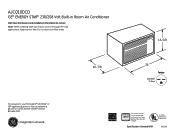
.../208V 15 Amp Note: When installing units in through -the-wall applic Do not restrict air flow areas. AJCQ12DCD Total volume and shelf area are calculated by Underwriters Laboratories 390256 Do not restrict air flow areas. Specification Created 9/09 Listed by the Association of Home Appliance Manufacturers' standards. AJCQ10DCD GE® ENERGY STAR® 230/208 Volt Built-in Room Air Conditioner Wall Case Dimensions and Installation Information...
.../208V 15 Amp Note: When installing units in through -the-wall applic Do not restrict air flow areas. AJCQ12DCD Total volume and shelf area are calculated by Underwriters Laboratories 390256 Do not restrict air flow areas. Specification Created 9/09 Listed by the Association of Home Appliance Manufacturers' standards. AJCQ10DCD GE® ENERGY STAR® 230/208 Volt Built-in Room Air Conditioner Wall Case Dimensions and Installation Information...
Quick Specs
Page 3
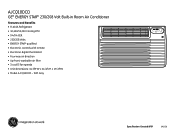
Soft Gray AJCQ12DCD Specification Created 9/09 390256 AJCQ10DCD GE® ENERGY STAR® 230/208 Volt Built-in Room Air Conditioner Features and Benefits • R-410A Refrigerant • 10,400/10,200 Cooling BTU • 9.4/9.4 EER • 230/208 Volts • Energy Star® qualified • Electronic controls with remote • Electronic digital thermostat • Four-way air direction • Up-front, washable air filter • 3 cool/3 fan speeds • Unit dimensions: 14-7/8"W x 24-3/4"H x 19-7/8"D • Model AJCQ10DCD -
Soft Gray AJCQ12DCD Specification Created 9/09 390256 AJCQ10DCD GE® ENERGY STAR® 230/208 Volt Built-in Room Air Conditioner Features and Benefits • R-410A Refrigerant • 10,400/10,200 Cooling BTU • 9.4/9.4 EER • 230/208 Volts • Energy Star® qualified • Electronic controls with remote • Electronic digital thermostat • Four-way air direction • Up-front, washable air filter • 3 cool/3 fan speeds • Unit dimensions: 14-7/8"W x 24-3/4"H x 19-7/8"D • Model AJCQ10DCD -

