
Owners Manual
Page 1
...AJCH 08, 10 AJCH 10, 12 AJCQ 06 AJCQ 08, 10, 12 AJCQ 10, 12 AJCS 06 AJCS 08, 10 AJCS 09, 10, 12 Heat/Cool: AJEH 12 AJES 06 AJES 08 AJES 09, 10, 12 AJES 10 Heat Pump: AJHS 08 AJHS 08, 10 ACC* DCC* LCC* ACC* DCC* ... ge.com Owner's Manual and Installation Instructions Safety Instructions 2, 3 Operating Instructions Controls-Control Knobs . . . . 8, 9 Controls-Touch Pads 4-6 Care and Cleaning Air Filter 11 Front Grille 10 Grille and Case 10 Outdoor Coils 10 Installation Instructions Before You Begin 12, 13 Installing a J-Model in an Existing Wall Case 14 Through-the-Wall Installation...
...AJCH 08, 10 AJCH 10, 12 AJCQ 06 AJCQ 08, 10, 12 AJCQ 10, 12 AJCS 06 AJCS 08, 10 AJCS 09, 10, 12 Heat/Cool: AJEH 12 AJES 06 AJES 08 AJES 09, 10, 12 AJES 10 Heat Pump: AJHS 08 AJHS 08, 10 ACC* DCC* LCC* ACC* DCC* ... ge.com Owner's Manual and Installation Instructions Safety Instructions 2, 3 Operating Instructions Controls-Control Knobs . . . . 8, 9 Controls-Touch Pads 4-6 Care and Cleaning Air Filter 11 Front Grille 10 Grille and Case 10 Outdoor Coils 10 Installation Instructions Before You Begin 12, 13 Installing a J-Model in an Existing Wall Case 14 Through-the-Wall Installation...
Owners Manual
Page 3
...break with repeated use an extension cord with the other hand. If the adapter ground terminal breaks, DO NOT USE the air conditioner until a proper ground has been established. Attaching the adapter ground terminal to make sure the outlet is absolutely necessary that... and Cleaning Installation Instructions Troubleshooting Tips Consumer Support ge.com WARNING! When disconnecting the power cord from the adapter, always hold the adapter in the connection of the 230/208 volt models. USE OF EXTENSION CORDS-115-Volt models only Because of potential safety hazards under certain conditions...
...break with repeated use an extension cord with the other hand. If the adapter ground terminal breaks, DO NOT USE the air conditioner until a proper ground has been established. Attaching the adapter ground terminal to make sure the outlet is absolutely necessary that... and Cleaning Installation Instructions Troubleshooting Tips Consumer Support ge.com WARNING! When disconnecting the power cord from the adapter, always hold the adapter in the connection of the 230/208 volt models. USE OF EXTENSION CORDS-115-Volt models only Because of potential safety hazards under certain conditions...
Owners Manual
Page 4
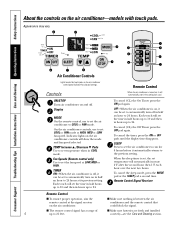
... Timer press the OFF pad again. correctly-see the Care and Cleaning section. Timer On Timer Off Sleep Cool Fan High Med Low On Air Conditioner Controls Lights beside the touch pads on the air conditioner-models with touch pads. Display MODE On the remote control, use to 24 hours at HIGH, MED or... LOW fan speed. OFF-When the air conditioner is set, the set temperature when in half an hour to COOL or FAN mode. SLEEP Press to set...
... Timer press the OFF pad again. correctly-see the Care and Cleaning section. Timer On Timer Off Sleep Cool Fan High Med Low On Air Conditioner Controls Lights beside the touch pads on the air conditioner-models with touch pads. Display MODE On the remote control, use to 24 hours at HIGH, MED or... LOW fan speed. OFF-When the air conditioner is set, the set temperature when in half an hour to COOL or FAN mode. SLEEP Press to set...
Owners Manual
Page 6
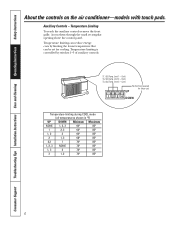
... can be set for future use) UP 1 2 3 4 DOWN Temperature limiting during COOL mode (all temperatures shown in °F) UP DOWN Minimum Maximum NONE 1, 2, 3...176; 1, 3 2 74° 85° 3 1, 2 76° 85° 6 Cool) No function (reserved for cooling. Temperature Limiting To reach the auxiliary controls remove the front grille. Temperature limiting is controlled by limiting ... them through the small rectangular opening above the control panel. Limit 3 - Cool) TL2 (C) (Temp. Cool) TL3 (C) (Temp. Auxiliary Controls - TL1 (C) (Temp. Consumer Support Troubleshooting...
... can be set for future use) UP 1 2 3 4 DOWN Temperature limiting during COOL mode (all temperatures shown in °F) UP DOWN Minimum Maximum NONE 1, 2, 3...176; 1, 3 2 74° 85° 3 1, 2 76° 85° 6 Cool) No function (reserved for cooling. Temperature Limiting To reach the auxiliary controls remove the front grille. Temperature limiting is controlled by limiting ... them through the small rectangular opening above the control panel. Limit 3 - Cool) TL2 (C) (Temp. Cool) TL3 (C) (Temp. Auxiliary Controls - TL1 (C) (Temp. Consumer Support Troubleshooting...
Owners Manual
Page 8
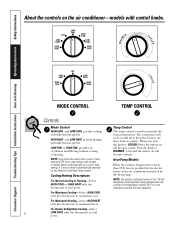
... same level of by the electric heater in the 115-volt heat pump model operates during defrost when the outdoor coil temperature is automatically provided on the Heat/Cool and Heat Pump models. For Maximum Cooling-Select HIGH COOL with the thermostat at maximum heat. For Maximum Heating...WARM About the controls on the air conditioner-models with the thermostat at mid point. For Quieter & Nighttime Cooling-Select 8 LOW COOL with control knobs. When you move the switch from a cool or heat setting to OFF or to maintain the room temperature. NOTE: The electric ...
... same level of by the electric heater in the 115-volt heat pump model operates during defrost when the outdoor coil temperature is automatically provided on the Heat/Cool and Heat Pump models. For Maximum Cooling-Select HIGH COOL with the thermostat at maximum heat. For Maximum Heating...WARM About the controls on the air conditioner-models with the thermostat at mid point. For Quieter & Nighttime Cooling-Select 8 LOW COOL with control knobs. When you move the switch from a cool or heat setting to OFF or to maintain the room temperature. NOTE: The electric ...
Owners Manual
Page 9
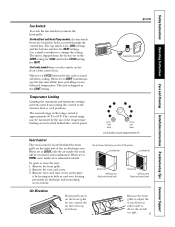
...front grille let you control the air direction up ) the fan runs all the time, providing a more balanced temperature. When set at front. ge.com or (Depending on the right side of the temperature limiting screws located behind the front grille on model) Temperature Limiting Limiting the maximum and...conditioned. Remove the front grille. 2. On Heat/Cool and Heat Pump models, the fan switch levers are located in the CYCLE setting for HEAT settings. The unit is located behind the control panel. When set at OPEN, some inside the room will be narrowed by locating rear hole in the...
...front grille let you control the air direction up ) the fan runs all the time, providing a more balanced temperature. When set at front. ge.com or (Depending on the right side of the temperature limiting screws located behind the front grille on model) Temperature Limiting Limiting the maximum and...conditioned. Remove the front grille. 2. On Heat/Cool and Heat Pump models, the fan switch levers are located in the CYCLE setting for HEAT settings. The unit is located behind the control panel. When set at OPEN, some inside the room will be narrowed by locating rear hole in the...
Owners Manual
Page 10
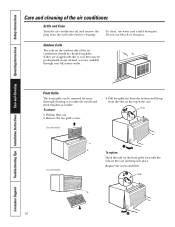
... on the outdoor side of the air conditioner should be removed for more thorough cleaning or to make the model and serial numbers accessible. Replace the screws and filter. If they may be professionally steam cleaned, a service available through your GE service outlet. To remove: 1. ...Grille and Case Turn the air conditioner off and remove the plug from...
... on the outdoor side of the air conditioner should be removed for more thorough cleaning or to make the model and serial numbers accessible. Replace the screws and filter. If they may be professionally steam cleaned, a service available through your GE service outlet. To remove: 1. ...Grille and Case Turn the air conditioner off and remove the plug from...
Owners Manual
Page 11
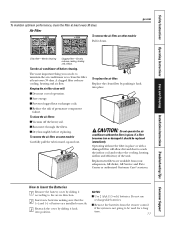
...air filter clean will allow dirt and dust to the arrow direction. 2 Insert new batteries making sure that the (+) and (-) of operation. I Reduce the risk of the unit. I Use 2 AAA (1.5 volt) batteries. Operating without the filter in place or with a damaged filter will : I Remove the batteries from your salesperson, GE dealer, GE...days. I Save energy. Air Filter To remove the air filter, on some models: Carefully pull the tab forward, up and out. A clogged filter reduces cooling, heating and air flow. To remove the air filter, on other models: FRONT FRONT Pull it back...
...air filter clean will allow dirt and dust to the arrow direction. 2 Insert new batteries making sure that the (+) and (-) of operation. I Reduce the risk of the unit. I Use 2 AAA (1.5 volt) batteries. Operating without the filter in place or with a damaged filter will : I Remove the batteries from your salesperson, GE dealer, GE...days. I Save energy. Air Filter To remove the air filter, on some models: Carefully pull the tab forward, up and out. A clogged filter reduces cooling, heating and air flow. To remove the air filter, on other models: FRONT FRONT Pull it back...
Owners Manual
Page 12
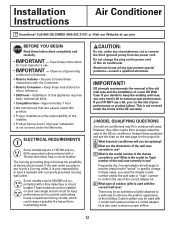
... confirm the use . • IMPORTANT - B What are the dimensions of the GE warranty. What is your responsibility to use is only a 2-prong outlet, it replaced with a properly grounded 3-prong wall outlet. Installation Instructions Air Conditioner Questions? ELECTRICAL REQUIREMENTS Some models require a 115/120-volt a.c., 60 Hz grounded outlet protected with a time delay fuse or circuit...
... confirm the use . • IMPORTANT - B What are the dimensions of the GE warranty. What is your responsibility to use is only a 2-prong outlet, it replaced with a properly grounded 3-prong wall outlet. Installation Instructions Air Conditioner Questions? ELECTRICAL REQUIREMENTS Some models require a 115/120-volt a.c., 60 Hz grounded outlet protected with a time delay fuse or circuit...
Owners Manual
Page 13
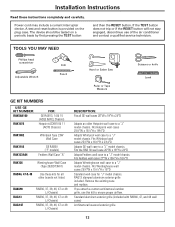
... Scissors or knife Level GE KIT NUMBERS USE GE KIT NUMBER: RAK56A100 RAK1072 FOR: GE RAB13, 14 & 15 (ACLB & RCL Chassis) Hotpoint ACXB10 & 11 (ACTB Chassis) RAK1082 Whirlpool Type 23W Wall Case RAK1102 RAK123A64 GE RAB30 ("F" models) Fedders Wall Case "A"... RAK126 Westinghouse Wall Case (Type 2626D73H01) RAB46, 47 & 48 Use these instructions completely and carefully. Installation Instructions Read these kits for "J" model chassis. The device should be tested on the plug case. If you attach a custom architectural outdoor grille, use of the air...
... Scissors or knife Level GE KIT NUMBERS USE GE KIT NUMBER: RAK56A100 RAK1072 FOR: GE RAB13, 14 & 15 (ACLB & RCL Chassis) Hotpoint ACXB10 & 11 (ACTB Chassis) RAK1082 Whirlpool Type 23W Wall Case RAK1102 RAK123A64 GE RAB30 ("F" models) Fedders Wall Case "A"... RAK126 Westinghouse Wall Case (Type 2626D73H01) RAB46, 47 & 48 Use these instructions completely and carefully. Installation Instructions Read these kits for "J" model chassis. The device should be tested on the plug case. If you attach a custom architectural outdoor grille, use of the air...
Owners Manual
Page 14
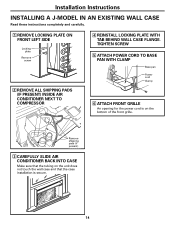
... (if present) 3 CAREFULLY SLIDE AIR CONDITIONER BACK INTO CASE Make sure that the tubing on the unit does not touch the wall case and that the case installation is on the bottom of the front grille. Installation Instructions INSTALLING A J-MODEL IN AN EXISTING WALL CASE Read... these instructions completely and carefully. 1 REMOVE LOCKING PLATE ON FRONT LEFT SIDE Locking plate Remove screw 2 REMOVE ALL SHIPPING PADS (IF PRESENT) INSIDE AIR CONDITIONER NEXT TO COMPRESSOR 4 REINSTALL LOCKING PLATE...
... (if present) 3 CAREFULLY SLIDE AIR CONDITIONER BACK INTO CASE Make sure that the tubing on the unit does not touch the wall case and that the case installation is on the bottom of the front grille. Installation Instructions INSTALLING A J-MODEL IN AN EXISTING WALL CASE Read... these instructions completely and carefully. 1 REMOVE LOCKING PLATE ON FRONT LEFT SIDE Locking plate Remove screw 2 REMOVE ALL SHIPPING PADS (IF PRESENT) INSIDE AIR CONDITIONER NEXT TO COMPRESSOR 4 REINSTALL LOCKING PLATE...
Owners Manual
Page 15
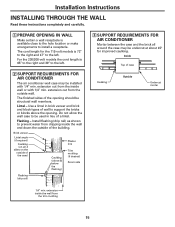
...sides of wall to support the bricks or blocks above & below the flashing) Plaster line Trim molding (if desired) Room side Flashing (drip rail) 3 SUPPORT REQUIREMENTS FOR AIR CONDITIONER Mortar between the case and the brick all 4 sides on all around the case may be installed with 1/4″...is 72″ to the right and 47″ to the left . 2 SUPPORT REQUIREMENTS FOR AIR CONDITIONER The air conditioner wall case may be undercut at about 45° for the 115-volt models is available close to the hole location or make arrangements to install a receptacle. extension out from the...
...sides of wall to support the bricks or blocks above & below the flashing) Plaster line Trim molding (if desired) Room side Flashing (drip rail) 3 SUPPORT REQUIREMENTS FOR AIR CONDITIONER Mortar between the case and the brick all 4 sides on all around the case may be installed with 1/4″...is 72″ to the right and 47″ to the left . 2 SUPPORT REQUIREMENTS FOR AIR CONDITIONER The air conditioner wall case may be undercut at about 45° for the 115-volt models is available close to the hole location or make arrangements to install a receptacle. extension out from the...
Owners Manual
Page 16
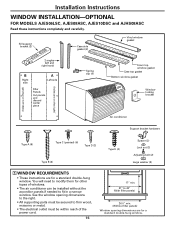
... Spring clip (4) Foam top window gasket Case top gasket Bottom window gasket Window locking bracket (holes are on the left) (holes are on the right) Air conditioner Support bracket hardware Type A (9) Type C (painted) (6) Type D (2) Type B (2) Type E (4) Spacer (2) Lock nut (2) Adjusting bolt (2) Large washer (2) 1 ...; These instructions are for a standard double-hung window. You will need to modify them for other types of windows. • The air conditioner can be within reach of the power cord. 16 17″ min. 31″ to fit in a narrow window. Installation ...
... Spring clip (4) Foam top window gasket Case top gasket Bottom window gasket Window locking bracket (holes are on the left) (holes are on the right) Air conditioner Support bracket hardware Type A (9) Type C (painted) (6) Type D (2) Type B (2) Type E (4) Spacer (2) Lock nut (2) Adjusting bolt (2) Large washer (2) 1 ...; These instructions are for a standard double-hung window. You will need to modify them for other types of windows. • The air conditioner can be within reach of the power cord. 16 17″ min. 31″ to fit in a narrow window. Installation ...
Owners Manual
Page 22
...air conditioner from the outdoor side of the unit. Moisture removed from the case front to the rear. • This is normal for open furnace registers and cold air returns. • Set the air conditioner's vent to the closed position. • See "Air... of the air conditioner. • On models with touch pads: In COOL mode, press the DECREASE M pad. • On models with little humidity; The air conditioner is ... and drip from cooling the room. Power failure. The room may be inserted correctly. • Replace the batteries. • This is high. Cold air is not tilted ...
...air conditioner from the outdoor side of the unit. Moisture removed from the case front to the rear. • This is normal for open furnace registers and cold air returns. • Set the air conditioner's vent to the closed position. • See "Air... of the air conditioner. • On models with touch pads: In COOL mode, press the DECREASE M pad. • On models with little humidity; The air conditioner is ... and drip from cooling the room. Power failure. The room may be inserted correctly. • Replace the batteries. • This is high. Cold air is not tilted ...
Owners Manual
Page 23
... related service to your receipt here. In Alaska, the warranty excludes the cost of improper cooling capacity for a particular purpose, are , consult your local or state consumer affairs office or... damage caused by a GE Authorized Servicer is product repair as provided in Canada, call 800.GE.CARES (800.432.2737). I In commercial locations labor necessary to move the unit to use , contact your... models not corrosionprotected. For service in this air conditioner. For The Period Of: One Year From the date of the original purchase Five Years From the date of the original purchase GE ...
... related service to your receipt here. In Alaska, the warranty excludes the cost of improper cooling capacity for a particular purpose, are , consult your local or state consumer affairs office or... damage caused by a GE Authorized Servicer is product repair as provided in Canada, call 800.GE.CARES (800.432.2737). I In commercial locations labor necessary to move the unit to use , contact your... models not corrosionprotected. For service in this air conditioner. For The Period Of: One Year From the date of the original purchase Five Years From the date of the original purchase GE ...


