
Owners Manual
Page 1
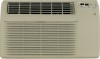
... the front grille. TINSEA518JBRZ 49-7572 03-07 JR Optional on the front of this product meets the ENERGY STAR® guidelines for energy efficiency. Air ConditionRoeorms ge.com Owner's Manual and Installation Instructions Safety Instructions 2, 3 Operating Instructions Controls-Control Knobs . . . . 8, 9 Controls-Touch Pads 4-6 Care and Cleaning Air Filter 11 Front Grille 10 Grille and Case 10 Outdoor Coils 10 Installation Instructions Before You Begin 12, 13 Installing a J-Model in an Existing Wall Case 14 Through-the-Wall Installation-Optional 15 Window Installation-
... the front grille. TINSEA518JBRZ 49-7572 03-07 JR Optional on the front of this product meets the ENERGY STAR® guidelines for energy efficiency. Air ConditionRoeorms ge.com Owner's Manual and Installation Instructions Safety Instructions 2, 3 Operating Instructions Controls-Control Knobs . . . . 8, 9 Controls-Touch Pads 4-6 Care and Cleaning Air Filter 11 Front Grille 10 Grille and Case 10 Outdoor Coils 10 Installation Instructions Before You Begin 12, 13 Installing a J-Model in an Existing Wall Case 14 Through-the-Wall Installation-Optional 15 Window Installation-
Owners Manual
Page 2
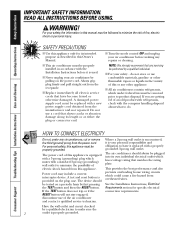
... a periodic basis by a qualified electrician to minimize the possibility of the air conditioner and contact a qualified service technician. WARNING! For personal safety, this appliance only for specific electrical connection requirements. Consumer Support Troubleshooting Tips Installation Instructions Care and Cleaning Operating Instructions Safety Instructions IMPORTANT SAFETY INFORMATION. If the TEST button does not trip or if the RESET button will not stay engaged, discontinue use a cord that matches the...
... a periodic basis by a qualified electrician to minimize the possibility of the air conditioner and contact a qualified service technician. WARNING! For personal safety, this appliance only for specific electrical connection requirements. Consumer Support Troubleshooting Tips Installation Instructions Care and Cleaning Operating Instructions Safety Instructions IMPORTANT SAFETY INFORMATION. If the TEST button does not trip or if the RESET button will not stay engaged, discontinue use a cord that matches the...
Owners Manual
Page 3
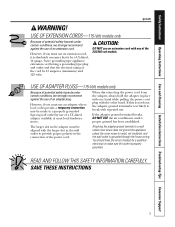
... cover screw is metal, not insulated, and the wall outlet is very likely to provide proper polarity in the adapter must use . READ AND FOLLOW THIS SAFETY INFORMATION CAREFULLY. The larger slot in the connection of the 230/208 volt models. Safety Instructions Operating Instructions Care and Cleaning Installation Instructions Troubleshooting Tips Consumer Support ge.com WARNING! When disconnecting the power cord from the adapter, always hold the adapter...
... cover screw is metal, not insulated, and the wall outlet is very likely to provide proper polarity in the adapter must use . READ AND FOLLOW THIS SAFETY INFORMATION CAREFULLY. The larger slot in the connection of the 230/208 volt models. Safety Instructions Operating Instructions Care and Cleaning Installation Instructions Troubleshooting Tips Consumer Support ge.com WARNING! When disconnecting the power cord from the adapter, always hold the adapter...
Owners Manual
Page 4
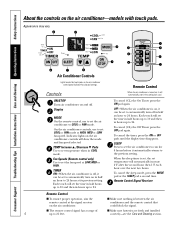
... two hours. To cancel the sleep mode, press the MODE pad or the SLEEP pad a second time. TEMP Increase L /Decrease M Pads Use to 24. I Make sure nothing is set, the set temperature when in half an hour to COOL or FAN mode. Consumer Support Troubleshooting Tips Installation Instructions Care and Cleaning Operating Instructions Safety Instructions About the controls on the air conditioner control panel indicate the selected settings. Indicator lights on the air conditioner. To cancel (CL) the On...
... two hours. To cancel the sleep mode, press the MODE pad or the SLEEP pad a second time. TEMP Increase L /Decrease M Pads Use to 24. I Make sure nothing is set, the set temperature when in half an hour to COOL or FAN mode. Consumer Support Troubleshooting Tips Installation Instructions Care and Cleaning Operating Instructions Safety Instructions About the controls on the air conditioner control panel indicate the selected settings. Indicator lights on the air conditioner. To cancel (CL) the On...

Owners Manual
Page 5
... used to direct the air left or right. 5 Safety Instructions Operating Instructions Care and Cleaning Installation Instructions Troubleshooting Tips Consumer Support ge.com COOL MODE Remote Control 1. Press COOL pad. 2. Control Panel 1. Press the INCREASE L / DECREASE M pads to COOL, it by locating rear hole in 1°F increments. NOTE: If the air conditioner is lit for the compressor to start and cooling to 85°F in card over and replace it will be displayed. Access through a hole in the CONT setting. Remote Control Press FAN...
... used to direct the air left or right. 5 Safety Instructions Operating Instructions Care and Cleaning Installation Instructions Troubleshooting Tips Consumer Support ge.com COOL MODE Remote Control 1. Press COOL pad. 2. Control Panel 1. Press the INCREASE L / DECREASE M pads to COOL, it by locating rear hole in 1°F increments. NOTE: If the air conditioner is lit for the compressor to start and cooling to 85°F in card over and replace it will be displayed. Access through a hole in the CONT setting. Remote Control Press FAN...
Owners Manual
Page 6
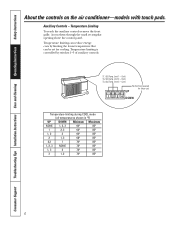
... 72° 85° 1, 3 2 74° 85° 3 1, 2 76° 85° 6 Cool) No function (reserved for cooling. Cool) TL2 (C) (Temp. Consumer Support Troubleshooting Tips Installation Instructions Care and Cleaning Operating Instructions Safety Instructions About the controls on the air conditioner-models with touch pads. Temperature Limiting To reach the auxiliary controls remove the front grille. Temperature limiting is controlled by limiting the lowest temperature that can reduce energy costs by switches 1-3 of auxiliary controls. Auxiliary Controls -
... 72° 85° 1, 3 2 74° 85° 3 1, 2 76° 85° 6 Cool) No function (reserved for cooling. Cool) TL2 (C) (Temp. Consumer Support Troubleshooting Tips Installation Instructions Care and Cleaning Operating Instructions Safety Instructions About the controls on the air conditioner-models with touch pads. Temperature Limiting To reach the auxiliary controls remove the front grille. Temperature limiting is controlled by limiting the lowest temperature that can reduce energy costs by switches 1-3 of auxiliary controls. Auxiliary Controls -
Owners Manual
Page 8
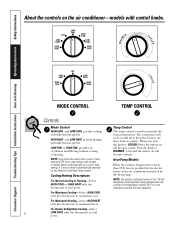
... HIGH HEAT with the thermostat at mid point. For Maximum Cooling-Select HIGH COOL with control knobs. Consumer Support Troubleshooting Tips Installation Instructions Care and Cleaning Operating Instructions Safety Instructions WARM About the controls on the air conditioner-models with the thermostat at the same level of by the electric heater in the 115-volt heat pump model operates during defrost when the outdoor coil temperature is below 36°F. Temp Control The temp control is not intended to keep the room at maximum cool.
... HIGH HEAT with the thermostat at mid point. For Maximum Cooling-Select HIGH COOL with control knobs. Consumer Support Troubleshooting Tips Installation Instructions Care and Cleaning Operating Instructions Safety Instructions WARM About the controls on the air conditioner-models with the thermostat at the same level of by the electric heater in the 115-volt heat pump model operates during defrost when the outdoor coil temperature is below 36°F. Temp Control The temp control is not intended to keep the room at maximum cool.
Owners Manual
Page 9
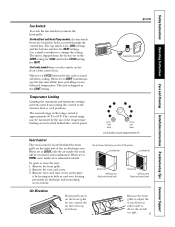
... off when cooling. Safety Instructions Operating Instructions Care and Cleaning Installation Instructions Troubleshooting Tips Consumer Support Fan Switch To reach the fan switch(es) remove the front grille. The unit is shipped in the CYCLE setting for HEAT. When set at front. ge.com or (Depending on the front grille let you control the air direction up ) the fan runs all the time, providing a more balanced temperature. When set in the CONT setting for HEAT settings. Remove the front grille to adjust...
... off when cooling. Safety Instructions Operating Instructions Care and Cleaning Installation Instructions Troubleshooting Tips Consumer Support Fan Switch To reach the fan switch(es) remove the front grille. The unit is shipped in the CYCLE setting for HEAT. When set at front. ge.com or (Depending on the front grille let you control the air direction up ) the fan runs all the time, providing a more balanced temperature. When set in the CONT setting for HEAT settings. Remove the front grille to adjust...
Owners Manual
Page 10
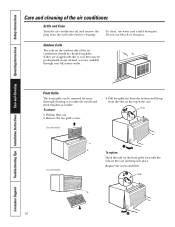
... of the case. Replace the screws and filter. Grille Tab 10 Consumer Support Troubleshooting Tips Installation Instructions Care and Cleaning Operating Instructions Safety Instructions Care and cleaning of the air conditioner should be checked regularly. Remove the two grille screws. Pull the grille out from the bottom and lift up from the wall outlet before cleaning. To remove: 1. Grille Tab On some models 3. Grille and Case Turn the air conditioner off and remove the plug from the tabs...
... of the case. Replace the screws and filter. Grille Tab 10 Consumer Support Troubleshooting Tips Installation Instructions Care and Cleaning Operating Instructions Safety Instructions Care and cleaning of the air conditioner should be checked regularly. Remove the two grille screws. Pull the grille out from the bottom and lift up from the wall outlet before cleaning. To remove: 1. Grille Tab On some models 3. Grille and Case Turn the air conditioner off and remove the plug from the tabs...
Owners Manual
Page 11
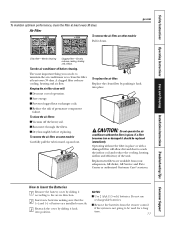
... the air conditioner is not going to clean the filter at least every 30 days. I Use 2 AAA (1.5 volt) batteries. Operating without the filter in place or with a damaged filter will : I Dry thoroughly before cleaning. Do not use rechargeable batteries. Safety Instructions Operating Instructions Care and Cleaning Installation Instructions Troubleshooting Tips Consumer Support To maintain optimum performance, clean the filter at least every 30 days. To clean the air filters: I Prevent clogged heat exchanger coils. ge.com Dirty filter-Needs cleaning Clogged filter-Greatly...
... the air conditioner is not going to clean the filter at least every 30 days. I Use 2 AAA (1.5 volt) batteries. Operating without the filter in place or with a damaged filter will : I Dry thoroughly before cleaning. Do not use rechargeable batteries. Safety Instructions Operating Instructions Care and Cleaning Installation Instructions Troubleshooting Tips Consumer Support To maintain optimum performance, clean the filter at least every 30 days. To clean the air filters: I Prevent clogged heat exchanger coils. ge.com Dirty filter-Needs cleaning Clogged filter-Greatly...
Owners Manual
Page 12
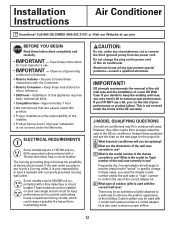
... instructions with a 15-amp time delay fuse or circuit breaker. Observe all governing codes and ordinances. • Note to the GE air conditioner. This is the model (or Type) number of the correct adapter kit. What is not covered under any circumstances, cut or remove the third (ground) prong from overheating wires. Custom grilles may need the chassis model number and/or the wall case or "type" number to Consumer - Installation of the GE warranty. ELECTRICAL REQUIREMENTS Some models require a 115...
... instructions with a 15-amp time delay fuse or circuit breaker. Observe all governing codes and ordinances. • Note to the GE air conditioner. This is the model (or Type) number of the correct adapter kit. What is not covered under any circumstances, cut or remove the third (ground) prong from overheating wires. Custom grilles may need the chassis model number and/or the wall case or "type" number to Consumer - Installation of the GE warranty. ELECTRICAL REQUIREMENTS Some models require a 115...
Owners Manual
Page 13
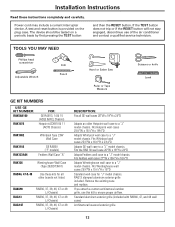
... RESET button will not stay engaged, discontinue use this kit to a "J" model chassis. RAK690 RAG13 RAG14E RAB36, 37, 38, 46, 47 or 48 (J-Chassis) RAB36, 37, 38, 46, 47 or 48 (J-Chassis) RAB36, 37, 38, 46, 47 or 48 (J-Chassis) DESCRIPTION: Fits all other brands not listed. If you attach a custom architectural outdoor grille, use of the air conditioner and contact a qualified service...
... RESET button will not stay engaged, discontinue use this kit to a "J" model chassis. RAK690 RAG13 RAG14E RAB36, 37, 38, 46, 47 or 48 (J-Chassis) RAB36, 37, 38, 46, 47 or 48 (J-Chassis) RAB36, 37, 38, 46, 47 or 48 (J-Chassis) DESCRIPTION: Fits all other brands not listed. If you attach a custom architectural outdoor grille, use of the air conditioner and contact a qualified service...
Owners Manual
Page 14
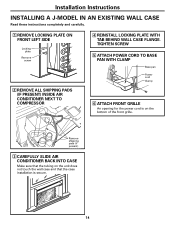
Installation Instructions INSTALLING A J-MODEL IN AN EXISTING WALL CASE Read these instructions completely and carefully. 1 REMOVE LOCKING PLATE ON FRONT LEFT SIDE Locking plate Remove screw 2 REMOVE ALL SHIPPING PADS (IF PRESENT) INSIDE AIR CONDITIONER NEXT TO COMPRESSOR 4 REINSTALL LOCKING PLATE WITH TAB BEHIND WALL CASE FLANGE. Remove shipping pads (if present) 3 CAREFULLY SLIDE AIR CONDITIONER BACK INTO CASE Make sure that the tubing on the unit does not...
Installation Instructions INSTALLING A J-MODEL IN AN EXISTING WALL CASE Read these instructions completely and carefully. 1 REMOVE LOCKING PLATE ON FRONT LEFT SIDE Locking plate Remove screw 2 REMOVE ALL SHIPPING PADS (IF PRESENT) INSIDE AIR CONDITIONER NEXT TO COMPRESSOR 4 REINSTALL LOCKING PLATE WITH TAB BEHIND WALL CASE FLANGE. Remove shipping pads (if present) 3 CAREFULLY SLIDE AIR CONDITIONER BACK INTO CASE Make sure that the tubing on the unit does not...
Owners Manual
Page 15
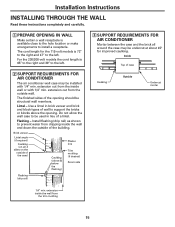
The cord length for improved caulking. Flashing - Inside Top of the opening . Installation Instructions INSTALLING THROUGH THE WALL Read these instructions completely and carefully. 1 PREPARE OPENING IN WALL Make certain a wall receptacle is available close to the hole location or make arrangements to the left . 2 SUPPORT REQUIREMENTS FOR AIR CONDITIONER The air conditioner wall case may be structural wall members. extension out from the trim molding 15 Use a lintel in lieu of the...
The cord length for improved caulking. Flashing - Inside Top of the opening . Installation Instructions INSTALLING THROUGH THE WALL Read these instructions completely and carefully. 1 PREPARE OPENING IN WALL Make certain a wall receptacle is available close to the hole location or make arrangements to the left . 2 SUPPORT REQUIREMENTS FOR AIR CONDITIONER The air conditioner wall case may be structural wall members. extension out from the trim molding 15 Use a lintel in lieu of the...
Owners Manual
Page 16
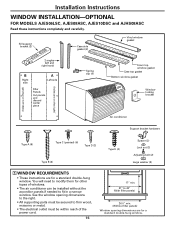
... air conditioner can be within reach of the power cord. 16 17″ min. 31″ to 43″ (With filler panels) 261⁄4″ min. (Without filler panels) Window opening dimensions to the right. • All supporting parts must be secured to firm wood, masonry or metal. • The electrical outlet must be installed without the accordion panels if needed to fit in a narrow window. Installation Instructions WINDOW INSTALLATION...
... air conditioner can be within reach of the power cord. 16 17″ min. 31″ to 43″ (With filler panels) 261⁄4″ min. (Without filler panels) Window opening dimensions to the right. • All supporting parts must be secured to firm wood, masonry or metal. • The electrical outlet must be installed without the accordion panels if needed to fit in a narrow window. Installation Instructions WINDOW INSTALLATION...
Owners Manual
Page 17
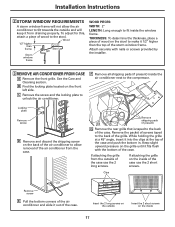
... the storm window frame. If attaching the grille on the back of the air conditioner to allow the air conditioner to tilt towards the outside of the air conditioner from draining properly. If attaching the grille from the outside and will not allow removal of the case use the 2 short screws. Locking plate Remove screw D Remove and discard the shipping screw on the inside the window frame. To...
... the storm window frame. If attaching the grille on the back of the air conditioner to allow the air conditioner to tilt towards the outside of the air conditioner from draining properly. If attaching the grille from the outside and will not allow removal of the case use the 2 short screws. Locking plate Remove screw D Remove and discard the shipping screw on the inside the window frame. To...
Owners Manual
Page 19
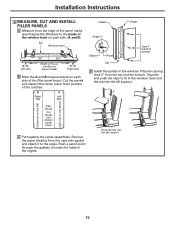
... the sill support. 3″ (holes are on the left) (holes are on each side of the filler panel board. Note position of the notches. Place the spring clips 3″ from the top and the bottom. Installation Instructions 6 MEASURE, CUT AND INSTALL FILLER PANELS A Measure from the edge of the panel marks (see Prepare the Window) to fit in the window track and...
... the sill support. 3″ (holes are on the left) (holes are on each side of the filler panel board. Note position of the notches. Place the spring clips 3″ from the top and the bottom. Installation Instructions 6 MEASURE, CUT AND INSTALL FILLER PANELS A Measure from the edge of the panel marks (see Prepare the Window) to fit in the window track and...
Owners Manual
Page 21
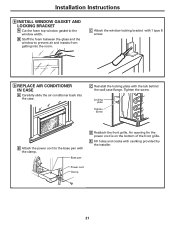
... with 1 type E screw. 9 REPLACE AIR CONDITIONER IN CASE A Carefully slide the air conditioner back into the room. Tighten the screw. An opening for the power cord is on the bottom of the front grille. B Stuff the foam between the glass and the window to the base pan with caulking provided by the installer. Base pan D Reattach the front grille. C Attach the window locking bracket with the...
... with 1 type E screw. 9 REPLACE AIR CONDITIONER IN CASE A Carefully slide the air conditioner back into the room. Tighten the screw. An opening for the power cord is on the bottom of the front grille. B Stuff the foam between the glass and the window to the base pan with caulking provided by the installer. Base pan D Reattach the front grille. C Attach the window locking bracket with the...
Owners Manual
Page 22
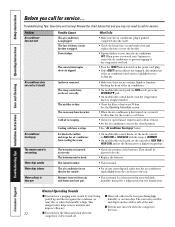
... the compressor overload. • Press the RESET button located on rainy days. Moisture removed from the case front to a higher number. • Clean the filter at HIGH FAN or HIGH COOL and set correctly. design feature helps remove moisture and improve efficiency. Cooling coils have been hot. The temp control may run even when the compressor does not. 22 I Water will not stay engaged, discontinue use of the unit. The air filter is...
... the compressor overload. • Press the RESET button located on rainy days. Moisture removed from the case front to a higher number. • Clean the filter at HIGH FAN or HIGH COOL and set correctly. design feature helps remove moisture and improve efficiency. Cooling coils have been hot. The temp control may run even when the compressor does not. 22 I Water will not stay engaged, discontinue use of the unit. The air filter is...
Owners Manual
Page 23
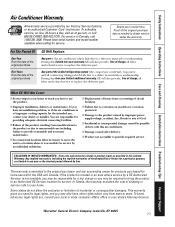
...: General Electric Company. Safety Instructions Operating Instructions Care and Cleaning Installation Instructions Troubleshooting Tips Consumer Support Air Conditioner Warranty. For The Period Of: One Year From the date of the original purchase Five Years From the date of the original purchase GE Will Replace: Any part of the sealed refrigerating system (the compressor, condenser, evaporator and all labor and related service to provide reasonable and necessary maintenance. Any part of the air conditioner which fails...
...: General Electric Company. Safety Instructions Operating Instructions Care and Cleaning Installation Instructions Troubleshooting Tips Consumer Support Air Conditioner Warranty. For The Period Of: One Year From the date of the original purchase Five Years From the date of the original purchase GE Will Replace: Any part of the sealed refrigerating system (the compressor, condenser, evaporator and all labor and related service to provide reasonable and necessary maintenance. Any part of the air conditioner which fails...

