
Owners Manual
Page 1
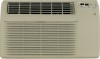
...: AJCH 08, 10 AJCH 10, 12 AJCQ 06 AJCQ 08, 10, 12 AJCQ 10, 12 AJCS 06 AJCS 08, 10 AJCS 09, 10, 12 Heat/Cool: AJEH 12 AJES 06 AJES 08 AJES 09, 10, 12 AJES 10 Heat Pump: AJHS 08 AJHS 08, 10 ACC* DCC* LCC* ACC* DCC* LCC... ENERGY STAR® guidelines for energy efficiency. Para consultar una version en español de este manual de instrucciones, visite nuestro sitio de internet ge.com. Air ConditionRoeorms ge.com Owner's Manual and Installation Instructions Safety Instructions 2, 3 Operating Instructions Controls-Control Knobs . . . . 8, 9 Controls-Touch Pads 4-6 Care and Cleaning...
...: AJCH 08, 10 AJCH 10, 12 AJCQ 06 AJCQ 08, 10, 12 AJCQ 10, 12 AJCS 06 AJCS 08, 10 AJCS 09, 10, 12 Heat/Cool: AJEH 12 AJES 06 AJES 08 AJES 09, 10, 12 AJES 10 Heat Pump: AJHS 08 AJHS 08, 10 ACC* DCC* LCC* ACC* DCC* LCC... ENERGY STAR® guidelines for energy efficiency. Para consultar una version en español de este manual de instrucciones, visite nuestro sitio de internet ge.com. Air ConditionRoeorms ge.com Owner's Manual and Installation Instructions Safety Instructions 2, 3 Operating Instructions Controls-Control Knobs . . . . 8, 9 Controls-Touch Pads 4-6 Care and Cleaning...
Owners Manual
Page 2
... this appliance only for specific electrical connection requirements. Power cord may include a current interrupter device. See the Installation Instructions, Electrical Requirements section for its own individual electrical outlet which under any other appliance. For your air conditioner by a qualified individual. I Replace immediately all electric service cords that any repairs or cleaning. For...
... this appliance only for specific electrical connection requirements. Power cord may include a current interrupter device. See the Installation Instructions, Electrical Requirements section for its own individual electrical outlet which under any other appliance. For your air conditioner by a qualified individual. I Replace immediately all electric service cords that any repairs or cleaning. For...
Owners Manual
Page 3
...wall outlet is properly grounded. If the adapter ground terminal breaks, DO NOT USE the air conditioner until a proper ground has been established. The larger slot in the adapter must use... codes permit, a temporary connection may be 15 amperes (minimum) and 125 volts. USE OF ADAPTER PLUGS-115-Volt models only Because of the cord be made to a properly grounded 2-prong ... circuit checked by use . Safety Instructions Operating Instructions Care and Cleaning Installation Instructions Troubleshooting Tips Consumer Support ge.com WARNING! However, if you must be aligned with the other ...
...wall outlet is properly grounded. If the adapter ground terminal breaks, DO NOT USE the air conditioner until a proper ground has been established. The larger slot in the adapter must use... codes permit, a temporary connection may be 15 amperes (minimum) and 125 volts. USE OF ADAPTER PLUGS-115-Volt models only Because of the cord be made to a properly grounded 2-prong ... circuit checked by use . Safety Instructions Operating Instructions Care and Cleaning Installation Instructions Troubleshooting Tips Consumer Support ge.com WARNING! However, if you must be aligned with the other ...
Owners Manual
Page 4
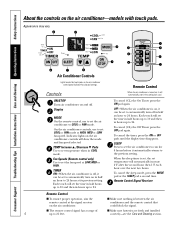
... nothing is set, the set to 24 hours. Appearance may vary. TIMER ON-When the air conditioner is off . Remote Control Signal Receiver Remote Control I Make sure batteries are fresh and installed 4 up to set COOL or FAN mode at LOW, MED or HIGH. I The remote control signal has a range... of I To ensure proper operation, aim the remote control at its previous setting. On the air conditioner controls, use to 24. ON/STOP...
... nothing is set, the set to 24 hours. Appearance may vary. TIMER ON-When the air conditioner is off . Remote Control Signal Receiver Remote Control I Make sure batteries are fresh and installed 4 up to set COOL or FAN mode at LOW, MED or HIGH. I The remote control signal has a range... of I To ensure proper operation, aim the remote control at its previous setting. On the air conditioner controls, use to 24. ON/STOP...

Owners Manual
Page 5
...the front grille to adjust the vertical louvers side-to-side to provide air circulation and filtering without cooling. Safety Instructions Operating Instructions Care and Cleaning Installation Instructions Troubleshooting Tips Consumer Support ge.com COOL MODE Remote Control 1. Control Panel 1. The compressor will take approximately 3 ...least 3 minutes before switching back to maintain the room temperature. NOTE: If the air conditioner is off to keep the room at CONT (continuous, up and down ) the fan cycles on the control box. The unit leaves the factory set at the set to 85...
...the front grille to adjust the vertical louvers side-to-side to provide air circulation and filtering without cooling. Safety Instructions Operating Instructions Care and Cleaning Installation Instructions Troubleshooting Tips Consumer Support ge.com COOL MODE Remote Control 1. Control Panel 1. The compressor will take approximately 3 ...least 3 minutes before switching back to maintain the room temperature. NOTE: If the air conditioner is off to keep the room at CONT (continuous, up and down ) the fan cycles on the control box. The unit leaves the factory set at the set to 85...
Owners Manual
Page 6
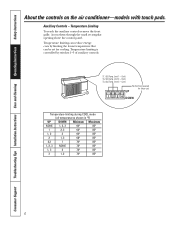
... through the small rectangular opening above the control panel. Cool) No function (reserved for cooling. Limit 3 - TL1 (C) (Temp. Limit 2 - Consumer Support Troubleshooting Tips Installation Instructions Care and Cleaning Operating Instructions Safety Instructions About the controls on the air conditioner-models with touch pads. Cool) TL3 (C) (Temp. Cool) TL2 (C) (Temp. Temperature Limiting To reach the auxiliary controls...
... through the small rectangular opening above the control panel. Cool) No function (reserved for cooling. Limit 3 - TL1 (C) (Temp. Limit 2 - Consumer Support Troubleshooting Tips Installation Instructions Care and Cleaning Operating Instructions Safety Instructions About the controls on the air conditioner-models with touch pads. Cool) TL3 (C) (Temp. Cool) TL2 (C) (Temp. Temperature Limiting To reach the auxiliary controls...
Owners Manual
Page 7
Safety Instructions Operating Instructions Care and Cleaning Installation Instructions Troubleshooting Tips Consumer Support 7 ge.com Notes.
Safety Instructions Operating Instructions Care and Cleaning Installation Instructions Troubleshooting Tips Consumer Support 7 ge.com Notes.
Owners Manual
Page 8
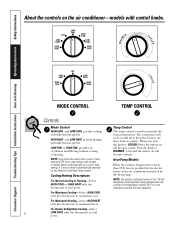
...the knob to COOLER (blue) the indoor air will become cooler. Cooling/Heating Descriptions For Normal Cooling or Heating-Select HIGH COOL or HIGH HEAT with the thermostat at maximum cool. It is below 36°F. For Maximum Cooling-Select HIGH COOL with the thermostat at mid point. For ...heat pump. Consumer Support Troubleshooting Tips Installation Instructions Care and Cleaning Operating Instructions Safety Instructions WARM About the controls on and off to keep the room at the same level of by the electric heater in the 115-volt heat pump model operates during defrost when...
...the knob to COOLER (blue) the indoor air will become cooler. Cooling/Heating Descriptions For Normal Cooling or Heating-Select HIGH COOL or HIGH HEAT with the thermostat at maximum cool. It is below 36°F. For Maximum Cooling-Select HIGH COOL with the thermostat at mid point. For ...heat pump. Consumer Support Troubleshooting Tips Installation Instructions Care and Cleaning Operating Instructions Safety Instructions WARM About the controls on and off to keep the room at the same level of by the electric heater in the 115-volt heat pump model operates during defrost when...
Owners Manual
Page 9
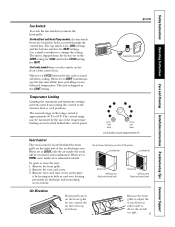
...The unit is for COOL and in card over locating pin inside the room will be narrowed by the use of the temperature limiting screws located behind the front grille on the front of the air discharge area. ge.com or (Depending on and off when cooling. ...Cool only models have a rocker switch on the right side of the control box. Remove the vent card screw. 3. The control range may be circulated and conditioned. Vent Control The vent control is shipped from turning the control to 85°F. Safety Instructions Operating Instructions Care and Cleaning Installation...
...The unit is for COOL and in card over locating pin inside the room will be narrowed by the use of the temperature limiting screws located behind the front grille on the front of the air discharge area. ge.com or (Depending on and off when cooling. ...Cool only models have a rocker switch on the right side of the control box. Remove the vent card screw. 3. The control range may be circulated and conditioned. Vent Control The vent control is shipped from turning the control to 85°F. Safety Instructions Operating Instructions Care and Cleaning Installation...
Owners Manual
Page 10
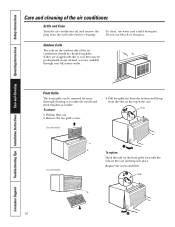
... from the wall outlet before cleaning. To remove: 1. Consumer Support Troubleshooting Tips Installation Instructions Care and Cleaning Operating Instructions Safety Instructions Care and cleaning of the case. Grille and Case Turn the air conditioner off and remove the plug from the tabs on the case and snap ...into place. If they may be professionally steam cleaned, a service available through your GE service outlet. On some models To replace: Hook the...
... from the wall outlet before cleaning. To remove: 1. Consumer Support Troubleshooting Tips Installation Instructions Care and Cleaning Operating Instructions Safety Instructions Care and cleaning of the case. Grille and Case Turn the air conditioner off and remove the plug from the tabs on the case and snap ...into place. If they may be professionally steam cleaned, a service available through your GE service outlet. On some models To replace: Hook the...
Owners Manual
Page 11
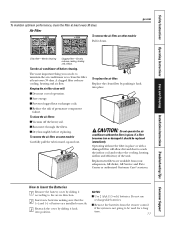
... ge.com Dirty filter-Needs cleaning Clogged filter-Greatly reduces cooling, heating and airflow. To clean the air filters: I Run water through the filters. How to Insert the Batteries 1 Remove the battery cover by sliding it according to be replaced immediately. Replacement filters are installed ... is to reach the indoor coil and reduce the cooling, heating, airflow and efficiency of premature component failure. A clogged filter reduces cooling, heating and air flow. I Reduce the risk of the unit. Keeping the air filter clean will allow dirt and dust to clean...
... ge.com Dirty filter-Needs cleaning Clogged filter-Greatly reduces cooling, heating and airflow. To clean the air filters: I Run water through the filters. How to Insert the Batteries 1 Remove the battery cover by sliding it according to be replaced immediately. Replacement filters are installed ... is to reach the indoor coil and reduce the cooling, heating, airflow and efficiency of premature component failure. A clogged filter reduces cooling, heating and air flow. I Reduce the risk of the unit. Keeping the air filter clean will allow dirt and dust to clean...
Owners Manual
Page 12
...the wall case currently in use ? Installation Instructions Air Conditioner Questions? Save these instructions with a 15-amp time delay fuse or circuit breaker. Installation of the correct adapter kit. ELECTRICAL REQUIREMENTS Some models require a 115/120-volt a.c., 60 Hz grounded outlet protected ...it replaced with a properly grounded 3-prong wall outlet. This is not covered under the terms of the installer. • Product failure due to the GE air conditioner. In these instructions completely and carefully. • IMPORTANT - Observe all governing codes and ordinances. ...
...the wall case currently in use ? Installation Instructions Air Conditioner Questions? Save these instructions with a 15-amp time delay fuse or circuit breaker. Installation of the correct adapter kit. ELECTRICAL REQUIREMENTS Some models require a 115/120-volt a.c., 60 Hz grounded outlet protected ...it replaced with a properly grounded 3-prong wall outlet. This is not covered under the terms of the installer. • Product failure due to the GE air conditioner. In these instructions completely and carefully. • IMPORTANT - Observe all governing codes and ordinances. ...
Owners Manual
Page 13
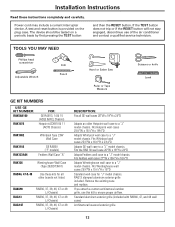
... proper airflow. Fits Westinghouse wall cases 257⁄8″W x 157⁄16″H x 16″D Standard wall case for all GE wall cases 26″W x 18″H x 24″D Adapts an older Hotpoint wall case to a "J" model chassis. Standard ...GE RAB30 ("F" models) Fedders Wall Case "A" RAK126 Westinghouse Wall Case (Type 2626D73H01) RAB46, 47 & 48 Use these instructions completely and carefully. Remove the existing case and replace. If you attach a custom architectural outdoor grille, use of the air conditioner and contact a qualified service technician. Installation...
... proper airflow. Fits Westinghouse wall cases 257⁄8″W x 157⁄16″H x 16″D Standard wall case for all GE wall cases 26″W x 18″H x 24″D Adapts an older Hotpoint wall case to a "J" model chassis. Standard ...GE RAB30 ("F" models) Fedders Wall Case "A" RAK126 Westinghouse Wall Case (Type 2626D73H01) RAB46, 47 & 48 Use these instructions completely and carefully. Remove the existing case and replace. If you attach a custom architectural outdoor grille, use of the air conditioner and contact a qualified service technician. Installation...
Owners Manual
Page 14
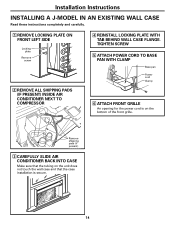
... Remove screw 2 REMOVE ALL SHIPPING PADS (IF PRESENT) INSIDE AIR CONDITIONER NEXT TO COMPRESSOR 4 REINSTALL LOCKING PLATE WITH TAB BEHIND WALL CASE FLANGE. Remove shipping pads (if present) 3 CAREFULLY SLIDE AIR CONDITIONER BACK INTO CASE Make sure that the case installation is on the unit does not touch the wall case and that the...
... Remove screw 2 REMOVE ALL SHIPPING PADS (IF PRESENT) INSIDE AIR CONDITIONER NEXT TO COMPRESSOR 4 REINSTALL LOCKING PLATE WITH TAB BEHIND WALL CASE FLANGE. Remove shipping pads (if present) 3 CAREFULLY SLIDE AIR CONDITIONER BACK INTO CASE Make sure that the case installation is on the unit does not touch the wall case and that the...
Owners Manual
Page 15
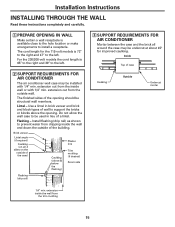
...Room side Flashing (drip rail) 3 SUPPORT REQUIREMENTS FOR AIR CONDITIONER Mortar between the case and the brick all 4 sides on the outside of the opening . Brick veneer Lintel angle (if required) Caulking (on all around the case may be undercut at about 45° for the 115-volt... models is 72″ to the right and 47″ to the left . 2 SUPPORT REQUIREMENTS FOR AIR CONDITIONER The air conditioner wall case may be installed with 1/4″ min. Installation Instructions INSTALLING THROUGH THE WALL Read these instructions completely...
...Room side Flashing (drip rail) 3 SUPPORT REQUIREMENTS FOR AIR CONDITIONER Mortar between the case and the brick all 4 sides on the outside of the opening . Brick veneer Lintel angle (if required) Caulking (on all around the case may be undercut at about 45° for the 115-volt... models is 72″ to the right and 47″ to the left . 2 SUPPORT REQUIREMENTS FOR AIR CONDITIONER The air conditioner wall case may be installed with 1/4″ min. Installation Instructions INSTALLING THROUGH THE WALL Read these instructions completely...
Owners Manual
Page 16
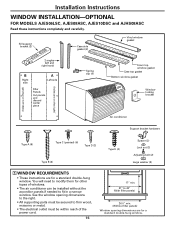
...the right. • All supporting parts must be secured to firm wood, masonry or metal. • The electrical outlet must be installed without the accordion panels if needed to 43″ (With filler panels) 261⁄4″ min. (Without filler panels) Window ... Spring clip (4) Foam top window gasket Case top gasket Bottom window gasket Window locking bracket (holes are on the left) (holes are on the right) Air conditioner Support bracket hardware Type A (9) Type C (painted) (6) Type D (2) Type B (2) Type E (4) Spacer (2) Lock nut (2) Adjusting bolt (2) Large washer (2) 1 ...
...the right. • All supporting parts must be secured to firm wood, masonry or metal. • The electrical outlet must be installed without the accordion panels if needed to 43″ (With filler panels) 261⁄4″ min. (Without filler panels) Window ... Spring clip (4) Foam top window gasket Case top gasket Bottom window gasket Window locking bracket (holes are on the left) (holes are on the right) Air conditioner Support bracket hardware Type A (9) Type C (painted) (6) Type D (2) Type B (2) Type E (4) Spacer (2) Lock nut (2) Adjusting bolt (2) Large washer (2) 1 ...
Owners Manual
Page 17
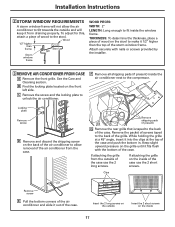
... at a 45° angle, insert it fits flush with nails or screws provided by the installer. 3 REMOVE AIR CONDITIONER FROM CASE A Remove the front grille. If attaching the grille on the back of the air conditioner to the back of the case. Insert the 2 long screws on the outside of the... next to fit inside of the storm window frame. If attaching the grille from the case. Clips Remove screw E Pull the bottom corners of the air conditioner and slide it 1/2″ higher than frame Stool Sill Storm window frame WOOD PIECES: WIDTH: 2″ LENGTH: Long enough to the compressor....
... at a 45° angle, insert it fits flush with nails or screws provided by the installer. 3 REMOVE AIR CONDITIONER FROM CASE A Remove the front grille. If attaching the grille on the back of the air conditioner to the back of the case. Insert the 2 long screws on the outside of the... next to fit inside of the storm window frame. If attaching the grille from the case. Clips Remove screw E Pull the bottom corners of the air conditioner and slide it 1/2″ higher than frame Stool Sill Storm window frame WOOD PIECES: WIDTH: 2″ LENGTH: Long enough to the compressor....
Owners Manual
Page 18
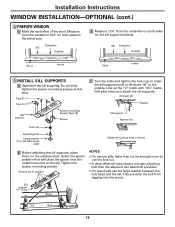
... are in position NOTES: • On narrow sills, there may not be enough room to the outside. Sill Centerline Outside Stool 123⁄8″ 123⁄8″ Inside 5 INSTALL SILL SUPPORTS A Assemble the sill supports. Measure from the centerline 133⁄8″ ...a longer adjusting bolt than the standard hex head bolt provided. • On wood sills use with 123⁄8″ marks. Installation Instructions WINDOW INSTALLATION-OPTIONAL (cont.) 4 PREPARE WINDOW A Mark the centerline of the stool. Centerline Sill Outside Stool 133⁄8″ 133⁄8&#...
... are in position NOTES: • On narrow sills, there may not be enough room to the outside. Sill Centerline Outside Stool 123⁄8″ 123⁄8″ Inside 5 INSTALL SILL SUPPORTS A Assemble the sill supports. Measure from the centerline 133⁄8″ ...a longer adjusting bolt than the standard hex head bolt provided. • On wood sills use with 123⁄8″ marks. Installation Instructions WINDOW INSTALLATION-OPTIONAL (cont.) 4 PREPARE WINDOW A Mark the centerline of the stool. Centerline Sill Outside Stool 133⁄8″ 133⁄8&#...
Owners Manual
Page 19
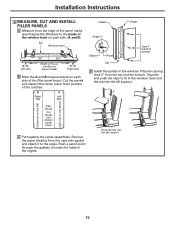
... on the left) (holes are on each side. (A and B) Sill Window track A Left side 133⁄8″ 133⁄8″ Width of the air conditioner (panel marks) B Right side B Mark the A and B measurements on the right) Filler Panels Cut panels and discard center piece C Put together ...the panel assemblies. B A Right Left side side Gasket Angle Angle Gasket Panel Tab Type C (painted screws) D Install the panels in the angles. Squeeze and push the clips to locate the holes in the window. Push a pencil point through the gaskets to fit...
... on the left) (holes are on each side. (A and B) Sill Window track A Left side 133⁄8″ 133⁄8″ Width of the air conditioner (panel marks) B Right side B Mark the A and B measurements on the right) Filler Panels Cut panels and discard center piece C Put together ...the panel assemblies. B A Right Left side side Gasket Angle Angle Gasket Panel Tab Type C (painted screws) D Install the panels in the angles. Squeeze and push the clips to locate the holes in the window. Push a pencil point through the gaskets to fit...

Owners Manual
Page 20
Installation Instructions WINDOW INSTALLATION-OPTIONAL (cont.) 7 INSTALL CASE IN WINDOW A Peel off the backing from the bottom window gasket. Drill pilot holes into the window until the holes in the case line ...
Installation Instructions WINDOW INSTALLATION-OPTIONAL (cont.) 7 INSTALL CASE IN WINDOW A Peel off the backing from the bottom window gasket. Drill pilot holes into the window until the holes in the case line ...


