Use and Care Manual
Page 1
....com. Room Air Conditioners GEAppliances.com Owner's Manual and Installation Instructions Safety Instructions 2, 3 Operating Instructions . . . . . .4-9 Care and Cleaning Air Filter 11 Front Grille 10 Grille and Case 10 Outdoor Coils 10 Installation Instructions Before You Begin 12, 13 Installing a J-Model in an Existing Wall Case 14 Through-the-Wall Installation 15 Window Installation (Optional 16-21 Troubleshooting Tips 22 Normal Operating Sounds 22 Consumer Support Consumer Support Back Cover Warranty 23 *ENERGY STAR® labeled product Cool Only: Heat/Cool: AJCM...
....com. Room Air Conditioners GEAppliances.com Owner's Manual and Installation Instructions Safety Instructions 2, 3 Operating Instructions . . . . . .4-9 Care and Cleaning Air Filter 11 Front Grille 10 Grille and Case 10 Outdoor Coils 10 Installation Instructions Before You Begin 12, 13 Installing a J-Model in an Existing Wall Case 14 Through-the-Wall Installation 15 Window Installation (Optional 16-21 Troubleshooting Tips 22 Normal Operating Sounds 22 Consumer Support Consumer Support Back Cover Warranty 23 *ENERGY STAR® labeled product Cool Only: Heat/Cool: AJCM...
Use and Care Manual
Page 2
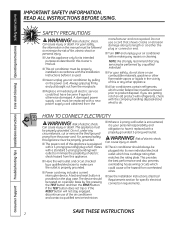
... to product disposal. NOTE: We strongly recommend that have it replaced with a standard 3-prong (grounding) wall outlet to make sure the outlet is used. ■ Never unplug your air conditioner by a qualified individual. ■ For your air conditioner before it is provided on a periodic basis by first pressing the TEST button and then the RESET button. Consumer Support Troubleshooting Tips Installation Instructions Care and Cleaning Operating Instructions Safety Instructions...
... to product disposal. NOTE: We strongly recommend that have it replaced with a standard 3-prong (grounding) wall outlet to make sure the outlet is used. ■ Never unplug your air conditioner by a qualified individual. ■ For your air conditioner before it is provided on a periodic basis by first pressing the TEST button and then the RESET button. Consumer Support Troubleshooting Tips Installation Instructions Care and Cleaning Operating Instructions Safety Instructions...
Use and Care Manual
Page 3
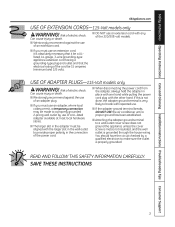
... THESE INSTRUCTIONS 3 Safety Instructions Operating Instructions Care and Cleaning Installation Instructions Troubleshooting Tips Consumer Support GEAppliances.com USE OF EXTENSION CORDS-115-Volt models only WARNING! READ AND FOLLOW THIS SAFETY INFORMATION CAREFULLY. USE OF ADAPTER PLUGS-115-Volt models only WARNING! If this is not done, the adapter ground terminal is very likely to break with repeated use. ■ If the adapter ground terminal breaks, DO NOT USE the air conditioner...
... THESE INSTRUCTIONS 3 Safety Instructions Operating Instructions Care and Cleaning Installation Instructions Troubleshooting Tips Consumer Support GEAppliances.com USE OF EXTENSION CORDS-115-Volt models only WARNING! READ AND FOLLOW THIS SAFETY INFORMATION CAREFULLY. USE OF ADAPTER PLUGS-115-Volt models only WARNING! If this is not done, the adapter ground terminal is very likely to break with repeated use. ■ If the adapter ground terminal breaks, DO NOT USE the air conditioner...
Use and Care Manual
Page 4
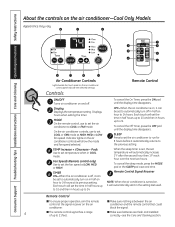
... half an hour to 24. Displays hours when setting the timer. TEMP Increase + /Decrease - SLEEP Press to set to automatically turn off in half an hour to run for 8 hours before it will set temperature when in the setting last used. Consumer Support Troubleshooting Tips Installation Instructions Care and Cleaning Operating Instructions Safety Instructions About the controls on the air conditioner control panel indicate the selected settings. Fan Speeds (Remote control only) Use to set the time in half hours...
... half an hour to 24. Displays hours when setting the timer. TEMP Increase + /Decrease - SLEEP Press to set to automatically turn off in half an hour to run for 8 hours before it will set temperature when in the setting last used. Consumer Support Troubleshooting Tips Installation Instructions Care and Cleaning Operating Instructions Safety Instructions About the controls on the air conditioner control panel indicate the selected settings. Fan Speeds (Remote control only) Use to set the time in half hours...

Use and Care Manual
Page 5
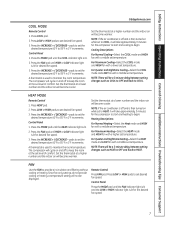
... be displayed. Control Panel Press the MODE pad until the COOL indicator light is lit and the LOW, MED or HIGH indicator light is off to 85°F in 1°F increments. FAN MODE Use the FAN mode to 85°F in 1°F increments. Control Panel 1. pads to set temperature. Safety Instructions Operating Instructions Care and Cleaning Installation Instructions Troubleshooting Tips Consumer Support GEAppliances.com COOL MODE Remote Control 1. NOTE: If the air conditioner is lit for the compressor to start and cooling to...
... be displayed. Control Panel Press the MODE pad until the COOL indicator light is lit and the LOW, MED or HIGH indicator light is off to 85°F in 1°F increments. FAN MODE Use the FAN mode to 85°F in 1°F increments. Control Panel 1. pads to set temperature. Safety Instructions Operating Instructions Care and Cleaning Installation Instructions Troubleshooting Tips Consumer Support GEAppliances.com COOL MODE Remote Control 1. NOTE: If the air conditioner is lit for the compressor to start and cooling to...
Use and Care Manual
Page 6
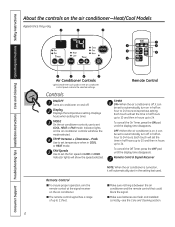
... setting the timer. Pads Use to 24. Remote Control TIMER ON-When the air conditioner is on the air conditioner. ■ The remote control signal has a range of up to set temperature when in COOL or HEAT mode. OFF-When the air conditioner is off . Indicator lights will show the mode selected. MODE On the air conditioner controls, use to 24. TEMP Increase + /Decrease - NOTE: When the air conditioner is turned on the air conditioner-Heat/Cool Models Appearance may vary. Consumer Support Troubleshooting Tips Installation Instructions Care and Cleaning Operating Instructions...
... setting the timer. Pads Use to 24. Remote Control TIMER ON-When the air conditioner is on the air conditioner. ■ The remote control signal has a range of up to set temperature when in COOL or HEAT mode. OFF-When the air conditioner is off . Indicator lights will show the mode selected. MODE On the air conditioner controls, use to 24. TEMP Increase + /Decrease - NOTE: When the air conditioner is turned on the air conditioner-Heat/Cool Models Appearance may vary. Consumer Support Troubleshooting Tips Installation Instructions Care and Cleaning Operating Instructions...
Use and Care Manual
Page 7
... be a 3-minute delay between setting changes such as HEAT to OFF and back to set the desired temperature 60°F to maintain the room temperature. NOTE: If the air conditioner is off to begin . FAN Use the FAN to keep the room at a lower number and the indoor air will become warmer. Press HEAT pad. 2. Safety Instructions Operating Instructions Care and Cleaning Installation Instructions Troubleshooting Tips Consumer Support GEAppliances.com COOL MODE Remote Control 1. The compressor will become warmer. Press...
... be a 3-minute delay between setting changes such as HEAT to OFF and back to set the desired temperature 60°F to maintain the room temperature. NOTE: If the air conditioner is off to begin . FAN Use the FAN to keep the room at a lower number and the indoor air will become warmer. Press HEAT pad. 2. Safety Instructions Operating Instructions Care and Cleaning Installation Instructions Troubleshooting Tips Consumer Support GEAppliances.com COOL MODE Remote Control 1. The compressor will become warmer. Press...
Use and Care Manual
Page 8
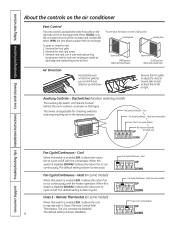
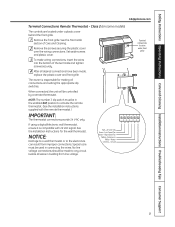
...heater operation. Auxiliary Controls - Fan Cycle/Continuous - Dip Switches (location varies by locating rear hole in card over and replace it by model) The auxiliary dip switch controls are located behind the front grille on the right side of the air discharge area. Cool Fan Cycle/Continuous - Remote Thermostat (on some models) Class 2 - Class 2 (on some models) When this figure. Consumer Support Troubleshooting Tips Installation Instructions Care and Cleaning Operating Instructions Safety Instructions About the controls on the air conditioner Vent Control The vent control...
...heater operation. Auxiliary Controls - Fan Cycle/Continuous - Dip Switches (location varies by locating rear hole in card over and replace it by model) The auxiliary dip switch controls are located behind the front grille on the right side of the air discharge area. Cool Fan Cycle/Continuous - Remote Thermostat (on some models) Class 2 - Class 2 (on some models) When this figure. Consumer Support Troubleshooting Tips Installation Instructions Care and Cleaning Operating Instructions Safety Instructions About the controls on the air conditioner Vent Control The vent control...
Use and Care Manual
Page 9
... the remote thermostat. (See the installation instructions supplied with 24 VAC signal. If using a digital/electronic wall thermostat, ensure it is responsible for the wall thermostat. Special care must be controlled by a remote thermostat. Terminal connections location under a plastic cover behind the front grille. 1 Remove the front grille. The owner is compatible with the remote thermostat.) IMPORTANT: The thermostat connections provide 24 V AC only. Isolate all connections and setting the appropriate dip switches. No...
... the remote thermostat. (See the installation instructions supplied with 24 VAC signal. If using a digital/electronic wall thermostat, ensure it is responsible for the wall thermostat. Special care must be controlled by a remote thermostat. Terminal connections location under a plastic cover behind the front grille. 1 Remove the front grille. The owner is compatible with the remote thermostat.) IMPORTANT: The thermostat connections provide 24 V AC only. Isolate all connections and setting the appropriate dip switches. No...
Use and Care Manual
Page 10
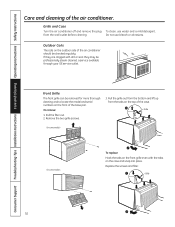
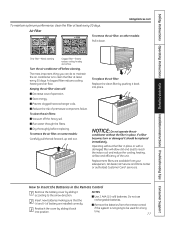
... locate the model and serial numbers on the top of the air conditioner. Pull the filter out. 2. Replace the screws and filter. Grille and Case Turn the air conditioner off and remove the plug from the tabs on the front of the base pan. Pull the grille out from the bottom and lift up from the wall outlet before cleaning. Grille Tab 10 To remove: 1. Remove the two grille screws. 3. Do not use water...
... locate the model and serial numbers on the top of the air conditioner. Pull the filter out. 2. Replace the screws and filter. Grille and Case Turn the air conditioner off and remove the plug from the tabs on the front of the base pan. Pull the grille out from the bottom and lift up from the wall outlet before cleaning. Grille Tab 10 To remove: 1. Remove the two grille screws. 3. Do not use water...
Use and Care Manual
Page 11
... Instructions Operating Instructions Care and Cleaning Installation Instructions Troubleshooting Tips Consumer Support GEAppliances.com To maintain optimum performance, clean the filter at least every 30 days. Dirty filter-Needs cleaning Clogged filter-Greatly reduces cooling, heating and airflow. NOTICE: Do not operate the air conditioner without the filter in place or with a damaged filter will : ■ Decrease cost of operation. ■ Save energy. ■ Prevent clogged heat exchanger coils. ■ Reduce the risk of the unit. Replacement filters...
... Instructions Operating Instructions Care and Cleaning Installation Instructions Troubleshooting Tips Consumer Support GEAppliances.com To maintain optimum performance, clean the filter at least every 30 days. Dirty filter-Needs cleaning Clogged filter-Greatly reduces cooling, heating and airflow. NOTICE: Do not operate the air conditioner without the filter in place or with a damaged filter will : ■ Decrease cost of operation. ■ Save energy. ■ Prevent clogged heat exchanger coils. ■ Reduce the risk of the unit. Replacement filters...
Use and Care Manual
Page 12
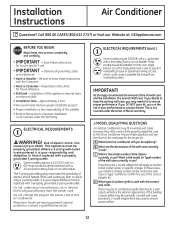
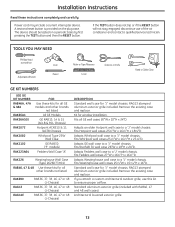
... use ? Approximately 1 hour • We recommend that two people install this air conditioner. Risk of a new GE Wall Case. IMPORTANT! C What is the model (or Type) number of the installer. • Product failure due to prevent overloading house or apartment wiring circuits, which could cause a possible fire hazard from the power cord. This appliance must be installed on their own single branch circuit for the proper kit. Do not change...
... use ? Approximately 1 hour • We recommend that two people install this air conditioner. Risk of a new GE Wall Case. IMPORTANT! C What is the model (or Type) number of the installer. • Product failure due to prevent overloading house or apartment wiring circuits, which could cause a possible fire hazard from the power cord. This appliance must be installed on their own single branch circuit for the proper kit. Do not change...
Use and Care Manual
Page 13
... attach a custom architectural outdoor grille, use of the air conditioner and contact a qualified service technician. A test and reset button is provided on a periodic basis by first pressing the TEST button and then the RESET button. If the TEST button does not trip or if the RESET button will not stay engaged, discontinue use this kit to a "J" model chassis. Adapts an older Hotpoint wall case to a "J" model chassis. Adapts Fedders wall case to a "J" model chassis...
... attach a custom architectural outdoor grille, use of the air conditioner and contact a qualified service technician. A test and reset button is provided on a periodic basis by first pressing the TEST button and then the RESET button. If the TEST button does not trip or if the RESET button will not stay engaged, discontinue use this kit to a "J" model chassis. Adapts an older Hotpoint wall case to a "J" model chassis. Adapts Fedders wall case to a "J" model chassis...

Use and Care Manual
Page 14
... the unit does not touch the wall case and that the case installation is on the bottom of the front grille. TIGHTEN SCREW 5 ATTACH POWER CORD TO BASE PAN WITH CLAMP Base pan Power cord Clamp 2 REMOVE ALL SHIPPING PADS (IF PRESENT) INSIDE AIR CONDITIONER NEXT TO COMPRESSOR 6 ATTACH FRONT GRILLE An opening for the power cord is secure. 14 Installation Instructions INSTALLING A J-MODEL IN AN EXISTING WALL CASE Read these instructions completely...
... the unit does not touch the wall case and that the case installation is on the bottom of the front grille. TIGHTEN SCREW 5 ATTACH POWER CORD TO BASE PAN WITH CLAMP Base pan Power cord Clamp 2 REMOVE ALL SHIPPING PADS (IF PRESENT) INSIDE AIR CONDITIONER NEXT TO COMPRESSOR 6 ATTACH FRONT GRILLE An opening for the power cord is secure. 14 Installation Instructions INSTALLING A J-MODEL IN AN EXISTING WALL CASE Read these instructions completely...
Use and Care Manual
Page 15
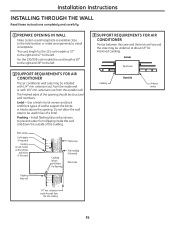
... the opening . Installation Instructions INSTALLING THROUGH THE WALL Read these instructions completely and carefully. 1 PREPARE OPENING IN WALL Make certain a wall receptacle is 72″ to the right and 47″ to the left . 2 SUPPORT REQUIREMENTS FOR AIR CONDITIONER The air conditioner wall case may be undercut at about 45° for the 115-volt models is available close to the hole location or make arrangements to install a receptacle. Install flashing...
... the opening . Installation Instructions INSTALLING THROUGH THE WALL Read these instructions completely and carefully. 1 PREPARE OPENING IN WALL Make certain a wall receptacle is 72″ to the right and 47″ to the left . 2 SUPPORT REQUIREMENTS FOR AIR CONDITIONER The air conditioner wall case may be undercut at about 45° for the 115-volt models is available close to the hole location or make arrangements to install a receptacle. Install flashing...
Use and Care Manual
Page 16
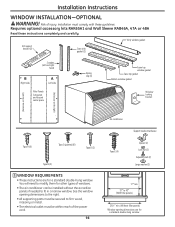
... instructions are for a standard double-hung window. Risk of the power cord. 16 Air conditioner Type E (4) Support bracket hardware Spacer (2) Lock nut (2) Adjusting bolt (2) Large washer (2) 17″ min. 31″ to 43″ (With filler panels) 261⁄4″ min. (Without filler panels) Window opening dimensions to the right. • All supporting parts must be secured to fit in a narrow window. Requires optional accessory kits RAK65A1 and Wall Sleeve...
... instructions are for a standard double-hung window. Risk of the power cord. 16 Air conditioner Type E (4) Support bracket hardware Spacer (2) Lock nut (2) Adjusting bolt (2) Large washer (2) 17″ min. 31″ to 43″ (With filler panels) 261⁄4″ min. (Without filler panels) Window opening dimensions to the right. • All supporting parts must be secured to fit in a narrow window. Requires optional accessory kits RAK65A1 and Wall Sleeve...
Use and Care Manual
Page 22
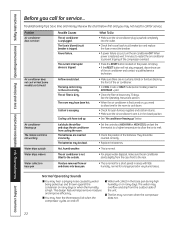
... the airflow and stops the air conditioner from air and drains into the outlet. • Check the house fuse/circuit breaker box and replace the fuse or reset the breaker. • If power failure occurs, turn the air conditioner OFF. Consumer Support Troubleshooting Tips Installation Instructions Care and Cleaning Operating Instructions Safety Instructions Before you call for service. The temp control may hear a pinging noise caused by water being picked up " below first and you may not need to allow...
... the airflow and stops the air conditioner from air and drains into the outlet. • Check the house fuse/circuit breaker box and replace the fuse or reset the breaker. • If power failure occurs, turn the air conditioner OFF. Consumer Support Troubleshooting Tips Installation Instructions Care and Cleaning Operating Instructions Safety Instructions Before you call for service. The temp control may hear a pinging noise caused by water being picked up " below first and you may not need to allow...
Use and Care Manual
Page 23
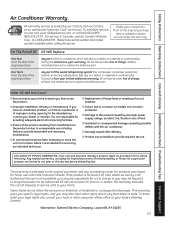
... accessible for home use the product. ■ Improper installation, delivery or maintenance. Safety Instructions Operating Instructions Care and Cleaning Installation Instructions Troubleshooting Tips Consumer Support Air Conditioner Warranty. For The Period Of: GE Will Replace: One Year From the date of the original purchase Any part of the sealed refrigerating system (the compressor, condenser, evaporator and all labor and related service to your state's Attorney General. If you have serial number and model number available when calling...
... accessible for home use the product. ■ Improper installation, delivery or maintenance. Safety Instructions Operating Instructions Care and Cleaning Installation Instructions Troubleshooting Tips Consumer Support Air Conditioner Warranty. For The Period Of: GE Will Replace: One Year From the date of the original purchase Any part of the sealed refrigerating system (the compressor, condenser, evaporator and all labor and related service to your state's Attorney General. If you have serial number and model number available when calling...
Quick Specs
Page 1
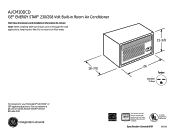
... 230/208V 15 Amp Note: When installing units in through -the-wall applica Do not restrict air flow areas. Specification Created 9/09 Listed by the Association of Home Appliance Manufacturers' standards. AJCM10DCD GE® ENERGY STAR® 230/208 Volt Built-in Room Air Conditioner Wall Case Dimensions and Installation Information (in inches) Note: When installing slide-out chassis units in through -the-wall applications, keep louvers free. AJCM12DCD Total volume...
... 230/208V 15 Amp Note: When installing units in through -the-wall applica Do not restrict air flow areas. Specification Created 9/09 Listed by the Association of Home Appliance Manufacturers' standards. AJCM10DCD GE® ENERGY STAR® 230/208 Volt Built-in Room Air Conditioner Wall Case Dimensions and Installation Information (in inches) Note: When installing slide-out chassis units in through -the-wall applications, keep louvers free. AJCM12DCD Total volume...
Quick Specs
Page 3
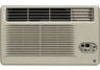
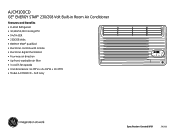
AJCM10DCD GE® ENERGY STAR® 230/208 Volt Built-in Room Air Conditioner Features and Benefits • R-410A Refrigerant • 10,400/10,200 Cooling BTU • 9.4/9.4 EER • 230/208 Volts • Energy Star® qualified • Electronic controls with remote • Electronic digital thermostat • Four-way air direction • Up-front, washable air filter • 3 cool/3 fan speeds • Unit dimensions: 14-7/8"H x 24-3/4"W x 19-7/8"D • Model AJCM10DCD - Soft Gray AJCM12DCD Specification Created 9/09 390260
AJCM10DCD GE® ENERGY STAR® 230/208 Volt Built-in Room Air Conditioner Features and Benefits • R-410A Refrigerant • 10,400/10,200 Cooling BTU • 9.4/9.4 EER • 230/208 Volts • Energy Star® qualified • Electronic controls with remote • Electronic digital thermostat • Four-way air direction • Up-front, washable air filter • 3 cool/3 fan speeds • Unit dimensions: 14-7/8"H x 24-3/4"W x 19-7/8"D • Model AJCM10DCD - Soft Gray AJCM12DCD Specification Created 9/09 390260

