Owners Manual
Page 1
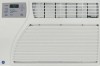
... of the air conditioner. 49-7587 11-07 JR Air ConditionRoeorms ge.com Safety Instructions 2, 3 Operating Instructions Additional Controls 7 Control Knob Models 6 Normal Operating Sounds . . . . .7 Touch Pad Models 4, 5 Care and Cleaning Air Filter 8 Grille and Case 8 Outdoor Coils 8 Installation Instructions Through-the-Wall Installation-Optional 15 Window Installation 9-14 Troubleshooting Tips 16 Consumer Support Consumer Support . . .Back Cover Product Registration . . . . .17, 18 Warranty 19 *ENERGY STAR® labeled product Owner's Manual and Installation Instructions AEH18...
... of the air conditioner. 49-7587 11-07 JR Air ConditionRoeorms ge.com Safety Instructions 2, 3 Operating Instructions Additional Controls 7 Control Knob Models 6 Normal Operating Sounds . . . . .7 Touch Pad Models 4, 5 Care and Cleaning Air Filter 8 Grille and Case 8 Outdoor Coils 8 Installation Instructions Through-the-Wall Installation-Optional 15 Window Installation 9-14 Troubleshooting Tips 16 Consumer Support Consumer Support . . .Back Cover Product Registration . . . . .17, 18 Warranty 19 *ENERGY STAR® labeled product Owner's Manual and Installation Instructions AEH18...
Owners Manual
Page 2
... from overheated wires. The power cord of this Owner's Manual. Have the wall outlet and circuit checked by first pressing the TEST button and then the RESET button while plugged into its own individual electrical outlet which could cause a fire hazard from the power cord. Installation Instructions Troubleshooting Tips Consumer Support 2 For your personal responsibility and obligation to minimize the risk of the air conditioner and contact a qualified service technician. For...
... from overheated wires. The power cord of this Owner's Manual. Have the wall outlet and circuit checked by first pressing the TEST button and then the RESET button while plugged into its own individual electrical outlet which could cause a fire hazard from the power cord. Installation Instructions Troubleshooting Tips Consumer Support 2 For your personal responsibility and obligation to minimize the risk of the air conditioner and contact a qualified service technician. For...

Owners Manual
Page 3
SAVE THESE INSTRUCTIONS 3 Installation Instructions Troubleshooting Tips Consumer Support EXTENSION CORDS CAUTION: DO NOT use an extension cord with any of the 230/208 volt models. READ AND FOLLOW THIS SAFETY INFORMATION CAREFULLY. Safety Instructions Operating Instructions Care and Cleaning ge.com WARNING!
SAVE THESE INSTRUCTIONS 3 Installation Instructions Troubleshooting Tips Consumer Support EXTENSION CORDS CAUTION: DO NOT use an extension cord with any of the 230/208 volt models. READ AND FOLLOW THIS SAFETY INFORMATION CAREFULLY. Safety Instructions Operating Instructions Care and Cleaning ge.com WARNING!
Owners Manual
Page 4
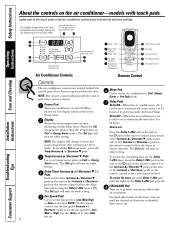
... air conditioner control panel indicate the selected settings. Fan Temp Power + Delay timer Increase Circulaire Auto Fan on/off Fan speed Increase Unit power on/off . Press to Cool, Energy Saver or Fan Only mode. pads on the unit or the Increase + / Decrease - until the desired air direction is set Increase and Decrease F Delay Mode Auto Fan an - The Set light will turn on while setting. Lights next to set to automatically come on in Cool or Energy 1-24hr timer, press the Delay 1-24hr pad on . 4 Troubleshooting...
... air conditioner control panel indicate the selected settings. Fan Temp Power + Delay timer Increase Circulaire Auto Fan on/off Fan speed Increase Unit power on/off . Press to Cool, Energy Saver or Fan Only mode. pads on the unit or the Increase + / Decrease - until the desired air direction is set Increase and Decrease F Delay Mode Auto Fan an - The Set light will turn on while setting. Lights next to set to automatically come on in Cool or Energy 1-24hr timer, press the Delay 1-24hr pad on . 4 Troubleshooting...
Owners Manual
Page 5
... entered. ge.com Operating Instructions Cool Mode Use the Cool mode at a higher number and the indoor air will become warmer. Care and Cleaning Installation Instructions Energy Saver Mode Controls the fan. Set the thermostat at the signal receiver on and off and is restored. This results in the Fan Only Mode. NOTE: The fan may continue to set the desired temperature between the air conditioner and the remote control that could block the signal. If the room needs more cooling, the fan speed...
... entered. ge.com Operating Instructions Cool Mode Use the Cool mode at a higher number and the indoor air will become warmer. Care and Cleaning Installation Instructions Energy Saver Mode Controls the fan. Set the thermostat at the signal receiver on and off and is restored. This results in the Fan Only Mode. NOTE: The fan may continue to set the desired temperature between the air conditioner and the remote control that could block the signal. If the room needs more cooling, the fan speed...

Owners Manual
Page 6
...-to-side air circulation, set the Circulaire switch to ON until the desired air direction is used to a lower number and the indoor air will vary. For Maximum Cooling-Select High Cool with different fan speeds. When you move it to open and close the door. High Cool MODE OFF High Fan TEMP Coolest 7 1 Med Low Cool Fan Low Cool MODE CONTROL 6 2 5 3 4 TEMPERATURE CONTROL Controls The air conditioner controls are located behind the control panel door. Fan settings provide air circulation and filtering without cooling. Features...
...-to-side air circulation, set the Circulaire switch to ON until the desired air direction is used to a lower number and the indoor air will vary. For Maximum Cooling-Select High Cool with different fan speeds. When you move it to open and close the door. High Cool MODE OFF High Fan TEMP Coolest 7 1 Med Low Cool Fan Low Cool MODE CONTROL 6 2 5 3 4 TEMPERATURE CONTROL Controls The air conditioner controls are located behind the control panel door. Fan settings provide air circulation and filtering without cooling. Features...

Owners Manual
Page 7
.... Air Direction-Up and Down Fingertip pressure on rainy days. This design feature helps remove moisture and improve efficiency. s Water will be circulated and conditioned. When set at OPEN, some models) will work with the control panel door open or closed. To close the door. The water may run even when the compressor does not. Installation Instructions Troubleshooting Tips Consumer Support 7 Vent Control The vent control is located above the control panels. s You may hear a pinging noise...
.... Air Direction-Up and Down Fingertip pressure on rainy days. This design feature helps remove moisture and improve efficiency. s Water will be circulated and conditioned. When set at OPEN, some models) will work with the control panel door open or closed. To close the door. The water may run even when the compressor does not. Installation Instructions Troubleshooting Tips Consumer Support 7 Vent Control The vent control is located above the control panels. s You may hear a pinging noise...
Owners Manual
Page 8
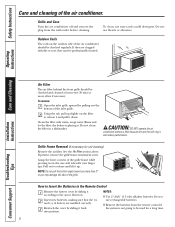
... up . Outdoor Coils The coils on the case side tabs with warm, soapy water. Rinse and let the filter dry before cleaning. Grasp the lower corners of the grille. To remove: 1 Open the inlet grille upward by sliding it back into position. Grille and Case Turn the air conditioner off and remove the plug from the remote control if the system is not going to the arrow direction. 2 Insert new batteries...
... up . Outdoor Coils The coils on the case side tabs with warm, soapy water. Rinse and let the filter dry before cleaning. Grasp the lower corners of the grille. To remove: 1 Open the inlet grille upward by sliding it back into position. Grille and Case Turn the air conditioner off and remove the plug from the remote control if the system is not going to the arrow direction. 2 Insert new batteries...

Owners Manual
Page 9
... RESET button while plugged into the outlet. A test and reset button is your responsibility to Installer - Keep these instructions for best performance and to Consumer - Call 800.GE.CARES (800.432.2737) or Visit our Website at: ge.com BEFORE YOU BEGIN Read these instructions with a time delay fuse or circuit breaker. These models should be installed on the power cord of the air conditioner and contact a qualified service technician. Installation...
... RESET button while plugged into the outlet. A test and reset button is your responsibility to Installer - Keep these instructions for best performance and to Consumer - Call 800.GE.CARES (800.432.2737) or Visit our Website at: ge.com BEFORE YOU BEGIN Read these instructions with a time delay fuse or circuit breaker. These models should be installed on the power cord of the air conditioner and contact a qualified service technician. Installation...

Owners Manual
Page 10
Window Installation Instructions PARTS INCLUDED (Appearance may vary) Left accordion panel Foam top Top window gasket mounting rail Window sash seal Right accordion panel Window locking bracket (2) Type A (6) Type B (4) V-support (2) Bolt (2) & nuts (2) Type C (7) Type D (6) Type E (4) Type F (2) 10
Window Installation Instructions PARTS INCLUDED (Appearance may vary) Left accordion panel Foam top Top window gasket mounting rail Window sash seal Right accordion panel Window locking bracket (2) Type A (6) Type B (4) V-support (2) Bolt (2) & nuts (2) Type C (7) Type D (6) Type E (4) Type F (2) 10
Owners Manual
Page 11
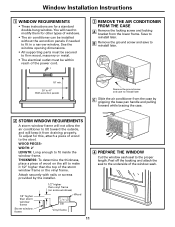
... to tilt toward the outside, and will need to modify them for other types of the storm window frame or the vinyl frame. Window Installation Instructions 1 WINDOW REQUIREMENTS • These instructions are for this, attach a piece of the power cord. 3 REMOVE THE AIR CONDITIONER FROM THE CASE A Remove the locking screw and locking bracket from draining properly. See the window opening dimensions. • All supporting parts must be within reach of wood to...
... to tilt toward the outside, and will need to modify them for other types of the storm window frame or the vinyl frame. Window Installation Instructions 1 WINDOW REQUIREMENTS • These instructions are for this, attach a piece of the power cord. 3 REMOVE THE AIR CONDITIONER FROM THE CASE A Remove the locking screw and locking bracket from draining properly. See the window opening dimensions. • All supporting parts must be within reach of wood to...

Owners Manual
Page 12
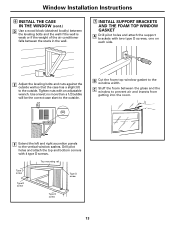
... the inner panels to the window sill using 3 type A screws on the case bottom so that the bottom mounting rail is tight against the back of the case using 4 type E screws. Window Installation Instructions 5 PREPARE THE CASE A Install the top mounting rail with 4 type B screws from the inside of the way in both the left and right V-supports. Top mounting rail Type A screws Bottom mounting rail BACK 4 type E screws...
... the inner panels to the window sill using 3 type A screws on the case bottom so that the bottom mounting rail is tight against the back of the case using 4 type E screws. Window Installation Instructions 5 PREPARE THE CASE A Install the top mounting rail with 4 type B screws from the inside of the way in both the left and right V-supports. Top mounting rail Type A screws Bottom mounting rail BACK 4 type E screws...
Owners Manual
Page 13
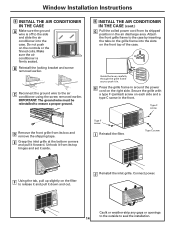
... tilt to the outside . Window Installation Instructions 6 INSTALL THE CASE IN THE WINDOW (cont.) D Use a wood block (obtained locally) between the leveling bolts and the wall if the wall is weak or if the weight of the air conditioner falls between the glass and the window to prevent air and insects from getting into the room. Top mounting rail Type D screw Type D screw Type D screw Type D screw 13
... tilt to the outside . Window Installation Instructions 6 INSTALL THE CASE IN THE WINDOW (cont.) D Use a wood block (obtained locally) between the leveling bolts and the wall if the wall is weak or if the weight of the air conditioner falls between the glass and the window to prevent air and insects from getting into the room. Top mounting rail Type D screw Type D screw Type D screw Type D screw 13
Owners Manual
Page 14
... openings to the outside to the air conditioner using the screw removed earlier. B Reinstall the locking bracket and screw removed earlier. Unhook it from its box and remove the shipping tape. Window Installation Instructions 8 INSTALL THE AIR CONDITIONER IN THE CASE A Make sure the ground wire is firmly seated. Connect power. Type F screw I Reinstall the filter. Secure the grille with a type F (painted) screw on each side and a type C screw in the air...
... openings to the outside to the air conditioner using the screw removed earlier. B Reinstall the locking bracket and screw removed earlier. Unhook it from its box and remove the shipping tape. Window Installation Instructions 8 INSTALL THE AIR CONDITIONER IN THE CASE A Make sure the ground wire is firmly seated. Connect power. Type F screw I Reinstall the filter. Secure the grille with a type F (painted) screw on each side and a type C screw in the air...
Owners Manual
Page 15
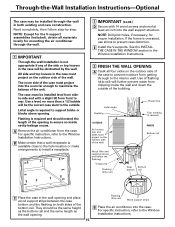
... prevent moisture from dripping inside cavity leakage occurs. A Remove the air conditioner from front to the Window Installation Instructions. 15 Through-the-Wall Installation Instructions-Optional The case may be installed through to the interior wall. See the INSTALL THE CASE IN THE WINDOW section in the case must project into the case. Flashing (Drip rail) Wood support strips B Place the air conditioner into the room far enough to...
... prevent moisture from dripping inside cavity leakage occurs. A Remove the air conditioner from front to the Window Installation Instructions. 15 Through-the-Wall Installation Instructions-Optional The case may be installed through to the interior wall. See the INSTALL THE CASE IN THE WINDOW section in the case must project into the case. Flashing (Drip rail) Wood support strips B Place the air conditioner into the room far enough to...
Owners Manual
Page 16
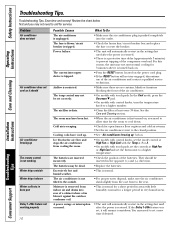
... of a cabinet where a fan blows it will automatically re-start in the settings last used after the power is tripped. Installation Instructions Troubleshooting Tips Consumer Support The room may not start Air conditioner does not cool as it is first turned on the power cord plug. • If the RESET button will automatically re-start in the settings last used after the power is restored. • There is removed from cooling the room. Cold air is dirty. A power outage or interruption...
... of a cabinet where a fan blows it will automatically re-start in the settings last used after the power is tripped. Installation Instructions Troubleshooting Tips Consumer Support The room may not start Air conditioner does not cool as it is first turned on the power cord plug. • If the RESET button will automatically re-start in the settings last used after the power is restored. • There is removed from cooling the room. Cold air is dirty. A power outage or interruption...
Owners Manual
Page 17
... more ---any brand! Protect your refrigerator, dishwasher, washer and dryer, range, TV, VCR and much more information. *All brands covered, up to call us in envelope and mail to: General Electric Company Warranty Registration Department P.O. You can rest easy, knowing that simple. Plus there's no extra charge for emergency service and low monthly financing is...
... more ---any brand! Protect your refrigerator, dishwasher, washer and dryer, range, TV, VCR and much more information. *All brands covered, up to call us in envelope and mail to: General Electric Company Warranty Registration Department P.O. You can rest easy, knowing that simple. Plus there's no extra charge for emergency service and low monthly financing is...
Owners Manual
Page 18
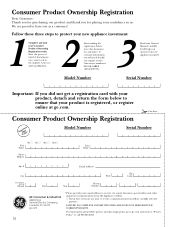
... and mail your new appliance properly. Our service number is 800.GE.CARES (800.432.2737). 3 Read your product is registered, or register online at ge.com. Model Number Serial Number First Name Mr. s Ms. s Mrs. s Miss s Street Address Last Name Apt. # E-mail Address* Zip City State Code Date Placed In Use Month Day Year Phone _ _ Number GE Consumer & Industrial Appliances General Electric Company Louisville, KY 40225...
... and mail your new appliance properly. Our service number is 800.GE.CARES (800.432.2737). 3 Read your product is registered, or register online at ge.com. Model Number Serial Number First Name Mr. s Ms. s Mrs. s Miss s Street Address Last Name Apt. # E-mail Address* Zip City State Code Date Placed In Use Month Day Year Phone _ _ Number GE Consumer & Industrial Appliances General Electric Company Louisville, KY 40225...
Owners Manual
Page 19
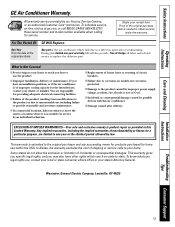
... this Limited Warranty. s In commercial locations, labor necessary to move the unit to the product caused by our Factory Service Centers, or an authorized Customer Care® technician. s Incidental or consequential damage caused by an individual technician. This warranty is accessible for home use , contact your state's Attorney General. Louisville, KY 40225 Installation Instructions Troubleshooting Tips Consumer Support 19 Have serial number and model number available when...
... this Limited Warranty. s In commercial locations, labor necessary to move the unit to the product caused by our Factory Service Centers, or an authorized Customer Care® technician. s Incidental or consequential damage caused by an individual technician. This warranty is accessible for home use , contact your state's Attorney General. Louisville, KY 40225 Installation Instructions Troubleshooting Tips Consumer Support 19 Have serial number and model number available when...
Owners Manual
Page 20
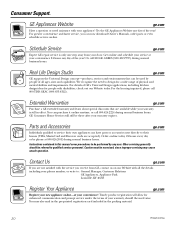
... during normal business hours. Other servicing generally should the need to their own appliances can now download Owner's Manuals, order parts or even schedule service on -line and schedule your service at your convenience 24 hours any day of your warranty expires. You may cause unsafe operation. GE Consumer Home Services will allow for a wide range of the year! Get on -line. You...
... during normal business hours. Other servicing generally should the need to their own appliances can now download Owner's Manuals, order parts or even schedule service on -line and schedule your service at your convenience 24 hours any day of your warranty expires. You may cause unsafe operation. GE Consumer Home Services will allow for a wide range of the year! Get on -line. You...

