
User Guide
Page 1
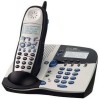
21095 2.4 GHz Digital Cordless Handset Speakerphone/Answering System with Call Waiting Caller ID User's Guide We bring good things to life.
21095 2.4 GHz Digital Cordless Handset Speakerphone/Answering System with Call Waiting Caller ID User's Guide We bring good things to life.

User Guide
Page 2
It is designed to be connected to a compatible modular jack that to which the receiving antenna is not practicable and the circumstances warrant such action, the telephone company may not be required. and (3) inform you the opportunity to correct the situation; This equipment has been tested and found to comply with FCC RF radiation exposure limits set forth in Subpart E of your dealer or an experienced radio/television technician for Hearing Aid Compatibility. These limits are expected to affect the use your line as determined by the telephone company. • Party ...
It is designed to be connected to a compatible modular jack that to which the receiving antenna is not practicable and the circumstances warrant such action, the telephone company may not be required. and (3) inform you the opportunity to correct the situation; This equipment has been tested and found to comply with FCC RF radiation exposure limits set forth in Subpart E of your dealer or an experienced radio/television technician for Hearing Aid Compatibility. These limits are expected to affect the use your line as determined by the telephone company. • Party ...
User Guide
Page 3
...7 BEFORE YOU BEGIN 8 PARTS CHECKLIST 8 TELEPHONE JACK REQUIREMENTS ........ 8 DIGITAL SECURITY SYSTEM 8 INSTALLATION 9 IMPORTANT INSTALLATION GUIDELINES 9 INSTALLING THE PHONE 10 WALL MOUNTING THE BASE 11 TELEPHONE SETUP 12 PROGRAMMING THE BASE 12 LANGUAGE 12 DISPLAY CONTRAST 12 ANSWERER ON/OFF 13 RING TO ANSWER... PROGRAMMING THE HANDSET 18 LANGUAGE 18 HANDSET NAME 19 AREA CODE 20 RINGER TONE 20 REGISTRATION 20 DEREGISTRATION 22 DEFAULT 23 CORDLESS PHONE BASICS 24 SPEAKERPHONE 24 CHARGE INDICATOR 24 MAKING A CALL WITH THE HANDSET ... 24 MAKING A CALL WITH THE SPEAKERPHONE...
...7 BEFORE YOU BEGIN 8 PARTS CHECKLIST 8 TELEPHONE JACK REQUIREMENTS ........ 8 DIGITAL SECURITY SYSTEM 8 INSTALLATION 9 IMPORTANT INSTALLATION GUIDELINES 9 INSTALLING THE PHONE 10 WALL MOUNTING THE BASE 11 TELEPHONE SETUP 12 PROGRAMMING THE BASE 12 LANGUAGE 12 DISPLAY CONTRAST 12 ANSWERER ON/OFF 13 RING TO ANSWER... PROGRAMMING THE HANDSET 18 LANGUAGE 18 HANDSET NAME 19 AREA CODE 20 RINGER TONE 20 REGISTRATION 20 DEREGISTRATION 22 DEFAULT 23 CORDLESS PHONE BASICS 24 SPEAKERPHONE 24 CHARGE INDICATOR 24 MAKING A CALL WITH THE HANDSET ... 24 MAKING A CALL WITH THE SPEAKERPHONE...
User Guide
Page 4
FLASH 27 LAST NUMBER REDIAL 27 EXIT 28 PAGING 28 TRANSFERRING CALLS 29 MUTE 30 TEMPORARY TONE DIALING 31 CORDLESS HANDSET VOLUME CONTROL 31 SPEAKERPHONE/ANSWERING SYSTEM VOLUME CONTROL ... 32 INTERCOM 32 MAKING AN INTERCOM CALL 32 RECEIVING AN INTERCOM CALL ...THE BASE ......... 46 MESSAGE PLAYBACK 46 ERASING MESSAGES 47 MEMO 48 REMOTE ACCESS 48 ACCESSING THE ANSWERING SYSTEM WITH THE CORDLESS HANDSET 48 SCREENING CALLS WITH THE CORDLESS HANDSET 49 ACCESSING THE ANSWERING SYSTEM FROM ANOTHER LOCATION 49 MEMORY FULL 49 REPLACING THE BATTERY 50 BATTERY SAFETY PRECAUTIONS ...
FLASH 27 LAST NUMBER REDIAL 27 EXIT 28 PAGING 28 TRANSFERRING CALLS 29 MUTE 30 TEMPORARY TONE DIALING 31 CORDLESS HANDSET VOLUME CONTROL 31 SPEAKERPHONE/ANSWERING SYSTEM VOLUME CONTROL ... 32 INTERCOM 32 MAKING AN INTERCOM CALL 32 RECEIVING AN INTERCOM CALL ...THE BASE ......... 46 MESSAGE PLAYBACK 46 ERASING MESSAGES 47 MEMO 48 REMOTE ACCESS 48 ACCESSING THE ANSWERING SYSTEM WITH THE CORDLESS HANDSET 48 SCREENING CALLS WITH THE CORDLESS HANDSET 49 ACCESSING THE ANSWERING SYSTEM FROM ANOTHER LOCATION 49 MEMORY FULL 49 REPLACING THE BATTERY 50 BATTERY SAFETY PRECAUTIONS ...
User Guide
Page 5
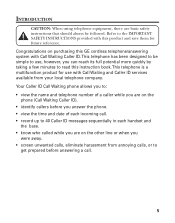
... be followed. INTRODUCTION CAUTION: When using telephone equipment, there are basic safety instructions that should always be simple to use with this GE cordless telephone/answering system with Call Waiting Caller ID. Refer to read this instruction book. This telephone is a multifunction product for use ... callers before you were away. • screen unwanted calls, eliminate harassment from your local telephone company. Your Caller ID Call Waiting phone allows you to: • view the name and telephone number of a caller while you are on purchasing this product and save them...
... be followed. INTRODUCTION CAUTION: When using telephone equipment, there are basic safety instructions that should always be simple to use with this GE cordless telephone/answering system with Call Waiting Caller ID. Refer to read this instruction book. This telephone is a multifunction product for use ... callers before you were away. • screen unwanted calls, eliminate harassment from your local telephone company. Your Caller ID Call Waiting phone allows you to: • view the name and telephone number of a caller while you are on purchasing this product and save them...
User Guide
Page 6
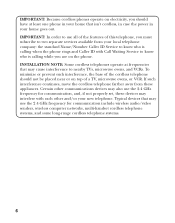
..., microwave ovens, or VCR. IMPORTANT: Because cordless phones operate on electricity, you should not be placed near or on the phone. To minimize or prevent such interference, the base of the cordless telephone should have at frequencies that isn't cordless, in case the power in your new telephone..., and, if not properly set, these appliances. INSTALLATION NOTE: Some cordless telephones operate at least one phone in your home that may cause interference to know who is calling when the phone rings and Caller ID with each other communications devices may interfere with Call...
..., microwave ovens, or VCR. IMPORTANT: Because cordless phones operate on electricity, you should not be placed near or on the phone. To minimize or prevent such interference, the base of the cordless telephone should have at frequencies that isn't cordless, in case the power in your new telephone..., and, if not properly set, these appliances. INSTALLATION NOTE: Some cordless telephones operate at least one phone in your home that may cause interference to know who is calling when the phone rings and Caller ID with each other communications devices may interfere with Call...
User Guide
Page 7
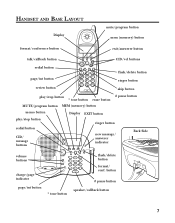
redial page ringer flash int delete 1 2 3 abc def review play/stop skip 4 ghi 5 6 jkl mno 7 8 9 pqrs tuv wxyz * tone 0 oper erase # pause CID/vol buttons flash/delete button ringer button skip button play/stop button # pause button * tone button erase button MUTE/program button MEM (memory) button memo button play/stop button redial button CID/ message buttons volume buttons charge/page indicator Display EXIT button ringer button memo play/stop new message/ answerer es ca f r v v CID/messag v volume v d er at co ial pro MUTE gram red MEM orm EXIT ing nf. 1...
redial page ringer flash int delete 1 2 3 abc def review play/stop skip 4 ghi 5 6 jkl mno 7 8 9 pqrs tuv wxyz * tone 0 oper erase # pause CID/vol buttons flash/delete button ringer button skip button play/stop button # pause button * tone button erase button MUTE/program button MEM (memory) button memo button play/stop button redial button CID/ message buttons volume buttons charge/page indicator Display EXIT button ringer button memo play/stop new message/ answerer es ca f r v v CID/messag v volume v d er at co ial pro MUTE gram red MEM orm EXIT ing nf. 1...
User Guide
Page 8
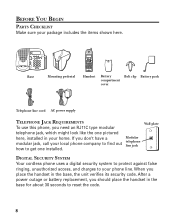
Modular telephone line jack Wall plate DIGITAL SECURITY SYSTEM Your cordless phone uses a digital security system to protect against false ringing, unauthorized access, ...compartment cover Telephone line cord AC power supply TELEPHONE JACK REQUIREMENTS To use this phone, you don't have a modular jack, call your local phone company to find out how to your package includes the items shown here. ...BEFORE YOU BEGIN PARTS CHECKLIST Make sure your phone line. After a power outage or battery replacement, you place the handset in the base for...
Modular telephone line jack Wall plate DIGITAL SECURITY SYSTEM Your cordless phone uses a digital security system to protect against false ringing, unauthorized access, ...compartment cover Telephone line cord AC power supply TELEPHONE JACK REQUIREMENTS To use this phone, you don't have a modular jack, call your local phone company to find out how to your package includes the items shown here. ...BEFORE YOU BEGIN PARTS CHECKLIST Make sure your phone line. After a power outage or battery replacement, you place the handset in the base for...

User Guide
Page 9
... been disconnected at the network interface. • Use caution when installing or modifying telephone lines. • Temporarily disconnect any equipment connected to the phone such as faxes, other phones, or modems. IMPORTANT INSTALLATION GUIDELINES • Install telephone near both a telephone (modular) jack and an electrical power outlet. • Avoid sources of ... ducts, heating appliances, radiators, and direct sunlight. • Avoid areas of excessive moisture or extremely low temperature. • Avoid dusty locations. • Avoid other cordless telephones or personal computers. 9
... been disconnected at the network interface. • Use caution when installing or modifying telephone lines. • Temporarily disconnect any equipment connected to the phone such as faxes, other phones, or modems. IMPORTANT INSTALLATION GUIDELINES • Install telephone near both a telephone (modular) jack and an electrical power outlet. • Avoid sources of ... ducts, heating appliances, radiators, and direct sunlight. • Avoid areas of excessive moisture or extremely low temperature. • Avoid dusty locations. • Avoid other cordless telephones or personal computers. 9

User Guide
Page 10
... on the top of the battery compartment cover (located on the back of the base and other power supplies may damage the unit. 3. INSTALLING THE PHONE 1. Plug the AC power supply into the electrical outlet and the DC connector into the power jack on the back of the handset) and slide...
... on the top of the battery compartment cover (located on the back of the base and other power supplies may damage the unit. 3. INSTALLING THE PHONE 1. Plug the AC power supply into the electrical outlet and the DC connector into the power jack on the back of the handset) and slide...

User Guide
Page 11
... is compromised. WALL MOUNTING THE BASE NOTE: For best results, leave the base on a flat surface during initial charging before you don't properly charge the phone, battery performance is charging. 6. Place the handset in the base cradle. The charge indicator turns on the back of the pedestal) over . 2. Slip the mounting...
... is compromised. WALL MOUNTING THE BASE NOTE: For best results, leave the base on a flat surface during initial charging before you don't properly charge the phone, battery performance is charging. 6. Place the handset in the base cradle. The charge indicator turns on the back of the pedestal) over . 2. Slip the mounting...
User Guide
Page 12
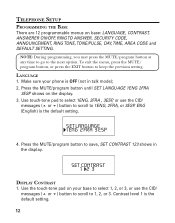
... CODE, ANNOUNCEMENT, RING TONE, TONE/PULSE, DAY, TIME, AREA CODE and DEFAULT SETTING. SET CONTRAST 1 23 DISPLAY CONTRAST 1. Use the touch-tone pad on your phone is the default setting. Make sure your base to select 1, 2, or 3, or use the CID/ messages ( or ) button to scroll to 1ENG, 2FRA, or 3ESP...
... CODE, ANNOUNCEMENT, RING TONE, TONE/PULSE, DAY, TIME, AREA CODE and DEFAULT SETTING. SET CONTRAST 1 23 DISPLAY CONTRAST 1. Use the touch-tone pad on your phone is the default setting. Make sure your base to select 1, 2, or 3, or use the CID/ messages ( or ) button to scroll to 1ENG, 2FRA, or 3ESP...

User Guide
Page 13
... a confirmation tone, and SECURITY CODE 1 2 3 shows in the display. For example, press the 5 key to save . You will hear a confirmation tone (If you want the phone to save , and SET ANSWERER 1ON 2OFF shows in the display. RINGS TO ANSWER 3 4 5 6 RING TO ANSWER You may set the number of times you...
... a confirmation tone, and SECURITY CODE 1 2 3 shows in the display. For example, press the 5 key to save . You will hear a confirmation tone (If you want the phone to save , and SET ANSWERER 1ON 2OFF shows in the display. RINGS TO ANSWER 3 4 5 6 RING TO ANSWER You may set the number of times you...

User Guide
Page 14
SECURITY CODE You can access the answering system from the microphone and try to eliminate as much background noise as possible. 14 Use the touch-tone pad to enter your answering system. SECURITY CODE 628 NOTE: If you should be about nine inches from a tone dialing telephone in the display, followed by the caller when the answering system answers the call. You will hear a confirmation tone, and the new security code shows in another (remote) location. You may only change the security code at the base. 1. For example, press the 6, 2, and 8 number keys for remote access, and ...
SECURITY CODE You can access the answering system from the microphone and try to eliminate as much background noise as possible. 14 Use the touch-tone pad to enter your answering system. SECURITY CODE 628 NOTE: If you should be about nine inches from a tone dialing telephone in the display, followed by the caller when the answering system answers the call. You will hear a confirmation tone, and the new security code shows in another (remote) location. You may only change the security code at the base. 1. For example, press the 6, 2, and 8 number keys for remote access, and ...

User Guide
Page 15
... ANNOUNCEMENT shows in the display. Press CID/message ( or ) to NEW, CURRENT or DEFAULT.The default setting is (use your name here), I can't answer the phone right now, so please leave your recorded greeting plays back. • If you select DEFAULT, ANNOUNCEMENT PLAYING shows in the display. ANNOUNCEMENT PLAYING shows in...
... ANNOUNCEMENT shows in the display. Press CID/message ( or ) to NEW, CURRENT or DEFAULT.The default setting is (use your name here), I can't answer the phone right now, so please leave your recorded greeting plays back. • If you select DEFAULT, ANNOUNCEMENT PLAYING shows in the display. ANNOUNCEMENT PLAYING shows in...

User Guide
Page 16
SET DAY SU M T W H F S shows in the display. Depending on your selection. SET TONE/PULSE 1 TONE 2 PULSE TONE/PULSE Most telephone systems use tone dialing, however, some may choose from six different ringer tones. 1. SET DATE SU M T W H F S NOTE: If you aren't sure which dialing system you have, set the telephone to save , and. The default setting is 1. 2. Press the MUTE/program button to tone dialing and make a test call connects, the setting is correct. The default setting is 1. 2. Press the MUTE/program button to your telephone system, set the telephone to ...
SET DAY SU M T W H F S shows in the display. Depending on your selection. SET TONE/PULSE 1 TONE 2 PULSE TONE/PULSE Most telephone systems use tone dialing, however, some may choose from six different ringer tones. 1. SET DATE SU M T W H F S NOTE: If you aren't sure which dialing system you have, set the telephone to save , and. The default setting is 1. 2. Press the MUTE/program button to tone dialing and make a test call connects, the setting is correct. The default setting is 1. 2. Press the MUTE/program button to your telephone system, set the telephone to ...
User Guide
Page 17
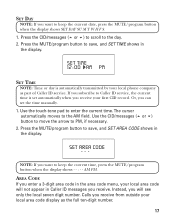
... display. NOTE: If you want to save , and SET AREA CODE shows in Caller ID messages you receive. Or, you receive from outside your local phone company as the full ten-digit number. 17 AREA CODE If you enter a 3-digit area code in the area code menu, your first CID record...
... display. NOTE: If you want to save , and SET AREA CODE shows in Caller ID messages you receive. Or, you receive from outside your local phone company as the full ten-digit number. 17 AREA CODE If you enter a 3-digit area code in the area code menu, your first CID record...

User Guide
Page 18
Follow the steps to return to the main menu. Press the MUTE/program button to save , and DEFAULT SETTING 1YES 2NO shows in the display. NOTE: You can press the mute/program button at any time to go to save , and the display returns to the factory settings. 1. LANGUAGE 1. Make sure your handset is NO. • If you select NO, your three digit area code. 2. Press the mute/program button until SET LANGUAGE 1ENG 2FRA 3ESP shows on handset: LANGUAGE, HANDSET NAME, AREA CODE, RING TONE, REGISTRATION, DEREGISTRATION and DEFAULT SETTING. Press the MUTE/program button to the next...
Follow the steps to return to the main menu. Press the MUTE/program button to save , and DEFAULT SETTING 1YES 2NO shows in the display. NOTE: You can press the mute/program button at any time to go to save , and the display returns to the factory settings. 1. LANGUAGE 1. Make sure your handset is NO. • If you select NO, your three digit area code. 2. Press the mute/program button until SET LANGUAGE 1ENG 2FRA 3ESP shows on handset: LANGUAGE, HANDSET NAME, AREA CODE, RING TONE, REGISTRATION, DEREGISTRATION and DEFAULT SETTING. Press the MUTE/program button to the next...

User Guide
Page 19
Use touch-tone pad to select 1ENG, 2FRA , 3ESP, or use the CID/vol ( or ) button to scroll to the next field. More than one letter is the default setting. 4. Briefly pause and the cursor moves to 1ENG, 2FRA, or 3ESP. NOTE: If you make a mistake press the flash/delete key to enter the handset name. ENG (English) is stored in the display. HANDSET NAME HANDSET NAME 1. Use the touch-tone pad to backspace and erase the wrong character. 2. Press the 5 key 3 times for the letter M. Press the 4 key 3 times for the letter B. For example, to the next field. Briefly pause ...
Use touch-tone pad to select 1ENG, 2FRA , 3ESP, or use the CID/vol ( or ) button to scroll to the next field. More than one letter is the default setting. 4. Briefly pause and the cursor moves to 1ENG, 2FRA, or 3ESP. NOTE: If you make a mistake press the flash/delete key to enter the handset name. ENG (English) is stored in the display. HANDSET NAME HANDSET NAME 1. Use the touch-tone pad to backspace and erase the wrong character. 2. Press the 5 key 3 times for the letter M. Press the 4 key 3 times for the letter B. For example, to the next field. Briefly pause ...

User Guide
Page 20
Calls you will not appear in the area code menu, your local area code display as the full ten-digit number. 1. Use the touch-tone pad to select 1, 2, 3, 4, 5, 6, or use the CID/vol ( or ) button to scroll to 1YES or 2NO. Instead, you receive from six different ringer tones. 1. Press the mute/program button to your three digit area code. 2. Use the touch-tone pad to select 1YES or 2NO, or use the CID/vol ( or ) button to scroll to save , and SET RINGER TONE 1 2 3 4 5 6 shows in the display. Use the touch-tone pad to save , and REGISTRATION 1YES 2NO shows in the display...
Calls you will not appear in the area code menu, your local area code display as the full ten-digit number. 1. Use the touch-tone pad to select 1, 2, 3, 4, 5, 6, or use the CID/vol ( or ) button to scroll to 1YES or 2NO. Instead, you receive from six different ringer tones. 1. Press the mute/program button to your three digit area code. 2. Use the touch-tone pad to select 1YES or 2NO, or use the CID/vol ( or ) button to scroll to save , and SET RINGER TONE 1 2 3 4 5 6 shows in the display. Use the touch-tone pad to save , and REGISTRATION 1YES 2NO shows in the display...