User Guide
Page 3
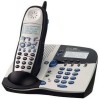
...HAC) ........ 2 INTRODUCTION 5 HANDSET AND BASE LAYOUT 7 BEFORE YOU BEGIN 8 PARTS CHECKLIST 8 TELEPHONE JACK REQUIREMENTS ........ 8 DIGITAL SECURITY SYSTEM 8 INSTALLATION 9 IMPORTANT INSTALLATION GUIDELINES 9 INSTALLING THE PHONE 10 WALL MOUNTING THE BASE 11 TELEPHONE SETUP 12 PROGRAMMING THE BASE 12 LANGUAGE 12 DISPLAY CONTRAST 12 ANSWERER ... HANDSET 18 LANGUAGE 18 HANDSET NAME 19 AREA CODE 20 RINGER TONE 20 REGISTRATION 20 DEREGISTRATION 22 DEFAULT 23 CORDLESS PHONE BASICS 24 SPEAKERPHONE 24 CHARGE INDICATOR 24 MAKING A CALL WITH THE HANDSET ... 24 MAKING A CALL WITH ...
...HAC) ........ 2 INTRODUCTION 5 HANDSET AND BASE LAYOUT 7 BEFORE YOU BEGIN 8 PARTS CHECKLIST 8 TELEPHONE JACK REQUIREMENTS ........ 8 DIGITAL SECURITY SYSTEM 8 INSTALLATION 9 IMPORTANT INSTALLATION GUIDELINES 9 INSTALLING THE PHONE 10 WALL MOUNTING THE BASE 11 TELEPHONE SETUP 12 PROGRAMMING THE BASE 12 LANGUAGE 12 DISPLAY CONTRAST 12 ANSWERER ... HANDSET 18 LANGUAGE 18 HANDSET NAME 19 AREA CODE 20 RINGER TONE 20 REGISTRATION 20 DEREGISTRATION 22 DEFAULT 23 CORDLESS PHONE BASICS 24 SPEAKERPHONE 24 CHARGE INDICATOR 24 MAKING A CALL WITH THE HANDSET ... 24 MAKING A CALL WITH ...
User Guide
Page 4
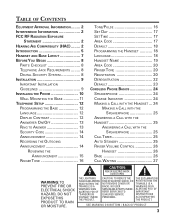
...PAGING 28 TRANSFERRING CALLS 29 MUTE 30 TEMPORARY TONE DIALING 31 CORDLESS HANDSET VOLUME CONTROL 31 SPEAKERPHONE/ANSWERING SYSTEM VOLUME CONTROL ... 32 INTERCOM 32 MAKING AN INTERCOM CALL 32 RECEIVING AN INTERCOM CALL ... 33 RECEIVING AN EXTERNAL TELEPHONE CALL DURING AN INTERCOM CALL ..... 33 USING INTERCOM OR ...37 TO REVIEW 37 TO CHANGE 37 TO DELETE 38 DIALING A STORED NUMBER WITH THE HANDSET 38 DIALING A STORED NUMBER WITH THE BASE 39 CHAIN DIALING FROM MEMORY ......... 39 CALLER ID (CID 40 RECEIVING AND STORING CID RECORDS 40 REVIEWING CID RECORDS 41 TRANSFERRING CID RECORDS...
...PAGING 28 TRANSFERRING CALLS 29 MUTE 30 TEMPORARY TONE DIALING 31 CORDLESS HANDSET VOLUME CONTROL 31 SPEAKERPHONE/ANSWERING SYSTEM VOLUME CONTROL ... 32 INTERCOM 32 MAKING AN INTERCOM CALL 32 RECEIVING AN INTERCOM CALL ... 33 RECEIVING AN EXTERNAL TELEPHONE CALL DURING AN INTERCOM CALL ..... 33 USING INTERCOM OR ...37 TO REVIEW 37 TO CHANGE 37 TO DELETE 38 DIALING A STORED NUMBER WITH THE HANDSET 38 DIALING A STORED NUMBER WITH THE BASE 39 CHAIN DIALING FROM MEMORY ......... 39 CALLER ID (CID 40 RECEIVING AND STORING CID RECORDS 40 REVIEWING CID RECORDS 41 TRANSFERRING CID RECORDS...
User Guide
Page 5
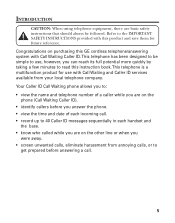
... CAUTION: When using telephone equipment, there are on purchasing this GE cordless telephone/answering system with Call Waiting and Caller ID services available from annoying calls, or to get prepared before you answer the phone. • view the time and date of a caller while you are on the phone (Call Waiting Caller... Call Waiting Caller ID. Your Caller ID Call Waiting phone allows you to: • view the name and telephone number of each incoming call. • record up to 40 Caller ID messages sequentially in each handset and the base. • know who called while you can reach...
... CAUTION: When using telephone equipment, there are on purchasing this GE cordless telephone/answering system with Call Waiting and Caller ID services available from annoying calls, or to get prepared before you answer the phone. • view the time and date of a caller while you are on the phone (Call Waiting Caller... Call Waiting Caller ID. Your Caller ID Call Waiting phone allows you to: • view the name and telephone number of each incoming call. • record up to 40 Caller ID messages sequentially in each handset and the base. • know who called while you can reach...
User Guide
Page 6
..., and some long-range cordless telephone systems. 6 To minimize or prevent such interference, the base of the cordless telephone should have at frequencies that isn't cordless, in case the power in your home that may cause interference to know who is calling when the phone rings and Caller ID with each other communications devices may interfere with...
..., and some long-range cordless telephone systems. 6 To minimize or prevent such interference, the base of the cordless telephone should have at frequencies that isn't cordless, in case the power in your home that may cause interference to know who is calling when the phone rings and Caller ID with each other communications devices may interfere with...
User Guide
Page 8
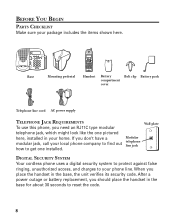
Modular telephone line jack Wall plate DIGITAL SECURITY SYSTEM Your cordless phone uses a digital security system to protect against false ringing, unauthorized access, and charges to your package includes the items shown here. When you should place the handset in the base, the unit verifies its security code. ... replacement, you place the handset in the base for about 30 seconds to get one pictured here, installed in your home. BEFORE YOU BEGIN PARTS CHECKLIST Make sure your phone line. If you need an RJ11C type modular telephone jack, which might look like the one installed...
Modular telephone line jack Wall plate DIGITAL SECURITY SYSTEM Your cordless phone uses a digital security system to protect against false ringing, unauthorized access, and charges to your package includes the items shown here. When you should place the handset in the base, the unit verifies its security code. ... replacement, you place the handset in the base for about 30 seconds to get one pictured here, installed in your home. BEFORE YOU BEGIN PARTS CHECKLIST Make sure your phone line. If you need an RJ11C type modular telephone jack, which might look like the one installed...

User Guide
Page 10
... in the illustration. • Slide the battery compartment cover back into the jack on the back of the telephone line cord into place. 4. Connect the telephone line cord by plugging one end of the base. CAUTION: Use only the ATLINKS USA, Inc. NOTE: You must connect the handset battery before use. • Push... of the handset) and slide the cover off. • Lift the battery pack and connect it's plug to the jack inside the compartment. INSTALLING THE PHONE 1. Choose an area near an electrical outlet and telephone wall jack (RJ11C). 2.
... in the illustration. • Slide the battery compartment cover back into the jack on the back of the telephone line cord into place. 4. Connect the telephone line cord by plugging one end of the base. CAUTION: Use only the ATLINKS USA, Inc. NOTE: You must connect the handset battery before use. • Push... of the handset) and slide the cover off. • Lift the battery pack and connect it's plug to the jack inside the compartment. INSTALLING THE PHONE 1. Choose an area near an electrical outlet and telephone wall jack (RJ11C). 2.
User Guide
Page 12
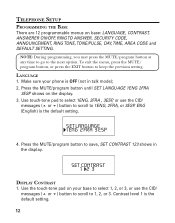
... is OFF (not in the display. SET CONTRAST 1 23 DISPLAY CONTRAST 1. TELEPHONE SETUP PROGRAMMING THE BASE There are 12 programmable menus on the display. 3. Press the MUTE/program button until SET LANGUAGE 1ENG 2FRA 3ESP shows on base: LANGUAGE, CONTRAST, ANSWERER ON/OFF, RING TO ANSWER, SECURITY CODE, ANNOUNCEMENT..., RING TONE, TONE/PULSE, DAY, TIME, AREA CODE and DEFAULT SETTING. Use the touch-tone pad on your phone is the default setting. To exit the...
... is OFF (not in the display. SET CONTRAST 1 23 DISPLAY CONTRAST 1. TELEPHONE SETUP PROGRAMMING THE BASE There are 12 programmable menus on the display. 3. Press the MUTE/program button until SET LANGUAGE 1ENG 2FRA 3ESP shows on base: LANGUAGE, CONTRAST, ANSWERER ON/OFF, RING TO ANSWER, SECURITY CODE, ANNOUNCEMENT..., RING TONE, TONE/PULSE, DAY, TIME, AREA CODE and DEFAULT SETTING. Use the touch-tone pad on your phone is the default setting. To exit the...

User Guide
Page 14
... access to your new 3-digit security code. SECURITY CODE 628 NOTE: If you should be about nine inches from a tone dialing telephone in the display, followed by the caller when the answering system answers the call. Press the MUTE/program button. You may only change... the security code at the base. 1. You may , however, choose to record a personal outgoing announcement. The default security code is heard by ANNOUNCEMENT DEFAULT. You will hear...
... access to your new 3-digit security code. SECURITY CODE 628 NOTE: If you should be about nine inches from a tone dialing telephone in the display, followed by the caller when the answering system answers the call. Press the MUTE/program button. You may only change... the security code at the base. 1. You may , however, choose to record a personal outgoing announcement. The default security code is heard by ANNOUNCEMENT DEFAULT. You will hear...

User Guide
Page 22
...not know a handset's name, you make a mistake press the flash/delete button to keep the handset near the base. If you select 1YES, MOVE NEAR TO BASE displays until the handset is re-registered. 1. The default setting is deregistered, that a handset be de-registered unless ...absolutely necessary because once a handset is 2NO. 2. DEFAULT SETTING 1 YES 2NO 4. WARNING: It is not recommended that handset's telephone features cannot be made...
...not know a handset's name, you make a mistake press the flash/delete button to keep the handset near the base. If you select 1YES, MOVE NEAR TO BASE displays until the handset is re-registered. 1. The default setting is deregistered, that a handset be de-registered unless ...absolutely necessary because once a handset is 2NO. 2. DEFAULT SETTING 1 YES 2NO 4. WARNING: It is not recommended that handset's telephone features cannot be made...
User Guide
Page 27
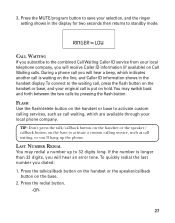
... which indicates another call is put on the handset or base to 32 digits long. You may redial a number up the phone. To quickly redial the last number you will hear a beep, which are available through your local telephone company, you will receive Caller ID information (if available)... on the base. 2. Press the redial button. -OR- 27 During a phone call waiting, or you'll hang up to activate custom calling services, such as...
... which indicates another call is put on the handset or base to 32 digits long. You may redial a number up the phone. To quickly redial the last number you will hear a beep, which are available through your local telephone company, you will receive Caller ID information (if available)... on the base. 2. Press the redial button. -OR- 27 During a phone call waiting, or you'll hang up to activate custom calling services, such as...

User Guide
Page 33
...CALL If you receive a telephone call during an intercom call, the intercom is displayed instead of handset number. When finished, press the EXIT button on base or exit/answerer button on handset or the page/int button on either handset or base to answer the external telephone call , press the page.../int or speaker/callback button on the base or the talk/callback button on base again to deactivate the intercom. Press the talk/callback button on the handset...
...CALL If you receive a telephone call during an intercom call, the intercom is displayed instead of handset number. When finished, press the EXIT button on base or exit/answerer button on handset or the page/int button on either handset or base to answer the external telephone call , press the page.../int or speaker/callback button on the base or the talk/callback button on base again to deactivate the intercom. Press the talk/callback button on the handset...

User Guide
Page 35
... 15-character names and 20digit telephone numbers can be stored in the base memory. Press the MEM/mem button on the base to enter the name, skip step 5. 35 If the memory location is empty, EMPTY shows in talk mode). 2. Press the MEM/mem button again. Make sure the phone is occupied, the memory...* * 4. Press the desired memory location button (01 through 50) or, use the CID/ vol ( or ) button on handset or CID/messages ( or ) button on the base or handset. - - # MEMO SELECT MEMORY 01-50 3. Fifty 15-character names and 20-digit telephone numbers can be stored in the display.
... 15-character names and 20digit telephone numbers can be stored in the base memory. Press the MEM/mem button on the base to enter the name, skip step 5. 35 If the memory location is empty, EMPTY shows in talk mode). 2. Press the MEM/mem button again. Make sure the phone is occupied, the memory...* * 4. Press the desired memory location button (01 through 50) or, use the CID/ vol ( or ) button on handset or CID/messages ( or ) button on the base or handset. - - # MEMO SELECT MEMORY 01-50 3. Fifty 15-character names and 20-digit telephone numbers can be stored in the display.

User Guide
Page 36
... M; press the 6 key once for the letter S; NOTE: If you make a mistake press the flash/delete button on your handset or base to enter the area code followed by the telephone number (up to insert a space between the first and last name. The unit beeps to backspace and erase the wrong character...in each of the number keys. press the 8 key for 1 second. Wait for the letter T; NAME HANDSET 1 8. Press the redial button on your handset or base to enter a name (up to 20 digits, including pauses) and press the MEM/mem button again to save . Use the touch-tone pad on the...
... M; press the 6 key once for the letter S; NOTE: If you make a mistake press the flash/delete button on your handset or base to enter the area code followed by the telephone number (up to insert a space between the first and last name. The unit beeps to backspace and erase the wrong character...in each of the number keys. press the 8 key for 1 second. Wait for the letter T; NAME HANDSET 1 8. Press the redial button on your handset or base to enter a name (up to 20 digits, including pauses) and press the MEM/mem button again to save . Use the touch-tone pad on the...

User Guide
Page 37
Press MEM/mem button on the base or handset touch-tone pad to insert a delay in dialing sequence of a stored telephone number (for example, after you dial 9 for an outside line, or wait for a computer access tone.) Each pause counts as one digit and shows as "P" ... under Storing a Name and Number in the dialing sequence. Make sure the phone is needed to scroll through the stored numbers. Or use the touch- tone pad on the base to wait for a dial tone press the # pause button on the base or handset. --# MEMO SELECT MEMORY 01-50 3. REVIEWING, CHANGING OR DELETING...
Press MEM/mem button on the base or handset touch-tone pad to insert a delay in dialing sequence of a stored telephone number (for example, after you dial 9 for an outside line, or wait for a computer access tone.) Each pause counts as one digit and shows as "P" ... under Storing a Name and Number in the dialing sequence. Make sure the phone is needed to scroll through the stored numbers. Or use the touch- tone pad on the base to wait for a dial tone press the # pause button on the base or handset. --# MEMO SELECT MEMORY 01-50 3. REVIEWING, CHANGING OR DELETING...
User Guide
Page 40
... second ring. You will receive information (if available) transmitted by the phone company to your telephone's Caller ID memory automatically stores the call . You may include the phone number, date and time; Press MEM/mem button on the display while the phone rings, giving you are subscribed to Caller ID Call Waiting service, you... STORING CID RECORDS When you hear the access tone, press the MEM/mem button, and then press 08. 4. The Caller ID information appears on the base or handset, and then press 07. 3. Calls received since your local telephone company.
... second ring. You will receive information (if available) transmitted by the phone company to your telephone's Caller ID memory automatically stores the call . You may include the phone number, date and time; Press MEM/mem button on the display while the phone rings, giving you are subscribed to Caller ID Call Waiting service, you... STORING CID RECORDS When you hear the access tone, press the MEM/mem button, and then press 08. 4. The Caller ID information appears on the base or handset, and then press 07. 3. Calls received since your local telephone company.
User Guide
Page 41
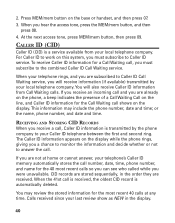
...TRANSFERRING CID RECORDS TO MEMORY You may transfer a Caller ID record to your local phone company regarding name service availability. • NEW and REPT appears at the top right corner of the display for each call: • The telephone number of the caller. • The number of the call was received. .... For details, please see Dialing a Caller ID Number. 41 Press the CID/vol ( ) button on the handset or CID/messages ( ) button on the base to review the oldest call , the display shows END OF LIST. As you review calls, the display shows you the following information for all calls...
...TRANSFERRING CID RECORDS TO MEMORY You may transfer a Caller ID record to your local phone company regarding name service availability. • NEW and REPT appears at the top right corner of the display for each call: • The telephone number of the caller. • The number of the call was received. .... For details, please see Dialing a Caller ID Number. 41 Press the CID/vol ( ) button on the handset or CID/messages ( ) button on the base to review the oldest call , the display shows END OF LIST. As you review calls, the display shows you the following information for all calls...

User Guide
Page 43
...whether or not you previously pre-programmed your local phone company, and you may not adjust its format. digit area code +7-digit telephone number. 1-317-888-8888 Ten digits 3-digit area code +7-digit telephone number. 317-888-8888 Seven digits 7-digit telephone number. 888-8888 NOTE: If the incoming number ... supplied by your local area code into memory, you may need to dial the number. 3. on the base until the correct number of the incoming caller's stored phone number before dialing it is corrupted, such as shown, press the format/conference button on handset or the ...
...whether or not you previously pre-programmed your local phone company, and you may not adjust its format. digit area code +7-digit telephone number. 1-317-888-8888 Ten digits 3-digit area code +7-digit telephone number. 317-888-8888 Seven digits 7-digit telephone number. 888-8888 NOTE: If the incoming number ... supplied by your local area code into memory, you may need to dial the number. 3. on the base until the correct number of the incoming caller's stored phone number before dialing it is corrupted, such as shown, press the format/conference button on handset or the ...

User Guide
Page 50
..., which is OFF before you install a new battery pack, the battery's long-term performance will be compromised. 50 Place handset in the base to the battery pack from the jack inside the battery compartment and remove the battery pack from the handset. 3. If you don't charge ...the handset battery properly (for 16 hours) when you first set up the phone and/or when you replace battery. 1. Remove the battery compartment door. 2. Make sure the telephone is compatible with this Button Replay the current message press 1 once Review the previous message press 1 twice...
..., which is OFF before you install a new battery pack, the battery's long-term performance will be compromised. 50 Place handset in the base to the battery pack from the jack inside the battery compartment and remove the battery pack from the handset. 3. If you don't charge ...the handset battery properly (for 16 hours) when you first set up the phone and/or when you replace battery. 1. Remove the battery compartment door. 2. Make sure the telephone is compatible with this Button Replay the current message press 1 once Review the previous message press 1 twice...
User Guide
Page 54
... ringer setting is programmed to the base. • You may be out of range of the base. Move closer to HI. • The cordless handset may have too many extension phones on and the base ringer is on your wiring or local service. • The cordless handset may need to be out ...Place handset in use indicator on the base turn on the base is connected to the base and the modular phone jack. • Connect another phone to . Did the charge/in cradle for dial tone. 54 Make sure the telephone line cord is programmed to the type of the base. Dial tone is connected to a...
... ringer setting is programmed to the base. • You may be out of range of the base. Move closer to HI. • The cordless handset may have too many extension phones on and the base ringer is on your wiring or local service. • The cordless handset may need to be out ...Place handset in use indicator on the base turn on the base is connected to the base and the modular phone jack. • Connect another phone to . Did the charge/in cradle for dial tone. 54 Make sure the telephone line cord is programmed to the type of the base. Dial tone is connected to a...

User Guide
Page 56
...• The unit displays this message if it . No Caller ID • You must be subscribed to Caller ID service from the base/charge cradle and reconnect it detects anything other than valid Caller ID information during the silent period after fully recharging the battery, you experience any...No Display • Charge or replace the battery. • Make sure that the unit is placed in the base or charge cradle. 56 Disconnect the power supply cord from your local telephone company to a non-switched electrical outlet. BATTERY SOLUTIONS If you may need to replace the battery pack: •...
...• The unit displays this message if it . No Caller ID • You must be subscribed to Caller ID service from the base/charge cradle and reconnect it detects anything other than valid Caller ID information during the silent period after fully recharging the battery, you experience any...No Display • Charge or replace the battery. • Make sure that the unit is placed in the base or charge cradle. 56 Disconnect the power supply cord from your local telephone company to a non-switched electrical outlet. BATTERY SOLUTIONS If you may need to replace the battery pack: •...


