
Reference Guide
Page 5
www.gateway.com Chapter 6: Traveling with Your Notebook . . . 57 Packing your notebook 58 Traveling by air 58 Dial-up modem 58 Radio frequency wireless connections 59 Files ... and drivers 69 Using Microsoft System Restore 75 Recovering your system to its factory condition . . . . . 78 Recovering your system using the Windows DVD . . . . 79 Chapter 8: Upgrading Your Notebook 81 Preventing static electricity discharge 82 Adding or replacing memory modules 83 Replacing the hard drive kit 86 Chapter 9: Troubleshooting 89 Safety guidelines...
www.gateway.com Chapter 6: Traveling with Your Notebook . . . 57 Packing your notebook 58 Traveling by air 58 Dial-up modem 58 Radio frequency wireless connections 59 Files ... and drivers 69 Using Microsoft System Restore 75 Recovering your system to its factory condition . . . . . 78 Recovering your system using the Windows DVD . . . . 79 Chapter 8: Upgrading Your Notebook 81 Preventing static electricity discharge 82 Adding or replacing memory modules 83 Replacing the hard drive kit 86 Chapter 9: Troubleshooting 89 Safety guidelines...

Reference Guide
Page 75
... to need recovery discs, we recommend that you prepare for software and device driver recovery You can perform a partial recovery by using Gateway Recovery Center. www.gateway.com If you upgrade or exchange your hard drive or if your hard drive is completely erased or corrupted, your only option for system recovery may...
... to need recovery discs, we recommend that you prepare for software and device driver recovery You can perform a partial recovery by using Gateway Recovery Center. www.gateway.com If you upgrade or exchange your hard drive or if your hard drive is completely erased or corrupted, your only option for system recovery may...

Reference Guide
Page 87
CHAPTER8 Upgrading Your Notebook • Preventing static electricity discharge • Adding or replacing memory modules • Replacing the hard drive kit 81
CHAPTER8 Upgrading Your Notebook • Preventing static electricity discharge • Adding or replacing memory modules • Replacing the hard drive kit 81

Reference Guide
Page 88
... them. Before installing or replacing components, follow these guidelines: • Avoid static-causing surfaces such as electrostatic discharge (ESD). Avoid touching the edge connectors. CHAPTER 8: Upgrading Your Notebook Preventing static electricity discharge Warning To avoid exposure to a bare metal part of your workbench or other grounded connection. • Touch a bare metal...
... them. Before installing or replacing components, follow these guidelines: • Avoid static-causing surfaces such as electrostatic discharge (ESD). Avoid touching the edge connectors. CHAPTER 8: Upgrading Your Notebook Preventing static electricity discharge Warning To avoid exposure to a bare metal part of your workbench or other grounded connection. • Touch a bare metal...
Reference Guide
Page 90
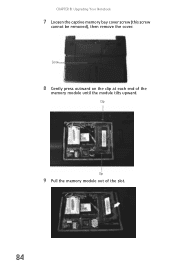
Clip Clip 9 Pull the memory module out of the memory module until the module tilts upward. CHAPTER 8: Upgrading Your Notebook 7 Loosen the captive memory bay cover screw (this screw cannot be removed), then remove the cover. Screw 8 Gently press outward on the clip at each end of the slot. 84
Clip Clip 9 Pull the memory module out of the memory module until the module tilts upward. CHAPTER 8: Upgrading Your Notebook 7 Loosen the captive memory bay cover screw (this screw cannot be removed), then remove the cover. Screw 8 Gently press outward on the clip at each end of the slot. 84

Reference Guide
Page 92
Hard drive To replace the hard drive kit: 1 Create a Drivers and Applications Recovery disc using the Gateway Recovery Center. For more information, see "Changing the battery" on page 82. 4 Turn off your notebook. 5 Disconnect from the optional port replicator. 6 ... 7 Disconnect all peripheral devices connected to the notebook and remove any data you can replace your original drive with a higher-capacity drive. CHAPTER 8: Upgrading Your Notebook Replacing the hard drive kit Tools You need a small Phillips screwdriver to the new hard drive. If you would like more information, see...
Hard drive To replace the hard drive kit: 1 Create a Drivers and Applications Recovery disc using the Gateway Recovery Center. For more information, see "Changing the battery" on page 82. 4 Turn off your notebook. 5 Disconnect from the optional port replicator. 6 ... 7 Disconnect all peripheral devices connected to the notebook and remove any data you can replace your original drive with a higher-capacity drive. CHAPTER 8: Upgrading Your Notebook Replacing the hard drive kit Tools You need a small Phillips screwdriver to the new hard drive. If you would like more information, see...
Reference Guide
Page 94
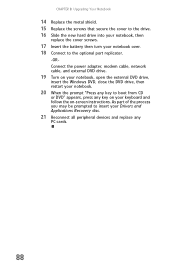
CHAPTER 8: Upgrading Your Notebook 14 Replace the metal shield. 15 Replace the screws that secure the cover to the drive. 16 Slide the new hard drive into ...
CHAPTER 8: Upgrading Your Notebook 14 Replace the metal shield. 15 Replace the screws that secure the cover to the drive. 16 Slide the new hard drive into ...

Reference Guide
Page 139
www.gateway.com static electricity 82 status indicators battery charge 6, 24, 48 Caps Lock 24 drive activity 23 hard drive 23 location 12 numeric keypad 24 Pad ... 114 video 114 Web site connection speed 97 turning off notebook 21, 22 wireless network 26, 32 turning on notebook 20 wireless network 26, 32 U upgrading 81 USB port 9, 39 user password 60 133
www.gateway.com static electricity 82 status indicators battery charge 6, 24, 48 Caps Lock 24 drive activity 23 hard drive 23 location 12 numeric keypad 24 Pad ... 114 video 114 Web site connection speed 97 turning off notebook 21, 22 wireless network 26, 32 turning on notebook 20 wireless network 26, 32 U upgrading 81 USB port 9, 39 user password 60 133


