
Reference Guide
Page 3
Contents Chapter 1: About This Reference 1 About this guide 2 Accessing your online User Guide 2 Gateway contact information 3 Gateway model and serial number 3 Microsoft Certificate of Authenticity 3 For more information 3 Chapter 2: Checking Out Your Notebook . . . . . 5 Front 6 Left 7 Right 9 Bottom 10 Keyboard area 12 Chapter 3: Setting Up and Getting Started . . 13 Working safely and comfortably 14 Reducing...
Contents Chapter 1: About This Reference 1 About this guide 2 Accessing your online User Guide 2 Gateway contact information 3 Gateway model and serial number 3 Microsoft Certificate of Authenticity 3 For more information 3 Chapter 2: Checking Out Your Notebook . . . . . 5 Front 6 Left 7 Right 9 Bottom 10 Keyboard area 12 Chapter 3: Setting Up and Getting Started . . 13 Working safely and comfortably 14 Reducing...
Reference Guide
Page 16
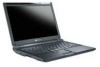
... Hard drive bay Speakers Memory bay Battery latch Battery Description The hard drive is not plugged into this bay. Install a memory module into AC power. 10 Slide to release the battery.
... Hard drive bay Speakers Memory bay Battery latch Battery Description The hard drive is not plugged into this bay. Install a memory module into AC power. 10 Slide to release the battery.

Reference Guide
Page 20
... overheating, permanent damage to your legs. Notebook operating temperatures can avoid glare on the screen or shine directly into your notebook, and fire danger. Every 10 or 15 minutes, look around the room, and try to protect your legs. • Do not use your notebook in your work area and avoiding...
... overheating, permanent damage to your legs. Notebook operating temperatures can avoid glare on the screen or shine directly into your notebook, and fire danger. Every 10 or 15 minutes, look around the room, and try to protect your legs. • Do not use your notebook in your work area and avoiding...

Reference Guide
Page 28
.... 3 Click the program that are not responding. The notebook turns off, then turns on your notebook, press and hold the power button for more than 10 seconds. 22 The notebook turns off. To restart your notebook: • Click (Start), click the arrow next to the lock icon, then click Shut Down...
.... 3 Click the program that are not responding. The notebook turns off, then turns on your notebook, press and hold the power button for more than 10 seconds. 22 The notebook turns off. To restart your notebook: • Click (Start), click the arrow next to the lock icon, then click Shut Down...

Reference Guide
Page 85
www.gateway.com 8 To perform a recovery with data backup (recommended), click Recovery with the full factory recovery will be automatically backed up your personal files, and create a ... drivers:" on page 70. 2 Insert the Windows DVD into your notebook's external DVD-capable drives, then turn on your hard drive is complete window opens. 10 Click Finish, then click Restart. To perform a full factory recovery without data backup, click Full factory recovery, then click Next. Caution Continuing with automatic data...
www.gateway.com 8 To perform a recovery with data backup (recommended), click Recovery with the full factory recovery will be automatically backed up your personal files, and create a ... drivers:" on page 70. 2 Insert the Windows DVD into your notebook's external DVD-capable drives, then turn on your hard drive is complete window opens. 10 Click Finish, then click Restart. To perform a full factory recovery without data backup, click Full factory recovery, then click Next. Caution Continuing with automatic data...
Reference Guide
Page 91
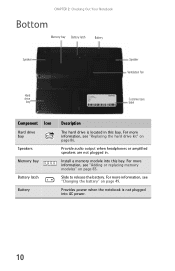
... lines up with the tab in place. 12 Replace the memory bay cover, then tighten the captive screw. 13 Insert the battery, then turn your Gateway notebook. 11 Gently push the module down until it clicks in the memory bay. This module is keyed so it into the empty memory slot...
... lines up with the tab in place. 12 Replace the memory bay cover, then tighten the captive screw. 13 Insert the battery, then turn your Gateway notebook. 11 Gently push the module down until it clicks in the memory bay. This module is keyed so it into the empty memory slot...
Reference Guide
Page 93
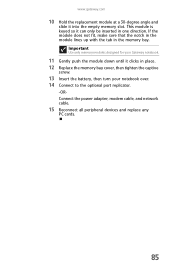
Screw Screw 10 Slide the hard drive bay cover, then remove it. www.gateway.com 9 Remove the two hard drive bay cover screws. Screw Screw Screw Screw 12 Remove the metal shield covering the old drive. 13 Insert the new drive label side up onto the cover so the screw holes line up. 87 The hard drive is attached to the back of the cover. 11 Remove the screws on the side of the hard drive that secure the hard drive to the hard drive cover.
Screw Screw 10 Slide the hard drive bay cover, then remove it. www.gateway.com 9 Remove the two hard drive bay cover screws. Screw Screw Screw Screw 12 Remove the metal shield covering the old drive. 13 Insert the new drive label side up onto the cover so the screw holes line up. 87 The hard drive is attached to the back of the cover. 11 Remove the screws on the side of the hard drive that secure the hard drive to the hard drive cover.

Reference Guide
Page 113
... 192.168.N.N where N is unique. For best results, all Ethernet components should be standard Ethernet (10 Mbps), Fast Ethernet (100 Mbps or 10/100 Mbps), or Gigabit Ethernet (1000 Mbps or 10/100/1000 Mbps). You cannot connect to the computers, make sure that all computers have different IP...troubleshooting in your network running slower than you expect • If your Ethernet network is plugged into the Ethernet jack on your notebook. www.gateway.com Networks (wired) Help For more information, see the documentation that came with your router. • Make sure that all computers on ...
... 192.168.N.N where N is unique. For best results, all Ethernet components should be standard Ethernet (10 Mbps), Fast Ethernet (100 Mbps or 10/100 Mbps), or Gigabit Ethernet (1000 Mbps or 10/100/1000 Mbps). You cannot connect to the computers, make sure that all computers have different IP...troubleshooting in your network running slower than you expect • If your Ethernet network is plugged into the Ethernet jack on your notebook. www.gateway.com Networks (wired) Help For more information, see the documentation that came with your router. • Make sure that all computers on ...
Reference Guide
Page 133
... status 48 charging 16, 48 conserving power 51 icons 48 installing 49 latch 10 locating 10 managing power 51 monitoring charge 48 purchasing 44 recalibrating 50 recharging 16, 48 release latch 10 replacing 49 bays battery 49 hard drive 10 memory 10, 83 Bluetooth 27 brightness adjusting 27, 30 system keys 27 C cable lock 9 cable...
... status 48 charging 16, 48 conserving power 51 icons 48 installing 49 latch 10 locating 10 managing power 51 monitoring charge 48 purchasing 44 recalibrating 50 recharging 16, 48 release latch 10 replacing 49 bays battery 49 hard drive 10 memory 10, 83 Bluetooth 27 brightness adjusting 27, 30 system keys 27 C cable lock 9 cable...
Reference Guide
Page 134
... 91 diskette drive troubleshooting 91 display brightness 30 switching 26 troubleshooting 92 docking port 7 double-clicking 29 dragging 30 drivers recovering 69 drives hard drive 10, 86 replacing hard drive 86 troubleshooting 91, 93, 96 DSL modem 9, 19
... 91 diskette drive troubleshooting 91 display brightness 30 switching 26 troubleshooting 92 docking port 7 double-clicking 29 dragging 30 drivers recovering 69 drives hard drive 10, 86 replacing hard drive 86 troubleshooting 91, 93, 96 DSL modem 9, 19

Reference Guide
Page 135
www.gateway.com troubleshooting 102 DVD cleaning 68 troubleshooting 93 DVD drive 9, 39 troubleshooting 93 E electrostatic discharge (ESD) 82 EmPower power adapter 52 ergonomics 14 Ethernet connecting ... camera 39 hard drive 86 memory 83 PC Card 37 peripheral devices 39 printer 39 scanner 39 Internet troubleshooting 97, 104 G Gateway model number 3 serial number 3 Support 3 H hard drive bay 10 indicator 23 installing 86 J jacks See connections K Kensington cable lock 60 lock slot 9 key combinations 26 keyboard buttons 24 cleaning 66...
www.gateway.com troubleshooting 102 DVD cleaning 68 troubleshooting 93 DVD drive 9, 39 troubleshooting 93 E electrostatic discharge (ESD) 82 EmPower power adapter 52 ergonomics 14 Ethernet connecting ... camera 39 hard drive 86 memory 83 PC Card 37 peripheral devices 39 printer 39 scanner 39 Internet troubleshooting 97, 104 G Gateway model number 3 serial number 3 Support 3 H hard drive bay 10 indicator 23 installing 86 J jacks See connections K Kensington cable lock 60 lock slot 9 key combinations 26 keyboard buttons 24 cleaning 66...

Reference Guide
Page 136
... 26 toggle display 26 Windows 25 L labels Microsoft Certificate of Authenticity 3 model number 3 serial number 3 laser printer 45 latch battery 10 LCD panel cleaning 66 switching display 26 troubleshooting 92 LCD/CRT system key 26 line protector 58 line tester 58 lock cable 60 Kensington... cable 9 130 M maintenance cleaning 65, 68 Media Center troubleshooting 99 memory bay 10 installing 83 purchasing 44 removing 83 replacing 83 troubleshooting 101 memory card reader locating 8 memory cards supported 36 using 36 microphone jack 9 Microsoft...
... 26 toggle display 26 Windows 25 L labels Microsoft Certificate of Authenticity 3 model number 3 serial number 3 laser printer 45 latch battery 10 LCD panel cleaning 66 switching display 26 troubleshooting 92 LCD/CRT system key 26 line protector 58 line tester 58 lock cable 60 Kensington... cable 9 130 M maintenance cleaning 65, 68 Media Center troubleshooting 99 memory bay 10 installing 83 purchasing 44 removing 83 replacing 83 troubleshooting 101 memory card reader locating 8 memory cards supported 36 using 36 microphone jack 9 Microsoft...

Reference Guide
Page 138
..., 53 system key 26 SO-DIMM See memory software recovering 69 sound adjusting 27, 31 controls 31 muting 27, 31 troubleshooting 113 speakers built-in 10 jack 9 SpeedStep technology 54 starting notebook 20 programs 29 startup password 60
..., 53 system key 26 SO-DIMM See memory software recovering 69 sound adjusting 27, 31 controls 31 muting 27, 31 troubleshooting 113 speakers built-in 10 jack 9 SpeedStep technology 54 starting notebook 20 programs 29 startup password 60