
8511418 - Component Replacement Manual
Page 1
...indicator turns on the bottom of your notebook, then plug it becomes damaged. www.gateway.com © 2006 Gateway, Inc. Warning Do not attempt to the AC adapter. Contact Gateway about returning defective AC adapters. Replacing the AC Adapter 3 Plug the power cord into a wall outlet. All other countries...power indicator does not turn blue after three hours, contact Gateway Customer Care at the Web address or telephone number shown on the label on , unplug the adapter from your notebook. Important If the battery charge indicator does not turn on the bottom of the ...
...indicator turns on the bottom of your notebook, then plug it becomes damaged. www.gateway.com © 2006 Gateway, Inc. Warning Do not attempt to the AC adapter. Contact Gateway about returning defective AC adapters. Replacing the AC Adapter 3 Plug the power cord into a wall outlet. All other countries...power indicator does not turn blue after three hours, contact Gateway Customer Care at the Web address or telephone number shown on the label on , unplug the adapter from your notebook. Important If the battery charge indicator does not turn on the bottom of the ...

8511418 - Component Replacement Manual
Page 2
... Slide the replacement battery into the notebook until it snaps into place. 7 Slide the battery lock to the lock position. 8 Turn your notebook over so the bottom is facing up. 4 Slide the battery lock to Step 2. - Technical Support See the label on the bottom of their respective companies. 1 Gateway and eMachines are...Tricks If your notebook is connected to AC power, you can replace the battery while the notebook is turned on and is not connected to AC power, save your work and turn blue after three hours, contact Gateway Customer Care at the Web address or telephone number shown on ...
... Slide the replacement battery into the notebook until it snaps into place. 7 Slide the battery lock to the lock position. 8 Turn your notebook over so the bottom is facing up. 4 Slide the battery lock to Step 2. - Technical Support See the label on the bottom of their respective companies. 1 Gateway and eMachines are...Tricks If your notebook is connected to AC power, you can replace the battery while the notebook is turned on and is not connected to AC power, save your work and turn blue after three hours, contact Gateway Customer Care at the Web address or telephone number shown on ...

8511418 - Component Replacement Manual
Page 3
...(available at most electronics stores) and attach it to use them. Avoid touching the edge connectors. For more information, see "Changing Batteries" in your notebook over any PC Cards. 6 Turn your notebook. Screw Technical Support See the label on the outside of the notebook... Touch a bare metal surface on your notebook and unplug the AC adapter, modem cable, and network cable before replacing a component. All rights reserved. www.gateway.com © 2006 Gateway, Inc. Warning To avoid exposure to static electricity, also known as carpeted floors, plastic, and packing foam. ...
...(available at most electronics stores) and attach it to use them. Avoid touching the edge connectors. For more information, see "Changing Batteries" in your notebook over any PC Cards. 6 Turn your notebook. Screw Technical Support See the label on the outside of the notebook... Touch a bare metal surface on your notebook and unplug the AC adapter, modem cable, and network cable before replacing a component. All rights reserved. www.gateway.com © 2006 Gateway, Inc. Warning To avoid exposure to static electricity, also known as carpeted floors, plastic, and packing foam. ...

8511418 - Component Replacement Manual
Page 4
... six cover screws. 14 Replace the keyboard screw. 15 Insert the battery, then turn your notebook over. 16 Connect the power adapter, modem cable, and network cable, then turn on the DVD bracket. DVD bracket Replacing the DVD Drive 11 Slide the new DVD drive into the drive bay. Gateway and eMachines are trademarks...
... six cover screws. 14 Replace the keyboard screw. 15 Insert the battery, then turn your notebook over. 16 Connect the power adapter, modem cable, and network cable, then turn on the DVD bracket. DVD bracket Replacing the DVD Drive 11 Slide the new DVD drive into the drive bay. Gateway and eMachines are trademarks...

8511418 - Component Replacement Manual
Page 5
... your notebook over any PC Cards. 6 Turn your notebook. Contact Gateway Customer Care at most electronics stores) and attach it . All rights reserved. Gateway and eMachines are trademarks or registered trademarks of Gateway, Inc. Do not lay components on the bottom of your notebook...to use them. in your notebook and unplug the AC adapter, modem cable, and network cable before replacing a component. For more information, see "Changing Batteries" in the United States and other brands and product names are trademarks or registered trademarks of their respective...
... your notebook over any PC Cards. 6 Turn your notebook. Contact Gateway Customer Care at most electronics stores) and attach it . All rights reserved. Gateway and eMachines are trademarks or registered trademarks of Gateway, Inc. Do not lay components on the bottom of your notebook...to use them. in your notebook and unplug the AC adapter, modem cable, and network cable before replacing a component. For more information, see "Changing Batteries" in the United States and other brands and product names are trademarks or registered trademarks of their respective...

8511418 - Component Replacement Manual
Page 6
...in the United States and other brands and product names are trademarks or registered trademarks of their respective companies. Gateway and eMachines are trademarks or registered trademarks of Gateway, Inc. Replacing the Hard Drive Kit 10 Place the new drive, label side up, onto the cover so the screw ... four screws that secure the cover to the drive. 12 Slide the new hard drive kit into your notebook, then replace the cover screws. 13 Insert the battery and turn your notebook over. 14 Connect the power adapter, modem cable, and network cable. 15 Reconnect all peripheral devices...
...in the United States and other brands and product names are trademarks or registered trademarks of their respective companies. Gateway and eMachines are trademarks or registered trademarks of Gateway, Inc. Replacing the Hard Drive Kit 10 Place the new drive, label side up, onto the cover so the screw ... four screws that secure the cover to the drive. 12 Slide the new hard drive kit into your notebook, then replace the cover screws. 13 Insert the battery and turn your notebook over. 14 Connect the power adapter, modem cable, and network cable. 15 Reconnect all peripheral devices...

8511418 - Component Replacement Manual
Page 7
... screws, remove them in your online hardware guide. 9 Turn your notebook over so the top is facing up , then remove the battery. Avoid touching the edge connectors. See your hardware guide for Customer Care Information. Never slide components over any PC Cards. 5 Turn ...working with a K. Technical Support See the label on your notebook and unplug the AC adapter, modem cable, and network cable before replacing a component. Gateway and eMachines are trademarks or registered trademarks of your workbench or other grounded connection. • Touch a bare metal surface on the bottom...
... screws, remove them in your online hardware guide. 9 Turn your notebook over so the top is facing up , then remove the battery. Avoid touching the edge connectors. See your hardware guide for Customer Care Information. Never slide components over any PC Cards. 5 Turn ...working with a K. Technical Support See the label on your notebook and unplug the AC adapter, modem cable, and network cable before replacing a component. Gateway and eMachines are trademarks or registered trademarks of your workbench or other grounded connection. • Touch a bare metal surface on the bottom...

8511418 - Component Replacement Manual
Page 8
...flat all the way across . Caution If the cover is facing up. 9 Replace the two optional keyboard screws. 10 Replace the memory bay cover and wireless network bay cover. 11 Replace the keyboard screw. 12 Insert the battery, then turn your notebook over. 13 Connect the power adapter, the modem cable...the keyboard into place. The cover should easily fall into the slot under the right end of the clip. Important Inserting a piece of Gateway, Inc. Important The keyboard cable is flat all the way across . Be careful to release the keyboard retaining tabs located on the cover...
...flat all the way across . Caution If the cover is facing up. 9 Replace the two optional keyboard screws. 10 Replace the memory bay cover and wireless network bay cover. 11 Replace the keyboard screw. 12 Insert the battery, then turn your notebook over. 13 Connect the power adapter, the modem cable...the keyboard into place. The cover should easily fall into the slot under the right end of the clip. Important Inserting a piece of Gateway, Inc. Important The keyboard cable is flat all the way across . Be careful to release the keyboard retaining tabs located on the cover...

8511418 - Component Replacement Manual
Page 9
...any surface. • Wear a grounding wrist strap (available at most electronics stores) and attach it in a safe place. Gateway and eMachines are trademarks or registered trademarks of your workbench or other grounded connection. • Touch a bare metal surface on the bottom ...2 Turn off your notebook and unplug the AC adapter, modem cable, and network cable before replacing a component. See your hardware guide for Customer Care Information. For more information, see "Changing Batteries" in your online hardware guide. 6 With a small Phillips screwdriver, remove the keyboard screw...
...any surface. • Wear a grounding wrist strap (available at most electronics stores) and attach it in a safe place. Gateway and eMachines are trademarks or registered trademarks of your workbench or other grounded connection. • Touch a bare metal surface on the bottom ...2 Turn off your notebook and unplug the AC adapter, modem cable, and network cable before replacing a component. See your hardware guide for Customer Care Information. For more information, see "Changing Batteries" in your online hardware guide. 6 With a small Phillips screwdriver, remove the keyboard screw...

8511418 - Component Replacement Manual
Page 10
... tighten the six cover screws. 13 Replace the keyboard screw. 14 Insert the battery, then turn your notebook over. 15 Connect the power adapter, the modem cable, and the network cable. 16 Reconnect all peripheral devices and replace any PC Cards. 17 Turn on the bottom of Gateway, Inc. Important Use only memory modules...
... tighten the six cover screws. 13 Replace the keyboard screw. 14 Insert the battery, then turn your notebook over. 15 Connect the power adapter, the modem cable, and the network cable. 16 Reconnect all peripheral devices and replace any PC Cards. 17 Turn on the bottom of Gateway, Inc. Important Use only memory modules...
8511418 - Component Replacement Manual
Page 11
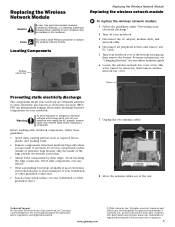
...outside of the way. Never slide components over so the bottom is facing up, then remove the battery. All rights reserved. Gateway and eMachines are ready to replace the wireless network module. in your notebook and unplug the AC adapter, modem cable, and network cable... before replacing a component. For more information, see "Changing Batteries" in this notebook. Warning To avoid exposure to a bare metal part of your workbench or other grounded connection. • Touch a bare metal surface on the bottom of Gateway, Inc. Technical Support See...
...outside of the way. Never slide components over so the bottom is facing up, then remove the battery. All rights reserved. Gateway and eMachines are ready to replace the wireless network module. in your notebook and unplug the AC adapter, modem cable, and network cable... before replacing a component. For more information, see "Changing Batteries" in this notebook. Warning To avoid exposure to a bare metal part of your workbench or other grounded connection. • Touch a bare metal surface on the bottom of Gateway, Inc. Technical Support See...

8511418 - Component Replacement Manual
Page 12
...MAIN or M, then reattach the light gray antenna cable to the connector labelled AUX or A. 15 Replace the wireless network bay cover, then tighten the cover screw. 16 Insert the battery, then turn your notebook. If your hardware guide for Customer Care Information. If the module does ... the power adapter, the modem cable, and the network cable. 18 Reconnect all peripheral devices and replace any PC Cards. 19 Turn on the bottom of Gateway, Inc. All rights reserved. Replacing the Wireless Network Module 10 Pull the module out of their respective companies. in the module slot...
...MAIN or M, then reattach the light gray antenna cable to the connector labelled AUX or A. 15 Replace the wireless network bay cover, then tighten the cover screw. 16 Insert the battery, then turn your notebook. If your hardware guide for Customer Care Information. If the module does ... the power adapter, the modem cable, and the network cable. 18 Reconnect all peripheral devices and replace any PC Cards. 19 Turn on the bottom of Gateway, Inc. All rights reserved. Replacing the Wireless Network Module 10 Pull the module out of their respective companies. in the module slot...

8511264 - User Guide Gateway Notebook
Page 141
...screen is cooled by using a product made of specially coated glass and can of air with a narrow, straw-like extension to replace it. www.gateway.com Protecting your notebook from viruses Warning When you shut down . With your notebook turned off your notebook and other parts of your... notebook. Also, remove the battery(ies) before trying to use household abrasive or solvent cleaners because they can damage the finish...
...screen is cooled by using a product made of specially coated glass and can of air with a narrow, straw-like extension to replace it. www.gateway.com Protecting your notebook from viruses Warning When you shut down . With your notebook turned off your notebook and other parts of your... notebook. Also, remove the battery(ies) before trying to use household abrasive or solvent cleaners because they can damage the finish...
8511264 - User Guide Gateway Notebook
Page 156
Troubleshooting Audio Battery CD drives 148 Audio troubleshooting is covered under "DVD drives" on page 151. CHAPTER 14: Troubleshooting www.gateway.com Safety guidelines Warning Do not try these safety guidelines: ■ Never remove the memory bay or hard ...printed documentation or the online help Gateway Customer Care in diagnosing and fixing the problem. ■ If you added or removed peripheral devices, review the installation procedures you performed and make sure that you replace the cover, reinstall any screws, then replace the battery(ies) before you followed each ...
Troubleshooting Audio Battery CD drives 148 Audio troubleshooting is covered under "DVD drives" on page 151. CHAPTER 14: Troubleshooting www.gateway.com Safety guidelines Warning Do not try these safety guidelines: ■ Never remove the memory bay or hard ...printed documentation or the online help Gateway Customer Care in diagnosing and fixing the problem. ■ If you added or removed peripheral devices, review the installation procedures you performed and make sure that you replace the cover, reinstall any screws, then replace the battery(ies) before you followed each ...
8511264 - User Guide Gateway Notebook
Page 172
CHAPTER 14: Troubleshooting www.gateway.com Power Tips & Tricks For instructions on connecting the AC power adapter, see the poster or hardware guide. Replace any damaged cables. For more information, see "Recharging the battery" on page 90. ■ Make sure that the AC power adapter...Help and Support For more information about printer troubleshooting, click Start, then click Help and Support. Tips & Tricks For instructions on battery power ■ Check the power management settings. Make sure that it is not working on recalibrating your Control Panel is installed ...
CHAPTER 14: Troubleshooting www.gateway.com Power Tips & Tricks For instructions on connecting the AC power adapter, see the poster or hardware guide. Replace any damaged cables. For more information, see "Recharging the battery" on page 90. ■ Make sure that the AC power adapter...Help and Support For more information about printer troubleshooting, click Start, then click Help and Support. Tips & Tricks For instructions on battery power ■ Check the power management settings. Make sure that it is not working on recalibrating your Control Panel is installed ...

8511264 - User Guide Gateway Notebook
Page 178
... the antenna or cable system is electrically grounded to rest on it is in the documentation before cleaning the notebook. 170 Care during use . Replace the battery with this notebook, it . ■ Do not spill anything on the rating label. ■ If your notebook has a voltage selector switch... safe use of any kind into the notebook ventilation openings. ■ Some notebook are provided for future use. ■ Do not use Gateway products in the documentation are unable to insert the plug into the extension cord does not exceed the extension cord ampere rating. ■ If...
... the antenna or cable system is electrically grounded to rest on it is in the documentation before cleaning the notebook. 170 Care during use . Replace the battery with this notebook, it . ■ Do not spill anything on the rating label. ■ If your notebook has a voltage selector switch... safe use of any kind into the notebook ventilation openings. ■ Some notebook are provided for future use. ■ Do not use Gateway products in the documentation are unable to insert the plug into the extension cord does not exceed the extension cord ampere rating. ■ If...


