8511369 - Gateway Notebook Hardware Reference
Page 3
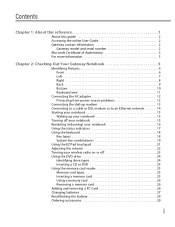
Contents Chapter 1: About this reference 1 About this guide 2 Accessing the online User Guide 2 Gateway contact information 2 Gateway model and serial number 2 Microsoft Certificate of Authenticity 3 For more information 3 Chapter 2: Checking Out Your Gateway Notebook 5 Identifying features 6 Front 6 Left 7 Right 8 Back 9 Bottom 10 Keyboard area 11 Connecting the AC adapter 12 Protecting from power source problems...
Contents Chapter 1: About this reference 1 About this guide 2 Accessing the online User Guide 2 Gateway contact information 2 Gateway model and serial number 2 Microsoft Certificate of Authenticity 3 For more information 3 Chapter 2: Checking Out Your Gateway Notebook 5 Identifying features 6 Front 6 Left 7 Right 8 Back 9 Bottom 10 Keyboard area 11 Connecting the AC adapter 12 Protecting from power source problems...
8511369 - Gateway Notebook Hardware Reference
Page 6
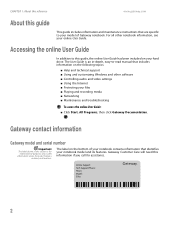
The User Guide is for assistance. Gateway contact information Gateway model and serial number Important The label shown in -depth, easy-to-read manual that identifies your notebook model and its features. Accessing the online User Guide In addition to your model of your notebook contains information that includes information on the following topics: ■ Help...
The User Guide is for assistance. Gateway contact information Gateway model and serial number Important The label shown in -depth, easy-to-read manual that identifies your notebook model and its features. Accessing the online User Guide In addition to your model of your notebook contains information that includes information on the following topics: ■ Help...
8511369 - Gateway Notebook Hardware Reference
Page 14
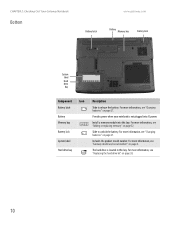
Provides power when your notebook is located in this bay. Includes the product model number. For more information, see "Gateway model and serial number" on page 32. For more information, see "Adding or replacing memory" on page 2. Slide to release the battery. For more information, see "...
Provides power when your notebook is located in this bay. Includes the product model number. For more information, see "Gateway model and serial number" on page 32. For more information, see "Adding or replacing memory" on page 2. Slide to release the battery. For more information, see "...
8511369 - Gateway Notebook Hardware Reference
Page 37
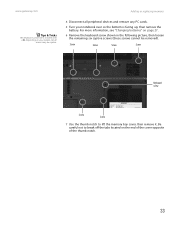
...loosen the remaining six captive screws (these screws cannot be captive. Depending on the end of the cover opposite of the thumb notch. 33 www.gateway.com Tips & Tricks The keyboard screw hole is facing up, then remove the battery. Screw Screw Screw Screw Keyboard screw Screw Screw 7 Use... the thumb notch to break off the tabs located on your model, not all peripheral devices and remove any PC cards. 5 Turn your notebook over so the bottom is marked with a K. Adding or replacing memory...
...loosen the remaining six captive screws (these screws cannot be captive. Depending on the end of the cover opposite of the thumb notch. 33 www.gateway.com Tips & Tricks The keyboard screw hole is facing up, then remove the battery. Screw Screw Screw Screw Keyboard screw Screw Screw 7 Use... the thumb notch to break off the tabs located on your model, not all peripheral devices and remove any PC cards. 5 Turn your notebook over so the bottom is marked with a K. Adding or replacing memory...

8511369 - Gateway Notebook Hardware Reference
Page 40
... the remaining six captive screws (these screws cannot be captive. 7 Remove the keyboard screw shown in a safe place. CHAPTER 3: Maintaining and Upgrading Your Notebook www.gateway.com Tips & Tricks The keyboard screw hole is facing up. 36 Screw 10 Turn your...
... the remaining six captive screws (these screws cannot be captive. 7 Remove the keyboard screw shown in a safe place. CHAPTER 3: Maintaining and Upgrading Your Notebook www.gateway.com Tips & Tricks The keyboard screw hole is facing up. 36 Screw 10 Turn your...

8511369 - Gateway Notebook Hardware Reference
Page 47
Screw Screw Screw Screw Screw Screw 15 Use the thumb notch to break off the tabs located on your model, not all screws may be captive. 14 Close the LCD panel, turn your notebook over so the bottom is facing up, then loosen the six memory bay cover screws (these screws cannot be removed), then remove the mini-PCI bay cover. 43 Be careful not to lift the memory bay cover, then remove it. www.gateway.com Replacing the keyboard Tips & Tricks Depending on the end of the cover opposite of the thumb notch. 16 Loosen the mini-PCI bay cover screw (this screw cannot be removed).
Screw Screw Screw Screw Screw Screw 15 Use the thumb notch to break off the tabs located on your model, not all screws may be captive. 14 Close the LCD panel, turn your notebook over so the bottom is facing up, then loosen the six memory bay cover screws (these screws cannot be removed), then remove the mini-PCI bay cover. 43 Be careful not to lift the memory bay cover, then remove it. www.gateway.com Replacing the keyboard Tips & Tricks Depending on the end of the cover opposite of the thumb notch. 16 Loosen the mini-PCI bay cover screw (this screw cannot be removed).

8511369 - Gateway Notebook Hardware Reference
Page 64
...22 finding specifications 3 Firewire port 8 Fn key 19 folders opening 22 function keys 18 G Gateway model number 2, 10 serial number 2, 3 Support 3 H hard drive bay 10 indicator 17 installing ... connecting 18 features 18 locating 11 replacing 40 USB port 8 keys application 18 60 www.gateway.com arrow 18 battery status 19 brightness 20 directional 18 Fn 19 function 18 LCD brightness ...card reader locating 8 memory card types supported 25 using 25 microphone jack 6 Microsoft Certificate of Authenticity 3 model number 2 modem cable 14 connecting DSL 14 jack 8, 13 monitor port 9 13, 14 mouse USB ...
...22 finding specifications 3 Firewire port 8 Fn key 19 folders opening 22 function keys 18 G Gateway model number 2, 10 serial number 2, 3 Support 3 H hard drive bay 10 indicator 17 installing ... connecting 18 features 18 locating 11 replacing 40 USB port 8 keys application 18 60 www.gateway.com arrow 18 battery status 19 brightness 20 directional 18 Fn 19 function 18 LCD brightness ...card reader locating 8 memory card types supported 25 using 25 microphone jack 6 Microsoft Certificate of Authenticity 3 model number 2 modem cable 14 connecting DSL 14 jack 8, 13 monitor port 9 13, 14 mouse USB ...

8511264 - User Guide Gateway Notebook
Page 59
... BigFix. Whenever BigFix detects a problem, it through the x-ray machine in airports, train stations, or bus terminals. www.gateway.com Traveling securely BigFix Your notebook may ask you leave. BigFix monitors your notebook model number and serial number in case of ownership or a merchandise passport when you travel assistance if your battery...
... BigFix. Whenever BigFix detects a problem, it through the x-ray machine in airports, train stations, or bus terminals. www.gateway.com Traveling securely BigFix Your notebook may ask you leave. BigFix monitors your notebook model number and serial number in case of ownership or a merchandise passport when you travel assistance if your battery...

8511264 - User Guide Gateway Notebook
Page 107
...network. SecureEasySetup Your notebook may be activated. When you set up a secure wireless network. Click the SecureEasySetup icon on select notebook models that helps you change anything about installing it also. This means that your access point has it and setting network security. Check your... your notebook. To test the connection, log onto the Internet using your notebook. If the connection is not working correctly. www.gateway.com Setting up your wireless network Setting up your wireless network Setting up your wireless network involves three steps: 1 Make sure your...
...network. SecureEasySetup Your notebook may be activated. When you set up a secure wireless network. Click the SecureEasySetup icon on select notebook models that helps you change anything about installing it also. This means that your access point has it and setting network security. Check your... your notebook. To test the connection, log onto the Internet using your notebook. If the connection is not working correctly. www.gateway.com Setting up your wireless network Setting up your wireless network Setting up your wireless network involves three steps: 1 Make sure your...
8511264 - User Guide Gateway Notebook
Page 153
... to restrict access to claim your notebook as soon as it passes through the X-ray machine in security checkpoints. ■ Write down your notebook model number and serial number (located on page 89. 145 The password feature is very secure, with confidential files until you are away. ■...to access your desktop computer files from your desktop computer for service. For information on page 41. ■ Take your AC power adapter to Gateway for remote access. Also, tape your business card or an address label to your notebook and accessories. ■ Whoever sits next to you ...
... to restrict access to claim your notebook as soon as it passes through the X-ray machine in security checkpoints. ■ Write down your notebook model number and serial number (located on page 89. 145 The password feature is very secure, with confidential files until you are away. ■...to access your desktop computer files from your desktop computer for service. For information on page 41. ■ Take your AC power adapter to Gateway for remote access. Also, tape your business card or an address label to your notebook and accessories. ■ Whoever sits next to you ...
8511264 - User Guide Gateway Notebook
Page 164
... advanced features, produce a better quality picture, and support higher screen resolutions. Progressive scan video displays a video frame with one at support.gateway.com. This results in the DVR-MS format. You want to a TV ■ Your Media Center computer detects whether you are using... the Media Center computer functions. You can be replayed on another Media Center computer or on a newer model TV. ■ Type of display device you can. Interlaced video displays a video frame with two passes of sequential scan lines. CHAPTER...
... advanced features, produce a better quality picture, and support higher screen resolutions. Progressive scan video displays a video frame with one at support.gateway.com. This results in the DVR-MS format. You want to a TV ■ Your Media Center computer detects whether you are using... the Media Center computer functions. You can be replayed on another Media Center computer or on a newer model TV. ■ Type of display device you can. Interlaced video displays a video frame with two passes of sequential scan lines. CHAPTER...
8511264 - User Guide Gateway Notebook
Page 183
www.gateway.com Index I i.Link port 54, 72 IEEE 1394 port 54, 72 IEEE 802.11 using while... 36 Outlook Express 36 Windows Media Player 65 Windows Movie Maker 72 Wordpad 21 MIDI file 65 minimize button 10 model number 145 modem cable 37 dial-up 36, 144 DSL 37 international adapter 144 troubleshooting 157 monitor adding external 55...file creating 69 editing track information 71 playing 65 MPEG file playing 65 multimedia adjusting volume 62 playing audio CD 66 playing DVD 66, 68 recording audio 69 using Windows Media Player 65 multiple monitors 123 music library building 71 music tracks copying ...
www.gateway.com Index I i.Link port 54, 72 IEEE 1394 port 54, 72 IEEE 802.11 using while... 36 Outlook Express 36 Windows Media Player 65 Windows Movie Maker 72 Wordpad 21 MIDI file 65 minimize button 10 model number 145 modem cable 37 dial-up 36, 144 DSL 37 international adapter 144 troubleshooting 157 monitor adding external 55...file creating 69 editing track information 71 playing 65 MPEG file playing 65 multimedia adjusting volume 62 playing audio CD 66 playing DVD 66, 68 recording audio 69 using Windows Media Player 65 multiple monitors 123 music library building 71 music tracks copying ...


