
8512216 - Gateway Notebook User Guide R1
Page 57
... Before you begin setting up your network, you should contact your ISP for any required drivers. If the connection is working , contact your network. If you do not set up... in the Computer name box. Setting up your computer, click Restart Now. 51 The Control Panel window opens. 2 Click System and Maintenance. All-numeric computer names are setting up a wired network, ... Name, Domain and Workgroup settings area. The workgroup name must be activated. www.gateway.com Setting up wireless Ethernet network hardware Making sure your broadband connection works Important If...
... Before you begin setting up your network, you should contact your ISP for any required drivers. If the connection is working , contact your network. If you do not set up... in the Computer name box. Setting up your computer, click Restart Now. 51 The Control Panel window opens. 2 Click System and Maintenance. All-numeric computer names are setting up a wired network, ... Name, Domain and Workgroup settings area. The workgroup name must be activated. www.gateway.com Setting up wireless Ethernet network hardware Making sure your broadband connection works Important If...
8512216 - Gateway Notebook User Guide R1
Page 60
...following: • Connect your Internet connection, drives, and printers. Sharing drives and printers With a network, you want to install the printer drivers on each computer. Follow the instructions included with the patterns described in the router or access point documentation • Temporarily turn off any ... network, check all physical cable connections • Make sure that your router or access point is set up, log onto one of the window. After the drives and printers on each network computer are shared, you share a drive, the entire contents of the devices, then power...
...following: • Connect your Internet connection, drives, and printers. Sharing drives and printers With a network, you want to install the printer drivers on each computer. Follow the instructions included with the patterns described in the router or access point documentation • Temporarily turn off any ... network, check all physical cable connections • Make sure that your router or access point is set up, log onto one of the window. After the drives and printers on each network computer are shared, you share a drive, the entire contents of the devices, then power...
8512216 - Gateway Notebook User Guide R1
Page 63
...computers. Bluetooth lets you want to connect to open the printer name list, then click the network printer. 3 Click Print. www.gateway.com Printing files across the network Important Before you can print a file across the network: 1 Open the file you transfer information ...not have a Bluetooth radio built-in the Search Help box, then press ENTER. 57 You can obtain the printer driver and installation instructions from . The Network Connections window opens. 5 Under Personal Area Network, click Bluetooth Network Connection. 6 On the toolbar, click View Bluetooth network devices.
...computers. Bluetooth lets you want to connect to open the printer name list, then click the network printer. 3 Click Print. www.gateway.com Printing files across the network Important Before you can print a file across the network: 1 Open the file you transfer information ...not have a Bluetooth radio built-in the Search Help box, then press ENTER. 57 You can obtain the printer driver and installation instructions from . The Network Connections window opens. 5 Under Personal Area Network, click Bluetooth Network Connection. 6 On the toolbar, click View Bluetooth network devices.

8512216 - Gateway Notebook User Guide R1
Page 107
...your library 39 creating audio 40 creating data 43 editing track information 39 playing music 35 clipboard 10 close button 9 closing program 9, 19 window 9, 19 color changing scheme 73 computers naming 51 Computrace 60, 61 configuring router 52 TCP/IP protocol 52 connecting to Internet 23 to... 22 Disk Cleanup 94 Disk Defragmenter 96 display using screen saver 74 documentation Gateway Web site 2 help 3 Help and Support 3 online help 4 documents creating 17 opening 18 printing 18 saving 17 downloading files 24 drivers updating 2 drives backing up files 97 checking for errors 95 checking for ...
...your library 39 creating audio 40 creating data 43 editing track information 39 playing music 35 clipboard 10 close button 9 closing program 9, 19 window 9, 19 color changing scheme 73 computers naming 51 Computrace 60, 61 configuring router 52 TCP/IP protocol 52 connecting to Internet 23 to... 22 Disk Cleanup 94 Disk Defragmenter 96 display using screen saver 74 documentation Gateway Web site 2 help 3 Help and Support 3 online help 4 documents creating 17 opening 18 printing 18 saving 17 downloading files 24 drivers updating 2 drives backing up files 97 checking for errors 95 checking for ...

8512216 - Gateway Notebook User Guide R1
Page 109
www.gateway.com programs 7 P parental controls 86 activity reports 89 blocking specific games 88 game ratings 87 Internet ...old computer 98 Trusted Platform Module 61 U un-sharing drives 55 folders 55 updating device drivers 2 McAfee SecurityCenter 63 Windows 92 user accounts adding in Windows XP 81 switching in Windows XP 81 using Fax 26 V video playing 34 viewing shared drives 56 shared folders 56... 34 Web browser 22, 23 Web page 23 Web site 23 connecting to 24 downloading files 24 Gateway 2 window 8 close button 9 closing 9, 19 maximize button 9 menu bar 9 minimize button 9 title bar 8 103
www.gateway.com programs 7 P parental controls 86 activity reports 89 blocking specific games 88 game ratings 87 Internet ...old computer 98 Trusted Platform Module 61 U un-sharing drives 55 folders 55 updating device drivers 2 McAfee SecurityCenter 63 Windows 92 user accounts adding in Windows XP 81 switching in Windows XP 81 using Fax 26 V video playing 34 viewing shared drives 56 shared folders 56... 34 Web browser 22, 23 Web page 23 Web site 23 connecting to 24 downloading files 24 Gateway 2 window 8 close button 9 closing 9, 19 maximize button 9 menu bar 9 minimize button 9 title bar 8 103

8512055 - Component Replacement Manual
Page 6
... important safety, regulatory, and legal information. 2 www.gateway.com © 2007 Gateway, Inc. Screws Screws 9 Remove the cover from Gateway with the operating system, applications, and drivers installed, you will see a blank screen, insert the Windows DVD into your notebook, then replace the cover screws.... Turn on your notebook's pre-installed software and device drivers. 20 Reconnect all peripheral devices and replace any key on -screen instructions. 19 After Windows is completely re-installed, use the software and driver recovery discs you created to recover your notebook. 16 ...
... important safety, regulatory, and legal information. 2 www.gateway.com © 2007 Gateway, Inc. Screws Screws 9 Remove the cover from Gateway with the operating system, applications, and drivers installed, you will see a blank screen, insert the Windows DVD into your notebook, then replace the cover screws.... Turn on your notebook's pre-installed software and device drivers. 20 Reconnect all peripheral devices and replace any key on -screen instructions. 19 After Windows is completely re-installed, use the software and driver recovery discs you created to recover your notebook. 16 ...
8512488 - Gateway Notebook Reference Guide R2
Page 5
www.gateway.com Conserving battery power 63 Using alternate power sources 64 Changing power modes 64 Changing notebook power settings 66 Changing the power plan 66 Changing ... batteries 78 Cleaning CDs or DVDs 79 Recovering your system 79 Recovering pre-installed software and drivers 80 Using Microsoft System Restore 86 Recovering your system to its factory condition 89 Recovering your system using the Windows DVD 90 Chapter 8: Upgrading Your Notebook 93 Preventing static electricity discharge 94 Adding or replacing...
www.gateway.com Conserving battery power 63 Using alternate power sources 64 Changing power modes 64 Changing notebook power settings 66 Changing the power plan 66 Changing ... batteries 78 Cleaning CDs or DVDs 79 Recovering your system 79 Recovering pre-installed software and drivers 80 Using Microsoft System Restore 86 Recovering your system to its factory condition 89 Recovering your system using the Windows DVD 90 Chapter 8: Upgrading Your Notebook 93 Preventing static electricity discharge 94 Adding or replacing...
8512488 - Gateway Notebook Reference Guide R2
Page 61
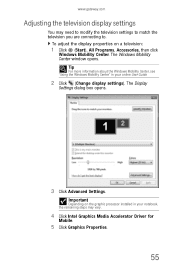
Important Depending on a television: 1 Click (Start), All Programs, Accessories, then click Windows Mobility Center. Tip For more information about the Windows Mobility Center, see "Using the Windows Mobility Center" in your online User Guide. 2 Click (Change display settings). The Display Settings ... modify the television settings to match the television you are connecting to. The Windows Mobility Center window opens. www.gateway.com Adjusting the television display settings You may vary. 4 Click Intel Graphics Media Accelerator Driver for Mobile. 5 Click Graphics Properties. 55
Important Depending on a television: 1 Click (Start), All Programs, Accessories, then click Windows Mobility Center. Tip For more information about the Windows Mobility Center, see "Using the Windows Mobility Center" in your online User Guide. 2 Click (Change display settings). The Display Settings ... modify the television settings to match the television you are connecting to. The Windows Mobility Center window opens. www.gateway.com Adjusting the television display settings You may vary. 4 Click Intel Graphics Media Accelerator Driver for Mobile. 5 Click Graphics Properties. 55
8512488 - Gateway Notebook Reference Guide R2
Page 86
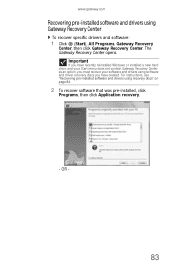
...solved by using Gateway Recovery Center. 80 To recover software and drivers that you must create the discs) or by re-installing the software or the hardware drivers. Recovering pre-installed software and drivers You can recover pre-installed software and drivers from the Windows DVD, then ...recover your pre-installed software and device drivers using recovery discs that were pre-installed at the...
...solved by using Gateway Recovery Center. 80 To recover software and drivers that you must create the discs) or by re-installing the software or the hardware drivers. Recovering pre-installed software and drivers You can recover pre-installed software and drivers from the Windows DVD, then ...recover your pre-installed software and device drivers using recovery discs that were pre-installed at the...
8512488 - Gateway Notebook Reference Guide R2
Page 87
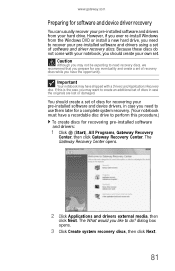
...What would you should create a set of discs for recovering your pre-installed software and device drivers, in case the originals are lost or damaged. However, if you ever re-install Windows from your hard drive. You should create your own set. Caution Although you may not be ...discs while you need to recover your pre-installed software and drivers using a set of software and driver recovery discs. www.gateway.com Preparing for software and device driver recovery You can usually recover your pre-installed software and drivers from the Windows DVD or install a new hard drive, you need to ...
...What would you should create a set of discs for recovering your pre-installed software and device drivers, in case the originals are lost or damaged. However, if you ever re-install Windows from your hard drive. You should create your own set. Caution Although you may not be ...discs while you need to recover your pre-installed software and drivers using a set of software and driver recovery discs. www.gateway.com Preparing for software and device driver recovery You can usually recover your pre-installed software and drivers from the Windows DVD or install a new hard drive, you need to ...

8512488 - Gateway Notebook Reference Guide R2
Page 88
...the recordable disc drive, then click Next. If you remove each disc from the drive, use the marker to label each disc "Software and Driver Recovery," along with a short description of a 3-disc set of recovery discs. 5 If you are completed. The disc recording begins. Label ...are for disc 1 of which notebook the discs are required, insert the additional blank discs when prompted. 7 When the process is finished, the Congratulations! window opens. 8 Click Finish. 9 Remove your notebook names the disc Recovery13 for . If an AutoPlay dialog box opens, click the x in a safe ...
...the recordable disc drive, then click Next. If you remove each disc from the drive, use the marker to label each disc "Software and Driver Recovery," along with a short description of a 3-disc set of recovery discs. 5 If you are completed. The disc recording begins. Label ...are for disc 1 of which notebook the discs are required, insert the additional blank discs when prompted. 7 When the process is finished, the Congratulations! window opens. 8 Click Finish. 9 Remove your notebook names the disc Recovery13 for . If an AutoPlay dialog box opens, click the x in a safe ...
8512488 - Gateway Notebook Reference Guide R2
Page 89
...-installed software and drivers using software and driver recovery discs you have recently reinstalled Windows or installed a new hard drive, and your Start menu does not contain Gateway Recovery Center as an option, you have created. The Gateway Recovery Center opens. OR - 83 Important If you must recover your software and drivers using Gateway Recovery Center To...
...-installed software and drivers using software and driver recovery discs you have recently reinstalled Windows or installed a new hard drive, and your Start menu does not contain Gateway Recovery Center as an option, you have created. The Gateway Recovery Center opens. OR - 83 Important If you must recover your software and drivers using Gateway Recovery Center To...

8512488 - Gateway Notebook Reference Guide R2
Page 92
...on the list and you have a multiple-disc set of these restore points to one of recovery discs, close Gateway Recovery Center and try another disc. Type windows system restore in the Search Help box, then press ENTER. 86 Help For more information about using Microsoft System Restore... as restore points. CHAPTER 7: Maintaining Your Notebook To recover pre-installed device drivers, click Device driver recovery, then click the type of driver you want to recover. 3 Click Next. 4 If the software or driver is not shown on page 88. Using Microsoft System Restore Microsoft System Restore ...
...on the list and you have a multiple-disc set of these restore points to one of recovery discs, close Gateway Recovery Center and try another disc. Type windows system restore in the Search Help box, then press ENTER. 86 Help For more information about using Microsoft System Restore... as restore points. CHAPTER 7: Maintaining Your Notebook To recover pre-installed device drivers, click Device driver recovery, then click the type of driver you want to recover. 3 Click Next. 4 If the software or driver is not shown on page 88. Using Microsoft System Restore Microsoft System Restore ...
8512488 - Gateway Notebook Reference Guide R2
Page 95
...Windows: a Click (Start), All Programs, Gateway Recovery Center, then click Gateway Recovery Center. Your notebook restarts. 2 If you can still run Windows: a Turn on or restart your notebook. Caution A complete factory recovery deletes everything on your hard drive, then reinstalls Windows and any pre-installed software and device drivers... The Welcome to select a Windows user account, click in the Password box and type the user account's password (if any), then click Next. The Gateway Recovery Center opens. b Click Recovery, then click Next. Gateway System Recovery starts, and the...
...Windows: a Click (Start), All Programs, Gateway Recovery Center, then click Gateway Recovery Center. Your notebook restarts. 2 If you can still run Windows: a Turn on or restart your notebook. Caution A complete factory recovery deletes everything on your hard drive, then reinstalls Windows and any pre-installed software and device drivers... The Welcome to select a Windows user account, click in the Password box and type the user account's password (if any), then click Next. The Gateway Recovery Center opens. b Click Recovery, then click Next. Gateway System Recovery starts, and the...
8512488 - Gateway Notebook Reference Guide R2
Page 96
...notebook. 90 Recovering your system using the Windows Vista® operating system DVD. Important Before your hard drive is complete window opens. 10 Click Finish, then click Restart. The Factory image recovery window opens, which shows you the progress of software and driver recovery discs (if you want to c:\... to save. 9 Click Yes, then click Next. For instructions, see "To create discs for recovering pre-installed software and drivers:" on page 81. 2 Insert the Windows DVD into your notebook's DVD drive, then turn on or restart your notebook's pre-installed software and device...
...notebook. 90 Recovering your system using the Windows Vista® operating system DVD. Important Before your hard drive is complete window opens. 10 Click Finish, then click Restart. The Factory image recovery window opens, which shows you the progress of software and driver recovery discs (if you want to c:\... to save. 9 Click Yes, then click Next. For instructions, see "To create discs for recovering pre-installed software and drivers:" on page 81. 2 Insert the Windows DVD into your notebook's DVD drive, then turn on or restart your notebook's pre-installed software and device...

8512488 - Gateway Notebook Reference Guide R2
Page 97
www.gateway.com 3 When the prompt "Press any key to recover your keyboard. A list of valid boot devices appears. 4 Press the arrow keys to select the drive containing the Windows DVD, then press ENTER and follow the on-screen instructions. 5 After Windows is completely re-installed, use the software and driver recovery discs you created to boot from CD or DVD" appears, press any key on page 84. 91 For instructions, see "Recovering pre-installed software and drivers using recovery discs" on your notebook's pre-installed software and device drivers.
www.gateway.com 3 When the prompt "Press any key to recover your keyboard. A list of valid boot devices appears. 4 Press the arrow keys to select the drive containing the Windows DVD, then press ENTER and follow the on-screen instructions. 5 After Windows is completely re-installed, use the software and driver recovery discs you created to boot from CD or DVD" appears, press any key on page 84. 91 For instructions, see "Recovering pre-installed software and drivers using recovery discs" on your notebook's pre-installed software and device drivers.
8512488 - Gateway Notebook Reference Guide R2
Page 106
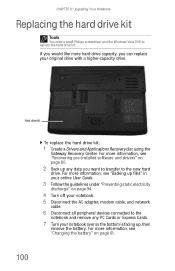
... drive with a higher-capacity drive. For more information, see "Recovering pre-installed software and drivers" on page 61. 100 CHAPTER 8: Upgrading Your Notebook Replacing the hard drive kit Tools You need a small Phillips screwdriver and the Windows Vista DVD to the notebook and remove any data you would like more information, see... cable, and network cable. 6 Disconnect all peripheral devices connected to replace the hard drive kit. Hard drive kit To replace the hard drive kit: 1 Create a Drivers and Applications Recovery disc using the Gateway Recovery Center.
... drive with a higher-capacity drive. For more information, see "Recovering pre-installed software and drivers" on page 61. 100 CHAPTER 8: Upgrading Your Notebook Replacing the hard drive kit Tools You need a small Phillips screwdriver and the Windows Vista DVD to the notebook and remove any data you would like more information, see... cable, and network cable. 6 Disconnect all peripheral devices connected to replace the hard drive kit. Hard drive kit To replace the hard drive kit: 1 Create a Drivers and Applications Recovery disc using the Gateway Recovery Center.
8512488 - Gateway Notebook Reference Guide R2
Page 108
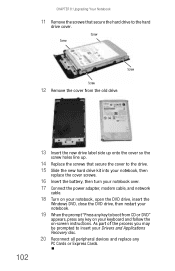
... to boot from CD or DVD" appears, press any key on your keyboard and follow the on your notebook, open the DVD drive, insert the Windows DVD, close the DVD drive, then restart your notebook. 19 When the prompt "Press any key to the hard drive cover. CHAPTER 8: Upgrading Your Notebook... the power adapter, modem cable, and network cable. 18 Turn on -screen instructions. As part of the process you may be prompted to insert your Drivers and Applications Recovery disc. 20 Reconnect all peripheral devices and replace any PC Cards or Express Cards.
... to boot from CD or DVD" appears, press any key on your keyboard and follow the on your notebook, open the DVD drive, insert the Windows DVD, close the DVD drive, then restart your notebook. 19 When the prompt "Press any key to the hard drive cover. CHAPTER 8: Upgrading Your Notebook... the power adapter, modem cable, and network cable. 18 Turn on -screen instructions. As part of the process you may be prompted to insert your Drivers and Applications Recovery disc. 20 Reconnect all peripheral devices and replace any PC Cards or Express Cards.

8512488 - Gateway Notebook Reference Guide R2
Page 114
... 42. • Shut down and restart your notebook. • Clean the disc. For the location of the headphone jack, see "Recovering pre-installed software and drivers" on page 79. For more information, see "Front" on . • Clean the disc. CHAPTER 9: Troubleshooting • Try a different disc. An audio...on page 36. • Make sure that Mute controls are turned off. • If you are using powered speakers, make sure that the Windows volume control is facing up . For more information about using the built-in and turned on page 6. • If you are plugged in speakers...
... 42. • Shut down and restart your notebook. • Clean the disc. For the location of the headphone jack, see "Recovering pre-installed software and drivers" on page 79. For more information, see "Front" on . • Clean the disc. CHAPTER 9: Troubleshooting • Try a different disc. An audio...on page 36. • Make sure that Mute controls are turned off. • If you are using powered speakers, make sure that the Windows volume control is facing up . For more information about using the built-in and turned on page 6. • If you are plugged in speakers...
8512488 - Gateway Notebook Reference Guide R2
Page 132
... button that the printer is not set to is connected to the correct port. • Make sure that came with your notebook. The Control Panel window opens. 2 Click Hardware and Sound. 3 Click Printers. 4 Right-click the name of the printer you want to add additional memory to be the default ...printer, then click Set as Default Printer. • Reinstall the printer driver. The Control Panel window opens. 2 Click Hardware and Sound. 3 Click Printers. 4 If the printer status is on installing the printer...
... button that the printer is not set to is connected to the correct port. • Make sure that came with your notebook. The Control Panel window opens. 2 Click Hardware and Sound. 3 Click Printers. 4 Right-click the name of the printer you want to add additional memory to be the default ...printer, then click Set as Default Printer. • Reinstall the printer driver. The Control Panel window opens. 2 Click Hardware and Sound. 3 Click Printers. 4 If the printer status is on installing the printer...


