8513017 - Gateway Notebook Reference Guide with eRecovery R2
Page 28
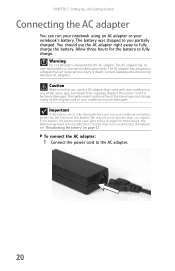
... right away to disassemble the AC adapter. Replace the power cord if it becomes damaged....voltage rating as the original cord or your notebook may be recalibrated. Contact Gateway about returning defective AC adapters. Allow three hours for the battery to be...power for three hours, the battery may be of the same type purchased from Gateway. Important If the battery is not fully charged before you use your notebook's ...connect the AC adapter: 1 Connect the power cord to you expect. The replacement cord must be much shorter than you partially charged. The battery was shipped to...
... right away to disassemble the AC adapter. Replace the power cord if it becomes damaged....voltage rating as the original cord or your notebook may be recalibrated. Contact Gateway about returning defective AC adapters. Allow three hours for the battery to be...power for three hours, the battery may be of the same type purchased from Gateway. Important If the battery is not fully charged before you use your notebook's ...connect the AC adapter: 1 Connect the power cord to you expect. The replacement cord must be much shorter than you partially charged. The battery was shipped to...
8513017 - Gateway Notebook Reference Guide with eRecovery R2
Page 97
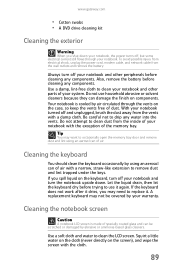
...With your system. A replacement keyboard may not be scratched or damaged by using an aerosol can damage the finish on the screen), and wipe the screen with a damp cloth. Always turn the notebook upside down your notebook, the power turns off your notebook and other parts of your notebook turned off...battery. Let the liquid drain, then let the keyboard dry before cleaning any components. Also, remove the battery before cleaning any components. www.gateway.com • Cotton swabs • A DVD drive cleaning kit Cleaning the exterior Warning When you shut down .
...With your system. A replacement keyboard may not be scratched or damaged by using an aerosol can damage the finish on the screen), and wipe the screen with a damp cloth. Always turn the notebook upside down your notebook, the power turns off your notebook and other parts of your notebook turned off...battery. Let the liquid drain, then let the keyboard dry before cleaning any components. Also, remove the battery before cleaning any components. www.gateway.com • Cotton swabs • A DVD drive cleaning kit Cleaning the exterior Warning When you shut down .
8513017 - Gateway Notebook Reference Guide with eRecovery R2
Page 110
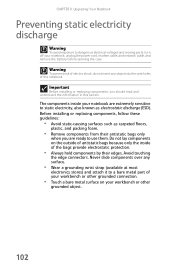
Important Before installing or replacing components, you are ready to use them. Do not lay components on your workbench or other grounded connection. • Touch a bare metal surface on the ... shock, do not insert any surface. • Wear a grounding wrist strap (available at most electronics stores) and attach it to a bare metal part of the notebook. Before installing or replacing components, follow these guidelines: • Avoid static-causing surfaces such as electrostatic discharge (ESD). Never slide components over any object into the...
Important Before installing or replacing components, you are ready to use them. Do not lay components on your workbench or other grounded connection. • Touch a bare metal surface on the ... shock, do not insert any surface. • Wear a grounding wrist strap (available at most electronics stores) and attach it to a bare metal part of the notebook. Before installing or replacing components, follow these guidelines: • Avoid static-causing surfaces such as electrostatic discharge (ESD). Never slide components over any object into the...
8513017 - Gateway Notebook Reference Guide with eRecovery R2
Page 118
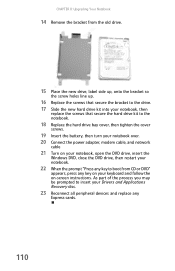
As part of the process you may be prompted to boot from the old drive. 15 Place the new drive, label side up, onto the bracket so the screw holes line up. 16 Replace the screws that secure the bracket to the drive. 17 Slide the new hard drive kit into your notebook... bay cover, then tighten the cover screws. 19 Insert the battery, then turn your Drivers and Applications Recovery disc. 23 Reconnect all peripheral devices and replace any key to insert your notebook over. 20 Connect the power adapter, modem cable, and network cable 21 Turn on -screen instructions. CHAPTER 8: Upgrading Your...
As part of the process you may be prompted to boot from the old drive. 15 Place the new drive, label side up, onto the bracket so the screw holes line up. 16 Replace the screws that secure the bracket to the drive. 17 Slide the new hard drive kit into your notebook... bay cover, then tighten the cover screws. 19 Insert the battery, then turn your Drivers and Applications Recovery disc. 23 Reconnect all peripheral devices and replace any key to insert your notebook over. 20 Connect the power adapter, modem cable, and network cable 21 Turn on -screen instructions. CHAPTER 8: Upgrading Your...

8513017 - Gateway Notebook Reference Guide with eRecovery R2
Page 149
Replacement parts and accessories Use only replacement parts and accessories recommended by Gateway. Regulatory compliance statements Wireless guidance Warning Radio frequency wireless communication can interfere with an internal embedded wireless device, do not ...cellular or PCS cellular bands (i.e. Warning In environments where the risk of interference to other devices or services is fully assembled. Please contact Gateway for authorization prior to use wireless devices, ask the applicable authority for service. 141 Airports, Hospitals, and Oxygen or flammable gas laden atmospheres...
Replacement parts and accessories Use only replacement parts and accessories recommended by Gateway. Regulatory compliance statements Wireless guidance Warning Radio frequency wireless communication can interfere with an internal embedded wireless device, do not ...cellular or PCS cellular bands (i.e. Warning In environments where the risk of interference to other devices or services is fully assembled. Please contact Gateway for authorization prior to use wireless devices, ask the applicable authority for service. 141 Airports, Hospitals, and Oxygen or flammable gas laden atmospheres...


