
User Guide
Page 3
Contents Using Your Gateway Flat-Panel Monitor 1 Connecting the monitor 2 Connecting video inputs 2 Connecting power 2 Connecting a security cable 3 Setting up the optional speaker bar 3 Starting the monitor 5 Adjusting monitor settings 6 Using the EzTouch menu buttons 6 Using the shortcut menu 6 Using the main menu 7 Using Picture-in-Picture (PIP 9 Changing Windows screen settings 10 Changing color depth and screen resolution 10 EzTune software 11 Power management 12 Energy declaration 12 Maintaining 12 Troubleshooting 12 No power 12 No picture 13 Display colors are wrong...
Contents Using Your Gateway Flat-Panel Monitor 1 Connecting the monitor 2 Connecting video inputs 2 Connecting power 2 Connecting a security cable 3 Setting up the optional speaker bar 3 Starting the monitor 5 Adjusting monitor settings 6 Using the EzTouch menu buttons 6 Using the shortcut menu 6 Using the main menu 7 Using Picture-in-Picture (PIP 9 Changing Windows screen settings 10 Changing color depth and screen resolution 10 EzTune software 11 Power management 12 Energy declaration 12 Maintaining 12 Troubleshooting 12 No power 12 No picture 13 Display colors are wrong...

User Guide
Page 5
Using Your Gateway Flat-Panel Monitor • Connecting the monitor • Starting the monitor • Adjusting monitor settings • Changing Windows screen settings • Power management • Maintaining • Troubleshooting • Specifications 1
Using Your Gateway Flat-Panel Monitor • Connecting the monitor • Starting the monitor • Adjusting monitor settings • Changing Windows screen settings • Power management • Maintaining • Troubleshooting • Specifications 1

User Guide
Page 6
... blue VGA video connector on the monitor. OR Connect an HDMI cable to the HDMI port on the monitor, or connect component video cables to the power connector under the back of the monitor. Connecting video inputs To connect video sources to your monitor: 1 Position your computer and the monitor so you can reach the back of your computer has a digital video connector (DVI), connect a DVI video cable (not included) to the matching video port on the back of each. 2 If your computer. Power connector 2 Using Your Gateway Flat-Panel Monitor Connecting the monitor To set...
... blue VGA video connector on the monitor. OR Connect an HDMI cable to the HDMI port on the monitor, or connect component video cables to the power connector under the back of the monitor. Connecting video inputs To connect video sources to your monitor: 1 Position your computer and the monitor so you can reach the back of your computer has a digital video connector (DVI), connect a DVI video cable (not included) to the matching video port on the back of each. 2 If your computer. Power connector 2 Using Your Gateway Flat-Panel Monitor Connecting the monitor To set...

User Guide
Page 7
....gateway.com. Kensington lock slot Setting up the optional speaker bar An optional speaker bar is available for mounting underneath your computer desk (or to the Kensington lock slot on the front button panel. To install the speaker bar: 1 Turn off the monitor. 2 Tilt the screen back, then match the mounting clips on the power button should be glowing purple. If the power icon is not visible, power is correctly connected, check...
....gateway.com. Kensington lock slot Setting up the optional speaker bar An optional speaker bar is available for mounting underneath your computer desk (or to the Kensington lock slot on the front button panel. To install the speaker bar: 1 Turn off the monitor. 2 Tilt the screen back, then match the mounting clips on the power button should be glowing purple. If the power icon is not visible, power is correctly connected, check...

User Guide
Page 9
... for the display image to adjust other monitor settings. Starting the monitor To start the monitor: 1 Touch the power button on the back of monitor. To remove the speaker bar: 1 Disconnect all audio and power cables from purple (off) to hear the audio. Power button 2 Turn on the monitor's power button should be blue. For more troubleshooting information, see "Adjusting monitor settings" on your computer. After your computer is running, the power LED on your monitor. See your source device's user guide for the best viewing angle. 4 Use the...
... for the display image to adjust other monitor settings. Starting the monitor To start the monitor: 1 Touch the power button on the back of monitor. To remove the speaker bar: 1 Disconnect all audio and power cables from purple (off) to hear the audio. Power button 2 Turn on the monitor's power button should be blue. For more troubleshooting information, see "Adjusting monitor settings" on your computer. After your computer is running, the power LED on your monitor. See your source device's user guide for the best viewing angle. 4 Use the...
User Guide
Page 10
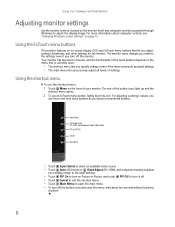
For adjusting a setting's values, you can touch and hold touch buttons as you adjust contrast, brightness, and other settings for the monitor. Input Select VGA mode: Auto DVI, HDMI, and Component mode: Video Adjust PIP On/PIP Off Cancel Main Menu • Touch Input Select to select an available video source. • Touch Auto (VGA mode) or Video Adjust (DVI, HDMI, and component modes) to adjust the display image. Using the shortcut menu To use an EzTouch menu button, lightly touch its icon. Using the EzTouch menu buttons This monitor features an on page 10. Your monitor has two...
For adjusting a setting's values, you can touch and hold touch buttons as you adjust contrast, brightness, and other settings for the monitor. Input Select VGA mode: Auto DVI, HDMI, and Component mode: Video Adjust PIP On/PIP Off Cancel Main Menu • Touch Input Select to select an available video source. • Touch Auto (VGA mode) or Video Adjust (DVI, HDMI, and component modes) to adjust the display image. Using the shortcut menu To use an EzTouch menu button, lightly touch its icon. Using the EzTouch menu buttons This monitor features an on page 10. Your monitor has two...

User Guide
Page 11
... menu To use a button, lightly touch its icon. Reset-Resets the monitor to optimum settings. (VGA mode only) Picture-Opens the Picture menu, where you can adjust the sharpness, video scaling, overscan, noise reduction, film mode detection, and auto video enhance values of the monitor backlights. Brightness-Adjusts the amount of light in -Picture image. You may need to maximize the life of the video image from a source such as you can adjust brightness, contrast, and gamma. PIP Settings-Opens the PIP Settings menu, where you can adjust color balance, change...
... menu To use a button, lightly touch its icon. Reset-Resets the monitor to optimum settings. (VGA mode only) Picture-Opens the Picture menu, where you can adjust the sharpness, video scaling, overscan, noise reduction, film mode detection, and auto video enhance values of the monitor backlights. Brightness-Adjusts the amount of light in -Picture image. You may need to maximize the life of the video image from a source such as you can adjust brightness, contrast, and gamma. PIP Settings-Opens the PIP Settings menu, where you can adjust color balance, change...

User Guide
Page 12
... video source. Sharpness-Adjusts sharpness for optimized video performance. If overscan is turned off at the top and bottom. MADI-Motion-Adaptive De-Interlacing ensures a more static (flicker-free) display image for image sections not containing moving elements. 8 PC input: Zooms the image to fill the screen from some types of the video being displayed. Using Your Gateway Flat-Panel Monitor OSD Menu Description PIP Settings menu PIP Display-Toggles the display of the video used in the PIP window. Source-Sets the source...
... video source. Sharpness-Adjusts sharpness for optimized video performance. If overscan is turned off at the top and bottom. MADI-Motion-Adaptive De-Interlacing ensures a more static (flicker-free) display image for image sections not containing moving elements. 8 PC input: Zooms the image to fill the screen from some types of the video being displayed. Using Your Gateway Flat-Panel Monitor OSD Menu Description PIP Settings menu PIP Display-Toggles the display of the video used in the PIP window. Source-Sets the source...

User Guide
Page 13
... OSD. Using Picture-in-Picture (PIP) Picture-in Windows to turn off the Resolution Reminder. OK HDMI OK No OK - ** For some video resolutions, refresh rates, and video scaling modes, PIP may want to change . www.gateway.com OSD Menu Geometry menu (VGA mode only) Advanced menu Description H Position-Moves the display image left and right. Information-Displays the current screen resolution and input source for analog TV input such as a PIP display. For more information. ■ Adjust the video scaling mode to Wide on page 10. 9 The horizontal screen size...
... OSD. Using Picture-in-Picture (PIP) Picture-in Windows to turn off the Resolution Reminder. OK HDMI OK No OK - ** For some video resolutions, refresh rates, and video scaling modes, PIP may want to change . www.gateway.com OSD Menu Geometry menu (VGA mode only) Advanced menu Description H Position-Moves the display image left and right. Information-Displays the current screen resolution and input source for analog TV input such as a PIP display. For more information. ■ Adjust the video scaling mode to Wide on page 10. 9 The horizontal screen size...
User Guide
Page 14
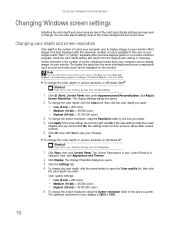
... color setting, if necessary. If the new settings do not look best displayed with the maximum number of colors available. Changing color depth and screen resolution Color depth is the number of pixels (individual colored dots) your computer uses to display images on your display is the number of colors your computer uses to display images on the monitor. You can be displayed on your Windows desktop, then click Properties. 1 Click Start, then click Control Panel. Using Your Gateway Flat-Panel Monitor Changing Windows screen settings Adjusting the color depth and screen...
... color setting, if necessary. If the new settings do not look best displayed with the maximum number of colors available. Changing color depth and screen resolution Color depth is the number of pixels (individual colored dots) your computer uses to display images on your display is the number of colors your computer uses to display images on the monitor. You can be displayed on your Windows desktop, then click Properties. 1 Click Start, then click Control Panel. Using Your Gateway Flat-Panel Monitor Changing Windows screen settings Adjusting the color depth and screen...

User Guide
Page 15
...; Change brightness, contrast, and color balance • Change screen geometry • Set the display position and resolution For more information, see the program's CD or the installed program's online help. 11 If the new settings do not look right, click No. With EzTune, you control many of the monitor settings from your computer, EzTune™ software (included on CD) lets you can: • Change the orientation of the image...
...; Change brightness, contrast, and color balance • Change screen geometry • Set the display position and resolution For more information, see the program's CD or the installed program's online help. 11 If the new settings do not look right, click No. With EzTune, you control many of the monitor settings from your computer, EzTune™ software (included on CD) lets you can: • Change the orientation of the image...

User Guide
Page 16
In the Active Off mode the Power LED will then enter the Active Off mode (sleep). Use these conventions and the power can conserve significant energy by reducing power consumption during periods of non-use. Using Your Gateway Flat-Panel Monitor Power management Energy declaration When connected to a computer that supports the VESA Display Power Management Signaling (DPMS) Protocol, the monitor can be reduced to the following levels: VESA State LED Indicator Power Consumption On Blue When your computer goes into the energy saving mode, the monitor will still show orange.
In the Active Off mode the Power LED will then enter the Active Off mode (sleep). Use these conventions and the power can conserve significant energy by reducing power consumption during periods of non-use. Using Your Gateway Flat-Panel Monitor Power management Energy declaration When connected to a computer that supports the VESA Display Power Management Signaling (DPMS) Protocol, the monitor can be reduced to the following levels: VESA State LED Indicator Power Consumption On Blue When your computer goes into the energy saving mode, the monitor will still show orange.

User Guide
Page 17
...; Touch Menu, Main Menu, then touch Auto to automatically adjust the display image to the ideal settings. (VGA mode only) • Remove any pins that might be bent or pushed in . • Turn off the monitor and unplug the video cable from the back of your monitor. www.gateway.com No picture • Touch Menu, then touch Input Select to make sure that you have selected the correct video source. • Make sure that the power cord is connected correctly...
...; Touch Menu, Main Menu, then touch Auto to automatically adjust the display image to the ideal settings. (VGA mode only) • Remove any pins that might be bent or pushed in . • Turn off the monitor and unplug the video cable from the back of your monitor. www.gateway.com No picture • Touch Menu, then touch Input Select to make sure that you have selected the correct video source. • Make sure that the power cord is connected correctly...
User Guide
Page 18
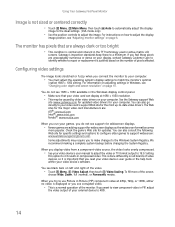
...'s user guide or the help tools within your video device's software. Using Your Gateway Flat-Panel Monitor Image is not sized or centered correctly • Touch Menu, Main Menu, then touch Auto to automatically adjust the display image to the ideal settings. (VGA mode only) • Use the position controls to -date video drivers. Check the game's Web site for your games, you try to 480i. 14 Setting this option to support widescreen: www.widescreengamingforum.com. For instructions on the number of the screen...
...'s user guide or the help tools within your video device's software. Using Your Gateway Flat-Panel Monitor Image is not sized or centered correctly • Touch Menu, Main Menu, then touch Auto to automatically adjust the display image to the ideal settings. (VGA mode only) • Use the position controls to -date video drivers. Check the game's Web site for your games, you try to 480i. 14 Setting this option to support widescreen: www.widescreengamingforum.com. For instructions on the number of the screen...

User Guide
Page 19
..., in the Windows taskbar, or click (Start), Control Panel, Sounds and Audio Devices, the Volume tab, then click Advanced. Also make sure that you can support the input of the speaker bar. To check your video device to plug in a superior digital image. The sound coming out of the speakers. • Make sure that the speaker bar power cord is plugged into the speaker bar's microphone jack, but no audio is set the Windows volume mid-way between...
..., in the Windows taskbar, or click (Start), Control Panel, Sounds and Audio Devices, the Volume tab, then click Advanced. Also make sure that you can support the input of the speaker bar. To check your video device to plug in a superior digital image. The sound coming out of the speakers. • Make sure that the speaker bar power cord is plugged into the speaker bar's microphone jack, but no audio is set the Windows volume mid-way between...

User Guide
Page 20
... that uses a digital visual interface (DVI). Using Your Gateway Flat-Panel Monitor HDCP What is HDCP and how should you troubleshoot it is not negotiating correctly. After authentication is a specification developed by Faroudja is a video mode algorithm that need smoothing. 16 High-bandwidth Digital Content Protection (HDCP) is established, the transmitter encrypts the data and sends it to watch broadcast TV, then change the input back...
... that uses a digital visual interface (DVI). Using Your Gateway Flat-Panel Monitor HDCP What is HDCP and how should you troubleshoot it is not negotiating correctly. After authentication is a specification developed by Faroudja is a video mode algorithm that need smoothing. 16 High-bandwidth Digital Content Protection (HDCP) is established, the transmitter encrypts the data and sends it to watch broadcast TV, then change the input back...

User Guide
Page 21
...:10 Brightness 300 cd/m2 Contrast ratio 1000:1 Viewing angles 160° horizontal, 160° vertical Response time UltraResponse enabled: 4 ms (typical) UltraResponse disabled: 5 ms (typical) Frequency Horizontal: 30-83 KHz Vertical: 56-75 Hz Lamp type/life 40,000 -50,000 hours (minimum) Colors 16.7 million OSD languages English, French, Spanish, Italian, Japanese Connections and inputs ■ Analog (VGA): 15-pin mini d-sub VGA ■ Digital (DVI-D): 24-pin DVI-D (supports...
...:10 Brightness 300 cd/m2 Contrast ratio 1000:1 Viewing angles 160° horizontal, 160° vertical Response time UltraResponse enabled: 4 ms (typical) UltraResponse disabled: 5 ms (typical) Frequency Horizontal: 30-83 KHz Vertical: 56-75 Hz Lamp type/life 40,000 -50,000 hours (minimum) Colors 16.7 million OSD languages English, French, Spanish, Italian, Japanese Connections and inputs ■ Analog (VGA): 15-pin mini d-sub VGA ■ Digital (DVI-D): 24-pin DVI-D (supports...

User Guide
Page 24
... water. The voltage selector switch is set up the system on a stable work area. Refer servicing to qualified service personnel. ■ Do not walk on the power cord or allow it to insert the plug into the extension cord does not exceed the extension cord ampere rating. Replacement parts and accessories Use only replacement parts and accessories recommended by Gateway. 20 If the monitor does get exposed to...
... water. The voltage selector switch is set up the system on a stable work area. Refer servicing to qualified service personnel. ■ Do not walk on the power cord or allow it to insert the plug into the extension cord does not exceed the extension cord ampere rating. Replacement parts and accessories Use only replacement parts and accessories recommended by Gateway. 20 If the monitor does get exposed to...

User Guide
Page 25
... the environment by disposing of in the online Reference Guide. Call Gateway to your local or regional waste collection administration for recycling. ■ In some cases, your part for computer energy efficiency and power management. Sleep mode uses less energy to run your computer, saves on the keyboard, or press the power button to "wake" it back" to see "Managing...
... the environment by disposing of in the online Reference Guide. Call Gateway to your local or regional waste collection administration for recycling. ■ In some cases, your part for computer energy efficiency and power management. Sleep mode uses less energy to run your computer, saves on the keyboard, or press the power button to "wake" it back" to see "Managing...

User Guide
Page 26
... from digital apparatus as set out in the radio interference regulations of the following two conditions: (1) this device may cause harmful interference to Part 15 of conformity Model: ■ HD2200/E ■ HD2201 Caution Changes or modifications not expressly approved by one or more of Industry Canada. FCC declaration of the FCC rules. These limits are : shielded video cable...
... from digital apparatus as set out in the radio interference regulations of the following two conditions: (1) this device may cause harmful interference to Part 15 of conformity Model: ■ HD2200/E ■ HD2201 Caution Changes or modifications not expressly approved by one or more of Industry Canada. FCC declaration of the FCC rules. These limits are : shielded video cable...


