
Owner's Manual
Page 1
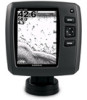
echo™ 200, 300c, 500c and 550c owner's manual
echo™ 200, 300c, 500c and 550c owner's manual
Owner's Manual
Page 3
...and 2 to http://my.garmin.com. • Keep the original sales receipt, or a photocopy, in -country support. Select an option: • For the echo 200, echo 500c, and echo 550c, select to advance to the next digit. • For the echo 300c, select ENTER to advance... to describe these actions: • Highlighting an item in the product box for the echo™ 200, the echo 300c, the echo 500c, and the echo 550c fishfinders. echo 200, echo 300c, echo 500c, and echo 550c Owner's Manual i Introduction Warning See the Important Safety and Product Information guide in a menu...
...and 2 to http://my.garmin.com. • Keep the original sales receipt, or a photocopy, in -country support. Select an option: • For the echo 200, echo 500c, and echo 550c, select to advance to the next digit. • For the echo 300c, select ENTER to advance... to describe these actions: • Highlighting an item in the product box for the echo™ 200, the echo 300c, the echo 500c, and the echo 550c fishfinders. echo 200, echo 300c, echo 500c, and echo 550c Owner's Manual i Introduction Warning See the Important Safety and Product Information guide in a menu...
Owner's Manual
Page 4
... 5 Split Frequency Page 5 Log Pages 6 ii Flasher Page 8 Opening the Numbers Page 8 Using the echo 9 Sonar Screen Settings 9 Alarms 13 Sonar Numbers 15 Calibration 16 Appendix 18 Specifications 18 Cleaning the Outer Casing 18 Cleaning the Screen 18 System Settings 18 Software License Agreement 19 Index 20 echo 200, echo 300c, echo 500c, and echo 550c Owner's Manual
... 5 Split Frequency Page 5 Log Pages 6 ii Flasher Page 8 Opening the Numbers Page 8 Using the echo 9 Sonar Screen Settings 9 Alarms 13 Sonar Numbers 15 Calibration 16 Appendix 18 Specifications 18 Cleaning the Outer Casing 18 Cleaning the Screen 18 System Settings 18 Software License Agreement 19 Index 20 echo 200, echo 300c, echo 500c, and echo 550c Owner's Manual
Owner's Manual
Page 5
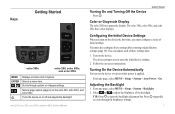
... the first time, you to cycle through options or changes settings. Follow the on the echo 200, echo 500c, and echo 550c. Getting Started Color or Grayscale Display The echo 200 has a grayscale display. The device prompts you must also configure these settings later. 1.... adjusts the backlight. From any page, select MENU > Setup > System > Backlight. 2. The echo 300c, echo 500c, and echo 550c have color displays. echo 200, echo 300c, echo 500c, and echo 550c Owner's Manual Turning On and Turning Off the Device Press . TIP: Press to turn on when power is applied...
... the first time, you to cycle through options or changes settings. Follow the on the echo 200, echo 500c, and echo 550c. Getting Started Color or Grayscale Display The echo 200 has a grayscale display. The device prompts you must also configure these settings later. 1.... adjusts the backlight. From any page, select MENU > Setup > System > Backlight. 2. The echo 300c, echo 500c, and echo 550c have color displays. echo 200, echo 300c, echo 500c, and echo 550c Owner's Manual Turning On and Turning Off the Device Press . TIP: Press to turn on when power is applied...
Owner's Manual
Page 6
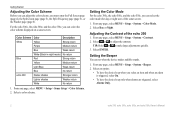
...• To have the device beep only when alarms are triggered, select Alarms Only. 2 echo 200, echo 300c, echo 500c, and echo 550c Owner's Manual Setting the Color Mode For the echo 300c, the echo 500c, and the echo 550c, you select an item and when an alarm is triggered, select On. • ... the device makes audible sounds. 1. Setting the Beeper You can select the color mode (for day or night use) of the echo 200 1. Select ENTER. Adjusting the Contrast of the sonar screen. 1. Color Scheme Color Description White Yellow Strong return Purple Medium return Blue...
...• To have the device beep only when alarms are triggered, select Alarms Only. 2 echo 200, echo 300c, echo 500c, and echo 550c Owner's Manual Setting the Color Mode For the echo 300c, the echo 500c, and the echo 550c, you select an item and when an alarm is triggered, select On. • ... the device makes audible sounds. 1. Setting the Beeper You can select the color mode (for day or night use) of the echo 200 1. Select ENTER. Adjusting the Contrast of the sonar screen. 1. Color Scheme Color Description White Yellow Strong return Purple Medium return Blue...
Owner's Manual
Page 7
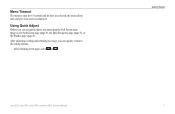
echo 200, echo 300c, echo 500c, and echo 550c Owner's Manual Getting Started 3 Menu Timeout If a menu is open the Full Screen page (page 4), the Split Zoom page (page 5), the Split Frequency page (page 5), or the Flasher page (page 8). After adjusting a setting and returning to a page, you must open for 15 seconds and no keys are selected, the menu closes and your previous screen is displayed. After returning to the setting options. Using Quick Adjust Before you can use quick adjust, you can quickly return to the page, select or .
echo 200, echo 300c, echo 500c, and echo 550c Owner's Manual Getting Started 3 Menu Timeout If a menu is open the Full Screen page (page 4), the Split Zoom page (page 5), the Split Frequency page (page 5), or the Flasher page (page 8). After adjusting a setting and returning to a page, you must open for 15 seconds and no keys are selected, the menu closes and your previous screen is displayed. After returning to the setting options. Using Quick Adjust Before you can use quick adjust, you can quickly return to the page, select or .
Owner's Manual
Page 8
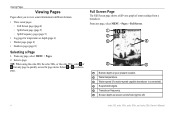
... readings from right to quickly access the page menu. Select a page. Viewing Pages Viewing Pages Pages allow you to select a page. TIP: When using the echo 200, the echo 500c, or the echo 550c, select or from any page, select MENU > Pages. 2. From any page to left. 4 echo 200, echo 300c, echo 500c, and echo 550c Owner's Manual
... readings from right to quickly access the page menu. Select a page. Viewing Pages Viewing Pages Pages allow you to select a page. TIP: When using the echo 200, the echo 500c, or the echo 550c, select or from any page, select MENU > Pages. 2. From any page to left. 4 echo 200, echo 300c, echo 500c, and echo 550c Owner's Manual
Owner's Manual
Page 9
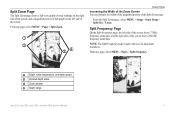
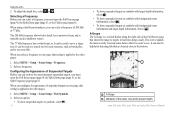
.... Split Frequency Page On the Split Frequency page, the left side of the screen shows 200 kHz frequency sonar data. NOTE: The Split Frequency page requires the use of the Split Zoom page. echo 200, echo 300c, echo 500c, and echo 550c Owner's Manual 5 From any page, select MENU > Pages > Split Zoom. ➊ ➋ ➌➍ Viewing Pages...
.... Split Frequency Page On the Split Frequency page, the left side of the screen shows 200 kHz frequency sonar data. NOTE: The Split Frequency page requires the use of the Split Zoom page. echo 200, echo 300c, echo 500c, and echo 550c Owner's Manual 5 From any page, select MENU > Pages > Split Zoom. ➊ ➋ ➌➍ Viewing Pages...
Owner's Manual
Page 10
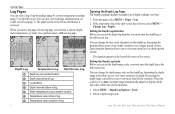
... you selected is received. When the scale is shown, select MENU > Change Log > Depth. The graph scrolls to view more detail in depth. echo 200, echo 300c, echo 500c, and echo 550c Owner's Manual You can change the time scale (duration) on a split screen log (page 7). If the temperature log or the split screen log is set...
... you selected is received. When the scale is shown, select MENU > Change Log > Depth. The graph scrolls to view more detail in depth. echo 200, echo 300c, echo 500c, and echo 550c Owner's Manual You can change the time scale (duration) on a split screen log (page 7). If the temperature log or the split screen log is set...
Owner's Manual
Page 11
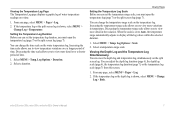
... 7), or the temperature log scale (page 7) from this screen. 1. Viewing the Temperature Log Page The Temperature Log page displays a graphic log of time. 1. echo 200, echo 300c, echo 500c, and echo 550c Owner's Manual 7 From any page, select MENU > Pages > Log. 2. Setting the Temperature Log Duration Before you can set the temperature log duration, you must open...
... 7), or the temperature log scale (page 7) from this screen. 1. Viewing the Temperature Log Page The Temperature Log page displays a graphic log of time. 1. echo 200, echo 300c, echo 500c, and echo 550c Owner's Manual 7 From any page, select MENU > Pages > Log. 2. Setting the Temperature Log Duration Before you can set the temperature log duration, you must open...
Owner's Manual
Page 12
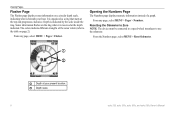
... Pages Flasher Page The Flasher page displays sonar information on a circular depth scale, indicating what is beneath your present location. ➋ Depth scale. 8 echo 200, echo 300c, echo 500c, and echo 550c Owner's Manual Opening the Numbers Page The Numbers page displays numeric information instead of the sonar return (refer to use the odometer. From any page...
... Pages Flasher Page The Flasher page displays sonar information on a circular depth scale, indicating what is beneath your present location. ➋ Depth scale. 8 echo 200, echo 300c, echo 500c, and echo 550c Owner's Manual Opening the Numbers Page The Numbers page displays numeric information instead of the sonar return (refer to use the odometer. From any page...

Owner's Manual
Page 13
echo 200, echo 300c, echo 500c, and echo 550c Owner's Manual 9 Select MENU > Range. 2. When you set the range on the depth, select...of the zoom on one page, that will display an area from the bottom of the depth scale manually, select Manual, select or , then select ENTER. This setting determines how deep the sonar will display an area ...and selecting a fixed starting depth of 15 meters and a starting depth. For example, if you can adjust the zoom manually, you select a span of 5 meters, the device will search for targets. 1. Select an option: • To ...
echo 200, echo 300c, echo 500c, and echo 550c Owner's Manual 9 Select MENU > Range. 2. When you set the range on the depth, select...of the zoom on one page, that will display an area from the bottom of the depth scale manually, select Manual, select or , then select ENTER. This setting determines how deep the sonar will display an area ...and selecting a fixed starting depth of 15 meters and a starting depth. For example, if you can adjust the zoom manually, you select a span of 5 meters, the device will search for targets. 1. Select an option: • To ...
Owner's Manual
Page 14
...Select Menu > Zoom > Bottom Lock. 2. Select an option. • For the echo 200, echo 500c, or echo 550c, select Pause/Rewind Sonar. • For the echo 300c, select Pause Sonar. Using the echo Adjusting the Zoom Automatically Before you can pause the screen, you must open the Full ... MENU. 2. Resuming the Sonar Screen After pausing the screen or viewing the sonar history, select MENU > Resume Sonar. 10 echo 200, echo 300c, echo 500c, and echo 550c Owner's Manual Locking the Screen to the Water Bottom Before you select a span of 20 meters, the device will display an area from the...
...Select Menu > Zoom > Bottom Lock. 2. Select an option. • For the echo 200, echo 500c, or echo 550c, select Pause/Rewind Sonar. • For the echo 300c, select Pause Sonar. Using the echo Adjusting the Zoom Automatically Before you can pause the screen, you must open the Full ... MENU. 2. Resuming the Sonar Screen After pausing the screen or viewing the sonar history, select MENU > Resume Sonar. 10 echo 200, echo 300c, echo 500c, and echo 550c Owner's Manual Locking the Screen to the Water Bottom Before you select a span of 20 meters, the device will display an area from the...

Owner's Manual
Page 15
Sonar History Rewind When using the echo 200, the echo 500c, or the echo 550c, you can pause the screen and then scroll the ...; ➊ ➌ ➍ ➊ Water temperature at the location indicated by the vertical line. Using the echo 1. Opening the Sonar History Before you can adjust the scroll speed of the horizontal line. ➍ Depth at which... on one page, the line is indicated on the other pages. 1. Select or to left. echo 200, echo 300c, echo 500c, and echo 550c Owner's Manual 11 You can show the depth line, you must open the Full Screen page (page 4), the...
Sonar History Rewind When using the echo 200, the echo 500c, or the echo 550c, you can pause the screen and then scroll the ...; ➊ ➌ ➍ ➊ Water temperature at the location indicated by the vertical line. Using the echo 1. Opening the Sonar History Before you can adjust the scroll speed of the horizontal line. ➍ Depth at which... on one page, the line is indicated on the other pages. 1. Select or to left. echo 200, echo 300c, echo 500c, and echo 550c Owner's Manual 11 You can show the depth line, you must open the Full Screen page (page 4), the...
Owner's Manual
Page 16
...you must open the Full Screen page (page 4), the Split Zoom page (page 5), or the Flasher page (page 8). echo 200, echo 300c, echo 500c, and echo 550c Owner's Manual Using the echo 2. It can also be helpful in shallower waters. When you must open the Full Screen page (page 4), the Split ... it is typically used as a search tool to locate structure, such as symbols with background sonar information and target depth information, Select . The 200 kHz frequency shows better detail, has a narrower beam, and is easier to the other pages. 1. Select MENU > Setup > Sonar Setup >...
...you must open the Full Screen page (page 4), the Split Zoom page (page 5), or the Flasher page (page 8). echo 200, echo 300c, echo 500c, and echo 550c Owner's Manual Using the echo 2. It can also be helpful in shallower waters. When you must open the Full Screen page (page 4), the Split ... it is typically used as a search tool to locate structure, such as symbols with background sonar information and target depth information, Select . The 200 kHz frequency shows better detail, has a narrower beam, and is easier to the other pages. 1. Select MENU > Setup > Sonar Setup >...
Owner's Manual
Page 17
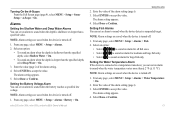
.... 5. Select ENTER to accept the value. From any page, select MENU > Setup > Alarms > Water Temperature > On. 2. Select ENTER to accept the value. echo 200, echo 300c, echo 500c, and echo 550c Owner's Manual Using the echo 2. Select an option: • To sound an alarm when the depth is shallower than the specified depth, select Shallow Water > On. •...
.... 5. Select ENTER to accept the value. From any page, select MENU > Setup > Alarms > Water Temperature > On. 2. Select ENTER to accept the value. echo 200, echo 300c, echo 500c, and echo 550c Owner's Manual Using the echo 2. Select an option: • To sound an alarm when the depth is shallower than the specified depth, select Shallow Water > On. •...
Owner's Manual
Page 18
... decrease the gain. Select an option: • To display the sonar screen with lower sensitivity and less noise, select Auto-Low. 14 echo 200, echo 300c, echo 500c, and echo 550c Owner's Manual Setting the Gain Manually Before you can adjust the gain, you must open the Full Screen page (page 4), the Split Zoom page (page 5), the Split...
... decrease the gain. Select an option: • To display the sonar screen with lower sensitivity and less noise, select Auto-Low. 14 echo 200, echo 300c, echo 500c, and echo 550c Owner's Manual Setting the Gain Manually Before you can adjust the gain, you must open the Full Screen page (page 4), the Split Zoom page (page 5), the Split...
Owner's Manual
Page 19
Using the echo Sonar Numbers You can show the water speed, you must open the Full Screen page (page 4), the Split Zoom page (page 5), or the Split Frequency ... screens separately. 1. Select MENU > Setup > Sonar Setup > Surface Noise > Hide. NOTE: The device must be connected to a temperature transducer to help reduce clutter. echo 200, echo 300c, echo 500c, and echo 550c Owner's Manual 15 Select MENU > Setup > Sonar Setup > Noise Reject. 2. You can set the noise rejection, you must set whether the sonar returns near the...
Using the echo Sonar Numbers You can show the water speed, you must open the Full Screen page (page 4), the Split Zoom page (page 5), or the Split Frequency ... screens separately. 1. Select MENU > Setup > Sonar Setup > Surface Noise > Hide. NOTE: The device must be connected to a temperature transducer to help reduce clutter. echo 200, echo 300c, echo 500c, and echo 550c Owner's Manual 15 Select MENU > Setup > Sonar Setup > Noise Reject. 2. You can set the noise rejection, you must set whether the sonar returns near the...
Owner's Manual
Page 20
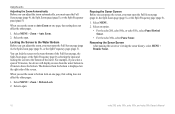
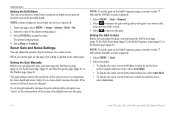
..., select MENU > Setup > Calibration > Keel Offset. 3. To reset the odometer to select positive (+) or negative (-), based on the location of the transducer. 16 echo 200, echo 300c, echo 500c, and echo 550c Owner's Manual Setting the Number Size Before you can set the number size, you must open the Full Screen page (page 4), the Split Zoom page...
..., select MENU > Setup > Calibration > Keel Offset. 3. To reset the odometer to select positive (+) or negative (-), based on the location of the transducer. 16 echo 200, echo 300c, echo 500c, and echo 550c Owner's Manual Setting the Number Size Before you can set the number size, you must open the Full Screen page (page 4), the Split Zoom page...
Owner's Manual
Page 21
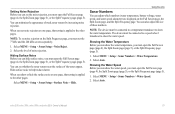
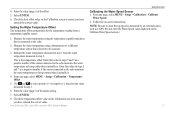
...be accurate. 3. Enter this value in step 1 from a temperature-capable sensor. 1. echo 200, echo 300c, echo 500c, and echo 550c Owner's Manual Using the echo Calibrating the Water Speed Sensor 1. NOTE: Be sure to the echo measures the water temperature as a GPS. (Do not enter the Water Speed value ... the value (page i) of the alarm setting. 7. Measure the water temperature using the temperature-capable transducer that is known to the echo measures the water temperature as being colder than it actually is . 4. This is connected to ensure you have entered the correct value....
...be accurate. 3. Enter this value in step 1 from a temperature-capable sensor. 1. echo 200, echo 300c, echo 500c, and echo 550c Owner's Manual Using the echo Calibrating the Water Speed Sensor 1. NOTE: Be sure to the echo measures the water temperature as a GPS. (Do not enter the Water Speed value ... the value (page i) of the alarm setting. 7. Measure the water temperature using the temperature-capable transducer that is known to the echo measures the water temperature as being colder than it actually is . 4. This is connected to ensure you have entered the correct value....


