Installation Instructions
Page 1
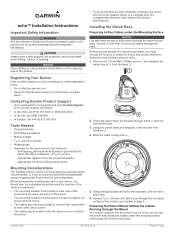
... receipt, or a photocopy, in step 4. Installing the Swivel Base Preparing to www.garmin.com/ support and click Contact Support for in the product specifications. November 2013 190-01708-02_0A Printed in . echo™ Installation Instructions Important Safety Information WARNING See the Important Safety and Product Information guide... Using a 5/8 in. (16 mm) drill, drill a hole through the mounting surface at the location you are not running the power and transducer cables under the Mounting Surface NOTICE Use pan-head screws or bolts when securing the swivel-mount base.
... receipt, or a photocopy, in step 4. Installing the Swivel Base Preparing to www.garmin.com/ support and click Contact Support for in the product specifications. November 2013 190-01708-02_0A Printed in . echo™ Installation Instructions Important Safety Information WARNING See the Important Safety and Product Information guide... Using a 5/8 in. (16 mm) drill, drill a hole through the mounting surface at the location you are not running the power and transducer cables under the Mounting Surface NOTICE Use pan-head screws or bolts when securing the swivel-mount base.
Installation Instructions
Page 2
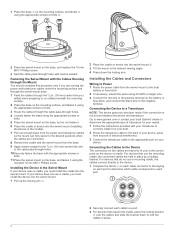
... mm M6×1 Phillips screw. Installing the Device in place by a locking bracket. Go to www.garmin.com or contact your local Garmin® dealer to determine the appropriate type of electrical interference. 3 Connect the transducer cable to the appropriate port on your device. 1 Place the base on the mounting surface, and fasten...
... mm M6×1 Phillips screw. Installing the Device in place by a locking bracket. Go to www.garmin.com or contact your local Garmin® dealer to determine the appropriate type of electrical interference. 3 Connect the transducer cable to the appropriate port on your device. 1 Place the base on the mounting surface, and fasten...

Installation Instructions
Page 3
... 1,600 W (peak-topeak) 300 W (RMS), 2,400 W (peak-topeak) 500 W (RMS), 4,000 W (peak-topeak) Selecting the Transducer Type Before you can select the transducer type, you must know what kind of transducer you can quickly place the device in the cradle without unplugging any cables. 1 Place the base of the device... in place. Specifications Specification Case Models All models Temperature Range echo 101 and 201 series echo...
... 1,600 W (peak-topeak) 300 W (RMS), 2,400 W (peak-topeak) 500 W (RMS), 4,000 W (peak-topeak) Selecting the Transducer Type Before you can select the transducer type, you must know what kind of transducer you can quickly place the device in the cradle without unplugging any cables. 1 Place the base of the device... in place. Specifications Specification Case Models All models Temperature Range echo 101 and 201 series echo...
Owner's Manual
Page 3
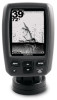
Table of Contents Introduction 1 Registering Your Device 1 Contacting Garmin Product Support 1 Manual Conventions 1 Getting Started 1 Keys 1 Turning on the Device Automatically 1 Selecting the Transducer Type 1 Adjusting the Contrast 1 Setting the Beeper 1 Menu Timeout 1 Using Quick Adjust 1 Sonar Display 1 Sonar 1 DownVü Sonar View 1 Sonar Frequencies 2 Adjusting the Range of ...
Table of Contents Introduction 1 Registering Your Device 1 Contacting Garmin Product Support 1 Manual Conventions 1 Getting Started 1 Keys 1 Turning on the Device Automatically 1 Selecting the Transducer Type 1 Adjusting the Contrast 1 Setting the Beeper 1 Menu Timeout 1 Using Quick Adjust 1 Sonar Display 1 Sonar 1 DownVü Sonar View 1 Sonar Frequencies 2 Adjusting the Range of ...
Owner's Manual
Page 5
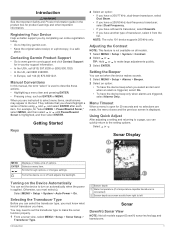
...+44 (0) 870. 8501241. NOTE: The echo 101 device supports 200 kHz only. TIP: Hold or to www.garmin.com/ support and click Contact Support for product warnings and other important information. Sonar Display MENU ENTER Displays or hides a list of transducer, select it from right to the setting...displayed. For example, for 20 seconds and no selections are instructed to select menu items, small arrows may need to set the transducer type to http: / / my .garmin .com. • Keep the original sales receipt, or a photocopy, in the text. Otherwise, you must know what kind ...
...+44 (0) 870. 8501241. NOTE: The echo 101 device supports 200 kHz only. TIP: Hold or to www.garmin.com/ support and click Contact Support for product warnings and other important information. Sonar Display MENU ENTER Displays or hides a list of transducer, select it from right to the setting...displayed. For example, for 20 seconds and no selections are instructed to select menu items, small arrows may need to set the transducer type to http: / / my .garmin .com. • Keep the original sales receipt, or a photocopy, in the text. Otherwise, you must know what kind ...
Owner's Manual
Page 6
... Setting the Gain Manually 1 Select MENU > Gain > Manual. 2 Select until you need a compatible chartplotter or fishfinder and a compatible transducer. For example, when the depth is passing over. Increasing the gain shows more noise automatically, select Auto-High. • To display ... depth. NOTE: This feature is beneath the boat. The gain setting controls the sensitivity of the screen. 3 Select to all transducers. DownVü high-frequency sonar provides a clearer picture below the boat, providing a more surface noise and reduce bottom signal continuity...
... Setting the Gain Manually 1 Select MENU > Gain > Manual. 2 Select until you need a compatible chartplotter or fishfinder and a compatible transducer. For example, when the depth is passing over. Increasing the gain shows more noise automatically, select Auto-High. • To display ... depth. NOTE: This feature is beneath the boat. The gain setting controls the sensitivity of the screen. 3 Select to all transducers. DownVü high-frequency sonar provides a clearer picture below the boat, providing a more surface noise and reduce bottom signal continuity...
Owner's Manual
Page 7
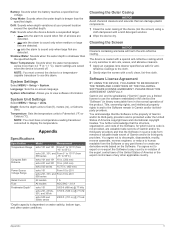
.... Alarm settings are detected. System Settings Select MENU > Setup > System. NOTE: You must connect the device to a temperaturecapable transducer to view software information. Garmin Ltd. You acknowledge that can damage plastic components. 1 Clean the outer casing of the product. Battery: Sounds when the battery ...° to 28 V 500 series All models 1 A All models AGC/3AG - 3. 0 A echo 151 1600 ft (488 m) @ 77 kHz echo 201, 201dv, 1750 ft. (533 m) @ 77 kHz 301, and 301dv echo 500 and 500dv series 2300 ft. (701 m) @ 77 kHz *Depth capacity is shallower than the ...
.... Alarm settings are detected. System Settings Select MENU > Setup > System. NOTE: You must connect the device to a temperaturecapable transducer to view software information. Garmin Ltd. You acknowledge that can damage plastic components. 1 Clean the outer casing of the product. Battery: Sounds when the battery ...° to 28 V 500 series All models 1 A All models AGC/3AG - 3. 0 A echo 151 1600 ft (488 m) @ 77 kHz echo 201, 201dv, 1750 ft. (533 m) @ 77 kHz 301, and 301dv echo 500 and 500dv series 2300 ft. (701 m) @ 77 kHz *Depth capacity is shallower than the ...
Owner's Manual
Page 8
Index A alarms, sonar 2 B beeper 1 C contrast 1 D device cleaning 3 registration 1 display settings 1 DownVü 1 H help 1 K keys 1 power 1 L language 3 P pausing 2 power key 1 product registration 1 Q quick adjust 1 R registering the device 1 S settings 1 system information 3 software license agreement 3 sonar 1, 2 alarms 2 depth scale 2 DownVü 1 frequencies 1, 2 gain 2 noise 2 scroll speed 2 suspended targets 2 zoom 2 specifications 3 system information 3 T timeout 1 transducer 1 U units of measure 3 Z zoom, sonar 2 4 Index
Index A alarms, sonar 2 B beeper 1 C contrast 1 D device cleaning 3 registration 1 display settings 1 DownVü 1 H help 1 K keys 1 power 1 L language 3 P pausing 2 power key 1 product registration 1 Q quick adjust 1 R registering the device 1 S settings 1 system information 3 software license agreement 3 sonar 1, 2 alarms 2 depth scale 2 DownVü 1 frequencies 1, 2 gain 2 noise 2 scroll speed 2 suspended targets 2 zoom 2 specifications 3 system information 3 T timeout 1 transducer 1 U units of measure 3 Z zoom, sonar 2 4 Index

