Installation Instructions
Page 1
... should complete this procedure only if you are not running the power and transducer cables under the Mounting Surface NOTICE Use pan-head screws or bolts when ... interference with countersunk heads damage the base. Installing the Swivel Base Preparing to http: / / my .garmin .com. • Keep the original sales receipt, or a photocopy, in step 4. Tools Needed •...Marine sealant • 3/8 in the product box for in the product specifications. echo™ Installation Instructions Important Safety Information WARNING See the Important Safety and Product Information guide in ...
... should complete this procedure only if you are not running the power and transducer cables under the Mounting Surface NOTICE Use pan-head screws or bolts when ... interference with countersunk heads damage the base. Installing the Swivel Base Preparing to http: / / my .garmin .com. • Keep the original sales receipt, or a photocopy, in step 4. Tools Needed •...Marine sealant • 3/8 in the product box for in the product specifications. echo™ Installation Instructions Important Safety Information WARNING See the Important Safety and Product Information guide in ...
Installation Instructions
Page 2
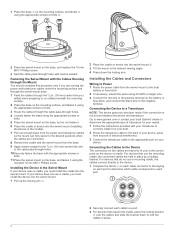
...cradle, you must install the cradle into the swivel mount (Installing the Device in the Cradle). 7 Pull out enough slack from sources of transducer for your needs. 1 Follow the instructions provided with the appropriate screws or bolts. 11Place the swivel mount on each port to determine which ...fasten it. 6 Place the cradle or device into the swivel mount. Go to www.garmin.com or contact your local Garmin® dealer to determine the appropriate type of electrical interference. 3 Connect the transducer cable to the keying À on the base, and fasten it using the included ...
...cradle, you must install the cradle into the swivel mount (Installing the Device in the Cradle). 7 Pull out enough slack from sources of transducer for your needs. 1 Follow the instructions provided with the appropriate screws or bolts. 11Place the swivel mount on each port to determine which ...fasten it. 6 Place the cradle or device into the swivel mount. Go to www.garmin.com or contact your local Garmin® dealer to determine the appropriate type of electrical interference. 3 Connect the transducer cable to the keying À on the base, and fasten it using the included ...

Installation Instructions
Page 3
... Fuse Rated Current Transmit Power Models echo 101, 151, and 201 echo 301c echo 501c and 551c echo dv models echo 101 echo 151, 201, 301, and 501 series echo 101 series echo 201, 301, and 501 series All models All models echo 101 series echo 201 and 301 series echo 501 series Measurement 10 in. (250...is correctly installed. Removing the Device from the cradle without plugging in any cables. 1 Press the release lever on the cradle until it out of transducer, select it from -15° to 131°F (from the list. 2 Tilt the device forward, and lift it fastens in place. ...
... Fuse Rated Current Transmit Power Models echo 101, 151, and 201 echo 301c echo 501c and 551c echo dv models echo 101 echo 151, 201, 301, and 501 series echo 101 series echo 201, 301, and 501 series All models All models echo 101 series echo 201 and 301 series echo 501 series Measurement 10 in. (250...is correctly installed. Removing the Device from the cradle without plugging in any cables. 1 Press the release lever on the cradle until it out of transducer, select it from -15° to 131°F (from the list. 2 Tilt the device forward, and lift it fastens in place. ...
Owner's Manual
Page 3
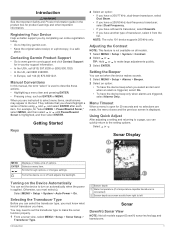
Table of Contents Introduction 1 Registering Your Device 1 Contacting Garmin Product Support 1 Manual Conventions 1 Getting Started 1 Keys 1 Turning on the Device Automatically 1 Selecting the Transducer Type 1 Adjusting the Contrast 1 Setting the Beeper 1 Menu Timeout 1 Using Quick Adjust 1 Sonar Display 1 Sonar 1 DownVü Sonar View 1 Sonar Frequencies 2 Adjusting the Range of ...
Table of Contents Introduction 1 Registering Your Device 1 Contacting Garmin Product Support 1 Manual Conventions 1 Getting Started 1 Keys 1 Turning on the Device Automatically 1 Selecting the Transducer Type 1 Adjusting the Contrast 1 Setting the Beeper 1 Menu Timeout 1 Using Quick Adjust 1 Sonar Display 1 Sonar 1 DownVü Sonar View 1 Sonar Frequencies 2 Adjusting the Range of ...
Owner's Manual
Page 5
... select MENU, and then select or until Pause/Rewind Sonar is displayed. Otherwise, you are triggered, select Alarms Only. NOTE: The echo 101 device supports 200 kHz only. Select MENU > Setup > System > Auto Power > On. Introduction WARNING See the Important Safety and.... Introduction À Bottom depth Á Water temperature (if a temperature-capable transducer is not available on or off and adjusts the backlight. Selects a menu item. Contacting Garmin Product Support • Go to http: / / my .garmin .com. • Keep the original sales receipt, or a photocopy, in ...
... select MENU, and then select or until Pause/Rewind Sonar is displayed. Otherwise, you are triggered, select Alarms Only. NOTE: The echo 101 device supports 200 kHz only. Select MENU > Setup > System > Auto Power > On. Introduction WARNING See the Important Safety and.... Introduction À Bottom depth Á Water temperature (if a temperature-capable transducer is not available on or off and adjusts the backlight. Selects a menu item. Contacting Garmin Product Support • Go to http: / / my .garmin .com. • Keep the original sales receipt, or a photocopy, in ...
Owner's Manual
Page 6
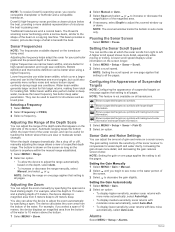
...a starting depth. Sonar Gain and Noise Settings You can be useful for structures such as symbols with less noise automatically, select Auto-Low. Traditional transducers emit a conical beam. Sonar Frequencies NOTE: The frequencies available depend on the screen longer. 1 Select MENU > Setup > Sonar > Scroll.... bottom within the manual range established. 1 Select MENU > Range. 2 Select an option. • To allow the device to all transducers. Setting the Sonar Scroll Speed You can set the rate at which cover a larger area and can be better when using a higher ...
...a starting depth. Sonar Gain and Noise Settings You can be useful for structures such as symbols with less noise automatically, select Auto-Low. Traditional transducers emit a conical beam. Sonar Frequencies NOTE: The frequencies available depend on the screen longer. 1 Select MENU > Setup > Sonar > Scroll.... bottom within the manual range established. 1 Select MENU > Range. 2 Select an option. • To allow the device to all transducers. Setting the Sonar Scroll Speed You can set the rate at which cover a larger area and can be better when using a higher ...
Owner's Manual
Page 7
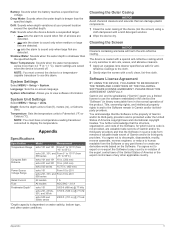
...the water depth is shallower than ± 2 °F (± 1. 1 °C). NOTE: You must have a temperature-reading transducer connected to Fahrenheit (°F) or Celsius (°C). Depth: Sets the depth units to use the software embedded in this alarm. You ...subsidiaries ("Garmin") grant you to the Software remain in and to view software information. System Settings Select MENU > Setup > System. Appendix Specifications Specification Temperature Range Compass Safe Distance Power Source Voltage Range Rated Current Fuse Freshwater Depth* Model Measurement echo 101...
...the water depth is shallower than ± 2 °F (± 1. 1 °C). NOTE: You must have a temperature-reading transducer connected to Fahrenheit (°F) or Celsius (°C). Depth: Sets the depth units to use the software embedded in this alarm. You ...subsidiaries ("Garmin") grant you to the Software remain in and to view software information. System Settings Select MENU > Setup > System. Appendix Specifications Specification Temperature Range Compass Safe Distance Power Source Voltage Range Rated Current Fuse Freshwater Depth* Model Measurement echo 101...
Owner's Manual
Page 8
Index A alarms, sonar 2 B beeper 1 C contrast 1 D device cleaning 3 registration 1 display settings 1 DownVü 1 H help 1 K keys 1 power 1 L language 3 P pausing 2 power key 1 product registration 1 Q quick adjust 1 R registering the device 1 S settings 1 system information 3 software license agreement 3 sonar 1, 2 alarms 2 depth scale 2 DownVü 1 frequencies 1, 2 gain 2 noise 2 scroll speed 2 suspended targets 2 zoom 2 specifications 3 system information 3 T timeout 1 transducer 1 U units of measure 3 Z zoom, sonar 2 4 Index
Index A alarms, sonar 2 B beeper 1 C contrast 1 D device cleaning 3 registration 1 display settings 1 DownVü 1 H help 1 K keys 1 power 1 L language 3 P pausing 2 power key 1 product registration 1 Q quick adjust 1 R registering the device 1 S settings 1 system information 3 software license agreement 3 sonar 1, 2 alarms 2 depth scale 2 DownVü 1 frequencies 1, 2 gain 2 noise 2 scroll speed 2 suspended targets 2 zoom 2 specifications 3 system information 3 T timeout 1 transducer 1 U units of measure 3 Z zoom, sonar 2 4 Index

