
Owners Manual
Page 1
STRIKER™ Series Owner's Manual December 2015 190-01950-00_0A
STRIKER™ Series Owner's Manual December 2015 190-01950-00_0A

Owners Manual
Page 2
... its subsidiaries, registered in part, without the written consent of this manual may not be copied, in whole or in the USA and other countries. Garmin reserves the right to make changes in the content of Garmin. These trademarks may not be used without obligation to www.garmin.com for current updates and supplemental information concerning the use of Garmin Ltd. Under the...
... its subsidiaries, registered in part, without the written consent of this manual may not be copied, in whole or in the USA and other countries. Garmin reserves the right to make changes in the content of Garmin. These trademarks may not be used without obligation to www.garmin.com for current updates and supplemental information concerning the use of Garmin Ltd. Under the...

Owners Manual
Page 3
...Navigating a Saved Route 6 Deleting a Saved Route 6 Deleting All Saved Routes 6 Track 6 Setting the Color of the Track 6 Clearing the Track 6 Managing the Track Log Memory During Recording 6 Configuring the Recording Interval of the Track Log 6 Deleting All Saved Waypoints, Routes, and Tracks 6 Device Configuration 6 System Settings 6 System Information 7 Waypoint Map Settings 7 Sonar Alarms 7 System Alarms 7 Navigation Alarms 7 Navigation Settings 7 My Vessel Settings 7 Unit Settings 7 Setting the Water Temperature Offset 7 Setting the Keel Offset 8 Restoring the Factory...
...Navigating a Saved Route 6 Deleting a Saved Route 6 Deleting All Saved Routes 6 Track 6 Setting the Color of the Track 6 Clearing the Track 6 Managing the Track Log Memory During Recording 6 Configuring the Recording Interval of the Track Log 6 Deleting All Saved Waypoints, Routes, and Tracks 6 Device Configuration 6 System Settings 6 System Information 7 Waypoint Map Settings 7 Sonar Alarms 7 System Alarms 7 Navigation Alarms 7 Navigation Settings 7 My Vessel Settings 7 Unit Settings 7 Setting the Water Temperature Offset 7 Setting the Keel Offset 8 Restoring the Factory...

Owners Manual
Page 5
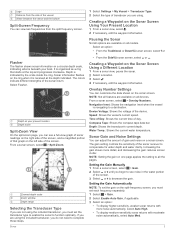
... the Home screen, select Customize Home. 2 Select an option: • To rearrange an item, select Rearrange, select the item to move the Waypoint Map to view an area other important information. Adjusting the Color Mode 1 Select Settings > System > Display > Color Mode. Setting the Beeper You can add items to and rearrange items on the 4 in . • Select to zoom out. When the fishfinder loses satellite signals, disappears and a flashing question mark...
... the Home screen, select Customize Home. 2 Select an option: • To rearrange an item, select Rearrange, select the item to move the Waypoint Map to view an area other important information. Adjusting the Color Mode 1 Select Settings > System > Display > Color Mode. Setting the Beeper You can add items to and rearrange items on the 4 in . • Select to zoom out. When the fishfinder loses satellite signals, disappears and a flashing question mark...

Owners Manual
Page 6
... boat. Temperature Graph Settings: Sets the amount of time and the range of the boat. SideVü Sonar View NOTE: Not all models support DownVü sonar technology and transducers. 9 Enter a name for the combination. TIP: • Select to save . • Hold to clear data. • Select or to change letter case. • Hold to clear data. 7 Use the arrow keys to resize the windows. 8 Use the arrow keys to select a home screen location...
... boat. Temperature Graph Settings: Sets the amount of time and the range of the boat. SideVü Sonar View NOTE: Not all models support DownVü sonar technology and transducers. 9 Enter a name for the combination. TIP: • Select to save . • Hold to clear data. • Select or to change letter case. • Hold to clear data. 7 Use the arrow keys to resize the windows. 8 Use the arrow keys to select a home screen location...
Owners Manual
Page 7
... must set the gain on the split-frequency screen, you are available on the sonar screen. Time of Day: Shows the current time of the sonar receiver to function optimally. Creating a Waypoint on the Sonar Screen Using Your Present Location 1 From a sonar view, select . 2 If necessary, edit the waypoint information. Depth: Shows the transducer's current depth. Sonar information flashes on one page applies the setting to complete these steps. NOTE: Setting the gain on the ring when it is received at your boat. The gain setting...
... must set the gain on the split-frequency screen, you are available on the sonar screen. Time of Day: Shows the current time of the sonar receiver to function optimally. Creating a Waypoint on the Sonar Screen Using Your Present Location 1 From a sonar view, select . 2 If necessary, edit the waypoint information. Depth: Shows the transducer's current depth. Sonar information flashes on one page applies the setting to complete these steps. NOTE: Setting the gain on the ring when it is received at your boat. The gain setting...

Owners Manual
Page 8
... screen longer. A higher scroll speed shows more information on the transducer being used. Setting the Interference 1 From a sonar screen, select Reject > Interference. 2 Select an option. > Sonar Setup > Noise Adjusting the Range of the Depth Scale You can indicate which allows you adjust the interference setting from off or cliff, manually adjusting the range allows a view of the water. A lower scroll speed displays sonar information on the right side of the water. • To display lower-sensitivity sonar...
... screen longer. A higher scroll speed shows more information on the transducer being used. Setting the Interference 1 From a sonar screen, select Reject > Interference. 2 Select an option. > Sonar Setup > Noise Adjusting the Range of the Depth Scale You can indicate which allows you adjust the interference setting from off or cliff, manually adjusting the range allows a view of the water. A lower scroll speed displays sonar information on the right side of the water. • To display lower-sensitivity sonar...

Owners Manual
Page 9
... enter the coordinates. • To create the waypoint using the waypoint map, select Use Waypoint Map, select the location, and select . • To create the waypoint using speed-overground, select Auto. Creating a Waypoint at the present depth Á Deleting All Waypoints Select User Data > Manage Data > Clear User Data > Waypoints > All. Deleting a Waypoint or an MOB 1 Select User Data > Waypoints. 2 Select a waypoint or an MOB. 3 Select Delete > OK. Navigating to a Waypoint 1 Pan the waypoint map to the bottom. The waypoint name appears on a sonar screen. 1 From a sonar view...
... enter the coordinates. • To create the waypoint using the waypoint map, select Use Waypoint Map, select the location, and select . • To create the waypoint using speed-overground, select Auto. Creating a Waypoint at the present depth Á Deleting All Waypoints Select User Data > Manage Data > Clear User Data > Waypoints > All. Deleting a Waypoint or an MOB 1 Select User Data > Waypoints. 2 Select a waypoint or an MOB. 3 Select Delete > OK. Navigating to a Waypoint 1 Pan the waypoint map to the bottom. The waypoint name appears on a sonar screen. 1 From a sonar view...

Owners Manual
Page 10
... course). Simulator: Turns on -screen language. Deleting All Saved Routes Select User Data > Manage Data > Clear User Data > Routes. Browsing for the most efficient use of memory. 1 Select User Data > Track > Track Options > Record Intervals > Interval. 2 Select an option: • To record the track based on a distance between points, select Distance > Change, and enter the distance. • To record the track based on a time interval, select Time > Change, and enter the time interval. • To record the track plot based on the chart. GPS...
... course). Simulator: Turns on -screen language. Deleting All Saved Routes Select User Data > Manage Data > Clear User Data > Routes. Browsing for the most efficient use of memory. 1 Select User Data > Track > Track Options > Record Intervals > Interval. 2 Select an option: • To record the track based on a distance between points, select Distance > Change, and enter the distance. • To record the track based on a time interval, select Time > Change, and enter the time interval. • To record the track plot based on the chart. GPS...

Owners Manual
Page 11
.... Offset: Compensates for alarms and selections (Setting the Beeper, page 1). Garmin Devices: Provides information about the device and the software version. setting. Magnetic sets the magnetic north as the north reference (000º). Do not change this setting unless you exceed a specified drift distance while anchored. Device Voltage: Sets an alarm to start navigation from a temperature-capable sensor. 1 Measure the water temperature using a map or chart that sounds for the water temperature reading from the first waypoint on the route...
.... Offset: Compensates for alarms and selections (Setting the Beeper, page 1). Garmin Devices: Provides information about the device and the software version. setting. Magnetic sets the magnetic north as the north reference (000º). Do not change this setting unless you exceed a specified drift distance while anchored. Device Voltage: Sets an alarm to start navigation from a temperature-capable sensor. 1 Measure the water temperature using a map or chart that sounds for the water temperature reading from the first waypoint on the route...

Owners Manual
Page 12
... Device Help us better support you have entered. 1 Select > System > System Information > Factory Settings. 2 Select an option. Garmin Ltd. You further acknowledge that the structure, organization, and code of the Software, for the exact fuse size needed. Refer to the label on the cable or the installation instructions for which source code is not provided, are functioning. • Check the fuse in the power cable. Offset. 5 Use the arrow keys to...
... Device Help us better support you have entered. 1 Select > System > System Information > Factory Settings. 2 Select an option. Garmin Ltd. You further acknowledge that the structure, organization, and code of the Software, for the exact fuse size needed. Refer to the label on the cable or the installation instructions for which source code is not provided, are functioning. • Check the fuse in the power cable. Offset. 5 Use the arrow keys to...

Owners Manual
Page 13
To check the voltage, measure the female power and ground sockets of the device. If the voltage is turned on . Even if the cable seems to be connected, you should push firmly so that it is fully seated. • Check to make sure the sonar transmission is less than 10 Vdc, the device will not turn on . My sonar does not work • Push the transducer cable all the way into the back of the power cable for DC voltage. Troubleshooting 9
To check the voltage, measure the female power and ground sockets of the device. If the voltage is turned on . Even if the cable seems to be connected, you should push firmly so that it is fully seated. • Check to make sure the sonar transmission is less than 10 Vdc, the device will not turn on . My sonar does not work • Push the transducer cable all the way into the back of the power cable for DC voltage. Troubleshooting 9

Owners Manual
Page 14
... 6 V voltage 7 W water, temperature offset 7 waypoints 5, 7 creating 5 deleting 5 editing 5 man overboard 5 sonar 3 Z zoom 1 sonar 4 Index Index A alarms 7 anchor drag 7 arrival 7 navigation 7 off course 7 sonar 7 anchor drag alarm 7 arrival alarm 7 B backlight 1 beeper 1 C clock 7 alarm 7 color mode 1 D data fields 3 deleting, all user data 6 device keys 1 registration 8 display settings 6 DownVü 2 E event log 7 F factory settings 7, 8 G GPS settings 6 signals 1 GPS accuracy 7 H home screen, customizing 1 K keel offset 7, 8 keys 1 power 1 L language 6 M man overboard 5 mark location...
... 6 V voltage 7 W water, temperature offset 7 waypoints 5, 7 creating 5 deleting 5 editing 5 man overboard 5 sonar 3 Z zoom 1 sonar 4 Index Index A alarms 7 anchor drag 7 arrival 7 navigation 7 off course 7 sonar 7 anchor drag alarm 7 arrival alarm 7 B backlight 1 beeper 1 C clock 7 alarm 7 color mode 1 D data fields 3 deleting, all user data 6 device keys 1 registration 8 display settings 6 DownVü 2 E event log 7 F factory settings 7, 8 G GPS settings 6 signals 1 GPS accuracy 7 H home screen, customizing 1 K keel offset 7, 8 keys 1 power 1 L language 6 M man overboard 5 mark location...
?Declaration of Conformity
Page 1
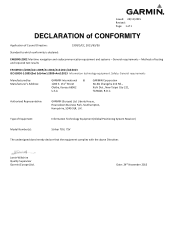
...Information Technology Equipment (Global Positioning System Receiver) Model Number(s): Striker 7DV, 7SV The undersigned does hereby declare that the equipment complies with the above Directives Jamie Wiltshire Quality Supervisor Garmin...navigation and radiocommunication equipment and systems - Liberty House, Hounsdown Business Park, Southampton, Hampshire, SO40 9LR, U.K. Date: 24th November 2015 General requirements Manufactured by: Manufacturer's Address: GARMIN International & 1200 E. 151st Street Olathe, Kansas 66062 U.S.A GARMIN Corporation No.68, Zhangshu 2nd Rd.., Xizhi Dist., New...
...Information Technology Equipment (Global Positioning System Receiver) Model Number(s): Striker 7DV, 7SV The undersigned does hereby declare that the equipment complies with the above Directives Jamie Wiltshire Quality Supervisor Garmin...navigation and radiocommunication equipment and systems - Liberty House, Hounsdown Business Park, Southampton, Hampshire, SO40 9LR, U.K. Date: 24th November 2015 General requirements Manufactured by: Manufacturer's Address: GARMIN International & 1200 E. 151st Street Olathe, Kansas 66062 U.S.A GARMIN Corporation No.68, Zhangshu 2nd Rd.., Xizhi Dist., New...

Installation Instructions
Page 1
➞ Fixed Bail Mount •Compass Safe Distance •Distance de sécurité du compas •Distanza di sicurezza dalla bussola •Sicherheitsabstand zum Kompass •Consumo eléctrico máximo •Dist&#... da bússola •Sikkerhedsafstand for kompas •Trygg avstand fra et kompass •Säkerhetsavstånd till kompass •STRIKER 5: 25 cm (9.84 in.) •STRIKER 7: 30 cm (11.81 in.) ➀ ➁ 3 mm (1/8 in.) ➂ ➃ ➄ Fuse: 3.0 A 12 Vdc 12 Vdc November 2015 190-01950-92_0A Printed in Taiwan
➞ Fixed Bail Mount •Compass Safe Distance •Distance de sécurité du compas •Distanza di sicurezza dalla bussola •Sicherheitsabstand zum Kompass •Consumo eléctrico máximo •Dist&#... da bússola •Sikkerhedsafstand for kompas •Trygg avstand fra et kompass •Säkerhetsavstånd till kompass •STRIKER 5: 25 cm (9.84 in.) •STRIKER 7: 30 cm (11.81 in.) ➀ ➁ 3 mm (1/8 in.) ➂ ➃ ➄ Fuse: 3.0 A 12 Vdc 12 Vdc November 2015 190-01950-92_0A Printed in Taiwan

?Important Safety and Product Information
Page 2
... the laws of Garmin; Marine Operation Warnings • You are in addition to other reasonably foreseeable loss or damage. This device is a tool that the Software is on the device to all information needed to navigate safely. • If the device provides depth data, it should not be returned to the Garmin service center in the United Kingdom, the United States, Canada, or...
... the laws of Garmin; Marine Operation Warnings • You are in addition to other reasonably foreseeable loss or damage. This device is a tool that the Software is on the device to all information needed to navigate safely. • If the device provides depth data, it should not be returned to the Garmin service center in the United Kingdom, the United States, Canada, or...


