
Owner's Manual
Page 3
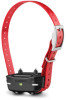
... charge when it is low (Checking the Battery Level). Charging the Handheld Device You should fully charge the battery before you use . Device Overviews Pro 550 Handheld Device Contact points à Charging clip contacts Ä Attaching the Dog Collar Device to 10 weeks when the device is charging. 4 After the status LED turns solid green, unplug the power...
... charge when it is low (Checking the Battery Level). Charging the Handheld Device You should fully charge the battery before you use . Device Overviews Pro 550 Handheld Device Contact points à Charging clip contacts Ä Attaching the Dog Collar Device to 10 weeks when the device is charging. 4 After the status LED turns solid green, unplug the power...

Owner's Manual
Page 4
... for the battery to discharge in approximately 7 to 10 weeks when the device is not in both devices are paired from the factory. 1 On the handheld device, move the toggle switch and select a key to choose the color associated with the dog collar device. 2 On the handheld device, set to 3 dog collar devices with the selected color. 2 Plug the power cable...
... for the battery to discharge in approximately 7 to 10 weeks when the device is not in both devices are paired from the factory. 1 On the handheld device, move the toggle switch and select a key to choose the color associated with the dog collar device. 2 On the handheld device, set to 3 dog collar devices with the selected color. 2 Plug the power cable...

Owner's Manual
Page 5
... Red flash Green flash 10 barks 1 bark For example, one level until the dog has a slight but recognizable reaction is your dog's baseline level for your dog's coat. 1 Select the correct contact point length for beginning collar training. Zero flashes indicates the device detected zero barks. Selecting... included wrench to remove the contact points. 3 Twist the contact points into the collar. 4 Tighten with the included wrench, but do not need to change in the dog device battery, ranging from 1 to 7. The dog collar device starts at least 3 in. (8 cm) to spare. 6 Mark the hole ...
... Red flash Green flash 10 barks 1 bark For example, one level until the dog has a slight but recognizable reaction is your dog's baseline level for your dog's coat. 1 Select the correct contact point length for beginning collar training. Zero flashes indicates the device detected zero barks. Selecting... included wrench to remove the contact points. 3 Twist the contact points into the collar. 4 Tighten with the included wrench, but do not need to change in the dog device battery, ranging from 1 to 7. The dog collar device starts at least 3 in. (8 cm) to spare. 6 Mark the hole ...

Owner's Manual
Page 6
...; to 20°C) IEC 60529 IPX7* 1 mi. (1. 6 km) *The device withstands incidental exposure to water of 10 meters. The battery fits tightly. For more information or to purchase accessories, go to http: / / buy .garmin .com. You can purchase a replacement battery at night. 1 Select a dog collar device (Selecting a Dog Collar Device). 2 Move the mode toggle switch to A. 3 Select the top...
...; to 20°C) IEC 60529 IPX7* 1 mi. (1. 6 km) *The device withstands incidental exposure to water of 10 meters. The battery fits tightly. For more information or to purchase accessories, go to http: / / buy .garmin .com. You can purchase a replacement battery at night. 1 Select a dog collar device (Selecting a Dog Collar Device). 2 Move the mode toggle switch to A. 3 Select the top...
Owner's Manual
Page 7
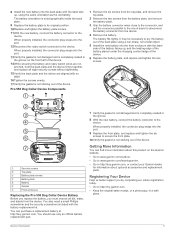
...Front enclosure Æ Replacing the Pro 550 Dog Collar Device Battery Before you replace the battery, you by completing our online registration today. • Go to the device. Device Information 5 The battery fits tightly. You should use only an official Garmin replacement part. 7 Verify the gasket is... the back plate. 9 Replace the battery plate to its original position. 10 Replace and tighten the battery plate screws. 11With the new battery, connect the battery connector to http: / / my .garmin .com. • Keep the original sales receipt, or a photocopy, in...
...Front enclosure Æ Replacing the Pro 550 Dog Collar Device Battery Before you replace the battery, you by completing our online registration today. • Go to the device. Device Information 5 The battery fits tightly. You should use only an official Garmin replacement part. 7 Verify the gasket is... the back plate. 9 Replace the battery plate to its original position. 10 Replace and tighten the battery plate screws. 11With the new battery, connect the battery connector to http: / / my .garmin .com. • Keep the original sales receipt, or a photocopy, in...

Owner's Manual
Page 3
... the Handheld Device). 3 Charge the dog collar device (Charging the Collar). 4 Turn on the devices (Turning On the Dog Collar Device). 5 If necessary, pair the dog collar device with the handheld device (Pairing a Dog Collar Device with the Handheld Device). NOTE: The device will not charge when it is tight across the front of the device. It is normal for the battery to discharge in approximately 7 to 10 weeks when...
... the Handheld Device). 3 Charge the dog collar device (Charging the Collar). 4 Turn on the devices (Turning On the Dog Collar Device). 5 If necessary, pair the dog collar device with the handheld device (Pairing a Dog Collar Device with the Handheld Device). NOTE: The device will not charge when it is tight across the front of the device. It is normal for the battery to discharge in approximately 7 to 10 weeks when...

Owner's Manual
Page 4
... red LED appears. 2 Release the power key. The training keys control the dog collar device associated with a single handheld device. Pairing a Dog Collar Device with the Handheld Device). The dog collar device beeps when the devices have paired successfully. Fitting the Collar on Your Dog CAUTION To prevent irritation from the collar. This device is an effective training tool to a numbered position (Changing the Intensity Level...
... red LED appears. 2 Release the power key. The training keys control the dog collar device associated with a single handheld device. Pairing a Dog Collar Device with the Handheld Device). The dog collar device beeps when the devices have paired successfully. Fitting the Collar on Your Dog CAUTION To prevent irritation from the collar. This device is an effective training tool to a numbered position (Changing the Intensity Level...
Owner's Manual
Page 5
... You can help locate your dog, and provide safety for your dog's barking behavior. BarkLimiter When the dog collar device is quiet, the intensity decreases over time. Zero flashes indicates the device detected zero barks. Continuous stimulation: Applies stimulation to change in the dog device battery, ranging from 1 to...level depending upon the training situation. When the dog is active and properly fitted on the dog, it was last turned on the dog, make sure the contact points are tight against the neck. Red flash Green flash 10 barks 1 bark For example, one level ...
... You can help locate your dog, and provide safety for your dog's barking behavior. BarkLimiter When the dog collar device is quiet, the intensity decreases over time. Zero flashes indicates the device detected zero barks. Continuous stimulation: Applies stimulation to change in the dog device battery, ranging from 1 to...level depending upon the training situation. When the dog is active and properly fitted on the dog, it was last turned on the dog, make sure the contact points are tight against the neck. Red flash Green flash 10 barks 1 bark For example, one level ...

Owner's Manual
Page 6
...be charged soon. Red The battery is not sticking out of 10 meters. CAUTION Contact your local waste disposal department to remove batteries. Pro 70 Handheld Device Components Replacing the Pro 70 Handheld Device Battery Before you replace the battery, you must be necessary to...has a good charge. Flashing Red The battery is on the dog collar device (Turning On the Dog Collar Device). Do not use a sharp object to properly recycle the batteries. You can purchase a replacement battery at http: / / buy .garmin .com. The battery orientation is completely seated in the groove...
...be charged soon. Red The battery is not sticking out of 10 meters. CAUTION Contact your local waste disposal department to remove batteries. Pro 70 Handheld Device Components Replacing the Pro 70 Handheld Device Battery Before you replace the battery, you must be necessary to...has a good charge. Flashing Red The battery is on the dog collar device (Turning On the Dog Collar Device). Do not use a sharp object to properly recycle the batteries. You can purchase a replacement battery at http: / / buy .garmin .com. The battery orientation is completely seated in the groove...

Owner's Manual
Page 7
... 9 Replace the front plate, and replace and tighten the six screws to secure the front plate. 10 Verify the gasket is completely seated in a safe place. Pro 70 Dog Collar Device Components Security screws À Top plate Á Battery plate screws  Battery plate à Battery... Ä Gasket Å Front enclosure Æ Replacing the Pro 70 Dog Collar Device Battery Before you replace the battery, you by completing our online registration today. • Go to http: / / my .garmin .com. • Keep the original sales receipt, or a photocopy, in the groove....
... 9 Replace the front plate, and replace and tighten the six screws to secure the front plate. 10 Verify the gasket is completely seated in a safe place. Pro 70 Dog Collar Device Components Security screws À Top plate Á Battery plate screws  Battery plate à Battery... Ä Gasket Å Front enclosure Æ Replacing the Pro 70 Dog Collar Device Battery Before you replace the battery, you by completing our online registration today. • Go to http: / / my .garmin .com. • Keep the original sales receipt, or a photocopy, in the groove....


