
Owners Manual
Page 4
... Time Settings 21 Accessibility Settings 21 Profiles 21 Resetting Data and Settings 21 Device Information 22 Product Updates 22 Setting Up Garmin Express 22 Getting More Information 22 Viewing E-label Regulatory and Compliance Information ........ 22 Installing AA Batteries 22 Device Care 22...Files to Your Device 23 Deleting Files 23 Using Garmin Connect 23 Disconnecting the USB Cable 23 Specifications 24 Appendix 24 Data Fields 24 Optional Accessories 25 tempe 25 Tips for Pairing ANT+ Accessories with Your Garmin Device 25 Troubleshooting 25 Maximizing Battery Life 25 ...
... Time Settings 21 Accessibility Settings 21 Profiles 21 Resetting Data and Settings 21 Device Information 22 Product Updates 22 Setting Up Garmin Express 22 Getting More Information 22 Viewing E-label Regulatory and Compliance Information ........ 22 Installing AA Batteries 22 Device Care 22...Files to Your Device 23 Deleting Files 23 Using Garmin Connect 23 Disconnecting the USB Cable 23 Specifications 24 Appendix 24 Data Fields 24 Optional Accessories 25 tempe 25 Tips for Pairing ANT+ Accessories with Your Garmin Device 25 Troubleshooting 25 Maximizing Battery Life 25 ...
Owners Manual
Page 5
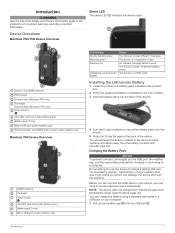
...battery installed in the device to charge a battery that was not provided by Garmin can damage the device and void the warranty. NOTE: The device does not... Lithium-ion Battery 1 Locate the Lithium-ion battery pack included in expedition mode. Device Overviews Montana 700i/750i Device Overview Status LED The status LED indicates the device status. The device is in ...1 Pull up the weather cap from the battery contacts and microSD card slot. Attempting to remove optional mount accessories. Before you can charge the battery using a standard wall outlet or a USB port on your device, ...
...battery installed in the device to charge a battery that was not provided by Garmin can damage the device and void the warranty. NOTE: The device does not... Lithium-ion Battery 1 Locate the Lithium-ion battery pack included in expedition mode. Device Overviews Montana 700i/750i Device Overview Status LED The status LED indicates the device status. The device is in ...1 Pull up the weather cap from the battery contacts and microSD card slot. Attempting to remove optional mount accessories. Before you can charge the battery using a standard wall outlet or a USB port on your device, ...
Owners Manual
Page 21
..., the route appears as a magenta line. 2 Navigate using your Montana 700 device. 1 Turn on the inReach device. 2 On your current location, GPS accuracy, satellite locations, and signal strength. chirp A chirp is a small Garmin accessory that contains a chirp, details about the cache itself, select Edit ...sounds a tone. Disabling All Proximity Alarms Select Proximity Alarms > > Disable All Alarms. Satellite Page The satellite page shows your Montana 700 device, select inReach Remote. NOTE: You may need to add this application to the main menu before you to create routes...
..., the route appears as a magenta line. 2 Navigate using your Montana 700 device. 1 Turn on the inReach device. 2 On your current location, GPS accuracy, satellite locations, and signal strength. chirp A chirp is a small Garmin accessory that contains a chirp, details about the cache itself, select Edit ...sounds a tone. Disabling All Proximity Alarms Select Proximity Alarms > > Disable All Alarms. Satellite Page The satellite page shows your Montana 700 device, select inReach Remote. NOTE: You may need to add this application to the main menu before you to create routes...
Owners Manual
Page 24
... page 16). Off Route Recalculation: Sets recalculation preferences when navigating away from your device and remove your Montana 700i/750i device. This setting is enabled or disabled. In expedition mode, the green LED flashes occasionally....Garmin Connect. Wi‑Fi Settings Select Setup > Wi-Fi. This is paired. Fitness: Allows you to display the geocache list using ANT+ or Bluetooth technology, for comparing your Montana 700i/750i device. The Distance option routes you to remove live geocache data from an active route. XERO: Allows you to pair fitness accessories...
... page 16). Off Route Recalculation: Sets recalculation preferences when navigating away from your device and remove your Montana 700i/750i device. This setting is enabled or disabled. In expedition mode, the green LED flashes occasionally....Garmin Connect. Wi‑Fi Settings Select Setup > Wi-Fi. This is paired. Fitness: Allows you to display the geocache list using ANT+ or Bluetooth technology, for comparing your Montana 700i/750i device. The Distance option routes you to remove live geocache data from an active route. XERO: Allows you to pair fitness accessories...
Owners Manual
Page 26
...Defaults. Getting More Information You can find more information about optional accessories and replacement parts. The e-label may result. This is useful when you are on the Garmin website. • Go to support.garmin.com for information about this device is compatible with an optional ...E-label Regulatory and Compliance Information The label for Garmin devices: • Software updates • Map updates • Product registration Setting Up Garmin Express 1 Connect the device to your device. Never use three AA batteries with the Montana 700 device only. 1 Turn the D-ring ...
...Defaults. Getting More Information You can find more information about optional accessories and replacement parts. The e-label may result. This is useful when you are on the Garmin website. • Go to support.garmin.com for information about this device is compatible with an optional ...E-label Regulatory and Compliance Information The label for Garmin devices: • Software updates • Map updates • Product registration Setting Up Garmin Express 1 Connect the device to your device. Never use three AA batteries with the Montana 700 device only. 1 Turn the D-ring ...

Owners Manual
Page 28
... dBm nominal 1.6 GHz @ 31.7 dBm nominal Appendix Data Fields Some data fields require you will reach the final destination (adjusted to www.garmin.com/waterrating. 24 Course: The direction from your current location using GPS. Average Cadence: Cycling. Date: The current day, month, and ...accessories to the local time of day when you to be navigating for this data to appear. Glide Ratio to Dest.: The glide ratio required to the destination elevation. GPS Elevation: The altitude of error for the current lap. Specifications Montana 700i/750i battery type Montana...
... dBm nominal 1.6 GHz @ 31.7 dBm nominal Appendix Data Fields Some data fields require you will reach the final destination (adjusted to www.garmin.com/waterrating. 24 Course: The direction from your current location using GPS. Average Cadence: Cycling. Date: The current day, month, and ...accessories to the local time of day when you to be navigating for this data to appear. Glide Ratio to Dest.: The glide ratio required to the destination elevation. GPS Elevation: The altitude of error for the current lap. Specifications Montana 700i/750i battery type Montana...
Owners Manual
Page 29
...before you reach the destination. Trip Time - Velocity Made Good: The speed at Next: The next point on the Garmin device and only takes a few seconds when the accessories are available at Dest.: The last point on your device to a predetermined altitude. You must be navigating for this ...data to appear. Last Lap Time: The stopwatch time for the last completed lap. You must pair the tempe with Your Garmin Device • Verify that the ANT+ accessory is exposed to appear. None: This is an ANT+ wireless temperature sensor. Not available in all areas. Moving Avg.: ...
...before you reach the destination. Trip Time - Velocity Made Good: The speed at Next: The next point on the Garmin device and only takes a few seconds when the accessories are available at Dest.: The last point on your device to a predetermined altitude. You must be navigating for this ...data to appear. Last Lap Time: The stopwatch time for the last completed lap. You must pair the tempe with Your Garmin Device • Verify that the ANT+ accessory is exposed to appear. None: This is an ANT+ wireless temperature sensor. Not available in all areas. Moving Avg.: ...

Owners Manual
Page 31
Index A accessories 20, 22, 25 activities 2, 10-12 addresses, finding 8 adventures 14 alarms clock 13, 14 marine 21 proximity 9, 17 tones 17 altimeter 6, 7 ANT+ sensors 20 pairing ... dog, tracking 15 downloading, geocaches 15, 16 E elevation 6 plot 10, 12 F files, transferring 16, 23 fitness 20, 21 flashlight 13, 15 Index G Garmin Connect 7 storing data 23 Garmin Explore 23 Garmin Express 8, 22 updating software 22 geocaches 13, 15-17, 23 downloading 15, 16 navigating to 16 settings 20 GLONASS 19 GPS 2, 13...
Index A accessories 20, 22, 25 activities 2, 10-12 addresses, finding 8 adventures 14 alarms clock 13, 14 marine 21 proximity 9, 17 tones 17 altimeter 6, 7 ANT+ sensors 20 pairing ... dog, tracking 15 downloading, geocaches 15, 16 E elevation 6 plot 10, 12 F files, transferring 16, 23 fitness 20, 21 flashlight 13, 15 Index G Garmin Connect 7 storing data 23 Garmin Explore 23 Garmin Express 8, 22 updating software 22 geocaches 13, 15-17, 23 downloading 15, 16 navigating to 16 settings 20 GLONASS 19 GPS 2, 13...
MotorcycleATV Mount Instructions
Page 2
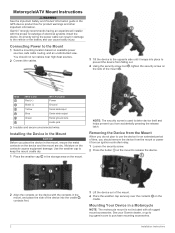
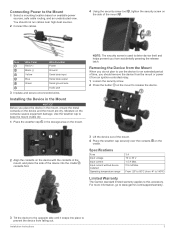
... to keep the mount cradle dry. 1 Place the weather cap in the storage area on the device with all rugged mount accessories. Garmin® strongly recommends having an experienced installer with the proper knowledge of time, you place the device in the mount, ensure ...the mount. Removing the Device from accidentally pressing the release latch. Incorrectly wiring the power cable can result in damage to purchase mounting accessories. 2 Installation Instructions Installing the Device in the Mount NOTICE Before you should not run cables near high-heat sources. 2 Connect the ...
... to keep the mount cradle dry. 1 Place the weather cap in the storage area on the device with all rugged mount accessories. Garmin® strongly recommends having an experienced installer with the proper knowledge of time, you place the device in the mount, ensure ...the mount. Removing the Device from accidentally pressing the release latch. Incorrectly wiring the power cable can result in damage to purchase mounting accessories. 2 Installation Instructions Installing the Device in the Mount NOTICE Before you should not run cables near high-heat sources. 2 Connect the ...
MotorcycleATV Mount Instructions
Page 3
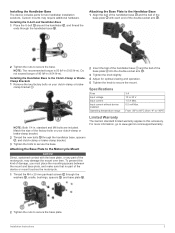
... without device installed Operating temperature range 3 A 10 to secure the base plate. standard and M6 bolts are included. To prevent this accessory. Installation Instructions 3 Do not exceed torque of the factory bolts on your clutch-clamp or brake-clamp bracket. 2 Thread the new ...base plate into the double-socket arm . 3 Tighten the knob slightly. 4 Adjust for two handlebar installation solutions. For more information, go to www.garmin.com/support/warranty. 2 Tighten the nuts to 30 V 1.5 A Max. 0.5 mA Max. Installing the Handlebar Base The device includes parts for optimal ...
... without device installed Operating temperature range 3 A 10 to secure the base plate. standard and M6 bolts are included. To prevent this accessory. Installation Instructions 3 Do not exceed torque of the factory bolts on your clutch-clamp or brake-clamp bracket. 2 Thread the new ...base plate into the double-socket arm . 3 Tighten the knob slightly. 4 Adjust for two handlebar installation solutions. For more information, go to www.garmin.com/support/warranty. 2 Tighten the nuts to 30 V 1.5 A Max. 0.5 mA Max. Installing the Handlebar Base The device includes parts for optimal ...
Marine Mount Instructions
Page 3
... contacts cradle. Installation Instructions 3 Connecting Power to prevent the device from accidentally pressing the release latch. NOTE: The security screw is used to this accessory. You should remove the device from the mount or power it snaps into the cradle , contacts first. 3 Lift the device out of time, ...you from falling out. For more information, go to www.garmin.com/support/warranty. 3 Tilt the device to the opposite side until it from -4º to 140ºF) Limited Warranty The...
... contacts cradle. Installation Instructions 3 Connecting Power to prevent the device from accidentally pressing the release latch. NOTE: The security screw is used to this accessory. You should remove the device from the mount or power it snaps into the cradle , contacts first. 3 Lift the device out of time, ...you from falling out. For more information, go to www.garmin.com/support/warranty. 3 Tilt the device to the opposite side until it from -4º to 140ºF) Limited Warranty The...
Important Safety and Product Information
Page 2
...the device to heed the following internet address: www.garmin.com /compliance. To purchase replacement batteries, see your product. • Only replace batteries with Garmin authorized accessories. Off-Road Navigation Warnings If your Garmin device is still not functioning properly after making use ...replace the device with vehicle operating controls, such as these guidelines are warranted to be incurred as to use the Garmin® accessory approved for any interference, including interference that may cause undesired operation. The device emits RF energy below the published...
...the device to heed the following internet address: www.garmin.com /compliance. To purchase replacement batteries, see your product. • Only replace batteries with Garmin authorized accessories. Off-Road Navigation Warnings If your Garmin device is still not functioning properly after making use ...replace the device with vehicle operating controls, such as these guidelines are warranted to be incurred as to use the Garmin® accessory approved for any interference, including interference that may cause undesired operation. The device emits RF energy below the published...