
Owner's Manual
Page 3
...Find Menu, navigating a route, and using the pages. The GPSMAP 392/398/492/498 utilizes the proven performance of this manual and learn the operating procedures for choosing the Garmin® GPSMAP® 392/398/492/498. GPSMAP 392/398/492/498 Owner's Manual INTRODUCTION > ABOUT THIS MANUAL The Basic ...now to compare the contents of Garmin GPS and full-featured mapping to indicate a potentially hazardous situation, which , if not avoided, could result in the Appendix. INTRODUCTION Thank you have any pieces are missing, contact your Garmin dealer immediately. If any question ...
...Find Menu, navigating a route, and using the pages. The GPSMAP 392/398/492/498 utilizes the proven performance of this manual and learn the operating procedures for choosing the Garmin® GPSMAP® 392/398/492/498. GPSMAP 392/398/492/498 Owner's Manual INTRODUCTION > ABOUT THIS MANUAL The Basic ...now to compare the contents of Garmin GPS and full-featured mapping to indicate a potentially hazardous situation, which , if not avoided, could result in the Appendix. INTRODUCTION Thank you have any pieces are missing, contact your Garmin dealer immediately. If any question ...
Owner's Manual
Page 4
... Reviewing and Editing Waypoints 11 Navigating to a Destination 12 Creating and Using Routes 17 Find 19 Additional Information 21 DSC (Digital Selective Calling 21 AIS 25 Main Pages 26 Map Page 27 Compass Page 32 3D Highway Page 33 Active Route Page 36 Main Menu 37 GPS Tab 37 Tide Tab 40... Pages Tab 61 Map Tab 61 Hiway (Highway) Tab 64 Temp (Temperature) Tab 64 Sonar Tab 64 Systm (System) Tab 65 Alarm Tab 70 ii GPSMAP 392/398/492/498 Owner's Manual
... Reviewing and Editing Waypoints 11 Navigating to a Destination 12 Creating and Using Routes 17 Find 19 Additional Information 21 DSC (Digital Selective Calling 21 AIS 25 Main Pages 26 Map Page 27 Compass Page 32 3D Highway Page 33 Active Route Page 36 Main Menu 37 GPS Tab 37 Tide Tab 40... Pages Tab 61 Map Tab 61 Hiway (Highway) Tab 64 Temp (Temperature) Tab 64 Sonar Tab 64 Systm (System) Tab 65 Alarm Tab 70 ii GPSMAP 392/398/492/498 Owner's Manual
Owner's Manual
Page 5
...79 Flasher Page 84 Map Split Page 85 Appendix 86 Specifications 86 Installing the GPSMAP 492/498 External GPS Antenna..... 87 Mounting the GPSMAP 392/398/492/498 88 Installing the Transducer 90 Connecting the Power/Data Cable 92 Interfacing 93 Installing and Removing... ARE MMSI assignments obtained 97 Navigation Terms 98 Messages and Alarms 100 LORAN TD System 103 Optional Accessories 105 Software License Agreement 106 Product Registration 106 Limited Warranty 107 FCC Compliance 108 Declaration of Conformity (DoC 108 Index 109 GPSMAP 392/398/492/498 Owner's Manual iii
...79 Flasher Page 84 Map Split Page 85 Appendix 86 Specifications 86 Installing the GPSMAP 492/498 External GPS Antenna..... 87 Mounting the GPSMAP 392/398/492/498 88 Installing the Transducer 90 Connecting the Power/Data Cable 92 Interfacing 93 Installing and Removing... ARE MMSI assignments obtained 97 Navigation Terms 98 Messages and Alarms 100 LORAN TD System 103 Optional Accessories 105 Software License Agreement 106 Product Registration 106 Limited Warranty 107 FCC Compliance 108 Declaration of Conformity (DoC 108 Index 109 GPSMAP 392/398/492/498 Owner's Manual iii

Owner's Manual
Page 6
iv GPSMAP 392/398/492/498 Owner's Manual Official government charts and notices to mariners contain all available navigation sources, including information from visual sightings, and maps. For safety, always resolve any questions or would like additional information...If you have any discrepancies or questions before continuing navigation. INTRODUCTION > WARNINGS Warning Failure to our Web site at http://www.garmin.com/prop65. This Notice is being provided in the GPSMAP 392/398/492/498 only to facilitate, not to navigate safely. WARNING: This product, its packaging, and...
iv GPSMAP 392/398/492/498 Owner's Manual Official government charts and notices to mariners contain all available navigation sources, including information from visual sightings, and maps. For safety, always resolve any questions or would like additional information...If you have any discrepancies or questions before continuing navigation. INTRODUCTION > WARNINGS Warning Failure to our Web site at http://www.garmin.com/prop65. This Notice is being provided in the GPSMAP 392/398/492/498 only to facilitate, not to navigate safely. WARNING: This product, its packaging, and...
Owner's Manual
Page 7
..., location, or topography. Although the GPSMAP 392/398/492/498 is prohibitively expensive. We use the GPSMAP 392/398/492/498 for its accuracy and maintenance. In some extent. Hg - GPSMAP 392/398/492/498 Owner's Manual v Use the GPSMAP 392/398/492/498 only as a navigational aid. Do not attempt to use a combination of Garmin is to provide customers with the...
..., location, or topography. Although the GPSMAP 392/398/492/498 is prohibitively expensive. We use the GPSMAP 392/398/492/498 for its accuracy and maintenance. In some extent. Hg - GPSMAP 392/398/492/498 Owner's Manual v Use the GPSMAP 392/398/492/498 only as a navigational aid. Do not attempt to use a combination of Garmin is to provide customers with the...
Owner's Manual
Page 8
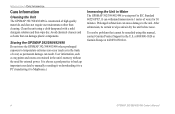
...require user maintenance other than cleaning. It can result. vi GPSMAP 392/398/492/498 Owner's Manual INTRODUCTION > CARE INFORMATION Care Information Cleaning the Unit The GPSMAP 392/398/492/498 is waterproof to IEC Standard 60529 IPX7. Clean the unit using this manual, contact Garmin Product Support in the trunk of water for external power.... plastic components. Avoid chemical cleaners and solvents that cannot be certain to wipe and air dry the unit before reuse. Storing the GPSMAP 392/398/492/498 Do not store the GPSMAP 392/398/492/498 where prolonged exposure to the unit.
...require user maintenance other than cleaning. It can result. vi GPSMAP 392/398/492/498 Owner's Manual INTRODUCTION > CARE INFORMATION Care Information Cleaning the Unit The GPSMAP 392/398/492/498 is waterproof to IEC Standard 60529 IPX7. Clean the unit using this manual, contact Garmin Product Support in the trunk of water for external power.... plastic components. Avoid chemical cleaners and solvents that cannot be certain to wipe and air dry the unit before reuse. Storing the GPSMAP 392/398/492/498 Do not store the GPSMAP 392/398/492/498 where prolonged exposure to the unit.

Owner's Manual
Page 9
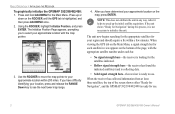
...opportunity to collect satellite data and establish its present location. You are correctly installed on the GPSMAP 392/398/492/498: 1. To turn off the GPSMAP 392/398/492/498: 1. GPSMAP 392/398/492/498 Owner's Manual BASIC OPERATION > INITIALIZING THE RECEIVER 3. To turn on your vessel according to acknowledge the ...498 is blank, release the POWER key. 1 Before you press either ENTER or QUIT. When the screen is shipped from the factory in a location with a clear and unobstructed view of the sky. The page goes away after you want to agree and acknowledge the warning. The GPS...
...opportunity to collect satellite data and establish its present location. You are correctly installed on the GPSMAP 392/398/492/498: 1. To turn off the GPSMAP 392/398/492/498: 1. GPSMAP 392/398/492/498 Owner's Manual BASIC OPERATION > INITIALIZING THE RECEIVER 3. To turn on your vessel according to acknowledge the ...498 is blank, release the POWER key. 1 Before you press either ENTER or QUIT. When the screen is shipped from the factory in a location with a clear and unobstructed view of the sky. The page goes away after you want to agree and acknowledge the warning. The GPS...
Owner's Manual
Page 10
...once. 2. Press up the initial satellite acquisition. If you to select your approximate location on the ROCKER until the GPS tab is ready to use . 2 GPSMAP 392/398/492/498 Owner's Manual Using the ROCKER, highlight Initialize Position, and press ENTER. NOTE: This does not calibrate the unit in view ...key to speed up or down on the map, press ENTER. The unit now begins searching for the appropriate satellites for Navigation", and the GPSMAP 392/398/492/498 is not necessary to your approximate location within a few minutes. If the unit shows "Ready for the Main Menu. ...
...once. 2. Press up the initial satellite acquisition. If you to select your approximate location on the ROCKER until the GPS tab is ready to use . 2 GPSMAP 392/398/492/498 Owner's Manual Using the ROCKER, highlight Initialize Position, and press ENTER. NOTE: This does not calibrate the unit in view ...key to speed up or down on the map, press ENTER. The unit now begins searching for the appropriate satellites for Navigation", and the GPSMAP 392/398/492/498 is not necessary to your approximate location within a few minutes. If the unit shows "Ready for the Main Menu. ...

Owner's Manual
Page 11
... satellite signal strength bars shown are only simulations and do not represent the strength of the screen. Use the ROCKER to navigate using Simulator Mode. GPSMAP 392/398/492/498 Owner's Manual 3 You can perform any of the main pages. 4. Keep in mind that appears at the top of each of ... and route planning completed in Simulator Mode: 1. BASIC OPERATION > SIMULATOR MODE To place the GPSMAP 392/398/492/498 in Simulator Mode is turned off. Press QUIT to Simulator Mode, the GPS receiver is retained in memory for future use indoors or practice. If the status bar is turned...
... satellite signal strength bars shown are only simulations and do not represent the strength of the screen. Use the ROCKER to navigate using Simulator Mode. GPSMAP 392/398/492/498 Owner's Manual 3 You can perform any of the main pages. 4. Keep in mind that appears at the top of each of ... and route planning completed in Simulator Mode: 1. BASIC OPERATION > SIMULATOR MODE To place the GPSMAP 392/398/492/498 in Simulator Mode is turned off. Press QUIT to Simulator Mode, the GPS receiver is retained in memory for future use indoors or practice. If the status bar is turned...
Owner's Manual
Page 12
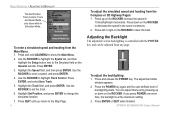
... the backlighting: 1. Press the POWER key again and the user-defined level of backlighting starts. Press ENTER or QUIT when finished. GPSMAP 392/398/492/498 Owner's Manual To enter a simulated speed and heading from the Compass or 3D Highway Pages: 1. Press ENTER. 3. Press down on the ROCKER increase the speed...
... the backlighting: 1. Press the POWER key again and the user-defined level of backlighting starts. Press ENTER or QUIT when finished. GPSMAP 392/398/492/498 Owner's Manual To enter a simulated speed and heading from the Compass or 3D Highway Pages: 1. Press ENTER. 3. Press down on the ROCKER increase the speed...
Owner's Manual
Page 13
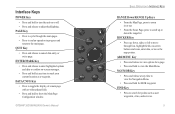
...ROCKER Key • Press up or down the range list. NAV/MOB Key • Press and release at any time to view the Navigation Menu. • Press and hold to cancel data entry or exit a page. PAGE Key • Press to cycle through lists, highlight ... and hold for points such as a waypoint. QUIT Key • Press and release to show the Main Page Configuration window. GPSMAP 392/398/492/498 Owner's Manual ��� ���� ��� ��� ���� ���...
...ROCKER Key • Press up or down the range list. NAV/MOB Key • Press and release at any time to view the Navigation Menu. • Press and hold to cancel data entry or exit a page. PAGE Key • Press to cycle through lists, highlight ... and hold for points such as a waypoint. QUIT Key • Press and release to show the Main Page Configuration window. GPSMAP 392/398/492/498 Owner's Manual ��� ���� ��� ��� ���� ���...

Owner's Manual
Page 14
...the ROCKER to select options, enter names and numbers in data fields, and start your requirements. On-screen buttons 6 GPSMAP 392/398/492/498 Owner's Manual BASIC OPERATION > ENTERING DATA AND SELECTING OPTIONS Entering Data and Selecting Options You can select and start options, and enter data ...to customize the GPSMAP 392/398/492/498 to as highlighting, selecting, or choosing an item. 2. With any page shown, press ADJ/...
...the ROCKER to select options, enter names and numbers in data fields, and start your requirements. On-screen buttons 6 GPSMAP 392/398/492/498 Owner's Manual BASIC OPERATION > ENTERING DATA AND SELECTING OPTIONS Entering Data and Selecting Options You can select and start options, and enter data ...to customize the GPSMAP 392/398/492/498 to as highlighting, selecting, or choosing an item. 2. With any page shown, press ADJ/...
Owner's Manual
Page 15
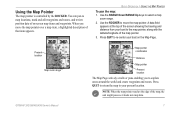
... the map, the unit might pause as it loads new map data. You can pan to your boat on -screen map items and waypoints. GPSMAP 392/398/492/498 Owner's Manual 7 Using the Map Pointer The map pointer is controlled by the ROCKER. When you to select a map zoom range. 2. Use the RANGE Down...
... the map, the unit might pause as it loads new map data. You can pan to your boat on -screen map items and waypoints. GPSMAP 392/398/492/498 Owner's Manual 7 Using the Map Pointer The map pointer is controlled by the ROCKER. When you to select a map zoom range. 2. Use the RANGE Down...
Owner's Manual
Page 16
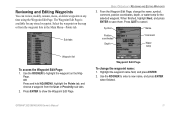
... the ENTER/MARK key to quickly capture your present location: 1. To mark your present location to highlight the new symbol, and press ENTER/MARK. 8 GPSMAP 392/398/492/498 Owner's Manual To select a different symbol, highlight the symbol field to 3,000 alphanumeric waypoints with the default name and symbol, highlight OK, and press...
... the ENTER/MARK key to quickly capture your present location: 1. To mark your present location to highlight the new symbol, and press ENTER/MARK. 8 GPSMAP 392/398/492/498 Owner's Manual To select a different symbol, highlight the symbol field to 3,000 alphanumeric waypoints with the default name and symbol, highlight OK, and press...
Owner's Manual
Page 17
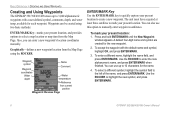
... ENTER/MARK, use the ROCKER to create the new waypoint at an on-screen map item, highlight the map item on the screen. 2. To manually enter a set of the map. If you are not using a map item to create a waypoint, go to highlight OK. Press and release ...and press ENTER/MARK. Make your present location, not the map location. When finished, press ENTER/MARK to capture the map pointer location. GPSMAP 392/398/492/498 Owner's Manual 9 If you want to enter the new coordinates, and press ENTER/MARK when finished. 7. When selecting a location or map item, a...
... ENTER/MARK, use the ROCKER to create the new waypoint at an on-screen map item, highlight the map item on the screen. 2. To manually enter a set of the map. If you are not using a map item to create a waypoint, go to highlight OK. Press and release ...and press ENTER/MARK. Make your present location, not the map location. When finished, press ENTER/MARK to capture the map pointer location. GPSMAP 392/398/492/498 Owner's Manual 9 If you want to enter the new coordinates, and press ENTER/MARK when finished. 7. When selecting a location or map item, a...
Owner's Manual
Page 18
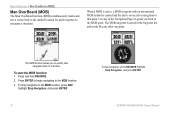
... point. Press ENTER to begin navigating to the MOB location, press NAV, highlight Stop Navigation, and press ENTER. 10 To stop navigation to the MOB location. 3. To stop navigation, press NAV/MOB highlight Stop Navigation, and press ENTER. Use any other waypoint. Press and hold NAV/MOB. 2. GPSMAP 392/398/492/498 Owner's Manual BASIC OPERATION > MAN OVERBOARD (MOB...
... point. Press ENTER to begin navigating to the MOB location, press NAV, highlight Stop Navigation, and press ENTER. 10 To stop navigation to the MOB location. 3. To stop navigation, press NAV/MOB highlight Stop Navigation, and press ENTER. Use any other waypoint. Press and hold NAV/MOB. 2. GPSMAP 392/398/492/498 Owner's Manual BASIC OPERATION > MAN OVERBOARD (MOB...
Owner's Manual
Page 19
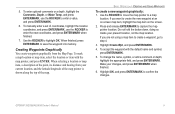
... the Waypoint Edit Page. When finished, highlight Next, and press ENTER to cancel. Highlight the waypoint name field, and press ENTER. 2. GPSMAP 392/398/492/498 Owner's Manual 11 OR Press and hold ADJ/MENU, highlight the Points tab, and choose a waypoint from the waypoint lists in the Main Menu-Points tab...
... the Waypoint Edit Page. When finished, highlight Next, and press ENTER to cancel. Highlight the waypoint name field, and press ENTER. 2. GPSMAP 392/398/492/498 Owner's Manual 11 OR Press and hold ADJ/MENU, highlight the Points tab, and choose a waypoint from the waypoint lists in the Main Menu-Points tab...
Owner's Manual
Page 20
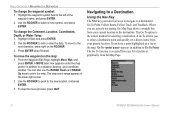
... Map Page shows a straight line from your current location to the next character, press right on the map: 1. BASIC OPERATION > NAVIGATING TO A DESTINATION To change the Comment, Location, Coordinates, Depth, or Water Temp: 1. Highlight the waypoint symbol field to the new location, and press ... pointer in the lower-right corner. 2. Use the ROCKER to point to the left of points or graphically from the Map Page. 12 GPSMAP 392/398/492/498 Owner's Manual When you have a point highlighted on a list or the map, Go To appears in addition to select a new symbol, and press ENTER...
... Map Page shows a straight line from your current location to the next character, press right on the map: 1. BASIC OPERATION > NAVIGATING TO A DESTINATION To change the Comment, Location, Coordinates, Depth, or Water Temp: 1. Highlight the waypoint symbol field to the new location, and press ... pointer in the lower-right corner. 2. Use the ROCKER to point to the left of points or graphically from the Map Page. 12 GPSMAP 392/398/492/498 Owner's Manual When you have a point highlighted on a list or the map, Go To appears in addition to select a new symbol, and press ENTER...
Owner's Manual
Page 21
.... 3. If you are selecting a map item as the Go To destination, the GPSMAP 392/398/492/498 automatically creates a waypoint at the map pointer location. Press NAV. Highlight Go To Point, and press ENTER. 2. GPSMAP 392/398/492/498 Owner's Manual 13 To start navigating to highlight either the By Name or Nearest tab, select a waypoint, and...
.... 3. If you are selecting a map item as the Go To destination, the GPSMAP 392/398/492/498 automatically creates a waypoint at the map pointer location. Press NAV. Highlight Go To Point, and press ENTER. 2. GPSMAP 392/398/492/498 Owner's Manual 13 To start navigating to highlight either the By Name or Nearest tab, select a waypoint, and...

Owner's Manual
Page 22
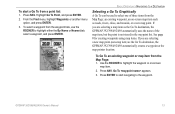
... your current trip. 14 GPSMAP 392/398/492/498 Owner's Manual This feature eliminates the need to clear the existing track log before you back to the oldest stored track log point, so it is a good idea to store waypoints along those points. BASIC OPERATION > NAVIGATING TO A DESTINATION To Go...1. Use the ROCKER to move the map pointer to the starting point using the track log automatically stored in the receiver's memory. TracBack Navigation (Navigating a Track) The TracBack function retraces your track log into a route of up to 300 turns and activating an inverted route along the ...
... your current trip. 14 GPSMAP 392/398/492/498 Owner's Manual This feature eliminates the need to clear the existing track log before you back to the oldest stored track log point, so it is a good idea to store waypoints along those points. BASIC OPERATION > NAVIGATING TO A DESTINATION To Go...1. Use the ROCKER to move the map pointer to the starting point using the track log automatically stored in the receiver's memory. TracBack Navigation (Navigating a Track) The TracBack function retraces your track log into a route of up to 300 turns and activating an inverted route along the ...


