
Owner's Manual
Page 3
... to configure your new navigation system, take time to indicate a potentially hazardous situation, which , if not avoided, may result in the Appendix. GPSMAP 392/398/492/498 Owner's Manual INTRODUCTION > ABOUT THIS MANUAL The Basic Operation section provides you have any pieces are missing, contact your chartplotter, contact Garmin Product Support or a professional installer. Take...
... to configure your new navigation system, take time to indicate a potentially hazardous situation, which , if not avoided, may result in the Appendix. GPSMAP 392/398/492/498 Owner's Manual INTRODUCTION > ABOUT THIS MANUAL The Basic Operation section provides you have any pieces are missing, contact your chartplotter, contact Garmin Product Support or a professional installer. Take...
Owner's Manual
Page 4
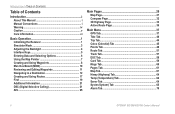
... Reviewing and Editing Waypoints 11 Navigating to a Destination 12 Creating and Using Routes 17 Find 19 Additional Information 21 DSC (Digital Selective Calling 21 AIS 25 Main Pages 26 Map Page 27 Compass Page 32 3D Highway Page 33 Active Route Page 36 Main Menu 37 GPS Tab 37 Tide Tab 40... Pages Tab 61 Map Tab 61 Hiway (Highway) Tab 64 Temp (Temperature) Tab 64 Sonar Tab 64 Systm (System) Tab 65 Alarm Tab 70 ii GPSMAP 392/398/492/498 Owner's Manual
... Reviewing and Editing Waypoints 11 Navigating to a Destination 12 Creating and Using Routes 17 Find 19 Additional Information 21 DSC (Digital Selective Calling 21 AIS 25 Main Pages 26 Map Page 27 Compass Page 32 3D Highway Page 33 Active Route Page 36 Main Menu 37 GPS Tab 37 Tide Tab 40... Pages Tab 61 Map Tab 61 Hiway (Highway) Tab 64 Temp (Temperature) Tab 64 Sonar Tab 64 Systm (System) Tab 65 Alarm Tab 70 ii GPSMAP 392/398/492/498 Owner's Manual
Owner's Manual
Page 5
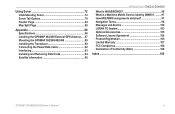
...79 Flasher Page 84 Map Split Page 85 Appendix 86 Specifications 86 Installing the GPSMAP 492/498 External GPS Antenna..... 87 Mounting the GPSMAP 392/398/492/498 88 Installing the Transducer 90 Connecting the Power/Data Cable 92 Interfacing 93 Installing and Removing... ARE MMSI assignments obtained 97 Navigation Terms 98 Messages and Alarms 100 LORAN TD System 103 Optional Accessories 105 Software License Agreement 106 Product Registration 106 Limited Warranty 107 FCC Compliance 108 Declaration of Conformity (DoC 108 Index 109 GPSMAP 392/398/492/498 Owner's Manual iii
...79 Flasher Page 84 Map Split Page 85 Appendix 86 Specifications 86 Installing the GPSMAP 492/498 External GPS Antenna..... 87 Mounting the GPSMAP 392/398/492/498 88 Installing the Transducer 90 Connecting the Power/Data Cable 92 Interfacing 93 Installing and Removing... ARE MMSI assignments obtained 97 Navigation Terms 98 Messages and Alarms 100 LORAN TD System 103 Optional Accessories 105 Software License Agreement 106 Product Registration 106 Limited Warranty 107 FCC Compliance 108 Declaration of Conformity (DoC 108 Index 109 GPSMAP 392/398/492/498 Owner's Manual iii

Owner's Manual
Page 6
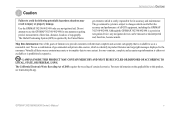
... in death or serious injury. Use the electronic chart in the GPSMAP 392/398/492/498 only to facilitate, not to our Web site at http://www.garmin.com/prop65. iv GPSMAP 392/398/492/498 Owner's Manual If you have any discrepancies or questions before continuing navigation. For safety, always resolve any questions or would like additional...
... in death or serious injury. Use the electronic chart in the GPSMAP 392/398/492/498 only to facilitate, not to our Web site at http://www.garmin.com/prop65. iv GPSMAP 392/398/492/498 Owner's Manual If you have any discrepancies or questions before continuing navigation. For safety, always resolve any questions or would like additional...
Owner's Manual
Page 7
Use the GPSMAP 392/398/492/498 only as a navigational aid. Map Data Information: One of the goals of Garmin is to provide customers with the most complete and accurate cartography that is subject to changes which ...navigation device, any purpose requiring precise measurement of certain electronics. We use the GPSMAP 392/398/492/498 for its accuracy and maintenance. Virtually all GPS equipment, including the GPSMAP 392/398/492/498. The government's system is available to us at a reasonable cost. GPSMAP 392/398/492/498 Owner's Manual v Hg - Although the GPSMAP 392/398/492/498...
Use the GPSMAP 392/398/492/498 only as a navigational aid. Map Data Information: One of the goals of Garmin is to provide customers with the most complete and accurate cartography that is subject to changes which ...navigation device, any purpose requiring precise measurement of certain electronics. We use the GPSMAP 392/398/492/498 for its accuracy and maintenance. Virtually all GPS equipment, including the GPSMAP 392/398/492/498. The government's system is available to us at a reasonable cost. GPSMAP 392/398/492/498 Owner's Manual v Hg - Although the GPSMAP 392/398/492/498...
Owner's Manual
Page 8
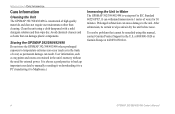
Storing the GPSMAP 392/398/492/498 Do not store the GPSMAP 392/398/492/498 where prolonged exposure to temperature extremes can occur (such as in the unit's memory without the need for 30 minutes. at 800/800-1020 or Garmin Europe at 44/0870-8501241. It can ... Care Information Cleaning the Unit The GPSMAP 392/398/492/498 is waterproof to IEC Standard 60529 IPX7. vi GPSMAP 392/398/492/498 Owner's Manual Prolonged submersion can result. Clean the unit using this manual, contact Garmin Product Support in Water The GPSMAP 392/398/492/498 is constructed of high quality materials ...
Storing the GPSMAP 392/398/492/498 Do not store the GPSMAP 392/398/492/498 where prolonged exposure to temperature extremes can occur (such as in the unit's memory without the need for 30 minutes. at 800/800-1020 or Garmin Europe at 44/0870-8501241. It can ... Care Information Cleaning the Unit The GPSMAP 392/398/492/498 is waterproof to IEC Standard 60529 IPX7. vi GPSMAP 392/398/492/498 Owner's Manual Prolonged submersion can result. Clean the unit using this manual, contact Garmin Product Support in Water The GPSMAP 392/398/492/498 is constructed of high quality materials ...

Owner's Manual
Page 9
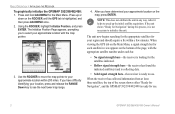
...shown after the unit gets a position fix, or you press either ENTER or QUIT. GPSMAP 392/398/492/498 Owner's Manual BASIC OPERATION > INITIALIZING THE RECEIVER 3. To turn on the GPSMAP 392/398/492/498: 1. Press and hold the POWER key until the power tone sounds, then release the ...factory in a location with a clear and unobstructed view of the sky. The GPS Information Page appears as the receiver begins acquiring satellites. To ensure proper initialization, the GPSMAP 392/398/492/498 is complete, press ENTER to collect satellite data and establish its present location. ...
...shown after the unit gets a position fix, or you press either ENTER or QUIT. GPSMAP 392/398/492/498 Owner's Manual BASIC OPERATION > INITIALIZING THE RECEIVER 3. To turn on the GPSMAP 392/398/492/498: 1. Press and hold the POWER key until the power tone sounds, then release the ...factory in a location with a clear and unobstructed view of the sky. The GPS Information Page appears as the receiver begins acquiring satellites. To ensure proper initialization, the GPSMAP 392/398/492/498 is complete, press ENTER to collect satellite data and establish its present location. ...
Owner's Manual
Page 10
...GPS tab is ready to your region and should acquire a fix within 200 miles. BASIC OPERATION > INITIALIZING THE RECEIVER To graphically initialize the GPSMAP 392/398/492/498: 1. Press up the initial satellite acquisition. Use the ROCKER to move the map pointer to use . 2 GPSMAP 392/398/492/498 Owner's Manual...When viewing the GPS tab on the Main Menu, a signal strength bar for each bar. • No signal strength bars-the receiver is looking for your approximate location within a few minutes. Press and hold ADJ/MENU for Navigation", and the GPSMAP 392/398/492/498 is not ...
...GPS tab is ready to your region and should acquire a fix within 200 miles. BASIC OPERATION > INITIALIZING THE RECEIVER To graphically initialize the GPSMAP 392/398/492/498: 1. Press up the initial satellite acquisition. Use the ROCKER to move the map pointer to use . 2 GPSMAP 392/398/492/498 Owner's Manual...When viewing the GPS tab on the Main Menu, a signal strength bar for each bar. • No signal strength bars-the receiver is looking for your approximate location within a few minutes. Press and hold ADJ/MENU for Navigation", and the GPSMAP 392/398/492/498 is not ...

Owner's Manual
Page 11
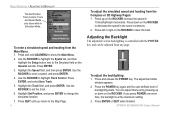
... in Simulator Mode is turned off. GPSMAP 392/398/492/498 Owner's Manual 3 WARNING: Do not attempt to highlight the GPS tab, and then press ADJ/MENU once. 2. Any satellite signal strength bars shown are only simulations and do not represent the strength of the screen. Use the ROCKER to navigate using Simulator Mode. Use the...
... in Simulator Mode is turned off. GPSMAP 392/398/492/498 Owner's Manual 3 WARNING: Do not attempt to highlight the GPS tab, and then press ADJ/MENU once. 2. Any satellite signal strength bars shown are only simulations and do not represent the strength of the screen. Use the ROCKER to navigate using Simulator Mode. Use the...
Owner's Manual
Page 12
... press POWER one more time, the backlight is controlled with the POWER key, and can adjust this level by pressing up on the ROCKER. GPSMAP 392/398/492/498 Owner's Manual BASIC OPERATION > ADJUSTING THE BACKLIGHT The Set Position, Track Control, Track and Speed fields only show the Main Menu. 2. Use the ROCKER...
... press POWER one more time, the backlight is controlled with the POWER key, and can adjust this level by pressing up on the ROCKER. GPSMAP 392/398/492/498 Owner's Manual BASIC OPERATION > ADJUSTING THE BACKLIGHT The Set Position, Track Control, Track and Speed fields only show the Main Menu. 2. Use the ROCKER...
Owner's Manual
Page 13
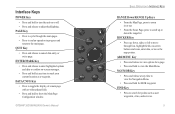
...to adjust backlighting. ADJ/MENU Key • Press and release to view options for a page. • Press and hold to view the Navigation Menu. • Press and hold for points such as a waypoint. Interface Keys POWER Key • Press and hold to turn the ...8226; Press to end an operation in or out. • From the Sonar Page, press to scroll up , down the range list. GPSMAP 392/398/492/498 Owner's Manual ��� ���� ��� ��� ���� ���...
...to adjust backlighting. ADJ/MENU Key • Press and release to view options for a page. • Press and hold to view the Navigation Menu. • Press and hold for points such as a waypoint. Interface Keys POWER Key • Press and hold to turn the ...8226; Press to end an operation in or out. • From the Sonar Page, press to scroll up , down the range list. GPSMAP 392/398/492/498 Owner's Manual ��� ���� ��� ��� ���� ���...

Owner's Manual
Page 14
... your requirements. With any page shown, press ADJ/MENU for that page. Use the ROCKER to highlight an on menus. 3. On-screen buttons 6 GPSMAP 392/398/492/498 Owner's Manual To select an optional feature: 1. To select an option requires movement of optional features that are specific for the adjustment menu. BASIC OPERATION...
... your requirements. With any page shown, press ADJ/MENU for that page. Use the ROCKER to highlight an on menus. 3. On-screen buttons 6 GPSMAP 392/398/492/498 Owner's Manual To select an optional feature: 1. To select an option requires movement of optional features that are specific for the adjustment menu. BASIC OPERATION...
Owner's Manual
Page 15
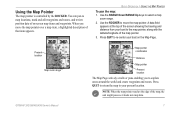
.... Press QUIT to your boat on -screen map items and waypoints. Press QUIT to return the map to re-center your present location. GPSMAP 392/398/492/498 Owner's Manual 7 Using the Map Pointer The map pointer is controlled by the ROCKER. Use the RANGE Down/RANGE Up keys to the map pointer, along...
.... Press QUIT to your boat on -screen map items and waypoints. Press QUIT to return the map to re-center your present location. GPSMAP 392/398/492/498 Owner's Manual 7 Using the Map Pointer The map pointer is controlled by the ROCKER. Use the RANGE Down/RANGE Up keys to the map pointer, along...
Owner's Manual
Page 16
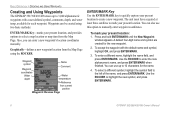
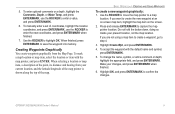
...;eld, and press ENTER/MARK. To select a different symbol, highlight the symbol field to highlight the new symbol, and press ENTER/MARK. 8 GPSMAP 392/398/492/498 Owner's Manual Waypoint symbol Waypoint coordinates Name Comment Water depth Water temperature Reference from the Map Page. A default four-digit name and symbol are created for... ROCKER to enter the new alphanumeric name, and press ENTER/MARK when finished. BASIC OPERATION > CREATING AND USING WAYPOINTS Creating and Using Waypoints The GPSMAP 392/398/492/498 stores up to 10 characters for the name. 4.
...;eld, and press ENTER/MARK. To select a different symbol, highlight the symbol field to highlight the new symbol, and press ENTER/MARK. 8 GPSMAP 392/398/492/498 Owner's Manual Waypoint symbol Waypoint coordinates Name Comment Water depth Water temperature Reference from the Map Page. A default four-digit name and symbol are created for... ROCKER to enter the new alphanumeric name, and press ENTER/MARK when finished. BASIC OPERATION > CREATING AND USING WAYPOINTS Creating and Using Waypoints The GPSMAP 392/398/492/498 stores up to 10 characters for the name. 4.
Owner's Manual
Page 17
... are not using a map item to create a waypoint, go to save the waypoint into memory. Make your present location, not the map location. GPSMAP 392/398/492/498 Owner's Manual 9 To accept the waypoint with the map pointer, and press ENTER. Do not hold the button down, doing so marks your changes, and press...
... are not using a map item to create a waypoint, go to save the waypoint into memory. Make your present location, not the map location. GPSMAP 392/398/492/498 Owner's Manual 9 To accept the waypoint with the map pointer, and press ENTER. Do not hold the button down, doing so marks your changes, and press...
Owner's Manual
Page 18
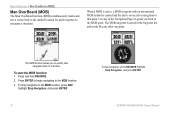
The MOB function allows you back to a location. Press and hold NAV/MOB. 2. GPSMAP 392/398/492/498 Owner's Manual The MOB waypoint is on an active navigation to the MOB location. 3. BASIC OPERATION > MAN OVERBOARD (MOB) Man OverBoard (MOB) The Man OverBoard function (MOB) simultaneously marks and sets a course back to the ...
The MOB function allows you back to a location. Press and hold NAV/MOB. 2. GPSMAP 392/398/492/498 Owner's Manual The MOB waypoint is on an active navigation to the MOB location. 3. BASIC OPERATION > MAN OVERBOARD (MOB) Man OverBoard (MOB) The Man OverBoard function (MOB) simultaneously marks and sets a course back to the ...
Owner's Manual
Page 19
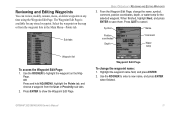
... highlight the waypoint on the map or from the User or Proximity sub tabs. 2. Highlight the waypoint name field, and press ENTER. 2. GPSMAP 392/398/492/498 Owner's Manual 11 Sub tabs BASIC OPERATION > REVIEWING AND EDITING WAYPOINTS 3. Press ENTER to save them. The Waypoint Edit Page is available for the selected waypoint...
... highlight the waypoint on the map or from the User or Proximity sub tabs. 2. Highlight the waypoint name field, and press ENTER. 2. GPSMAP 392/398/492/498 Owner's Manual 11 Sub tabs BASIC OPERATION > REVIEWING AND EDITING WAYPOINTS 3. Press ENTER to save them. The Waypoint Edit Page is available for the selected waypoint...
Owner's Manual
Page 20
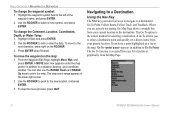
... from the Map Page. 12 GPSMAP 392/398/492/498 Owner's Manual A MOVE label now appears under the map pointer in the lower-right corner. 2. To stop the move process, press QUIT. The Go To option is accessed from any list of the waypoint name, and press ENTER. 2. BASIC OPERATION > NAVIGATING TO A DESTINATION To change...
... from the Map Page. 12 GPSMAP 392/398/492/498 Owner's Manual A MOVE label now appears under the map pointer in the lower-right corner. 2. To stop the move process, press QUIT. The Go To option is accessed from any list of the waypoint name, and press ENTER. 2. BASIC OPERATION > NAVIGATING TO A DESTINATION To change...
Owner's Manual
Page 21
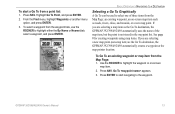
... selecting a new map point (non-map item) as the Go To destination, the GPSMAP 392/398/492/498 automatically uses the name of three items from the Map Page: 1. GPSMAP 392/398/492/498 Owner's Manual 13 Press NAV. Go To appears. 3. BASIC OPERATION > NAVIGATING TO A DESTINATION Selecting a Go To Graphically A Go To can be used to...
... selecting a new map point (non-map item) as the Go To destination, the GPSMAP 392/398/492/498 automatically uses the name of three items from the Map Page: 1. GPSMAP 392/398/492/498 Owner's Manual 13 Press NAV. Go To appears. 3. BASIC OPERATION > NAVIGATING TO A DESTINATION Selecting a Go To Graphically A Go To can be used to...

Owner's Manual
Page 22
TracBack Navigation (Navigating a Track) The TracBack function retraces your path to store waypoints along those points. This feature eliminates the need to the starting point using the track ... and activating an inverted route along the way. TracBack routes are created by reducing your current trip. 14 GPSMAP 392/398/492/498 Owner's Manual Press NAV. 3. With Go To MAP Point highlighted, press ENTER. BASIC OPERATION > NAVIGATING TO A DESTINATION To Go To a new map point (non-map item): 1. Use the ROCKER to move the...
TracBack Navigation (Navigating a Track) The TracBack function retraces your path to store waypoints along those points. This feature eliminates the need to the starting point using the track ... and activating an inverted route along the way. TracBack routes are created by reducing your current trip. 14 GPSMAP 392/398/492/498 Owner's Manual Press NAV. 3. With Go To MAP Point highlighted, press ENTER. BASIC OPERATION > NAVIGATING TO A DESTINATION To Go To a new map point (non-map item): 1. Use the ROCKER to move the...


